
Search results for "Determined" in Home Design Ideas
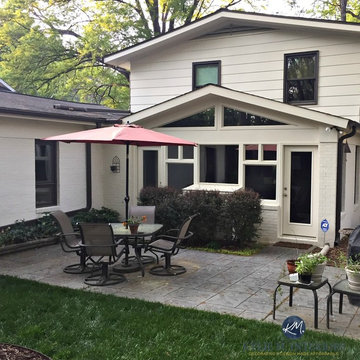
 Kylie M Interiors
A split level home with brick and wood siding, painted and remodelled. A new roof was added over the front door area, creating a focal point. The body of the home is Benjamin Moore Ballet White, the trim is Benjamin Moore Willow and the front door was Sherwin Williams Determined Orange. Slight mid century details.
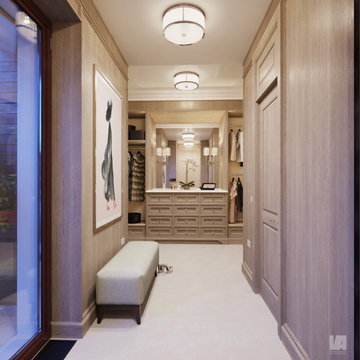
 VA Renderings
3D interior renderings of a Closet in a private residence
Walk-in closet - large traditional gender-neutral carpeted and beige floor walk-in closet idea in Tampa with recessed-panel cabinets and medium tone wood cabinets
Walk-in closet - large traditional gender-neutral carpeted and beige floor walk-in closet idea in Tampa with recessed-panel cabinets and medium tone wood cabinets
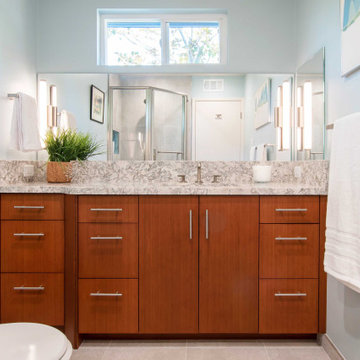
 Bennett Design Co.
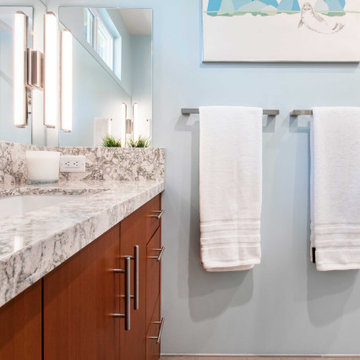
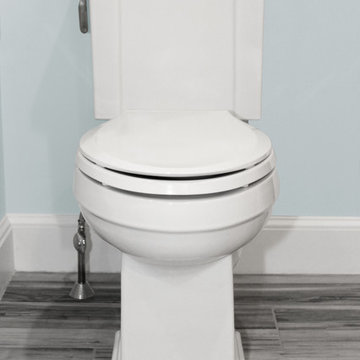
This couple's long-term water leak left their downstairs guest bathroom in disarray. It had gotten so bad that the toilet would actually rock due to the sub-floor deterioration. After the remodel, this small but mighty bathroom leaves a memorable impression on its guests, primarily because of its efficient footprint and bold use of color.
This project became necessary after a long- term water leak left the floor tile broken and the subfloor deteriorating.
Once underway, we set out to determine what other problems we could help solve in this guest bathroom. We explored several different floorplans for this space, but we ultimately decided that the general location of the fixtures worked well for these homeowners.
One of the primary concerns was to determine how we could include as much vanity storage as possible. Their old vanity included a shallow section next to the toilet, but it only had two shallow top drawers, making the bulk of the storage awkward and hard to access.
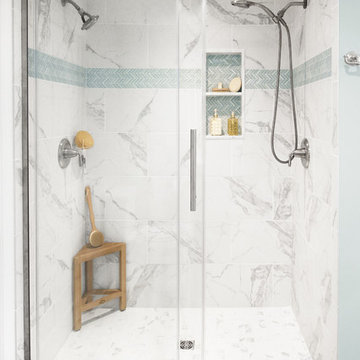
Although they liked the size of their old shower stall, the plastic insert was corroding. They also didn't have anywhere to place their shower products, and there was no place to hang a towel. We opted for a tiled shower and included a shampoo niche for their bath products. We also included a horizontal shower door handle, which doubles as a towel bar.
Find the right local pro for your project
 Renovisions
This South Shore of Boston couple reached out to Renovisions to design and build a beautiful, maintenance free and easy to use ‘his and hers’ master bathroom with plenty of storage. The former bath which had a single sink, one mirror, a vanity cabinet with not enough storage and a tired fiberglass shower stall was the last room in their home to be remodeled. They envisioned a more spa-like feel with a brighter walk-in shower and stylish cabinetry with double sinks and more storage.
Renovisions re-designed this bath with a fresh approach to a classic style; boasting two sinks and framed mirrors that match the custom oak cabinetry with a grey stain and cherused finish (a process that allows raising of the wood grain, creating a beautiful texture).
Choosing a white and grey palette with Carrara-look tiles in the shower opened up the space, tied in nicely with the weathered grey vanity and exemplified the feeling of casual luxury. The bright and airy walk-in shower with double recessed niches and dual shower heads affords both his and hers showering needs. Stunning and dramatic chevron patterned mosaic glass tile defines the niche spaces and lends a pretty, decorative touch to the overall look. The soft blue-green hue on the walls match perfectly with this tile and continue the serene and spa-like appeal throughout the bath.
Replacing the existing double-hung window with a smaller, decorative cut glass casement window not only provided a stunning focal point to the bathroom, but also allowed for additional cabinetry that includes a pull-out hamper and two deep drawers. Silestone’s stunning ‘white diamond’ quartz looks great with the color scheme and provides more countertop space for make-up and cosmetics.
The clients were thrilled with their ‘Renovision’ that imparts clean aesthetic and beautifully appointed classic details.
"Just wanted to say thank you for a job well done. We absolutely love our bathroom. From start to finish you were all so pleasant and professional. The fact that Ed is determined to come up with a solution for our bathroom door shows your commitment to your clients and the pride you take in your work. I can say from experience that not all contractors would care to or be as determined as Ed to say “I will come up with a solution just give me some time” especially after being paid in full. So thank you again. I would highly recommend your company to anyone looking for a bathroom ‘Renovision’! All the best!"
- Dan & Deb S. (Hanover)
 Bennett Design Co.
This couple's long-term water leak left their downstairs guest bathroom in disarray. It had gotten so bad that the toilet would actually rock due to the sub-floor deterioration. After the remodel, this small but mighty bathroom leaves a memorable impression on its guests, primarily because of its efficient footprint and bold use of color.
This project became necessary after a long- term water leak left the floor tile broken and the subfloor deteriorating.
Once underway, we set out to determine what other problems we could help solve in this guest bathroom. We explored several different floorplans for this space, but we ultimately decided that the general location of the fixtures worked well for these homeowners.
One of the primary concerns was to determine how we could include as much vanity storage as possible. Their old vanity included a shallow section next to the toilet, but it only had two shallow top drawers, making the bulk of the storage awkward and hard to access.
Although they liked the size of their old shower stall, the plastic insert was corroding. They also didn't have anywhere to place their shower products, and there was no place to hang a towel. We opted for a tiled shower and included a shampoo niche for their bath products. We also included a horizontal shower door handle, which doubles as a towel bar.
 Texas Patio Covers
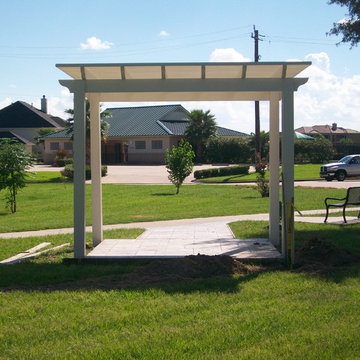
Transform your outdoor space with a gorgeous pergola from Texas Patio Covers. Our pergolas work to frame and add value to your space. They also happen to be affordable! Our pergolas are built-to-last and are installed with professional excellence. They may provide a rustic aesthetic, embellishment, or structure. Often pergolas end up having vines and other plants growing on them and further adding an aesthetic pleasure to the yard. Contact us for a free on-site visit, and we’ll work with your outdoor patio space, tastes, and budget to determine the best pergola for you. We provide fully-custom pergolas. You can choose from custom materials such as:
Aluminum
Cedar
And more
Each material offers a different aesthetic, and with a consultation, we can determine which material will best fit your wants and needs!
 O'Hanlon Kitchen & Bath
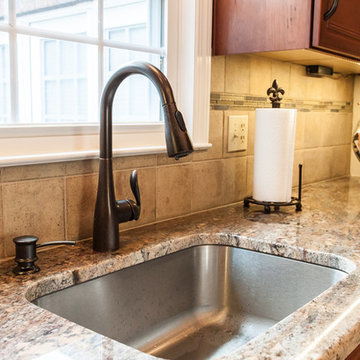
The cabinets we used in this warm and welcoming kitchen are our DeWils Millsboro Cherry line in Cinnamon. They paired beautifully with cream Granite counter tops in Bordeaux. A beautiful back splash with slate accents enhances the kitchen with special border detail at the stove. We also added under cabinet lights, above cabinet lighting, and replaced the window over sink completing this gorgeous kitchen.

 William Hoffman Architect
4 Steps to Achieving a Rewarding Cost Effective Home Renovation
1 Home Renovation an Introduction
A home renovation due to changes in family needs and space requirements can be a challenging, but also a rewarding experience. As a homeowner, gathering and coordinating resources and possibly help from professional consultants are required. Once the construction phase has started, patience, endurance and commitment to follow through are necessary. Despite the challenges, the rewards of a well-planned and successfully completed project are meaningful, adding aesthetic and economic value, also providing the opportunity to personalize a home, encompassing the function, comfort and aesthetics to accommodate individual taste and lifestyle.
A renovation of an existing home is a viable alternative to moving or building a new home, assuming that a home is structurally sound, the expenditure to enlarge or improve can be a cost effective alternative. A home possessing charm, style, historical significance, established landscaping or an exceptional location could be a significant motivation to consider purchasing another home with the intent to renovate.
The complexity of a project could be relatively simple, changing the use of a room, consolidating two rooms into one, or opening up a room to the outdoors. It could also be a more involved task requiring planning, design and construction documents to build a second floor addition, the addition of a new wing or completely gutting the interior. Some projects could be completed in a weekend’s work or more complex projects, using a “Master Plan”, a plan which provides overall guidance; a renovation can be accomplished all at once or divided into manageable projects over a period of time. With the home evolving gradually allowing the renovation to be planned, timed and tailored to meet individual needs and circumstances.
The due diligence phase should precede the decision to renovate whether it’s an existing home or a home that is purchased with the intent to renovate. The due diligence phase will reveal the factors affecting the nature and scope of the project or if a renovation makes sense.
Every renovation project is unique relative to personal requirements, architectural style & construction type. This guide will be helpful in developing an understanding of the preliminary groundwork required to realize a successful project. If properly planned, a home renovation project can be a positive and rewarding experience resulting in a comfortable, practical and an attractive living environment.
The first step of the planning process is documenting the goals and long-range plans referred to as the “Project Program”. This will dictate the nature, scope and feasibility of the project. Providing a guide to achieving defined goals, the timing or phasing of the project and budget required to achieve the desired end result.
2 Documenting Existing Conditions
Once the “Project Program”, has been established, the next step is to determine what there is to work with. This requires documenting the home’s floor plan and site elements which includes drawing an “as built” floor & site plan consisting of the existing exterior walls, interior rooms, doors, windows, etc. and surrounding site elements, landscape and other significant exterior features. Additionally understanding and noting on the “as built” plan, the structural, mechanical and electrical systems as necessary. Gathering the “existing condition” information defines what there is to work with, creating the framework from which to facilitate and organize the decision making process and develop effective “project program” solutions.
3 Evaluating Existing Conditions
The goals and long-range plans have been established, and the existing floor plan and site elements have been documented. Before developing design solutions, the next step is to evaluate existing conditions. The evaluation includes: a detailed analysis of the structural, mechanical and electrical systems, determining the condition of the house, noting functional and aesthetic deficiencies. At the same time recognizing the home’s strengths, assets and evaluating its relationship to its site. The remaining parameters will be defined by the local jurisdiction’s zoning regulations, these regulations will define the “envelope”, within which the proposed project will be required to fit:
•required front, side & rear yard setbacks
•maximum allowable lot coverage & height
The previous three steps have provided the necessary foundation to start the design phase. The goals and long range plans have been established, existing conditions have been documented and the evaluation of what there is to work with are now in place. This will provide the framework from which to facilitate and organize design solutions. The consolidation of this information is manifested in the development of the “Master Plan” which will become the road map by which sound decision-making can be made as a home renovation evolves. Keeping the project, on a linear path, avoiding redundancies and back tracking, on time, within budget, concluding with a well crafted finished product. After all the “up front” research and documentation has been completed, the design phase of the project can now precede, with the creation of diagrammatic design drawings. Organizing interior spaces, taking into account the external elements, prevailing breezes, solar orientation, view, existing outdoor features, etc. Through the development of schematic sketches themes will emerge followed by design development drawings. Wise planning and renovation decisions can save money and time at the same time provide a well crafted finished project. The “Master Plan” provides a strategic path in the planning and decision making process leading to a successful and rewarding home renovation, which will add value and considerable enjoyment, for many years, living in a newly renovated home.
By virtue of having gone through these steps, frustrations sometimes encountered during a home renovation will be minimized, allowing the renovation to be a gratifying and rewarding experience. Being aware of the process allows one to become an “Educated Client,” which is worth quite a bit more than one might realize. The uneducated client may not realize the benefit of going through the planning, evaluation and documentation groundwork. He will only realize its benefits after having completed a prior renovation project. This rational approach keeps the design process on a direct path to achieving prescribed goals.
4 Exploring Design Solutions & Developing a Master Plan
The previous three steps have provided the necessary foundation to start the design phase. The goals and long range plans have been established, existing conditions have been documented and the evaluation of what there is to work with are now in place. This will provide the framework from which to facilitate and organize design solutions. The consolidation of this information is manifested in the development of the “Master Plan” which will become the road map by which sound decision-making can be made as a home renovation evolves. Keeping the project, on a linear path, avoiding redundancies and back tracking, on time, within budget, concluding with a well crafted finished product.
By virtue of having gone through these steps, frustrations sometimes encountered during a home renovation will be minimized, allowing the renovation to be a gratifying and rewarding experience. Being aware of the process allows one to become an “Educated Client,” which is worth quite a bit more than one might realize. The uneducated client may not realize the benefit of going through the planning, evaluation and documentation groundwork. He will only realize its benefits after having completed a prior renovation project. This rational approach keeps the design process on a direct path to achieving prescribed goals.
After all the “up front” research and documentation has been completed, the design phase of the project can now precede, with the creation of diagrammatic design drawings. Organizing interior spaces, taking into account the external elements, prevailing breezes, solar orientation, view, existing outdoor features, etc. Through the development of schematic sketches themes will emerge followed by design development drawings. Wise planning and renovation decisions can save money and time at the same time provide a well crafted finished project. The “Master Plan” provides a strategic path in the planning and decision making process leading to a successful and rewarding home renovation, which will add value and considerable enjoyment, for many years, living in a newly renovated home.
 Renovisions
This South Shore of Boston couple reached out to Renovisions to design and build a beautiful, maintenance free and easy to use ‘his and hers’ master bathroom with plenty of storage. The former bath which had a single sink, one mirror, a vanity cabinet with not enough storage and a tired fiberglass shower stall was the last room in their home to be remodeled. They envisioned a more spa-like feel with a brighter walk-in shower and stylish cabinetry with double sinks and more storage.
Renovisions re-designed this bath with a fresh approach to a classic style; boasting two sinks and framed mirrors that match the custom oak cabinetry with a grey stain and cherused finish (a process that allows raising of the wood grain, creating a beautiful texture).
Choosing a white and grey palette with Carrara-look tiles in the shower opened up the space, tied in nicely with the weathered grey vanity and exemplified the feeling of casual luxury. The bright and airy walk-in shower with double recessed niches and dual shower heads affords both his and hers showering needs. Stunning and dramatic chevron patterned mosaic glass tile defines the niche spaces and lends a pretty, decorative touch to the overall look. The soft blue-green hue on the walls match perfectly with this tile and continue the serene and spa-like appeal throughout the bath.
Replacing the existing double-hung window with a smaller, decorative cut glass casement window not only provided a stunning focal point to the bathroom, but also allowed for additional cabinetry that includes a pull-out hamper and two deep drawers. Silestone’s stunning ‘white diamond’ quartz looks great with the color scheme and provides more countertop space for make-up and cosmetics.
The clients were thrilled with their ‘Renovision’ that imparts clean aesthetic and beautifully appointed classic details.
"Just wanted to say thank you for a job well done. We absolutely love our bathroom. From start to finish you were all so pleasant and professional. The fact that Ed is determined to come up with a solution for our bathroom door shows your commitment to your clients and the pride you take in your work. I can say from experience that not all contractors would care to or be as determined as Ed to say “I will come up with a solution just give me some time” especially after being paid in full. So thank you again. I would highly recommend your company to anyone looking for a bathroom ‘Renovision’! All the best!"
- Dan & Deb S. (Hanover)
 Corinthian Fine Homes
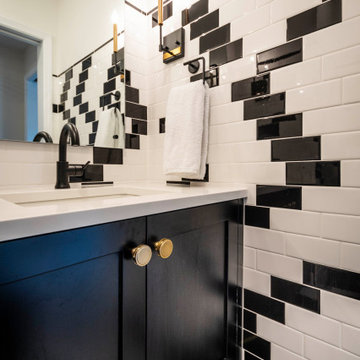
We had renovated others areas of this home and enjoyed designing and renovating this fun black and white "kids" bath. With a whimsical aesthetic we wanted to do something fun and creative with black and white tile and laid out this zig zag pattern that our tile setters followed well. We used black tile to finish the look for base around the room and a black pencil mold to finish the top. By determining the height of the vanity and the size of the mirror, we were able to determine the best height to lay the tile up the walls. A black toilet anchors the toilet niche and the floating black vanity is gorgeous with the pop of white quartz top and sink and a black faucet make for a gorgeous aesthetic. Black and Gold sconces mounted on the side walls finish this fun room for the "kid" in all of us.
 Renovisions
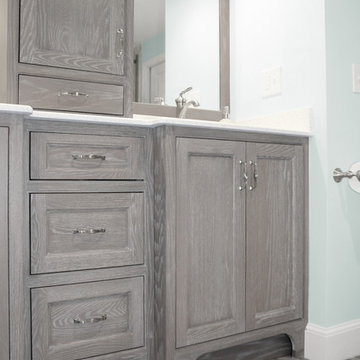
This South Shore of Boston couple reached out to Renovisions to design and build a beautiful, maintenance free and easy to use ‘his and hers’ master bathroom with plenty of storage. The former bath which had a single sink, one mirror, a vanity cabinet with not enough storage and a tired fiberglass shower stall was the last room in their home to be remodeled. They envisioned a more spa-like feel with a brighter walk-in shower and stylish cabinetry with double sinks and more storage.
Renovisions re-designed this bath with a fresh approach to a classic style; boasting two sinks and framed mirrors that match the custom oak cabinetry with a grey stain and cherused finish (a process that allows raising of the wood grain, creating a beautiful texture).
Choosing a white and grey palette with Carrara-look tiles in the shower opened up the space, tied in nicely with the weathered grey vanity and exemplified the feeling of casual luxury. The bright and airy walk-in shower with double recessed niches and dual shower heads affords both his and hers showering needs. Stunning and dramatic chevron patterned mosaic glass tile defines the niche spaces and lends a pretty, decorative touch to the overall look. The soft blue-green hue on the walls match perfectly with this tile and continue the serene and spa-like appeal throughout the bath.
Replacing the existing double-hung window with a smaller, decorative cut glass casement window not only provided a stunning focal point to the bathroom, but also allowed for additional cabinetry that includes a pull-out hamper and two deep drawers. Silestone’s stunning ‘white diamond’ quartz looks great with the color scheme and provides more countertop space for make-up and cosmetics.
The clients were thrilled with their ‘Renovision’ that imparts clean aesthetic and beautifully appointed classic details.
"Just wanted to say thank you for a job well done. We absolutely love our bathroom. From start to finish you were all so pleasant and professional. The fact that Ed is determined to come up with a solution for our bathroom door shows your commitment to your clients and the pride you take in your work. I can say from experience that not all contractors would care to or be as determined as Ed to say “I will come up with a solution just give me some time” especially after being paid in full. So thank you again. I would highly recommend your company to anyone looking for a bathroom ‘Renovision’! All the best!"
- Dan & Deb S. (Hanover)
 Texas Patio Covers
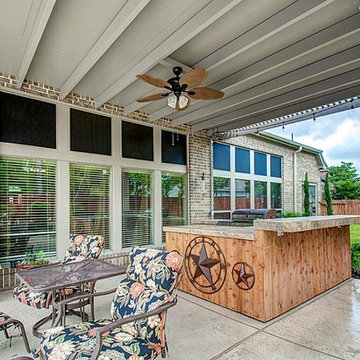
Transform your outdoor space with a gorgeous pergola from Texas Patio Covers. Our pergolas work to frame and add value to your space. They also happen to be affordable! Our pergolas are built-to-last and are installed with professional excellence. They may provide a rustic aesthetic, embellishment, or structure. Often pergolas end up having vines and other plants growing on them and further adding an aesthetic pleasure to the yard. Contact us for a free on-site visit, and we’ll work with your outdoor patio space, tastes, and budget to determine the best pergola for you. We provide fully-custom pergolas. You can choose from custom materials such as:
Aluminum
Cedar
And more
Each material offers a different aesthetic, and with a consultation, we can determine which material will best fit your wants and needs!
 LEDVANS
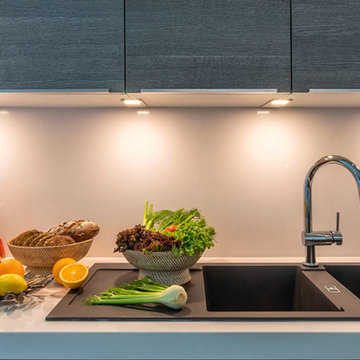
Determine the lighting layout. Before installing the fixtures, it is necessary to determine the layout of the lighting. Generally, installing fixtures above, below, and on the sides of cabinets can achieve better illumination. If the kitchen space is small, consider installing lights above the walls. Additionally, consider the lighting coverage and quantity to ensure optimal illumination for the entire kitchen.
 Phoenix Home Remodeling
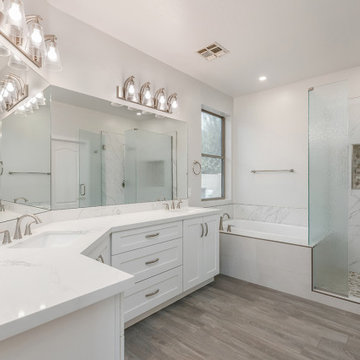
After meeting with Mark, we determined that the goal of his remodel was that he wanted to convert his typical 2000s master bath into a transitional and functional area and get more storage. The standard cultured marble walls and soaking tub wasn’t exactly what he wanted any longer.
After learning about his style, we determined a large format tile and larger base cabinets would do the trick. From the white cabinetry, and striking vein large format tile and deep soaking tub.
The white shaker cabinets are for Sollid Cabinetry. We minimized the sink bases so that Mark could control what is under those cabinets, however do you see those drawer bases? They are large enough to hold anything you desire.
The two-toned shower and tub deck tile feature a striking vein that appears to go on for days. The wall tiles size is a large format tile measuring at 24X48.
This size allows for two great design elements. The first, allowing the vein to be continuous. Second, less wall grout. A total of 9 tiles used on the walls. To accentuate this vein we installed an oversized niche allows for a spotlight for the pebble mosaic to be a feature on the wall and the shower pan.
The tub deck and curb tiles are from Arizona Tile as well. It is the Cemento Rasato – Bianco 12X24. By pairing these tiles together, it supports the wall tile and allows that to be the star of the show.
The bathroom floor is Frassino, from the collection of Porta Nouva from Arizona Tile. Laid in a horizontal random offset. This selection pops the whites and grounds the elements.
This bathroom features a Calcatta quartz countertops that showcase a slight vein that supports the wall tile. The bathroom accessories, lighting fixtures and faucets are all brushed nickel.
 Phoenix Home Remodeling
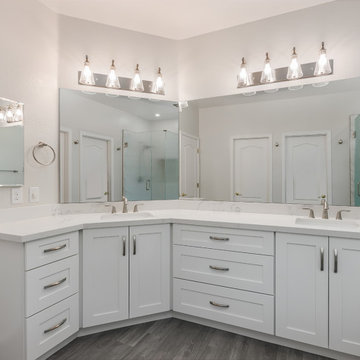
After meeting with Mark, we determined that the goal of his remodel was that he wanted to convert his typical 2000s master bath into a transitional and functional area and get more storage. The standard cultured marble walls and soaking tub wasn’t exactly what he wanted any longer.
After learning about his style, we determined a large format tile and larger base cabinets would do the trick. From the white cabinetry, and striking vein large format tile and deep soaking tub.
The white shaker cabinets are for Sollid Cabinetry. We minimized the sink bases so that Mark could control what is under those cabinets, however do you see those drawer bases? They are large enough to hold anything you desire.
The two-toned shower and tub deck tile feature a striking vein that appears to go on for days. The wall tiles size is a large format tile measuring at 24X48.
This size allows for two great design elements. The first, allowing the vein to be continuous. Second, less wall grout. A total of 9 tiles used on the walls. To accentuate this vein we installed an oversized niche allows for a spotlight for the pebble mosaic to be a feature on the wall and the shower pan.
The tub deck and curb tiles are from Arizona Tile as well. It is the Cemento Rasato – Bianco 12X24. By pairing these tiles together, it supports the wall tile and allows that to be the star of the show.
The bathroom floor is Frassino, from the collection of Porta Nouva from Arizona Tile. Laid in a horizontal random offset. This selection pops the whites and grounds the elements.
This bathroom features a Calcatta quartz countertops that showcase a slight vein that supports the wall tile. The bathroom accessories, lighting fixtures and faucets are all brushed nickel.
 Green Home Systems
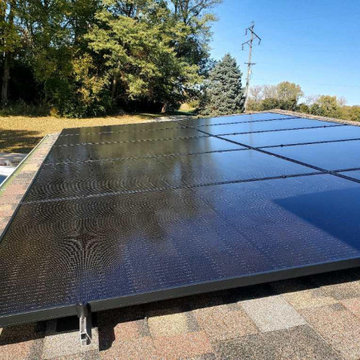
Green Home Systems provides reliable solar power solutions to residential and commercial customers all over the country. Recently, we had the opportunity to work with Bruce D. in Jacksonville, IL to provide a 19kW solar system for his home. We were able to complete this job quickly and efficiently, delivering a high quality product at an affordable price.
At Green Home Systems, our mission is to provide our customers with the best customer service in the industry as well as unparalleled solar solutions at the most economical price. We understand that not everyone can afford large upfront costs associated with installing solar systems and we are proud to offer competitive financing options that make it easier for our customers to go solar without breaking the bank. This was certainly true for Bruce D., who took advantage of our financing options and was able to have his new solar system installed within a couple of weeks time.
Our team worked hard to ensure everything went smoothly when installing Bruce’s new system. We began by inspecting his roof to determine if it was suitable for installation and if there were any potential problems that needed addressing before beginning work. Once we determined everything was in order we then moved on to designing and installing the system itself. Our team of experienced professionals worked diligently to ensure each component was installed properly and securely so that it would be able to withstand years of exposure to the elements without issue.
We also made sure that Bruce was aware of all the financial benefits associated with having a photovoltaic system installed on his home. He was now able to take advantage of numerous tax credits available in Illinois as well as decreased utility bills due to reduced consumption from his local electricity provider. Additionally, he will be able to increase the value of his home by having a solar power system installed which will make it more attractive should he decide he wants to sell it down the line.
In conclusion, we are proud of our work with Bruce D. in Jacksonville, IL and were happy to provide him with an efficient and cost-effective way to add renewable energy sources into his home’s power grid. Our team worked diligently throughout every stage of this project from design through installation until completion and we are thrilled with the results. We look forward to continuing our work throughout Illinois providing reliable solar solutions at competitive prices so that more people can benefit from this clean source of energy!
 Corinthian Fine Homes
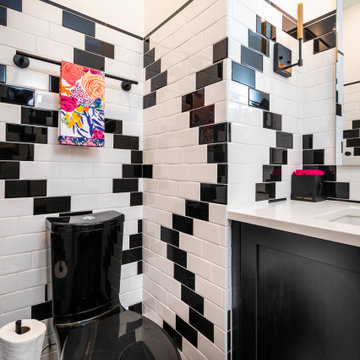
We had renovated others areas of this home and enjoyed designing and renovating this fun black and white "kids" bath. With a whimsical aesthetic we wanted to do something fun and creative with black and white tile and laid out this zig zag pattern that our tile setters followed well. We used black tile to finish the look for base around the room and a black pencil mold to finish the top. By determining the height of the vanity and the size of the mirror, we were able to determine the best height to lay the tile up the walls. A black toilet anchors the toilet niche and the floating black vanity is gorgeous with the pop of white quartz top and sink and a black faucet make for a gorgeous aesthetic. Black and Gold sconces mounted on the side walls finish this fun room for the "kid" in all of us.
 Legrand
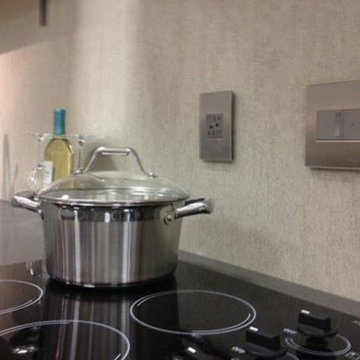
ARTR152M4: adorne® Tamper-Resistant Outlet - 15A - 125V - Magnesium
ADPD703HM4: adorne® Paddle Dimmer - 700W - Incandescent/Halogen - Magnesium
ADTP703TUM4: - 700W - True-Universal - Magnesium
adorne® Tamper-Resistant Outlet -
All adorne outlets include a tamper-resistant design featuring a patented shutter system, keeping children safe by preventing them from pushing small objects into the outlet. The shutters are molded a dark color that they fade into the backgorund while keeping users safe.
Patented shutter system helps prevent improper insertion of foreign objects.
Configuration easily supports two plugs and offers the capacity of a standard outlet.
Easy "1-for-1" installation lets you simply replace your existing outlet in just minutes.
Fits in your existing electrical box and does not require new wires for typical installation. Innovative assembly and snap-in system make it fast and simple to install.
adorne® Paddle Dimmer -
Dual-engineered with a rocking motion for seamless on/off lighting control, as well as a slider for dimming in one beautifully inventive package.
To determine what option is right for you, make sure the wattage of your bulbs matches the wattage of the dimmer switch by multiplying the number of bulbs by their respective wattage. For example, if you have a chandelier with 11 bulbs at 100 watts each, you would need the 1100 watt dimmer switch.
Supports incandescent and halogen bulbs and single-pole/3-way operation.
Easy "1-for-1" installation lets you simply replace your existing switch in just minutes.
Fits in your existing electrical box and does not require new wires for typical installation. Innovative assembly and snap-in system make it fast and simple to install.
adorne® sofTap Dimmer -
The sofTap design features an innovative micro-movement that turns lights on an doff with just a soft "tap" of the finger.
2015 Light for Tomorrow Winner.
To determine what option is right for you, make sure the wattage of your bulbs matches the wattage of the dimmer switch by multiplying the number of bulbs by their respective wattage. For example, if you have a chandelier with 11 bulbs at 100 watts each, you would need the 1100 watt dimmer switch.
Switch supports single-pole and three-way operation.
Easy "1-for-1" installation lets you simply replace your existing switch in just minutes.
Fits in your existing electrical box and does not require new wires for typical installation. Innovative assembly and snap-in system make it fast and simple to install.
Tru-Universal technology enables the dimmer to support all load types, including incandescent/halogen, Magnetic Low Voltage (MLV), Electronic Low Voltage (ELV) in forward or reverse Phase, CFL/LED, etc.

 Texas Patio Covers
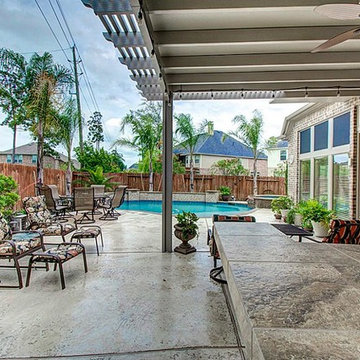
Transform your outdoor space with a gorgeous pergola from Texas Patio Covers. Our pergolas work to frame and add value to your space. They also happen to be affordable! Our pergolas are built-to-last and are installed with professional excellence. They may provide a rustic aesthetic, embellishment, or structure. Often pergolas end up having vines and other plants growing on them and further adding an aesthetic pleasure to the yard. Contact us for a free on-site visit, and we’ll work with your outdoor patio space, tastes, and budget to determine the best pergola for you. We provide fully-custom pergolas. You can choose from custom materials such as:
Aluminum
Cedar
And more
Each material offers a different aesthetic, and with a consultation, we can determine which material will best fit your wants and needs!
40