
Search results for "Effectively lost" in Home Design Ideas

 Veritas Fine Homes Inc
Photos credited to Imagesmith- Scott Smith
Open and functional kitchen, access everything with your fingertips. Including the dining room, wood burning stove, and living area. The structural Douglas Fir post and ceiling beams set the tone along with the stain matched 2x6 pine tongue and groove ceiling –this also serves as the finished floor surface at the loft above. Dreaming a cozy feel at the kitchen/dining area a darker stain was used to visual provide a shorter ceiling height to a 9’ plate line. The knotty Alder floating shelves and wall cabinetry share their own natural finish with a chocolate glazing. The island cabinet was of painted maple with a chocolate glaze as well, this unit wanted to look like a piece of furniture that was brought into the ‘cabin’ rather than built-in, again with a value minded approach. The flooring is a pre-finished engineered ½” Oak flooring, and again with the darker shade we wanted to emotionally deliver the cozier feel for the space. Additionally, lighting is essential to a cook’s –and kitchen’s- performance. We needed there to be ample lighting but only wanted to draw attention to the pendants above the island and the dining chandelier. We opted to wash the back splash and the counter tops with hidden LED strips. We then elected to use track lighting over the cooking area with as small of heads as possible and in black to make them ‘go away’ or get lost in the sauce.

 DF Design Build
Transitional l-shaped light wood floor kitchen photo in Toronto with an undermount sink, shaker cabinets, white cabinets, blue backsplash, matchstick tile backsplash, stainless steel appliances and an island

 Pool & Hot Tub Alliance
The transitional modern home was designed with large amount of glass opening into the courtyard, creating an indoor-outdoor feel, and a visual connection among the spaces that could not be ignored. The neighboring wall, however, was not only rather imposing, but also of a style completely disconnected from our clients home. Our goal was to create a layering effect, with features of varying heights, both to add depth and dimension to the space, and to take the focus of the viewer off of the neighbors wall. Many designers would have squared off the pool, with the thought of maximizing the size of the pool in this small space. Our designer felt it more important to incorporate a graceful curve on the back of the pool. The small amount of square footage lost in the water area was more than regained in the visual interest added to the space. By creating a raised stucco wall on this curve, anchored by a simple sheer descent waterfall, the eye is drawn down the length of this petite pool. Separated by a simple bed of Horsetail Reed, the main feature wall, clad in deep plum stucco, includes three vertical windows, with LED up-lighting. Leaving these windows open on the top, increases the feel of height in the space. The final step in the layering effect is the planting space behind the plum wall. Banana trees were selected here, for their deep green color, and for the large, simple texture of their leaves. The main outdoor seating area is situated just outside the master suite, and is separated from the pool by a Leuder limestone fire pit. The floating stepper pads adjacent the fire pit serve the multiple functions of a walkway, a poolside table for beverages, and as seating near the fire. The tempered glass fire surround was added after the fact, when the client discovered the courtyard was a bit of a wind tunnel, and found the fire a bit uncontrollable. This simple addition, solved the problem, and pleased the client visually, as well.
Find the right local pro for your project

 BGD&C Custom Homes
Herringbone stone inset wall panels take center stage in this gracious light filled master bath with a deep soaking tub, burled walnut vanity and Bardiglio stone floors.
Architecture, Design & Construction by BGD&C
Interior Design by Kaldec Architecture + Design
Exterior Photography: Tony Soluri
Interior Photography: Nathan Kirkman

 O’Hara Interiors
Martha O'Hara Interiors, Furnishings & Photo Styling | Detail Design + Build, Builder | Charlie & Co. Design, Architect | Corey Gaffer, Photography | Please Note: All “related,” “similar,” and “sponsored” products tagged or listed by Houzz are not actual products pictured. They have not been approved by Martha O’Hara Interiors nor any of the professionals credited. For information about our work, please contact design@oharainteriors.com.

 Urbanism Designs
Example of a trendy 3/4 green tile and subway tile gray floor freestanding bathtub design in San Francisco with flat-panel cabinets, medium tone wood cabinets, white walls, an undermount sink and white countertops

 House of L
Jason Miller of Pixelate Ltd.
A formal powder room that lost its luster gets a huge makeover and regains glamour with this complete revamp. Originally, the room housed an oddly placed round vanity that floated in the middle of the room, making for a very awkward walking space to the commode room. A window that looked out to the exterior of the home prior to a Sun Room addition was left in creating another mar in the potential this generously sized bath offered if laid out properly. During the renovation, the plumbing was moved to the far right wall and sconces flanked either side. The center fixture was replaced with a flush-mount that filled the space nicely while still accentuating the overall design. The inspiration for the asian-motif floral mural came from the foyer (the bath is directly off of it) and its original moldings and black and white palette dating to the late 20's, which although had been repainted, still maintained the feel of that period. The sweeping blossoms lend a sense of whimsy and the saturated backdrop gives the blooms a dewy effect as if kissed by moonlight. The goal was to have an eye drawing element in the foyer since the door would be left open most of the time and the was definitely achieved by the graphic use of texture and color in this bath.

Sponsored
Sunbury, OH

J.Holderby - Renovations
Franklin County's Leading General Contractors - 2X Best of Houzz!

 CabinetGlass.com
This photo was taken just outside our production shop. Sorry it is not a better photo, but it does help to show you the effect of Beveled Glass, and how much lighting can make a difference to the color and texture of glass.
A nice design where we adjusted the size of the Beveled Glass Star Clusters to best fit the overall size of the cabinet openings...
As we make all of our own Beveled Glass, this is something we can easily do for you as well.
The two panels shown in these photos measured - 12" x 24-1/2".
The small Ellipse Accents used Spectrum Glass - 152G - Ruby Red. The outside border features - Spectrum Glass - 319-02S - Pale Amber/White and the inside background glass used was - Spectrum Glass - 100G - Clear Granite.
Once again we used our Dark Antique Lead Came to match the cabinet hardware.
 Sixth Sense Studio
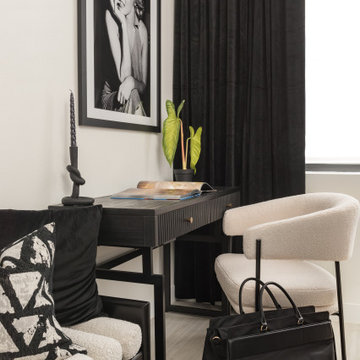
This black-and-white image portrays a streamlined home office, perfect for those seeking a minimalist workspace. A sleek black desk dominates the center, offering ample surface area for laptops, paperwork, or creative endeavors. A simple white chair stands opposite, providing a clean and comfortable contrast. The overall composition conveys a sense of order and efficiency, ideal for maximizing focus and productivity.
To further personalize this space, consider hanging artwork that complements your style and reflects your work. If you crave a calming atmosphere, serene landscapes or nature photography could be ideal. Perhaps motivational quotes or diagrams related to your field would spark inspiration. When choosing artwork, keep in mind the size of the space. A small piece might feel lost on a larger wall, while a massive canvas could overwhelm a compact area. Aim for pieces that create a balanced and visually pleasing effect.
 Sixth Sense Studio
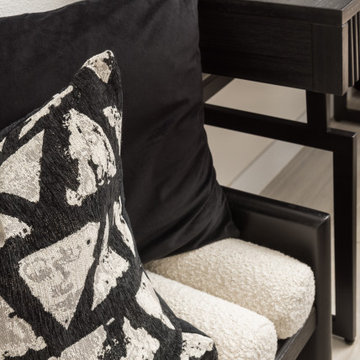
This black-and-white image portrays a streamlined home office, perfect for those seeking a minimalist workspace. A sleek black desk dominates the center, offering ample surface area for laptops, paperwork, or creative endeavors. A simple white chair stands opposite, providing a clean and comfortable contrast. The overall composition conveys a sense of order and efficiency, ideal for maximizing focus and productivity.
To further personalize this space, consider hanging artwork that complements your style and reflects your work. If you crave a calming atmosphere, serene landscapes or nature photography could be ideal. Perhaps motivational quotes or diagrams related to your field would spark inspiration. When choosing artwork, keep in mind the size of the space. A small piece might feel lost on a larger wall, while a massive canvas could overwhelm a compact area. Aim for pieces that create a balanced and visually pleasing effect.
 House of L
Jason Miller of Pixelate Ltd.
A formal powder room that lost its luster gets a huge makeover and regains glamour with this complete revamp. Originally, the room housed an oddly placed round vanity that floated in the middle of the room, making for a very awkward walking space to the commode room. A window that looked out to the exterior of the home prior to a Sun Room addition was left in creating another mar in the potential this generously sized bath offered if laid out properly. During the renovation, the plumbing was moved to the far right wall and sconces flanked either side. The center fixture was replaced with a flush-mount that filled the space nicely while still accentuating the overall design. The inspiration for the asian-motif floral mural came from the foyer (the bath is directly off of it) and its original moldings and black and white palette dating to the late 20's, which although had been repainted, still maintained the feel of that period. The sweeping blossoms lend a sense of whimsy and the saturated backdrop gives the blooms a dewy effect as if kissed by moonlight. The goal was to have an eye drawing element in the foyer since the door would be left open most of the time and the was definitely achieved by the graphic use of texture and color in this bath.
 Haus Of Tre Li
Automatic clean. Absolute freedom.
Fully automated cleaning
Cleans smarter with advanced AI Action
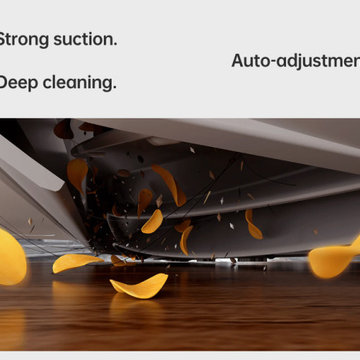
Vacuums deeply with 5,300Pa* of powerful suction
Delivers up to 60 days of hands-free cleaning
Automatically cleans and dries its mops
L10s Ultra combines leading robotic cleaning technologies, like auto-emptying and automatic mop cleaning, to deliver an outstanding, hassle-free cleaning experience.
Auto-Empty
Mop Self-Cleaning
AI + 3D Navigation
5,300Pa Suction
Mop Lifting
Set it and
forget it.
Automate your day-to-day cleaning and come home to just-cleaned floors that smell and feel good. Stop spending so much of your time cleaning and start enjoying your home.
Automatic dust collection, mop-cleaning and drying, water-refilling, solution-adding, fast mapping, and path-planning combine to make fully automated home cleaning a reality.
Efficient, intelligent cleaning,
just as if you were doing it yourself.
AI-powered navigation ensures your whole home is cleaned efficiently and effectively,
reducing missed spots, repeated cleaning, getting lost, or getting stuck.
 Haus Of Tre Li
Automatic clean. Absolute freedom.
Fully automated cleaning
Cleans smarter with advanced AI Action
Vacuums deeply with 5,300Pa* of powerful suction
Delivers up to 60 days of hands-free cleaning
Automatically cleans and dries its mops
L10s Ultra combines leading robotic cleaning technologies, like auto-emptying and automatic mop cleaning, to deliver an outstanding, hassle-free cleaning experience.
Auto-Empty
Mop Self-Cleaning
AI + 3D Navigation
5,300Pa Suction
Mop Lifting
Set it and
forget it.
Automate your day-to-day cleaning and come home to just-cleaned floors that smell and feel good. Stop spending so much of your time cleaning and start enjoying your home.
Automatic dust collection, mop-cleaning and drying, water-refilling, solution-adding, fast mapping, and path-planning combine to make fully automated home cleaning a reality.
Efficient, intelligent cleaning,
just as if you were doing it yourself.
AI-powered navigation ensures your whole home is cleaned efficiently and effectively,
reducing missed spots, repeated cleaning, getting lost, or getting stuck.
Sponsored
Sunbury, OH
J.Holderby - Renovations
Franklin County's Leading General Contractors - 2X Best of Houzz!
 Haus Of Tre Li
Automatic clean. Absolute freedom.
Fully automated cleaning
Cleans smarter with advanced AI Action
Vacuums deeply with 5,300Pa* of powerful suction
Delivers up to 60 days of hands-free cleaning
Automatically cleans and dries its mops
L10s Ultra combines leading robotic cleaning technologies, like auto-emptying and automatic mop cleaning, to deliver an outstanding, hassle-free cleaning experience.
Auto-Empty
Mop Self-Cleaning
AI + 3D Navigation
5,300Pa Suction
Mop Lifting
Set it and
forget it.
Automate your day-to-day cleaning and come home to just-cleaned floors that smell and feel good. Stop spending so much of your time cleaning and start enjoying your home.
Automatic dust collection, mop-cleaning and drying, water-refilling, solution-adding, fast mapping, and path-planning combine to make fully automated home cleaning a reality.
Efficient, intelligent cleaning,
just as if you were doing it yourself.
AI-powered navigation ensures your whole home is cleaned efficiently and effectively,
reducing missed spots, repeated cleaning, getting lost, or getting stuck.
 Haus Of Tre Li
Automatic clean. Absolute freedom.
Fully automated cleaning
Cleans smarter with advanced AI Action
Vacuums deeply with 5,300Pa* of powerful suction
Delivers up to 60 days of hands-free cleaning
Automatically cleans and dries its mops
L10s Ultra combines leading robotic cleaning technologies, like auto-emptying and automatic mop cleaning, to deliver an outstanding, hassle-free cleaning experience.
Auto-Empty
Mop Self-Cleaning
AI + 3D Navigation
5,300Pa Suction
Mop Lifting
Set it and
forget it.
Automate your day-to-day cleaning and come home to just-cleaned floors that smell and feel good. Stop spending so much of your time cleaning and start enjoying your home.
Automatic dust collection, mop-cleaning and drying, water-refilling, solution-adding, fast mapping, and path-planning combine to make fully automated home cleaning a reality.
Efficient, intelligent cleaning,
just as if you were doing it yourself.
AI-powered navigation ensures your whole home is cleaned efficiently and effectively,
reducing missed spots, repeated cleaning, getting lost, or getting stuck.
 House of L
Jason Miller of Pixelate Ltd.
A formal powder room that lost its luster gets a huge makeover and regains glamour with this complete revamp. Originally, the room housed an oddly placed round vanity that floated in the middle of the room, making for a very awkward walking space to the commode room. A window that looked out to the exterior of the home prior to a Sun Room addition was left in creating another mar in the potential this generously sized bath offered if laid out properly. During the renovation, the plumbing was moved to the far right wall and sconces flanked either side. The center fixture was replaced with a flush-mount that filled the space nicely while still accentuating the overall design. The inspiration for the asian-motif floral mural came from the foyer (the bath is directly off of it) and its original moldings and black and white palette dating to the late 20's, which although had been repainted, still maintained the feel of that period. The sweeping blossoms lend a sense of whimsy and the saturated backdrop gives the blooms a dewy effect as if kissed by moonlight. The goal was to have an eye drawing element in the foyer since the door would be left open most of the time and the was definitely achieved by the graphic use of texture and color in this bath.
 Haus Of Tre Li
Automatic clean. Absolute freedom.
Fully automated cleaning
Cleans smarter with advanced AI Action
Vacuums deeply with 5,300Pa* of powerful suction
Delivers up to 60 days of hands-free cleaning
Automatically cleans and dries its mops
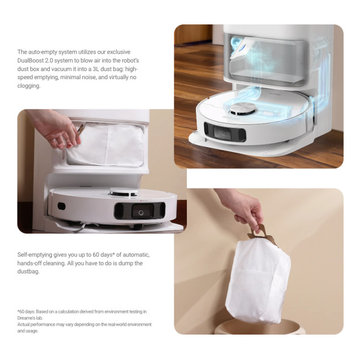
L10s Ultra combines leading robotic cleaning technologies, like auto-emptying and automatic mop cleaning, to deliver an outstanding, hassle-free cleaning experience.
Auto-Empty
Mop Self-Cleaning
AI + 3D Navigation
5,300Pa Suction
Mop Lifting
Set it and
forget it.
Automate your day-to-day cleaning and come home to just-cleaned floors that smell and feel good. Stop spending so much of your time cleaning and start enjoying your home.
Automatic dust collection, mop-cleaning and drying, water-refilling, solution-adding, fast mapping, and path-planning combine to make fully automated home cleaning a reality.
Efficient, intelligent cleaning,
just as if you were doing it yourself.
AI-powered navigation ensures your whole home is cleaned efficiently and effectively,
reducing missed spots, repeated cleaning, getting lost, or getting stuck.


 House of L
Jason Miller of Pixelate Ltd.
A formal powder room that lost its luster gets a huge makeover and regains glamour with this complete revamp. Originally, the room housed an oddly placed round vanity that floated in the middle of the room, making for a very awkward walking space to the commode room. A window that looked out to the exterior of the home prior to a Sun Room addition was left in creating another mar in the potential this generously sized bath offered if laid out properly. During the renovation, the plumbing was moved to the far right wall and sconces flanked either side. The center fixture was replaced with a flush-mount that filled the space nicely while still accentuating the overall design. The inspiration for the asian-motif floral mural came from the foyer (the bath is directly off of it) and its original moldings and black and white palette dating to the late 20's, which although had been repainted, still maintained the feel of that period. The sweeping blossoms lend a sense of whimsy and the saturated backdrop gives the blooms a dewy effect as if kissed by moonlight. The goal was to have an eye drawing element in the foyer since the door would be left open most of the time and the was definitely achieved by the graphic use of texture and color in this bath.
 Tile Doctor Ltd
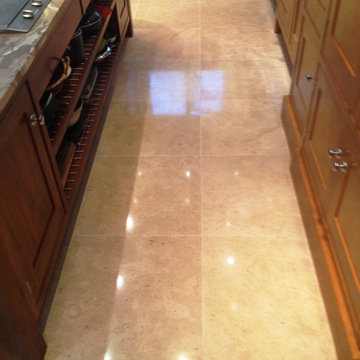
Another quick job here in Cheshire, this time in the town of Wilmslow. Much like Alderly Edge, where I recently completed another job, Wilmslow is an affluent area known for its upmarket lifestyle and as a popular option for residence amongst celebrities and famous figures. In fact it is currently, and has previously been, home to several Premier League footballers from the nearby clubs Manchester United and Manchester City.
This job was another case of where a tiled floor had lost its shine due to the sealer wearing away over time. In this instance, my client had a Travertine tiled floor in her kitchen that she wanted to me to restore back to looking at its best.
Travertine is a fantastic natural stone which possesses unique features that no other stone can offer. It offers a particularly distinctive design style, making it a popular choice both for commercial and residential use. Many homeowners use Travertine tiles for kitchen flooring, bathroom walls and floors and for external floors, such as patios.
The process of stripping off old sealer can be done effectively and relatively quickly without using a liquid stripper. The best method is to use a series of fine diamond encrusted burnishing pads, which is exactly what I did in this case. The burnishing pads are applied in sequence from coarse, medium, fine and superfine to remove the old sealer without damaging the Travertine and then re-polish to a lovely polished shine.
One the floor had been burnished, rinsed and dried; I proceeded to re-seal the floor with Tile Doctor Colour Grow. Colour Grow is particularly effective when to seal porous natural stone surfaces such as Travertine and Limestone, whether internal or external. This is because the product is specially formulated to penetrate deep into the pores of the stone, providing durable surface protection from within.
The other key benefit of Colour Grow is that it intensifies the colours within the stone, as you can from the photos. This adds additional character and flair to already impressive household features like this Travertine floor.
The finished results were exactly what my client had hoped for. It goes to show that with the right methods and know-how such a big difference can be made to the appearance of tiled floors. I was very happy to help.
Steve Keary
North Cheshire Tile Doctor
 House of L
Jason Miller of Pixelate Ltd.
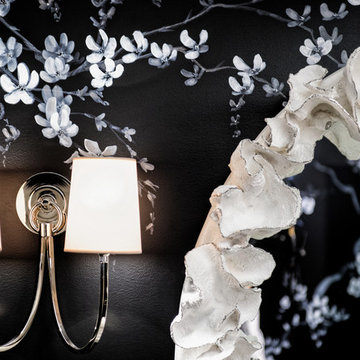
A formal powder room that lost its luster gets a huge makeover and regains glamour with this complete revamp. Originally, the room housed an oddly placed round vanity that floated in the middle of the room, making for a very awkward walking space to the commode room. A window that looked out to the exterior of the home prior to a Sun Room addition was left in creating another mar in the potential this generously sized bath offered if laid out properly. During the renovation, the plumbing was moved to the far right wall and sconces flanked either side. The center fixture was replaced with a flush-mount that filled the space nicely while still accentuating the overall design. The inspiration for the asian-motif floral mural came from the foyer (the bath is directly off of it) and its original moldings and black and white palette dating to the late 20's, which although had been repainted, still maintained the feel of that period. The sweeping blossoms lend a sense of whimsy and the saturated backdrop gives the blooms a dewy effect as if kissed by moonlight. The goal was to have an eye drawing element in the foyer since the door would be left open most of the time and the was definitely achieved by the graphic use of texture and color in this bath.
5