
Search results for "Feedback" in Home Design Ideas
 Milgard Windows & Doors
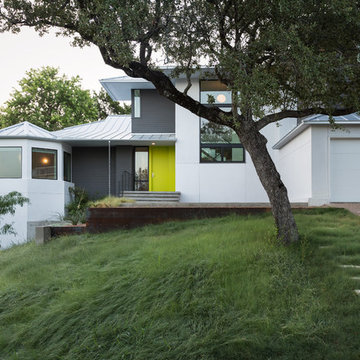
The Kiguchi family moved into their Austin, Texas home in 1994. Built in the 1980’s as part of a neighborhood development, they happily raised their family here but longed for something more contemporary. Once they became empty nesters, they decided it was time for a major remodel. After spending many years visiting Austin AIA Home Tours that highlight contemporary residential architecture, they had a lot of ideas and in 2013 were ready to interview architects and get their renovation underway.
The project turned into a major remodel due to an unstable foundation. Architects Ben Arbib and Ed Hughey, of Arbib Hughey Design were hired to solve the structural issue and look for inspiration in the bones of the house, which sat on top of a hillside and was surrounded by great views.
Unfortunately, with the old floor plan, the beautiful views were hidden by small windows that were poorly placed. In order to bring more natural light into the house the window sizes and configurations had to be addressed, all while keeping in mind the homeowners desire for a modern look and feel.
To achieve a more contemporary and sophisticated front of house, a new entry was designed that included removing a two-story bay window and porch. The entrance of the home also became more integrated with the landscape creating a template for new foliage to be planted. Older exterior materials were updated to incorporate a more muted palette of colors with a metal roof, dark grey siding in the back and white stucco in the front. Deep eaves were added over many of the new large windows for clean lines and sun protection.
“Inside it was about opening up the floor plan, expanding the views throughout the house, and updating the material palette to get a modern look that was also warm and inviting,” said Ben from Arbib Hughey Design. “Prior to the remodel, the house had the typical separation of rooms. We removed the walls between them and changed all of the windows to Milgard Thermally Improved Aluminum to connect the inside with the outside. No matter where you are you get nice views and natural light.”
The architects wanted to create some drama, which they accomplished with the window placement and opening up the interior floor plan to an open concept approach. Cabinetry was used to help delineate intimate spaces. To add warmth to an all-white living room, white-washed oak wood floors were installed and pine planks were used around the fireplace. The large windows served as artwork bringing the color of nature into the space.
An octagon shaped, elevated dining room, (named “the turret”), had a big impact on the design of the house. They architects rounded the corners and added larger window openings overlooking a new sunken garden. The great room was also softened by rounding out the corners and that circular theme continued throughout the house, being picked up in skylight wells and kitchen cabinetry. A staircase leading to a catwalk was added and the result was a two-story window wall that flooded the home with natural light.
When asked why Milgard® Thermally Improved Aluminum windows were selected, the architectural team listed many reasons:
1) Aesthetics: “We liked the slim profiles and narrow sightlines. The window frames never get in the way of the view and that was important to us. They also have a very contemporary look that went well with our design.”
2) Options: “We liked that we could get large sliding doors that matched the windows, giving us a very cohesive look and feel throughout the project.”
3) Cost Effective: “Milgard windows are affordable. You get a good product at a good price.”
4) Custom Sizes: “Milgard windows are customizable, which allowed us to get the right window for each location.”
Ready to take on your own traditional to modern home remodeling project? Arbib Hughey Design advises, “Work with a good architect. That means picking a team that is creative, communicative, listens well and is responsive. We think it’s important for an architect to listen to their clients and give them something they want, not something the architect thinks they should have. At the same time you want an architect who is willing and able to think outside the box and offer up design options that you may not have considered. Design is about a lot of back and forth, trying out ideas, getting feedback and trying again.”
The home was completely transformed into a unique, contemporary house perfectly integrated with its site. Internally the home has a natural flow for the occupants and externally it is integrated with the surroundings taking advantage of great natural light. As a side note, it was highly praised as part of the Austin AIA homes tour.
 Utopia 360 Studio
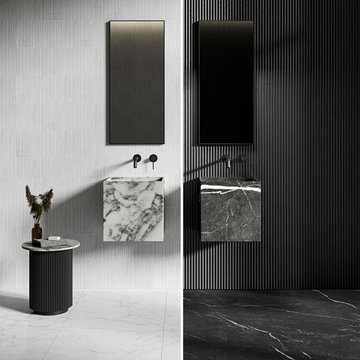
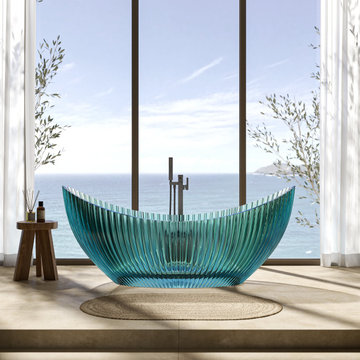
Leader Online, a UK-based company, approached us to support the launch of Nosa, a new sanitary ware brand targeting the British market.
With competition in the sector increasing, they required a cohesive set of visuals for their numerous products to establish a consistent visual language across e-commerce platforms, catalogs, and promotional materials.
It was a complete brand creation from scratch, and we pulled it off.
Key tasks:
- Develop a cohesive visual brand identity for Nosa
- Produce over 2,000 high-quality 3D visualizations
within five months
- Optimize workflows for high efficiency and a unified
visual standard
Our approach:
To efficiently manage high production volumes and accelerate feedback, we implemented an optimized workflow system. This transformed our render production into an assembly line, drastically cutting individual product processing time while upholding top image quality.
Nosa's unique marble, with its distinct veins and inclusions, was central to their brand. Since no existing textures matched, we requested physical samples.
Upon receiving the stone, we set up an improvised photo studio, capturing every detail. Our goal was
not just to replicate the marble in 3D, but to preserve
its raw, organic beauty.
We applied the same meticulous process to metal materials for accurate shade representation. Nosa prioritized authenticity, ensuring buyers saw the true material, not an over-polished version.
Result:
Nosa's market entry surpassed all expectations.
Fueled by its compelling visual identity, the brand achieved strong initial sales and is now rapidly expanding its product range, cementing its presence.
We are proud to continue our partnership with Nosa
to this day.
 Right Angle Kitchens
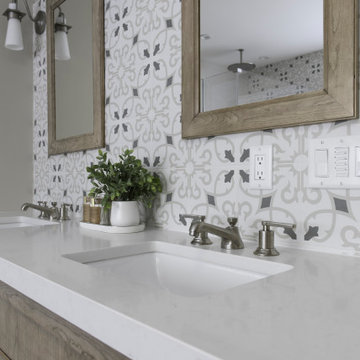
With the help of E.Byrne Construction, we took this bathroom from builder grade basics to serene escape. Nothing compares to soaking in this tub after a long day. Organic perfection.
Find the right local pro for your project
 Legendary Escapes Pools
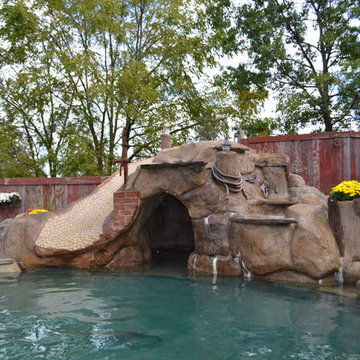
Nautical-themed hybrid swimming pool with raised spa, sunshelf, slide, grotto, and pizza oven
(September 2013) – Ask the Pool Guy and his team at Legendary Escapes recently unveiled the newest Legendary Escape, a stunning nautical-themed hybrid swimming pool. The hand-carved concrete waterfall, rock slide, and grotto are the focal point of this incredible project, and designer and builder Al Curtis has truly outdone himself this time. Behind the waterfall sits a grotto that seats 8-10 people comfortably. The waterfall, slide, and grotto area come complete with intricate details and additions that perfectly play into the project’s theme. An immense amount of creativity, talent, and skill is required to take ordinary materials like vinyl and concrete and turn them into the outstanding backyards that Curtis creates, but these details allow his creativity to shine in a different light. Curtis immerses himself completely in just one or two projects at a time, which allows him the opportunity to add those intricate details that take his extraordinary projects to the next level. Some of the details in the grotto area of this hybrid project include real ship portholes that open and close, as well as carvings and lanterns to add visual interest inside of the grotto.
The project also includes a raised spillover spa and a sunshelf with a bubbling water feature. The sunshelf has steps leading into the main body of the pool, giving swimmers an easy entry point if they don’t feel the urge to jump off the top of the waterfall or take a ride down the hand-carved, hand-tiled slide. The shelf has just enough water to allow shallow wading or lounging, and the pebbled finish provides a perfect place to set a lounge chair without worrying about damaging the vinyl liner. With the spa nearby, this whole end of the pool is perfect for relaxing, talking, or watching the kids while they swim.
This incredible hybrid swimming pool also includes a poolside pizza oven, so fresh, stone-fired pizza is never far away. The brick oven can cook a pizza in about 90 seconds, and produces authentic, outstanding pizzas. The homeowners have spent years perfecting their pizza crust and sauce recipes, as well as growing their own tomatoes and basil. The pizza oven adds another element of their own personality, and makes this project even more perfect for them. With a built-in countertop, it’s easy to get a couple of pies going at one time, or to prep ingredients for personal pizzas.
The homeowners are very family-oriented and love to have friends and family over to their home. During the construction process, the Legendary Escapes crew met several friends and family members who stopped in for some quality time and to check out the progress of the pool. The finished product is a perfect place for entertaining, and it feels very comfortable and welcoming. With the sunshelf, spa, grotto, poolside seating, and the pool itself, there are plenty of different places to sit or soak and have conversations or splash around.
Curtis is incredibly proud of this project, and he has high hopes for it. He was recently named a Master of Design by Pool & Spa News for a hybrid swimming pool he built in Brighton, MI. This new, nautical hybrid pool fits in beautifully with his portfolio, but also stands out as extraordinary. The team at Legendary Escapes anticipates positive feedback and recognition for this project, and looks forward to building more swimming pools that push the envelope and wow clients and fans.
 Utopia 360 Studio
Leader Online, a UK-based company, approached us to support the launch of Nosa, a new sanitary ware brand targeting the British market.
With competition in the sector increasing, they required a cohesive set of visuals for their numerous products to establish a consistent visual language across e-commerce platforms, catalogs, and promotional materials.
It was a complete brand creation from scratch, and we pulled it off.
Key tasks:
- Develop a cohesive visual brand identity for Nosa
- Produce over 2,000 high-quality 3D visualizations
within five months
- Optimize workflows for high efficiency and a unified
visual standard
Our approach:
To efficiently manage high production volumes and accelerate feedback, we implemented an optimized workflow system. This transformed our render production into an assembly line, drastically cutting individual product processing time while upholding top image quality.
Nosa's unique marble, with its distinct veins and inclusions, was central to their brand. Since no existing textures matched, we requested physical samples.
Upon receiving the stone, we set up an improvised photo studio, capturing every detail. Our goal was
not just to replicate the marble in 3D, but to preserve
its raw, organic beauty.
We applied the same meticulous process to metal materials for accurate shade representation. Nosa prioritized authenticity, ensuring buyers saw the true material, not an over-polished version.
Result:
Nosa's market entry surpassed all expectations.
Fueled by its compelling visual identity, the brand achieved strong initial sales and is now rapidly expanding its product range, cementing its presence.
We are proud to continue our partnership with Nosa
to this day.
 D&G Construction
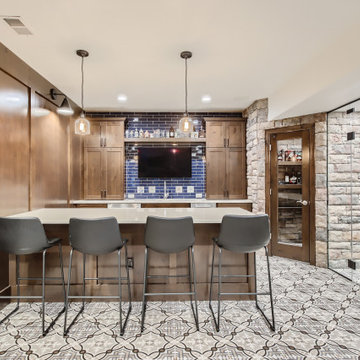
This basement bar features a custom wet bar with wood paneling, pantry and an air-tight wine cellar.
Inspiration for a small mediterranean ceramic tile and wainscoting basement remodel in Denver
Inspiration for a small mediterranean ceramic tile and wainscoting basement remodel in Denver
 Triumph Roofing
Shingles Roof Repairs in Charlotte
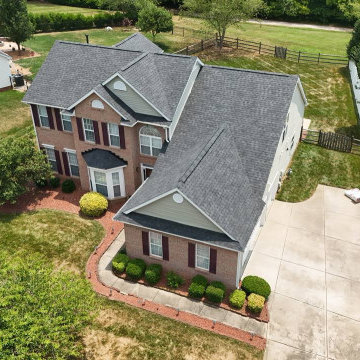
Eternity Matters, a nonprofit organization based in Charlotte, contacted Triumph Roofing with concerns about their roof. Years of wear and tear had caused multiple shingles to crack, curl, and detach, leading to water seepage in certain areas. They needed a reliable roofing solution to protect their building and ensure it remained a safe space for their community activities.
After a thorough inspection, we determined that a comprehensive Shingles Roof Repairs project would address the damage. The estimated cost of $6,500 fit their budget, providing a cost-effective yet high-quality solution. Our team quickly developed a plan to repair the damaged areas and restore the integrity of the roof.
The Repair Process
On the scheduled repair day, our team arrived early to begin the work. First, we carefully removed the damaged shingles, ensuring no debris was left behind. Next, we replaced the underlayment to provide added protection and prevent future leaks. Finally, we installed new, high-quality shingles to match the existing roof, restoring its uniform appearance.
Throughout the process, we kept Eternity Matters informed of each step, answering their questions and ensuring they felt confident in the project’s progress. By the end of the day, their roof was fully repaired, durable, and ready to withstand future weather challenges.
Client Feedback
The team at Eternity Matters shared their gratitude: "Triumph Roofing went above and beyond! They worked efficiently, stayed within our budget, and left our roof looking as good as new. We highly recommend their Shingles Roof Repairs services!"
This project highlights our commitment to delivering reliable and affordable roofing solutions. Whether it's repairing damaged shingles or providing full roof replacements, Triumph Roofing stands ready to protect your property with expert care.
 Utopia 360 Studio
Leader Online, a UK-based company, approached us to support the launch of Nosa, a new sanitary ware brand targeting the British market.
With competition in the sector increasing, they required a cohesive set of visuals for their numerous products to establish a consistent visual language across e-commerce platforms, catalogs, and promotional materials.
It was a complete brand creation from scratch, and we pulled it off.
Key tasks:
- Develop a cohesive visual brand identity for Nosa
- Produce over 2,000 high-quality 3D visualizations
within five months
- Optimize workflows for high efficiency and a unified
visual standard
Our approach:
To efficiently manage high production volumes and accelerate feedback, we implemented an optimized workflow system. This transformed our render production into an assembly line, drastically cutting individual product processing time while upholding top image quality.
Nosa's unique marble, with its distinct veins and inclusions, was central to their brand. Since no existing textures matched, we requested physical samples.
Upon receiving the stone, we set up an improvised photo studio, capturing every detail. Our goal was
not just to replicate the marble in 3D, but to preserve
its raw, organic beauty.
We applied the same meticulous process to metal materials for accurate shade representation. Nosa prioritized authenticity, ensuring buyers saw the true material, not an over-polished version.
Result:
Nosa's market entry surpassed all expectations.
Fueled by its compelling visual identity, the brand achieved strong initial sales and is now rapidly expanding its product range, cementing its presence.
We are proud to continue our partnership with Nosa
to this day.
 House of Meraki
A dream kitchen for the Bold & Beautiful.
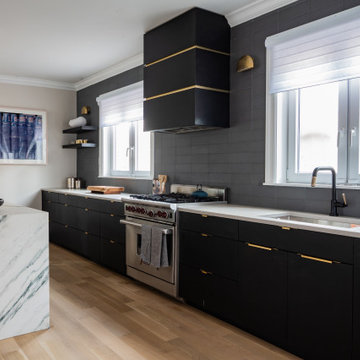
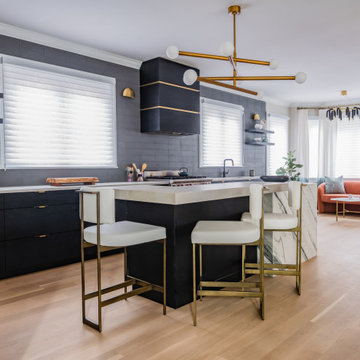
Deciding to create an open floor plan for this Bayside home renovation meant we would be extending the kitchen into the previous living room, visible as you enter the home. For this exact reason, we wanted to integrate it into the new “Great Room”. Starting off with a dedicated bar area, the underwater wallpaper sets the tone for a transitional welcome to the kitchen. The melody of natural materials, including the 3-sided waterfall edge island, is balanced on the other side by a bar-height quartz for the dine-in kitchen experience. Making the split height island the start of the kitchen. The bar height side provides the perfect place to have a drink or snack, while the counter height side drops to a lower level, adjacent from the stove, allowing for a spacious kitchen. To contrast the lighter two tone countertops, installed were minimal and sleek oversized custom cabinets, with black grain flat doors and matching black hood with horizontal gold accents to go over the Wolf rage. Across the island, houses the SubZero fridge, in floor to ceiling cabinets, laminated in a linen texture that seamlessly blends in with the walls. To finish off the cabinets, peaks of shine provided by the brass edge pulls throughout married perfectly with the attention grabbing brass chandelier floating over the island and gold sconces along the stove wall. The kitchen doesn’t end there! Past the island, the breakfast nook is furnished with a salmon velvet settee and coffee table, perfect for cuddling and having your morning coffee.
Client Feedback:
The house looks fantastic! Very much appreciate all the hard work you have put into this, it really shows!
 House of Meraki
A dream kitchen for the Bold & Beautiful.
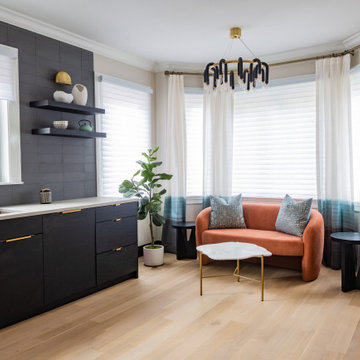
Deciding to create an open floor plan for this Bayside home renovation meant we would be extending the kitchen into the previous living room, visible as you enter the home. For this exact reason, we wanted to integrate it into the new “Great Room”. Starting off with a dedicated bar area, the underwater wallpaper sets the tone for a transitional welcome to the kitchen. The melody of natural materials, including the 3-sided waterfall edge island, is balanced on the other side by a bar-height quartz for the dine-in kitchen experience. Making the split height island the start of the kitchen. The bar height side provides the perfect place to have a drink or snack, while the counter height side drops to a lower level, adjacent from the stove, allowing for a spacious kitchen. To contrast the lighter two tone countertops, installed were minimal and sleek oversized custom cabinets, with black grain flat doors and matching black hood with horizontal gold accents to go over the Wolf rage. Across the island, houses the SubZero fridge, in floor to ceiling cabinets, laminated in a linen texture that seamlessly blends in with the walls. To finish off the cabinets, peaks of shine provided by the brass edge pulls throughout married perfectly with the attention grabbing brass chandelier floating over the island and gold sconces along the stove wall. The kitchen doesn’t end there! Past the island, the breakfast nook is furnished with a salmon velvet settee and coffee table, perfect for cuddling and having your morning coffee.
Client Feedback:
The house looks fantastic! Very much appreciate all the hard work you have put into this, it really shows!
 House of Meraki
A dream kitchen for the Bold & Beautiful.
Deciding to create an open floor plan for this Bayside home renovation meant we would be extending the kitchen into the previous living room, visible as you enter the home. For this exact reason, we wanted to integrate it into the new “Great Room”. Starting off with a dedicated bar area, the underwater wallpaper sets the tone for a transitional welcome to the kitchen. The melody of natural materials, including the 3-sided waterfall edge island, is balanced on the other side by a bar-height quartz for the dine-in kitchen experience. Making the split height island the start of the kitchen. The bar height side provides the perfect place to have a drink or snack, while the counter height side drops to a lower level, adjacent from the stove, allowing for a spacious kitchen. To contrast the lighter two tone countertops, installed were minimal and sleek oversized custom cabinets, with black grain flat doors and matching black hood with horizontal gold accents to go over the Wolf rage. Across the island, houses the SubZero fridge, in floor to ceiling cabinets, laminated in a linen texture that seamlessly blends in with the walls. To finish off the cabinets, peaks of shine provided by the brass edge pulls throughout married perfectly with the attention grabbing brass chandelier floating over the island and gold sconces along the stove wall. The kitchen doesn’t end there! Past the island, the breakfast nook is furnished with a salmon velvet settee and coffee table, perfect for cuddling and having your morning coffee.
Client Feedback:
The house looks fantastic! Very much appreciate all the hard work you have put into this, it really shows!

 Tile Doctor Ltd
These pictures of a Victorian Tiled Hallway are from a property in Canterbury that was once a nursing home and was now being renovated to become a children’s home. The building was being gutted and extended at the same time and when the carpet was pulled up in the hallway, they were surprised to find a relatively intact Victorian tiled floor underneath.
Whilst they thought it bizarre that anyone would want to cover up such an attractive floor the carpet had protected it over the years. They realized it would make a marvellous feature at the entrance to the property, but professional restoration would be needed to do it justice. After a bit of research, they came across Tile Doctor and got in touch.
Canterbury comes under my North Kent designation, so I went to visit the property and survey the floor and quote for doing the restoration. There were a few missing and loose tiles that would need replacing and refixing also there was a lot of ingrained dirt so a deep clean and application of a new sealer would be required. I gave them a price for the work which they readily accepted, and we arranged a suitable time to carry out the work. Subject to the building schedule I had calculated the floor would take three days to restore.
On the first day I set about replacing and re-fixing the missing, broken, and loose tiles. This is delicate work as you need to extract the old tile without disturbing its neighbours and then clean up the area ready for its replacement. Being a Tile Doctor I keep a selection of stock tiles for repairs, some are reclaimed, and some are replica. Also, there are several companies still making Victorian style tiles so I can usually source what I need.
After the individual missing and broken tiles had been replaced and the adhesive had set, it was then a matter of renovating the floor as a whole. The tiles were covered in a thick layer of carpet adhesive which needed a combination of specialist tools and products to remove. First, a liberal layer of Tile Doctor Remove and Go was applied and left to dwell for thirty minutes. Next, Tile Doctor Pro-Clean was added and scrubbed in with a black pad.
This process softened the adhesive sufficiently in readiness for the next stage which involves using a set of diamond burnishing pads on a weighted buffing machine. Several applications were needed, each time with a successively finer grade of diamond pad and rinsing off the slurry in between. The tiles were first milled using a very coarse 50-grit pad, followed by 100, 200 and finally burnished with a 400-grit burnishing pads. This removed all the adhesive and dirt in the tiles, which was cleaned up using the wet vacuum.
Old Victorian floors like this do not have a damp proof membrane installed under the floor, and with a lot of water being used in the cleaning process I was concerned White efflorescence salts could appear later as the floor dried. To counter this, I gave the floor an acid wash using Tile Doctor Acid Gel to counter and dissolve the salts, it also gives the tiles another clean and will remove any old grout smears further improving the appearance of the tiles. Once done the floor was left to dry overnight.
On my return I tested the floor was dry by taking several moisture readings around the floor with a damp meter. Applying sealer to a damp floor is never advised and can lead to clouding and an unwanted finish.
Happy that the tiles were dry, a single coat of Tile Doctor Colour Grow sealer was applied. This is an impregnating sealer with a colour enhancing component to ‘lift’ the stronger colours of the floor. Colour Grow however does leave a matt appearance and as the client had asked for a shiny finish it was topped up with five coats of Tile Doctor Seal and Go. This is a compatible topical sealer which added a mid to high sheen.
By the end of the third day the Victorian floor looked brand new, and I received the following feedback from the client. Its rare to receive feedback from commercial customers so they were clearly overwhelmed with the transformation.
Did not think this glued covered bad old floor could look sooooo good Fabulous Fantastic job Looks Amazing Thank you
For aftercare I recommend the use of Tile Doctor Neutral Cleaner which isn’t as harsh as many of the products you find in supermarket. Stronger products can actually strip off the sealer over time leaving it vulnerable to dirt and detracting from its appearance.
Graham Davis
North Kent Tile Doctor
 Abda Custom Window Fashions
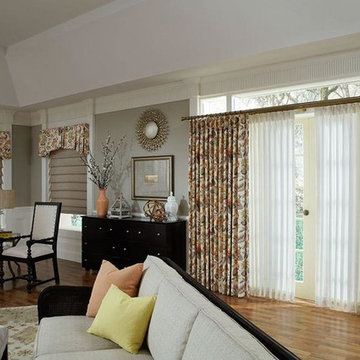
This picture is of a transitional living room. We love the gray walls with the pop of color throughout the room. Adding the visual interest in the draperies and valances creates a soothing space plus allows you to pull in additional colors in your accessories.
We also like to layer draperies with sheers to give the customer multiple lighting and privacy options in a space. Line the draperies with our blackout liners to provide the ultimate privacy. Sheers are also important to provide UV protection on your gorgeous hard wood floors.
We also like layering the valances with the roman shades. This provides a gorgeous look while giving you privacy and sun protection.
We work with clients all over the country! Our virtual designers have experience as local and long distance design consultants. Our designers offer professional fabric and design recommendations, free estimates and have a great ability to communicate via email or phone to help conceptualize the project and see it through to the final stages. Fabric samples are mailed directly to you and we also provide easy installation guides.
Abda Window fashions of Indianapolis has custom curtains, drapes, valances, cornices, pillows and hardware in a variety of fabrics and finishes. Curtains and drapes are great alone or paired with a hard window treatment for the ultimate fashion statement. All of our curtains, drapes, valances, cornices and pillows are custom-made from our own workroom. We also make custom bedding and upholstery. We have a huge selection of fabrics that will match any style.
Our custom, affordable draperies, curtains and sheers are now available to anyone in the US. We make them in our own workroom and ship them anywhere in the US! Talk with our professional design specialists and let them help you transform your home! It’s simple and easy. This is a great solution for persons who live out of state or are too busy for a traditional home consultation. With our great reviews, solid company and company values- you know that you’re home is in great hands!
We also have ready-made curtains and bedding available too! And don’t forget our custom hardware! You can also check out our houzz.com store for great window fashion products, including our exclusive bendable rods!
To see our new line, contact Talitha at 317-273-8343 or email: talitha@abdawindowfashions.com or check out our houzz.com store!
For our local customers we offer, FREE In-home consultation or showroom appointment to meet your lifestyle and design needs. At Abda, we have the perfect blend of high-end and affordable solutions for every style and budget. Affordable doesn’t mean cheap! We pride ourselves on quality products with excellent service. We’re so confident of our products that we give our customers more than the manufacturers guarantee!
We give our customers an additional 2 year warranty on top of the manufacturers guarantee!
At Abda, you will find knowledgeable staff that will turn your visions into a reality. Stop in our showroom or schedule a Free In-home consultation today! We know you will be happy with the results but don’t take our word for it, check out what some of our customers say about us on Houzz and Angie’s List!
http://www.angieslist.com/companylist/us/in/indianapolis/abda-inc-custom-window-fashions-reviews-60394.htm?cid=ssabadge
Why Choose Us?
We have been in business since November 1998 and started in the window covering business by cleaning & repairing blinds. This gave us a unique perspective from most window covering dealers. We have always considered how well products hold up and which manufacturers stand behind their products the best. We let our clients know the benefits of more expensive products and give honest feedback. We take pride in showing alternative products to fit all budgets.
Our great testamonials on Angie’s List, Houzz.com and referrals have helped our company grow without the need for “conventional” advertising. Abda means ‘servant’. At Abda, we approach every customer with a servant’s attitude. This philosophy has helped our customers feel confident in their purchases and well-taken care of. Our number one focus is customer service and we believe in putting the customer’s needs first. We offer our clients an additional 2 year warranty on top of the manufacturer’s warranty and want each and every client to be completely happy with their purchase. We’ve been awarded the prestigious 2013 Angie’s List Super Service Award, an honor bestowed annually on approximately 5 percent of all the businesses rated on the nation’s leading provider of consumer reviews. We’ve grown over the years and have added more team members to our company and we’re very excited at the direction our company is going.
Check out our website for more information: www.abdawindowfashions.com
Below is a list of styles and types of curtains and draperies that we can help you with. No worries if you do not find what you’re looking for below! Since we have our own workroom, the sky is the limit. There’s no project too small or large! Our design specialists are great at helping you with window treatment ideas. Stop in our showroom or call today for a FREE in-home consultation. If you’re out of state, no problem! We’re now making our custom treatments and shipping them to you!
Call today (317-273-8343) for more information or email:
talitha@abdawindowfashions.com
Some of the styles and types:
Modern curtains & draperies,
Contemporary curtains & draperies,
Traditional curtains & draperies,
Transitional curtains & draperies,
Beach Style curtains & draperies,
Asian Style curtains & draperies,
Eclectic curtains & draperies,
Midcentury curtains & draperies,
Mediterranean curtains & draperies,
Farmhouse Style curtains & draperies
Kitchen curtains,
Living room curtains,
Dining room curtians,
Master Bedroom curtains,
Nursery curtains,
Children’s room curtains,
Guest bedroom curtains,
Areas that we serve for installation for curtains & draperies are listed below. (But we ship to anywhere in the US!) If you don’t see your city on the list, just give us a call and we will see what we can do.
Indianapolis curtains and draperies & surrounding areas,
Carmel curtains and draperies & surrounding areas,
Zionsville curtains and draperies & surrounding areas
Westfield curtains and draperies & surrounding areas,
Avon curtains and draperies & surrounding areas,
Greenwood curtains and draperies & surrounding areas,
 Evergreen Remodeling & Construction
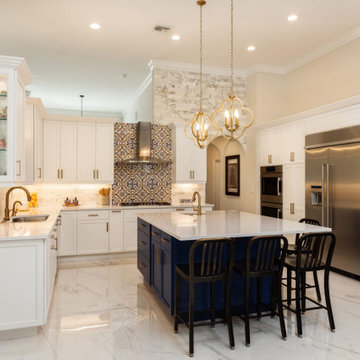
“I want a kitchen that looks like a showroom, but where I can actually cook.” The homeowner knew from day one: she loved hosting dinner parties and needed a space that allowed her to cook to perfection and looked spectacular. After twenty years of living with oak cabinets and laminate countertops, she was ready for her dream kitchen.
What we created is sophisticated elegance with just enough personality to keep it interesting.
The foundation is classic: pristine white cabinets that reach the ceiling, creating a sense of height and offering ample storage. But it’s the details that make this kitchen special. That navy blue island defines the entire space, a bold choice the homeowner initially hesitated to make, but now claims is her favorite design decision. Combined with brass hardware throughout the house and those gorgeous Moroccan-inspired pendant lights, it creates a sense of understated luxury.
The real showstopper is the backsplash behind the cooktop. We sourced tiles with intricate designs that resemble an art installation; It’s the kind of detail that makes guests pause mid-conversation to take a closer look. The arched niche that frames it adds architectural interest and sets the kitchen area apart like a stage set.
Technically, this renovation was a lot of work. We relocated the plumbing to accommodate the island sink, upgraded the electrical system to support commercial-grade appliances, and installed a powerful, concealed ventilation system in the custom-made range hood. The marble-look porcelain flooring extends throughout the house in large-format tiles: practical, durable, and absolutely luminous.
The glass-fronted display cabinets on the left were custom-made for her grandmother’s porcelain collection, which finally had the display it deserved, with interior LED lighting illuminating everything.
Three months after completion, she hosted Thanksgiving for eighteen people. “This kitchen handled it beautifully,” she wrote to us afterward, “and everyone wanted to know who designed it.” That’s the kind of feedback that makes our work worthwhile and is our best advertising.
 Matthew Lechowick Design
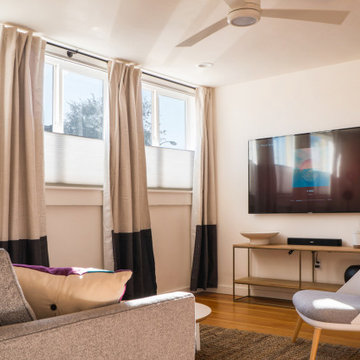
A former apartment that was run down we gut and remodeled head to toe and turned it into an Airbnb listing. I try to play up the light as much as I can in every project
 Campbell Cabinetry Designs Inc.
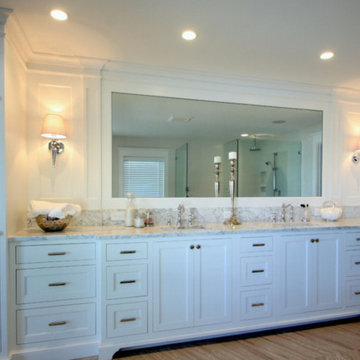
Bathroom - mid-sized coastal master bathroom idea in Tampa with flat-panel cabinets, white cabinets, an undermount sink and marble countertops

 safe ZOnea
If you’re active on GardenWeb sharing plant photos, asking for advice, tracking seasonal progress you already understand how much detail goes into gardening. Soil pH, rainfall, emerging leaves, bloom counts, fertilizer schedules it adds up fast. But all that rich information often remains buried in posts, lists or memory. What if you could visualize that data and turn it into clear quick insights? That’s where a graph maker becomes a game-changer for your gardening workflow.
1. Why garden data belongs on a graph
On GardenWeb, you’ll find forums for everything from perennial care, vegetable gardening, patios, herbs, even cooking and craft projects. While plant lovers share observations and ask questions, many track progress manually in spreadsheets or memory. A graph maker flips that around:
Instead of a list of numbers (e.g., “Soil test: pH 6.4 in May, 6.1 in October”), you get a line graph showing the decline over time.
Instead of guessing which plant bloomed most, you see a bar chart comparing counts across plants.
Instead of manually calculating average rainfall effect, you plot scatter points of bloom count vs. rainfall.
By turning your data into visuals, you’re not just recording—you’re analysing, learning and improving. For GardenWeb users this means smarter decisions: Which fertilizer actually improves bloom count? Which shady spot recovers slower? A graph maker gives clarity.
2. What is a graph maker and how to use one
A graph maker is a web tool or software that lets you input raw data (numbers, dates, categories) and output visual charts like line graphs, bar charts, scatter plots, etc. It might allow you to import a spreadsheet, select chart type, customize colours, label axes, and export the image for your blog, forum post or personal log.
Here’s how you could apply it for gardening:
Log blooms per week for each rose plant.
Using the graph maker, choose line graph to track changes over weeks.
Label your y-axis “Number of Blooms”, x-axis “Week of Year”.
Add colour lines for each plant for easy comparison.
Export as PNG and embed it in a GardenWeb forum post: “See bloom trend for my ‘Peace’ vs ‘Knock Out’ roses”.
This isn’t just pretty-to-look-at: it makes the trend obvious, invites discussion (“Hey, your ‘Knock Out’ line dips after week 28—what changed?”) and helps you refine your routine.
3. Use these specific scenarios on GardenWeb
A. Soil pH and plant health tracking
After multiple tests you have pH values over time and bloom results. Upload both datasets into the graph maker, produce a dual-axis line graph: soil pH on one axis, bloom count on the other. Post your findings in the “Soil, Fertility & Nutrients” forum and get feedback.
B. Seasonal pest or disease appearance
Record number of aphids spotted each month and whether you used treatment. A bar chart via the graph maker can show pre- and post-treatment figures. Then ask the “Insect & Disease Control” forum for advice based on your visual data.
C. Yield comparison between varieties
You grow two zucchini varieties. You keep weekly yield in pounds. Use the graph maker for a side-by-side bar chart. Share in the “Vegetable Gardening” forum: “Which was better this year? See the chart”.
D. Rainfall vs growth rate
You log weekly rainfall and growth (in cm) of your tomato plants. Use scatter plot in graph maker. If a pattern emerges, you’re ready to post: “Is my growth plateau due to drought? Chart shows a clear correlation.”
4. Why this elevates your GardenWeb contributions
When you post with a chart made by a graph maker, you’re doing more than asking or showing off. You’re investigating. You’re analysing. You invite the community to give feedback on data, not just anecdotes. That elevates the discussion. Instead of “My plant died, any ideas?” you post “See this graph of pH drop and bloom count—what might be the limiting factor?” High-quality visuals raise your post’s value and garner more thoughtful responses.
Plus, your posts become useful references for others: someone else can say, “Cool graphic, can you share your data sheet?” You build credibility and help the forum become a learning hub—not just a Q&A board.
5. Tips for using a graph maker effectively in the GardenWeb context
Keep it simple: One chart, one insight. Don’t overcrowd.
Label clearly: Titles, axis labels, units (e.g., cm/week, mg/L, °F).
Use readable colours: Avoid faint tones that vanish on mobile.
Annotate when needed: Add notes like “Fertiliser switched week 12” or “Shade cloth added”.
Provide context in your post: Don’t leave the chart alone—write a few sentences explaining what it shows and what you’re seeking.
Embed carefully: Make sure your image displays properly in GardenWeb; check mobile view.
Share raw data: If possible link to your spreadsheet so others can replicate or comment.
Be open to feedback: The chart invites questions; embrace them.
6. Possible pitfalls and how to avoid them
Bad data = bad chart: If your measurements aren’t consistent, your graph will mislead. Use standardized data collection.
Too much complexity: Multi-axis charts, too many variables—confusing. Stick to one or two variables.
Overlooking mobile viewers: Many GardenWeb users browse via phones. Use large fonts and simple visuals.
Ignoring the narrative: Chart alone won’t answer. Explain what it means and what you need.
Outdated charts: If you update your data annually, keep your visuals current or label them clearly as “2024 data”.
7. Final thoughts
On GardenWeb you’ll find a vibrant community of gardeners, DIYers, cooks and design lovers.Using a graph maker for your posts and progress turns your experience from casual hobby-logging into smart data-driven gardening. You’ll not only learn more—your peers will learn more, too.
So next time you log your plant growth, record your yield, test your soil or track pests—don’t just note it. Plot it. Use a graph maker. Share it in the forum. Let your garden tell the story, and let the community help you write the next chapter.
 Tile Doctor Ltd
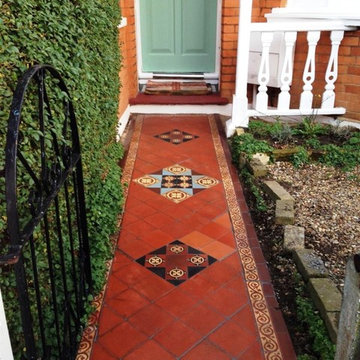
At first sight, this Victorian tiled pathway in Palmers Green, N13 did not appear to need too many repairs, with just a few obvious broken and loose tiles to be fixed. On closer inspection however it became clear it was in need of a deep clean and fresh seal.
To start, we applied Tile Doctor Remove & Go across the entire length of the pathway to break down and strip off the old sealer and provide an initial clean. In the more stubborn and difficult to reach areas where we saw the buildup of efflorescence, we applied Tile Doctor Acid Gel to neutralise the alkaline salts.
Acid Gel, as the name indicates, is a pH1 blend of Phosphoric and Hydrochloric acid in gel form, making it easier to apply to tricky areas, including sloped or vertical surfaces. Users should be aware not to use this type of product on acid-sensitive stone such as Limestone, as this can cause etching if left on too long.
Once the dirt and efflorescence buildups had been dealt with, I focused my attention towards the tile repairs, quickly realising that the extent of damage was greater than initially thought. Firstly, the numerous loose and broken tiles were removed and individually cleaned in a similar way to the rest of the floor. We then repaired the sub base ready for the existing and newly sourced tiles to be re-laid, before leaving the floor to set and dry overnight.
The next day, the pathway was grouted, before being sealed with Tile Doctor’s colour enhancing, impregnating sealer, Colour Grow to bring back the life and character to the Victorian tiles.
I was also asked to renovate the Edwardian hallway tiles in the house so once finished with the pathway they were deep cleaned using a strong dilution of Tile Doctor Pro Clean. This also helped to break down the old sealers and waxes – followed by a careful cleaning of the grout lines using Tile Doctor Grout Clean Up in combination with 3m black pads and detail brushes.
To ensure any pre existing sealer was completely removed, I followed up with a steam clean and left the tiles to dry overnight.
Upon my return to the property the next day, I completed re-grouting in the necessary areas, before sealing the tiles with five coats of Tile Doctor Seal & Go, providing an aesthetically pleasing satin finish. Seal & Go is a topical, solvent-based sealer which forms a layer of durable protection on the surface of the tiles, protecting against dirt and stains.
The hard work invested in restoring these two floors certainly paid off, as the client was exceptionally pleased with the results, going as far as to leave the following feedback:
“I wanted to restore my tired Edwardian tiled hallway and was given Rob Voyce’s
contact details. I was very impressed with Rob and his team; they were very
professional and friendly. Rob explained the stages of the work to be carried out and
we agreed a date and the job was completed much to my satisfaction. Very pleased.”
Nigel Voyce
North London Tile Doctor
 Milgard Windows & Doors
The Kiguchi family moved into their Austin, Texas home in 1994. Built in the 1980’s as part of a neighborhood development, they happily raised their family here but longed for something more contemporary. Once they became empty nesters, they decided it was time for a major remodel. After spending many years visiting Austin AIA Home Tours that highlight contemporary residential architecture, they had a lot of ideas and in 2013 were ready to interview architects and get their renovation underway.
The project turned into a major remodel due to an unstable foundation. Architects Ben Arbib and Ed Hughey, of Arbib Hughey Design were hired to solve the structural issue and look for inspiration in the bones of the house, which sat on top of a hillside and was surrounded by great views.
Unfortunately, with the old floor plan, the beautiful views were hidden by small windows that were poorly placed. In order to bring more natural light into the house the window sizes and configurations had to be addressed, all while keeping in mind the homeowners desire for a modern look and feel.
To achieve a more contemporary and sophisticated front of house, a new entry was designed that included removing a two-story bay window and porch. The entrance of the home also became more integrated with the landscape creating a template for new foliage to be planted. Older exterior materials were updated to incorporate a more muted palette of colors with a metal roof, dark grey siding in the back and white stucco in the front. Deep eaves were added over many of the new large windows for clean lines and sun protection.
“Inside it was about opening up the floor plan, expanding the views throughout the house, and updating the material palette to get a modern look that was also warm and inviting,” said Ben from Arbib Hughey Design. “Prior to the remodel, the house had the typical separation of rooms. We removed the walls between them and changed all of the windows to Milgard Thermally Improved Aluminum to connect the inside with the outside. No matter where you are you get nice views and natural light.”
The architects wanted to create some drama, which they accomplished with the window placement and opening up the interior floor plan to an open concept approach. Cabinetry was used to help delineate intimate spaces. To add warmth to an all-white living room, white-washed oak wood floors were installed and pine planks were used around the fireplace. The large windows served as artwork bringing the color of nature into the space.
An octagon shaped, elevated dining room, (named “the turret”), had a big impact on the design of the house. They architects rounded the corners and added larger window openings overlooking a new sunken garden. The great room was also softened by rounding out the corners and that circular theme continued throughout the house, being picked up in skylight wells and kitchen cabinetry. A staircase leading to a catwalk was added and the result was a two-story window wall that flooded the home with natural light.
When asked why Milgard® Thermally Improved Aluminum windows were selected, the architectural team listed many reasons:
1) Aesthetics: “We liked the slim profiles and narrow sightlines. The window frames never get in the way of the view and that was important to us. They also have a very contemporary look that went well with our design.”
2) Options: “We liked that we could get large sliding doors that matched the windows, giving us a very cohesive look and feel throughout the project.”
3) Cost Effective: “Milgard windows are affordable. You get a good product at a good price.”
4) Custom Sizes: “Milgard windows are customizable, which allowed us to get the right window for each location.”
Ready to take on your own traditional to modern home remodeling project? Arbib Hughey Design advises, “Work with a good architect. That means picking a team that is creative, communicative, listens well and is responsive. We think it’s important for an architect to listen to their clients and give them something they want, not something the architect thinks they should have. At the same time you want an architect who is willing and able to think outside the box and offer up design options that you may not have considered. Design is about a lot of back and forth, trying out ideas, getting feedback and trying again.”
The home was completely transformed into a unique, contemporary house perfectly integrated with its site. Internally the home has a natural flow for the occupants and externally it is integrated with the surroundings taking advantage of great natural light. As a side note, it was highly praised as part of the Austin AIA homes tour.

 Southern Roofing Systems of Orange Beach
"Are you in search of a reliable roofing contractor in Orange Beach? Contact Southern Roofing Systems for high-quality and reasonably priced roofing services. We have a committed team whose sole purpose is to satisfy our customers. Our team's dedication to offering top-notch roofing services has made our work stand out. At Southern Roofing Systems, services are delivered on time, with customer experiences specially tailored for each client. Our professionals have undergone credible training; they're also licensed for their jobs. Their vast knowledge of roofing has made it possible for them to provide customers with unsurpassed services. We believe that a roof should do more than just protecting your building. Our team is constantly working on expanding its expertise and familiarizing itself with the latest roof designs. Give our team a chance, and you can rest assured to have a quality and appealing roof after we're done with the job.
Our company stands out for two primary reasons; our expertise in roofing and our reliable customer support. Customer services mean more than just prompt feedback to us; it means patiently advising our customers and helping them make the right choices. Our customer care team is knowledgeable; thus, the information and recommendations they offer customers are dependable. We cover Mobile, Tillman's Corner, Semmes, Saraland, Satsuma, Theodore, Spanish Fort, Daphne, Fairhope, Gulf Shores, and Orange Beach.
Southern Roofing Systems - Orange Beach offers everything from Commercial Roofing, Residential Roofing, and Roof Repairs. Additional services include Roof Insurance Claims Services, Metal Roofing, Shingle Roofing, Storm Repair and Emergency Roof Repair, Tile Roofing, Slate Roofing, and Flat Roofing, to Roof Flashing repair and inspection.
You can rely on Southern Roofing Systems for commercial or residential roofing projects. We promise to get your job done to a very high standard, on time, and on a budget."
27