
Search results for "Final cut" in Home Design Ideas
 Marble Builder Direct
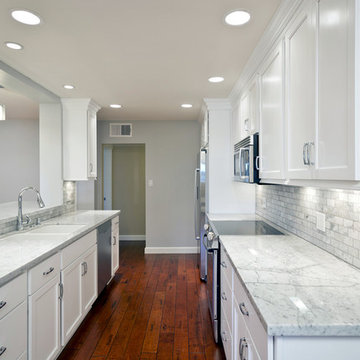
Example of a mid-sized trendy galley medium tone wood floor and brown floor enclosed kitchen design in Cleveland with an undermount sink, shaker cabinets, white cabinets, marble countertops, gray backsplash, marble backsplash, stainless steel appliances and no island
 SoYoung Mack Design, Assoc. AIA
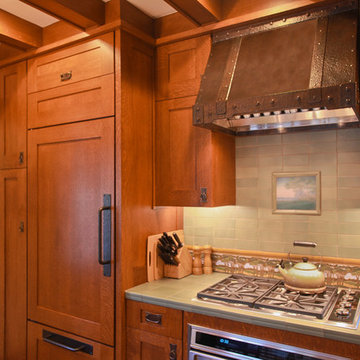
Craftsman Kitchen with custom bronze patina hood and Craftsman tile backspalsh.
Barry Toranto Photography
Example of an arts and crafts kitchen design in San Francisco
Example of an arts and crafts kitchen design in San Francisco
 Pleasant Living, LLC
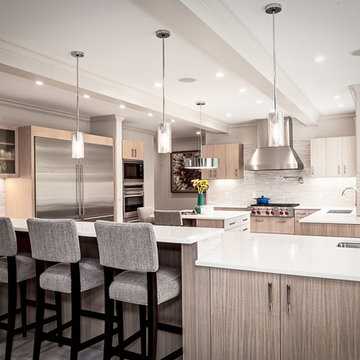
The challenge with this project was to transform a very traditional house into something more modern and suited to the lifestyle of a young couple just starting a new family. We achieved this by lightening the overall color palette with soft grays and neutrals. Then we replaced the traditional dark colored wood and tile flooring with lighter wide plank hardwood and stone floors. Next we redesigned the kitchen into a more workable open plan and used top of the line professional level appliances and light pigmented oil stained oak cabinetry. Finally we painted the heavily carved stained wood moldings and library and den cabinetry with a fresh coat of soft pale light reflecting gloss paint.
Photographer: James Koch
Find the right local pro for your project
 Archer & Buchanan Architecture, Ltd.
Tom Crane Photography
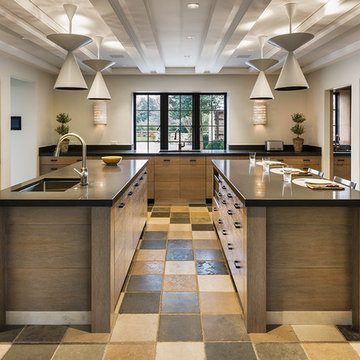
Inspiration for a large transitional l-shaped travertine floor eat-in kitchen remodel in Philadelphia with an undermount sink, flat-panel cabinets, light wood cabinets, limestone countertops, ceramic backsplash, stainless steel appliances and two islands
Inspiration for a large transitional l-shaped travertine floor eat-in kitchen remodel in Philadelphia with an undermount sink, flat-panel cabinets, light wood cabinets, limestone countertops, ceramic backsplash, stainless steel appliances and two islands
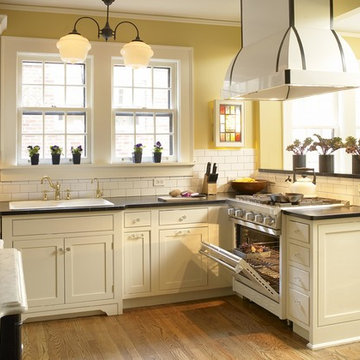
 Pittam Associates, Inc.
The small "old fashioned" 1920's kitchen was outdated by today's standards for the client who loved this look, but not the inconveniences that went with it.
The original breakfast room and butler’s pantry (after much discussion concerning honoring the original floor plan!) was incorporated into the new space by removal of the wall that separated them from the kitchen. The final result is tasteful and functional and in keeping with the classic 1920's look.
Photo credit: White Good & Company
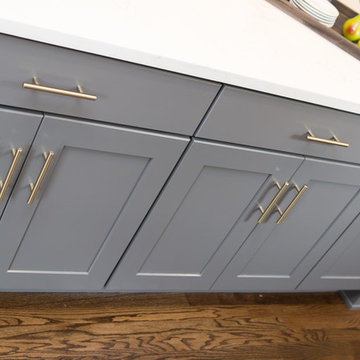
 Advance Design Studio, Ltd.
After six years of living in their Huntley IL home, Chris and Meghan were tired of their dark, dingy, outdated kitchen and it was finally time for a long-anticipated change. “The kitchen is the place where we live, it’s where we do everything,” Meghan said. “It was important that it be a space where we wanted to be.” Meghan loves cooking and enjoys including their girls in healthy meal prepping, this led them to want a brighter, more enjoyable kitchen with increased functionality and improved storage.
For Chris especially, the laundry room was an entirely dysfunctional eyesore. “We had a washer and a dryer, but it was all kind-of cobbled together!” Chris said. “There were always laundry piles everywhere, we weren’t really sure what we wanted to do in there, but it was time for us to make a change.” The mess of the space was stressful every time they walked in the door from the garage each day. Kids’ backpacks and shoes piled up haphazardly in the makeshift boot-bench closet left the family feeling disorganized and stressed. They needed space for folding clothes and locker cubbies to help keep the family organized.
Having known Christine and Todd in the Huntley community for years, Chris and Meghan were familiar with their work. “We already trusted them personally and having seen their projects for years we knew they did top notch work. After we reviewed the initial round of designs, we knew that hiring them was definitely the right choice,” Meghan and Chris said. Although Chris had done a lot of work in their home himself, the kitchen and laundry room renovation was such a large undertaking that he didn’t want to steal time away from his family to spend what would surely be many long weekends doing the job himself. “That would not have been a wise choice for us,” Chris laughed.
“Our designer, Michelle was very, very, easy to work with; anything we wanted to see or weren’t sure about, she went above and beyond to make this easy for us. She was easy to get hold of and always quick to respond,” the couple said. Michelle pulled ideas that mirrored the couple’s taste and style and was adept at directing the couple to limited choices that didn’t overwhelm them and kept the process moving. “I have a hard time making decisions. Michelle made the decision-making process so easy. I loved how she listened to what I liked and then presented three great options for me to choose from,” Meghan said.
The main objectives for the kitchen were better storage solutions, they wanted the space to reflect their lifestyle and taste, and they wanted it to last for years with low maintenance. One of the first steps in creating a more functional kitchen was relocating the refrigerator, creating an improved workflow for the busy family.
“We didn’t know that we could even move the refrigerator to a new location where it is now, that was something that we never would have thought of,” Chris said. “The new refrigerator location makes the kitchen feel so much bigger. We didn’t add any space, but our whole kitchen with the new design just seems like it’s so much larger than before!” Meghan said.
The perimeter mist colored cabinets helped warm and brighten the entire room, while the graphite colored cabinets on the island added contrast. Using this fresh, clean color palette satisfied the couple’s desire for a bright space that was the exact opposite of what they had before. Organization accessories were also added to the cabinets such as a spice drawer tray and roll outs to create hidden convenience.
“I absolutely love the hidden spices – it makes cooking so much more enjoyable!” Chris said. “And all the pull outs, and the double trash bin, who would think you could get so excited about organization!” the couple said in unison.
One thing they hated in their original kitchen was how dark the space felt. Added lighting on the ceiling with the new light fixtures combined with the lighter cabinetry colors throughout solved this problem. “Our new kitchen has this warm, almost cozy feeling that our old kitchen never had, it’s just a space that I love spending my time in now,” Meghan said. The light airy feeling was accentuated with the use of floating white shelves on either side of the decorative range hood. “We have so much cabinetry space, the new design is amazing we actually have more storage space than we will ever need,” Meghan said.
The island was extended to create more work surface and added space for stool seating. “The new island changes how we live. Now the kids can be in the kitchen with us, doing homework, eating breakfast, and the three of us have special dinners there when Chris is working late,” Meghan said.
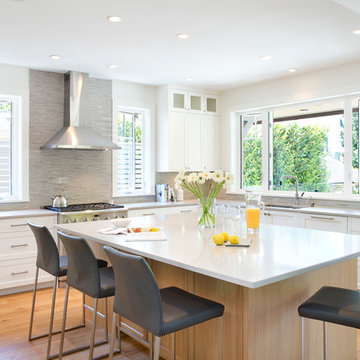
The Carrara Marmi Quartz countertops were chosen because they are, not only beautiful, but are made from hard-working material that doesn’t require maintenance. The white subway tile backsplash that wraps to the ceiling behind the focal point cooktop range/hood compliments the crisp white countertops perfectly, while brushed brass hardware and light fixtures keep the design fresh and new.
The couple had a few fears at the beginning of the project, as most homeowners do. Their biggest fear was being out of their kitchen and laundry room for an extended time. The crew made it very easy for the family to work in a limited space keeping the washer and dryer hooked up the majority of the time, and also getting appliances working with minimal downtime.
“They above and beyond accommodated us to get us through the process,” Meghan said. “They did a great job making sure we were as comfortable as possible throughout the process,” Chris added.
“Our project manager DJ did a great job. He was very good at updating us on schedule changes, getting guys in as quickly as possible. Everyone that stepped in the house was nice and did great work,” said Chris. They thought Advance’s carpenter was phenomenal and were impressed when he took a conceptual idea from a photograph and worked with designer Michelle to create a one of a kind range/hood that has become the topic of conversation with friends and family who visit the new kitchen. “He was in our house literally every day for several weeks. He was easy to work with and good at what he did,” Meghan and Chris said.
The focal point of the kitchen; a hand-crafted, custom-built ventilation hood was clad with handpicked reclaimed barnwood. Advance Design’s carpenter built the framework and the cladding to create a one-of-a-kind design element that the couple loves.
“I think it was especially fun for him to create something unique from scratch, showcasing his talent in this area,” Meghan said. “I love that my kitchen is not like everyone else’s. I got to pick out the wood on my hood and watch it being built and was able to choose what pieces of wood went where on it. It’s totally unique.”
Red Oak flooring was toothed-in throughout the kitchen and the rest of the first floor anywhere changes were made. Then the whole floor was refinished to tone down the orange undertones in the existing floor stain, ultimately changing the color complexion of the entire first floor. The result is a completely new feeling to the entire home.
Renovating the laundry room was extremely important to Meghan and Chris, but they had trouble visualizing what the possibilities were for the seemingly small space. Michelle produced beautiful 3D illustrations that helped them envision the space in a whole new way.
“I must have told Michelle 100 times that I am a visual person, seeing the designs in 3D made it so easy to make decisions and see what we could really do with our space,” Meghan said.
A dividing wall and doorway were removed between the existing laundry room and hallway formerly containing a coat closet, providing space to design specialized graphite colored cabinetry matching the kitchen island to house custom storage cubbies for each family member. Adding the tall utility cabinetry in the new laundry area helped solve the storage issue, tucking away cleaning supplies, household items, and even the cat got its own cubby.
“I love how everything is now hidden in its own space. I can’t tell you how much I hated coming home and seeing everything sitting around on counters,” Chris said.
Electrical outlets were planned for the inside of utility cabinets, so devices could charge in hidden locations. Stacking the washer and dryer allowed for wider countertop space to provide a folding area and a special space for clothes to hang. “The way I do laundry has been completely transformed! I can actually fold clothes and hang them now right out of the washer and dryer,” Meghan said.
“The end result in the kitchen and the laundry/mud room was an updated light and bright space, with a smarter work flow that better meets the needs of this family,” Michelle said.
“I would totally recommend Advance Design,” Meghan said. “Sometimes I sit and just look at my kitchen and laundry room and think ‘Wow, I can’t believe I get to live here!’ It’s an understatement to say we love our new space.”
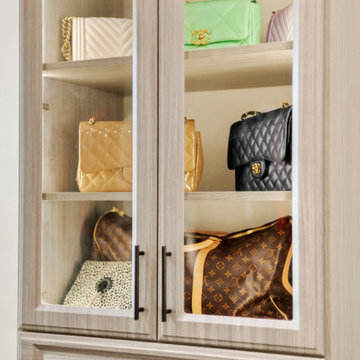
 Inspired Closets Baton Rouge
One morning, you’re starting your day as you normally would. Then you take a look at your closet, and it’s all the same.
There’s not much room for anything, and everything is a mess.
That was the daily routine for Mary, one of our recent Baton Rouge clients, until she decided she had finally had enough.
Little to No Closet Space: The Start of a Solution
Mary and her family moved into their new home in 2020, and they quickly realized they had had little to no closet space. Knowing that she needed that space for herself, she was inspired and wanted to see if she could turn a 10x12 office in her home into a closet.
Mary took charge and found us through an online search for closet installations, and she decided to give us a call. After speaking with our expert designer Felicity and sharing some photos she saw online, she decided to trust us with her closet installation.
“We had an instant connection and relationship,” Mary said. “Felicity was so down-to-earth and personable that a relationship was built immediately.”
Get the Ball Rolling: Designing and Constructing the Closet
Mary thought that the process was beautiful and simple. Felicity provided a 3D interactive design of the project and based it on Mary’s needs.
Mary said, “It felt like she was trying to accommodate my needs by using her knowledge of what I would need in my closet. It felt very natural.”
Felicity had a contractor she worked with closely. Together, they handled the project in two days, even with the crown molding that needed to be removed for the projected closet cabinets to reach the ceiling.
Once we finished, Mary was amazed at how quickly we finished the closet.
The Final Product: When Fashion and Functionality Work Together
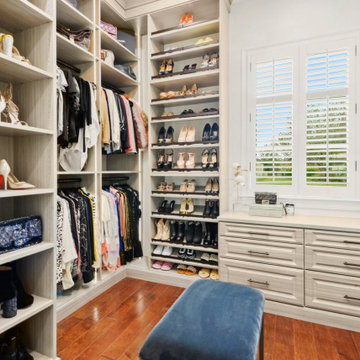
“I love how everything has a place, is very organized, and can all be seen very quickly,” Mary said. Along with the closet’s functionality, Mary loves that her closet looks like a boutique showroom.
We were able to bring fashion and functionality to this closet with:
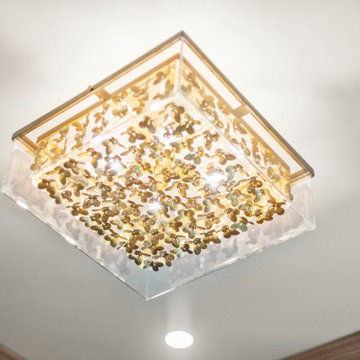
Showroom lights; makes it look more like a boutique rather than a closet
Hidden hamper
Separate space to see her purses and shoes
Jewelry drawer
Display cabinet for belts and scarves
Small closet for her four-year-old daughter to put her items in
See for yourself!
Saving Time and Stress Through The Day
Now Mary has cut down on both her time and wardrobe. Thanks to her new closet, finding an outfit each day is “quick and easy.”
She even entertains guests in her closet space, thanks to the showroom look we gave her closet.
What makes it better? The small closet inside helps her daughter find her things and keep organized.
Let Us Make Your Dreams Come True
Our work has Mary making plans to work with us for the future. She is already planning to convert another room into a closet, design her pantry, and renovate her garage.
Let us help you achieve your dream pantry, laundry room, or even a closet space like Mary’s!
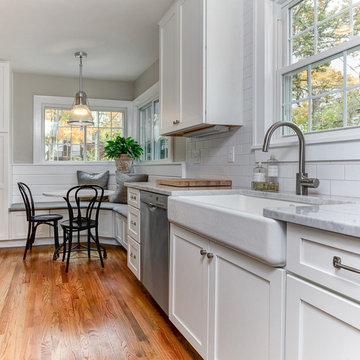
Sponsored
Columbus, OH

Hope Restoration & General Contracting
Columbus Design-Build, Kitchen & Bath Remodeling, Historic Renovations
 Inspired Closets Baton Rouge
One morning, you’re starting your day as you normally would. Then you take a look at your closet, and it’s all the same.
There’s not much room for anything, and everything is a mess.
That was the daily routine for Mary, one of our recent Baton Rouge clients, until she decided she had finally had enough.
Little to No Closet Space: The Start of a Solution
Mary and her family moved into their new home in 2020, and they quickly realized they had had little to no closet space. Knowing that she needed that space for herself, she was inspired and wanted to see if she could turn a 10x12 office in her home into a closet.
Mary took charge and found us through an online search for closet installations, and she decided to give us a call. After speaking with our expert designer Felicity and sharing some photos she saw online, she decided to trust us with her closet installation.
“We had an instant connection and relationship,” Mary said. “Felicity was so down-to-earth and personable that a relationship was built immediately.”
Get the Ball Rolling: Designing and Constructing the Closet
Mary thought that the process was beautiful and simple. Felicity provided a 3D interactive design of the project and based it on Mary’s needs.
Mary said, “It felt like she was trying to accommodate my needs by using her knowledge of what I would need in my closet. It felt very natural.”
Felicity had a contractor she worked with closely. Together, they handled the project in two days, even with the crown molding that needed to be removed for the projected closet cabinets to reach the ceiling.
Once we finished, Mary was amazed at how quickly we finished the closet.
The Final Product: When Fashion and Functionality Work Together
“I love how everything has a place, is very organized, and can all be seen very quickly,” Mary said. Along with the closet’s functionality, Mary loves that her closet looks like a boutique showroom.
We were able to bring fashion and functionality to this closet with:
Showroom lights; makes it look more like a boutique rather than a closet
Hidden hamper
Separate space to see her purses and shoes
Jewelry drawer
Display cabinet for belts and scarves
Small closet for her four-year-old daughter to put her items in
See for yourself!
Saving Time and Stress Through The Day
Now Mary has cut down on both her time and wardrobe. Thanks to her new closet, finding an outfit each day is “quick and easy.”
She even entertains guests in her closet space, thanks to the showroom look we gave her closet.
What makes it better? The small closet inside helps her daughter find her things and keep organized.
Let Us Make Your Dreams Come True
Our work has Mary making plans to work with us for the future. She is already planning to convert another room into a closet, design her pantry, and renovate her garage.
Let us help you achieve your dream pantry, laundry room, or even a closet space like Mary’s!
 Inspired Closets Baton Rouge
One morning, you’re starting your day as you normally would. Then you take a look at your closet, and it’s all the same.
There’s not much room for anything, and everything is a mess.
That was the daily routine for Mary, one of our recent Baton Rouge clients, until she decided she had finally had enough.
Little to No Closet Space: The Start of a Solution
Mary and her family moved into their new home in 2020, and they quickly realized they had had little to no closet space. Knowing that she needed that space for herself, she was inspired and wanted to see if she could turn a 10x12 office in her home into a closet.
Mary took charge and found us through an online search for closet installations, and she decided to give us a call. After speaking with our expert designer Felicity and sharing some photos she saw online, she decided to trust us with her closet installation.
“We had an instant connection and relationship,” Mary said. “Felicity was so down-to-earth and personable that a relationship was built immediately.”
Get the Ball Rolling: Designing and Constructing the Closet
Mary thought that the process was beautiful and simple. Felicity provided a 3D interactive design of the project and based it on Mary’s needs.
Mary said, “It felt like she was trying to accommodate my needs by using her knowledge of what I would need in my closet. It felt very natural.”
Felicity had a contractor she worked with closely. Together, they handled the project in two days, even with the crown molding that needed to be removed for the projected closet cabinets to reach the ceiling.
Once we finished, Mary was amazed at how quickly we finished the closet.
The Final Product: When Fashion and Functionality Work Together
“I love how everything has a place, is very organized, and can all be seen very quickly,” Mary said. Along with the closet’s functionality, Mary loves that her closet looks like a boutique showroom.
We were able to bring fashion and functionality to this closet with:
Showroom lights; makes it look more like a boutique rather than a closet
Hidden hamper
Separate space to see her purses and shoes
Jewelry drawer
Display cabinet for belts and scarves
Small closet for her four-year-old daughter to put her items in
See for yourself!
Saving Time and Stress Through The Day
Now Mary has cut down on both her time and wardrobe. Thanks to her new closet, finding an outfit each day is “quick and easy.”
She even entertains guests in her closet space, thanks to the showroom look we gave her closet.
What makes it better? The small closet inside helps her daughter find her things and keep organized.
Let Us Make Your Dreams Come True
Our work has Mary making plans to work with us for the future. She is already planning to convert another room into a closet, design her pantry, and renovate her garage.
Let us help you achieve your dream pantry, laundry room, or even a closet space like Mary’s!

 Tile Doctor Ltd
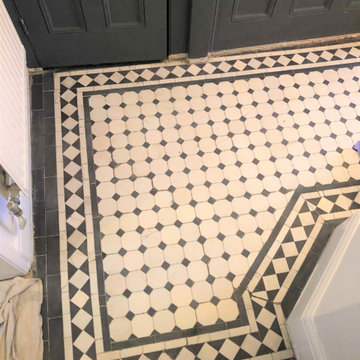
The owners of this Edwardian property in Finchley had purchased it a couple of years prior and since then had slowly been renovating it to restore its original character. The project was almost complete and now attention had turned to the tiled floor. The tiles were in quite a state and I was asked to work our Tile Doctor magic and bring it back to its original condition.
When they moved in the hallway had been covered with carpet which gave the tiles underneath some protection. Unfortunately, however the carpet has been secured with carpet grippers that had been glued to the tiles around the edges. There were also paint splashes on the surface that would need dealing with. On top of that the floor had a few missing tiles that had been back filled by cement to provide a level base for the carpet, the client wanted like them replaced if possible.
After surveying the floor, I explained what could be done and ever completed a small test clean to demonstrate how the tiles would look once deep cleaned. I was confident on being able to source very similar reclaimed tiles so replacing the missing should not be a problem. The client was very happy with the initial test result and my quotation so booked me in to restore the floor.
On my return I started by applying Tile Doctor Remove and Go to soften up the glue which allowed it to be carefully peeled off the tiles with scrappers. Once all the carpet adhesive was gone, I worked a strong dilution of Tile Doctor Remove and Go into the tiles using a black pad to work the cleaning solution deeper into the tiles. A wet vacuum was used to remove the slurry created, and I followed this by giving the tiles an extra clean using a 200-grit diamond burnishing pad lubricated with water.
The last step in the cleaning process was to give the floor an acid rinse using Tile Doctor Grout Clean-up, I did this for several reasons, first it removes old grout smears from the surface of the tile and second it neutralised any efflorescent salts lying dormant in the floor. This can be quite a problem for old floors which don’t have the benefit of a protective damp proof membrane under the floor. The floor was given a final rinse with water which was again extracted with a wet vacuum.
I then set about lifting all the loose tiles (approximately ten) and carefully removing the concrete infills. I had previously managed to source replacements for these holes from original features. Unfortunately, they didn’t sell the correct sized octagon tiles, so I had bought 150mm square tiles and then needed to cut them on site to get the right size.
After cutting and fixing the tiles I fixed them in place and regrouted the rest of the floor.
I then left the floor to dry out overnight and returned in the morning. Before applying a sealer, I took several moisture readings with the damp meter to make sure the tiles were dry enough to take the sealer.
I was able to confirm the floor was dry, so went ahead and applied three coats of Tile Doctor Colour Grow sealant. Colour Grow is an impregnating sealer that is fully breathable sealer which is important when it comes to old floors like these that don’t have a damp proof membrane installed.
My client was very happy with the renovated floor and for aftercare I left them with a bottle of Tile Doctor Neutral Tile Cleaner and gave advice on how best to clean the floor going forward.
Andrew Newstead
North London Tile Doctor
 Andover Landscape Design & Construction
He wanted a lake house, she wanted a pool.
Tucked away on a small cul-de-sac in North Reading is a backyard oasis like no other.
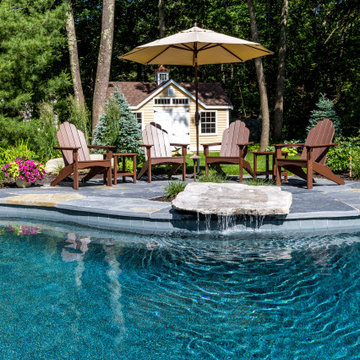
“During our initial meeting with the homeowners, it became apparent that they wanted a unique pool, so we suggested a free-form gunite pool surrounded by an indigenous Goshen Stone patio, custom cut to create ultra-tight joints. The stone arrived in huge slabs — most over 5’ x 5’ in size — and varied significantly in thickness. Countless hours were spent cutting, chiseling, and even sandblasting this life-sized jigsaw puzzle. The final look was exactly what we were shooting for.” Russell
The pool itself has a dark, pebble finish with a long, custom bench and a simple, spillway stone creating a perfect respite with a calming sound. Surrounding the pool and patio is a lush lawn with large swatches of summertime perennials. The homeowner is an active gardener, so providing him with areas to hone his skills was paramount to our success as a design firm. Large, architectural boulders were carefully arranged throughout the rear yard as both design elements and as functional furniture. A custom-built, wood, wire, and split granite fence meets pool-enclosure requirements and adds that farmhouse-feel to the overall look. Carefully arranged Goshen step stone set flush in the lawn orchestrates movement throughout the garden while connecting the house and pool in a thoughtful, artistic way.
No need to travel north to the lake when you’ve got this to enjoy daily — right in your own backyard!
 Allreno
Bathroom Renovation: How Allreno Simplifies Your Remodel – Save Time and Money
When it comes to bathroom renovation, creating a space that’s functional, stylish, and tailored to your needs can feel like a daunting task. But with Allreno, the process becomes streamlined, efficient, and remarkably simple. Whether you’re planning a small update or a full-scale remodel, Allreno’s cutting-edge app and services are designed to help you achieve your dream bathroom with ease.
Why Choose Allreno for Your Bathroom Renovation?
Allreno stands out in the renovation industry by leveraging advanced artificial intelligence to automate complex processes, cutting down the time and cost typically associated with bathroom remodels. Through our platform, homeowners and professionals alike can design, plan, and execute renovations in a fraction of the time it takes with traditional methods.
Our innovative approach focuses on:
• Custom Designs: With Allreno, you can visualize your bathroom renovation in real-time, experimenting with layouts, finishes, and fixtures to find the perfect fit.
• Cost Efficiency: Our AI technology optimizes material use and labor planning, saving you money without compromising on quality.
• Seamless Execution: From selecting a bathroom vanity to finalizing the layout, Allreno simplifies every step of the process.
Comparing Allreno to Leading Competitors
When exploring bathroom renovation options, it’s important to consider the services and value offered by different providers. Here’s how Allreno stacks up against major players like Home Depot, Houzz, Block Renovation, and Angi.com:
• Home Depot: Known for its wide range of DIY and contractor-friendly products, Home Depot offers accessibility but lacks the personalized design and AI-powered planning that Allreno provides.
• Houzz: While Houzz excels in inspiration and connecting homeowners with professionals, its platform does not streamline the actual renovation process like Allreno’s app does.
• Block Renovation: Specializing in high-quality bathroom remodels, Block offers comprehensive services but often at a premium price. Allreno delivers comparable results with significant cost savings.
• Angi.com: Angi connects homeowners with contractors but doesn’t offer the integrated design-to-execution experience that sets Allreno apart.
Bathroom Vanity: The Centerpiece of Your Renovation
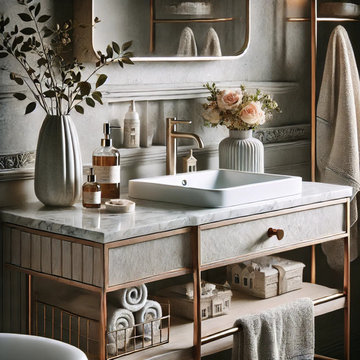
A bathroom vanity is often the focal point of any bathroom design. Choosing the right vanity can elevate the entire look and feel of your space. With Allreno, selecting the perfect bathroom vanity becomes an enjoyable experience. Our app allows you to browse a curated collection of high-quality vanities, customize dimensions, and visualize how they’ll look in your remodeled space.
Allreno’s vanities combine style, functionality, and durability, ensuring they not only look great but also stand the test of time. Whether you prefer a modern minimalist design or a classic, timeless aesthetic, Allreno has options to suit every taste.
Expert Tips for Bathroom Renovation
Renovating a bathroom requires careful planning and attention to detail. Here are some expert tips to keep in mind:
1. Set a Realistic Budget: Determine how much you’re willing to spend and allocate funds for unexpected expenses.
2. Plan the Layout: Consider functionality and flow when designing the space. Allreno’s app makes this step easy with AI-generated layouts tailored to your needs.
3. Choose Durable Materials: Bathrooms face moisture and wear, so opt for high-quality, water-resistant materials.
4. Focus on Lighting: Proper lighting enhances both the functionality and ambiance of your bathroom.
5. Hire Professionals: While DIY can be tempting, working with experienced contractors ensures the job is done right.
Explore Our Complete Guide to New York Bathroom Remodels
For New York homeowners, bathroom renovations come with unique challenges and opportunities. Explore our complete guide to New York bathroom remodels, with expert tips on bathroom renovation and a breakdown of costs to help you plan. From navigating small spaces to complying with building codes, our guide provides all the insights you need for a successful project.
Why Allreno is the Future of Bathroom Renovation
With Allreno, you’re not just renovating a bathroom—you’re transforming the way renovations are done. Our app eliminates the stress and inefficiency of traditional methods, empowering you to achieve stunning results in less time and with less hassle.
Ready to start your bathroom renovation journey? Download the Allreno app today and experience the difference for yourself. Whether it’s finding the perfect bathroom vanity or planning a complete remodel, Allreno is here to make your dream bathroom a reality.
Tags: ai design, bathroom renovation, renovation, bathroom design, interior design
Sponsored
Columbus, OH
Hope Restoration & General Contracting
Columbus Design-Build, Kitchen & Bath Remodeling, Historic Renovations
 Refresh and Build
Full Kitchen Remodel Mill Valley Marin County
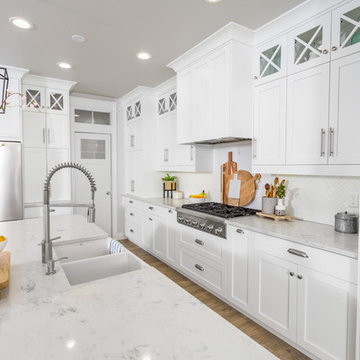
This complete kitchen transformation in Bernal Heights was completed in just 6 weeks with a $80,000 investment. The project involved full demolition and rebuild, with every detail carefully selected for both beauty and longevity.
Key Features:
Custom Omega cabinetry — known for their superior craftsmanship and lifetime warranty
Quartz countertops — durable, low maintenance and stunning
Premium Viking appliances — professional grade performance for the home chef
Solid hardwood flooring throughout
Full permit management — rough and final inspections passed first time
As with every Refresh and Build project, we handled the entire San Francisco permit process from start to finish — including all rough and final inspections — so our client never had to deal with the city's complex building department.
Project Stats:
Duration: 6 weeks
Investment: $80,000
Location: Mill Valley
Permits: Mill Valley building permits pulled and passed
 Tile Doctor Ltd
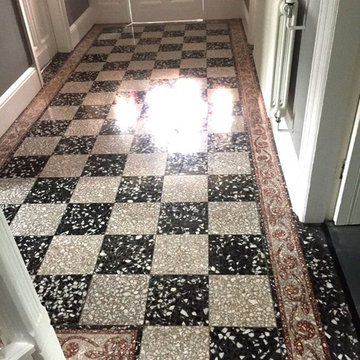
For this job, I paid a visit to the bustling town of Windermere in South Cumbria. My client asked me to refinish a black and white Terrazzo tiled entrance and hallway floor. Terrazzo if you’re not familiar is a very interesting and beautiful stone of Italian origin, which has been used for flooring in houses for centuries.
We had previously quoted to do the work on this floor however the customer has also received a quote from another firm in Glasgow and had chosen to go with them solely because they were more expensive. However, it stands to reason that the most expensive companies are not always the best quality and Tile Doctor prides itself on the amount of customer feedback we display on our websites which we believe is a far better indicator.
On the arranged day no one from the Glasgow firm showed up and after following up with the firm a young man in his early 20s arrived five hours late and began work on the floor. According to the customer he spent three days attempting to complete the job, but ran out of time and asked the client to apply the sealer themselves. The client applied the sealer, but as she had never done it before the floor turned out blotchy in appearance and she was far from happy.
To cut a long story short, my client complained to the Glaswegian company, after all she had paid for a full service and not received it. Unable to get a satisfactory conclusion from them she decided to call in Tile Doctor to put the matter right. I must point out that although I have included before and after photos one this post it’s really difficult to appreciate the extent of the problem without seeing the floor in real life.
To resolve the sealer, and to provide my client with the polished finish she had originally wanted, I burnished the floor using a set of four Tile Doctor Diamond encrusted burnishing pads. Each of the four pads has a different grit: I first applied the coarse pad and worked my way through medium, fine and eventually very fine using a little water to lubricate and rinsing the floor between each pad to remove any residue; after the burnishing process was complete I gave the entire floor a final, thorough wash.
I then used a wet-vac machine to extract the water and get the floor as dry as possible before leaving for the day and allowing it to fully dry completely overnight, it’s very important that the floor is as moisture free as possible before being sealed as it can affect the final result.
The next day I returned to the house and sealed the floor with two coats of Tile Doctor Colour Grow, an impregnating, colour-enhancing sealer that really accentuates the look of the black and white tiles.
Now that the problem has been resolved, my client is very happy with the condition of her Terrazzo tiled entrance and hallway floor.
Heidi Taylor
South Cumbria Tile Doctor

 Sherry Frederick Interior Designs & Co
Here’s what some people may refer to as the “fun part” of a redesign—picking out all the pretty stuff. First, choose your appliances. Many higher-end brands such as Sub-Zero and Wolf currently have a lead time of six to 12 months due to COVID. The cabinets, which have a shorter lead time of eight to 12 weeks on average, says Frederick, will then be built around them. From there, you’ll work with your designer to solidify all the details, such as cabinet door style, countertop material, decorative hardware, fixtures, flooring, backsplash and the sink.
“This is the stage where you finalize the design and prepare final floor plans, elevations, details and, if applicable, mechanical and electrical drawings, lighting switch plans and exterior elevations,” says Terrill. It’s essentially an extension of step No. 4, except here you’re confirming all the details and making sure everything is going as scheduled. For example, at this point your builder will give the interior designers a schedule so the designer can make sure everything (such as the countertop marble) is on-site and ready for installation.
Assuming you’re changing the footprint of the kitchen, you’ll need to figure out specific details as they pertain to the construction, our designers note, such as:
How will the construction team remove debris? With a dumpster or will they keep it in your garage or yard?
Will there be a staging area for cutting wood and tile?
When will you need to be out of the house, and for how long?
Where can crew members use the bathroom?
Can/should the crew work on weekends and if so, during what hours?
Keep in mind too that certain requests might require more money, such as having the crew clean-up their dusty mess daily rather than, say, once a week.
 NatureRails LLC
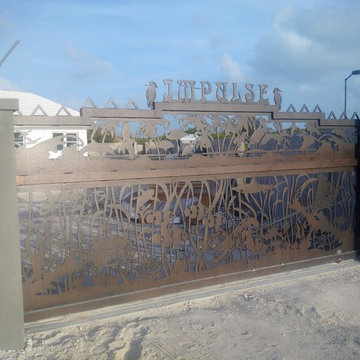
Traditional landscape and sea life designs, local to Turks and Caicos Islands, create the railing design sections (up to 13 feet in length) for areas used in between planters around the property of this lovely home.
Durable, heavy gauge aluminum railing sections, as well as several pedestrian gates, were fabricated with sea & bird life of the local area.
All to 4" code, aluminum materials provide a long lasting and durable product that puts spindles to shame. Finally--a railing that compliments the natural landscape, rather than deterring from it. Railing and gates shown with primer and penny vein powder coat finish.
The exterior railings are dipped in an acid wash bath with a rust inhibitor, powder coated with a layer of primer, and powder coated again with the customer's choice of powder coat colors. This gate is very low maintenance and will always look amazing. No painting ever!
What can we design for you? Call 888-743-2325 or visit our website and fill out our contact form to get a free quote or discuss your project. www.NatureRails.com
 Inspired Closets Baton Rouge
One morning, you’re starting your day as you normally would. Then you take a look at your closet, and it’s all the same.
There’s not much room for anything, and everything is a mess.
That was the daily routine for Mary, one of our recent Baton Rouge clients, until she decided she had finally had enough.
Little to No Closet Space: The Start of a Solution
Mary and her family moved into their new home in 2020, and they quickly realized they had had little to no closet space. Knowing that she needed that space for herself, she was inspired and wanted to see if she could turn a 10x12 office in her home into a closet.
Mary took charge and found us through an online search for closet installations, and she decided to give us a call. After speaking with our expert designer Felicity and sharing some photos she saw online, she decided to trust us with her closet installation.
“We had an instant connection and relationship,” Mary said. “Felicity was so down-to-earth and personable that a relationship was built immediately.”
Get the Ball Rolling: Designing and Constructing the Closet
Mary thought that the process was beautiful and simple. Felicity provided a 3D interactive design of the project and based it on Mary’s needs.
Mary said, “It felt like she was trying to accommodate my needs by using her knowledge of what I would need in my closet. It felt very natural.”
Felicity had a contractor she worked with closely. Together, they handled the project in two days, even with the crown molding that needed to be removed for the projected closet cabinets to reach the ceiling.
Once we finished, Mary was amazed at how quickly we finished the closet.
The Final Product: When Fashion and Functionality Work Together
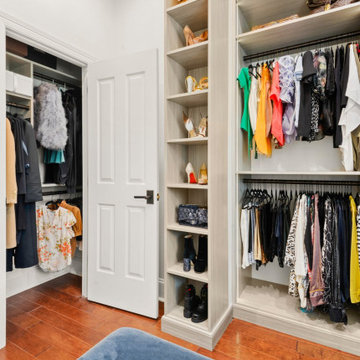
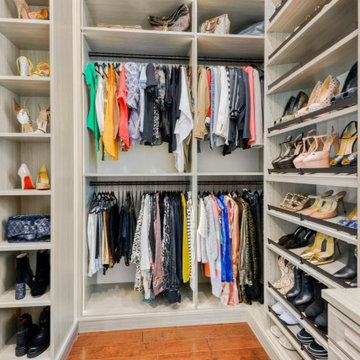
“I love how everything has a place, is very organized, and can all be seen very quickly,” Mary said. Along with the closet’s functionality, Mary loves that her closet looks like a boutique showroom.
We were able to bring fashion and functionality to this closet with:
Showroom lights; makes it look more like a boutique rather than a closet
Hidden hamper
Separate space to see her purses and shoes
Jewelry drawer
Display cabinet for belts and scarves
Small closet for her four-year-old daughter to put her items in
See for yourself!
Saving Time and Stress Through The Day
Now Mary has cut down on both her time and wardrobe. Thanks to her new closet, finding an outfit each day is “quick and easy.”
She even entertains guests in her closet space, thanks to the showroom look we gave her closet.
What makes it better? The small closet inside helps her daughter find her things and keep organized.
Let Us Make Your Dreams Come True
Our work has Mary making plans to work with us for the future. She is already planning to convert another room into a closet, design her pantry, and renovate her garage.
Let us help you achieve your dream pantry, laundry room, or even a closet space like Mary’s!
 Inspired Closets Baton Rouge
One morning, you’re starting your day as you normally would. Then you take a look at your closet, and it’s all the same.
There’s not much room for anything, and everything is a mess.
That was the daily routine for Mary, one of our recent Baton Rouge clients, until she decided she had finally had enough.
Little to No Closet Space: The Start of a Solution
Mary and her family moved into their new home in 2020, and they quickly realized they had had little to no closet space. Knowing that she needed that space for herself, she was inspired and wanted to see if she could turn a 10x12 office in her home into a closet.
Mary took charge and found us through an online search for closet installations, and she decided to give us a call. After speaking with our expert designer Felicity and sharing some photos she saw online, she decided to trust us with her closet installation.
“We had an instant connection and relationship,” Mary said. “Felicity was so down-to-earth and personable that a relationship was built immediately.”
Get the Ball Rolling: Designing and Constructing the Closet
Mary thought that the process was beautiful and simple. Felicity provided a 3D interactive design of the project and based it on Mary’s needs.
Mary said, “It felt like she was trying to accommodate my needs by using her knowledge of what I would need in my closet. It felt very natural.”
Felicity had a contractor she worked with closely. Together, they handled the project in two days, even with the crown molding that needed to be removed for the projected closet cabinets to reach the ceiling.
Once we finished, Mary was amazed at how quickly we finished the closet.
The Final Product: When Fashion and Functionality Work Together
“I love how everything has a place, is very organized, and can all be seen very quickly,” Mary said. Along with the closet’s functionality, Mary loves that her closet looks like a boutique showroom.
We were able to bring fashion and functionality to this closet with:
Showroom lights; makes it look more like a boutique rather than a closet
Hidden hamper
Separate space to see her purses and shoes
Jewelry drawer
Display cabinet for belts and scarves
Small closet for her four-year-old daughter to put her items in
See for yourself!
Saving Time and Stress Through The Day
Now Mary has cut down on both her time and wardrobe. Thanks to her new closet, finding an outfit each day is “quick and easy.”
She even entertains guests in her closet space, thanks to the showroom look we gave her closet.
What makes it better? The small closet inside helps her daughter find her things and keep organized.
Let Us Make Your Dreams Come True
Our work has Mary making plans to work with us for the future. She is already planning to convert another room into a closet, design her pantry, and renovate her garage.
Let us help you achieve your dream pantry, laundry room, or even a closet space like Mary’s!
 Inspired Closets Baton Rouge
One morning, you’re starting your day as you normally would. Then you take a look at your closet, and it’s all the same.
There’s not much room for anything, and everything is a mess.
That was the daily routine for Mary, one of our recent Baton Rouge clients, until she decided she had finally had enough.
Little to No Closet Space: The Start of a Solution
Mary and her family moved into their new home in 2020, and they quickly realized they had had little to no closet space. Knowing that she needed that space for herself, she was inspired and wanted to see if she could turn a 10x12 office in her home into a closet.
Mary took charge and found us through an online search for closet installations, and she decided to give us a call. After speaking with our expert designer Felicity and sharing some photos she saw online, she decided to trust us with her closet installation.
“We had an instant connection and relationship,” Mary said. “Felicity was so down-to-earth and personable that a relationship was built immediately.”
Get the Ball Rolling: Designing and Constructing the Closet
Mary thought that the process was beautiful and simple. Felicity provided a 3D interactive design of the project and based it on Mary’s needs.
Mary said, “It felt like she was trying to accommodate my needs by using her knowledge of what I would need in my closet. It felt very natural.”
Felicity had a contractor she worked with closely. Together, they handled the project in two days, even with the crown molding that needed to be removed for the projected closet cabinets to reach the ceiling.
Once we finished, Mary was amazed at how quickly we finished the closet.
The Final Product: When Fashion and Functionality Work Together
“I love how everything has a place, is very organized, and can all be seen very quickly,” Mary said. Along with the closet’s functionality, Mary loves that her closet looks like a boutique showroom.
We were able to bring fashion and functionality to this closet with:
Showroom lights; makes it look more like a boutique rather than a closet
Hidden hamper
Separate space to see her purses and shoes
Jewelry drawer
Display cabinet for belts and scarves
Small closet for her four-year-old daughter to put her items in
See for yourself!
Saving Time and Stress Through The Day
Now Mary has cut down on both her time and wardrobe. Thanks to her new closet, finding an outfit each day is “quick and easy.”
She even entertains guests in her closet space, thanks to the showroom look we gave her closet.
What makes it better? The small closet inside helps her daughter find her things and keep organized.
Let Us Make Your Dreams Come True
Our work has Mary making plans to work with us for the future. She is already planning to convert another room into a closet, design her pantry, and renovate her garage.
Let us help you achieve your dream pantry, laundry room, or even a closet space like Mary’s!
31