
Search results for "Final roughly" in Home Design Ideas
 John Rogers Design
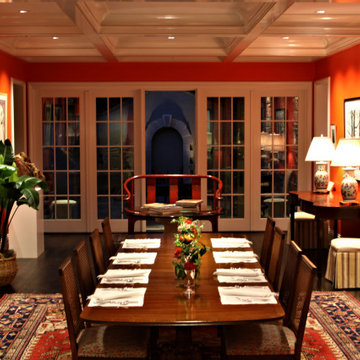
This home is located in an area of Little Rock we call the upper heights by the Little Rock Country Club.
What was difficult about this project, was it had been under construction for one year. The house roof was installed and the rough-in framing almost complete.
On a nice spring day, I just happened to see the builder Jack Hartsell in the front yard. We have worked together on several projects and I inquired as to the status of the interior lighting design. Jack informed me the lighting plans had not been finalized. Jack gave me the architectural firm's name, Lindsey Yeary Architects in Little Rock. I have worked with the firm before but not with this architect, Carolyn Lindsey.
We met and she introduced me to the owner who has a vast art collection that they rotate. In review of my lighting design portfolio with my focus on art lighting I was hired.
Now the lighting design became the project priority. The builder was a month away from needing recessed can lighting housings and I had to produce the lighting plans, with lighting specifications, in two weeks.
I met their schedule, lighting was ordered.
To accent art, furnishings and architectural features, the recessed lighting distance placement from the wall is critical. All good lighting designers show in their lighting plans the recessed cans measurements from the walls. This helps the electricians know exactly where to place the art accent lighting.
Once the house is completed, the recessed cans cannot be relocated without creating a mess and extra cost.
I worked with the architect to re-layout the dining room coffered ceiling placement in order to place the lighting according to my lighting plan. All the recessed cans featured ceiling trims with a four inch diameter opening, rotated 360 degrees and a forty-five degree vertical adjustability. Recessed can fixtures must have the ability to adjust. it is the key to accent lighting.
This was the typical lighting approach for all the rooms in the house with art.
Credits:
Client: DES Rogers , AR Contracted JRD
https://www.des3s.com/
Architects : Yeary Lindsey Architects Little Rock, Ar
https://www.yearylindsey.com
Builder: Jack Hartsell Constuction Little Rock, AR
Electrician: Jacobs Electric & Communications LLC
Little Rock, AR
 Quarry Mill
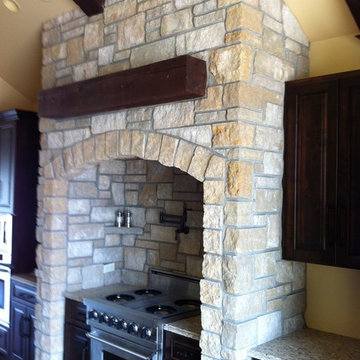
This stunning kitchen highlights Cambrian Creek natural thin veneer from the Quarry Mill. Cambrian Creek is a classic real stone veneer cut into the dimensional (sawn-height) style. The stone is natural dolomitic limestone with the timeless colors of gold, buff and the occasional grey. The quarrying and production process for Cambrian Creek is quite impressive. The stone is cut from the ground in blocks roughly the size of a car. Then, the blocks get sawn or sliced as it is called into large sheets of stone in heights of 2.25”, 5” and 7.75”. The sheets are fed into the splitter where the hydraulic press breaks them every four inches. At this stage, the stone is considered building stone or full veneer. Finally, the pieces are run through the saw to create the beautiful thin veneer.
 Grennan Construction
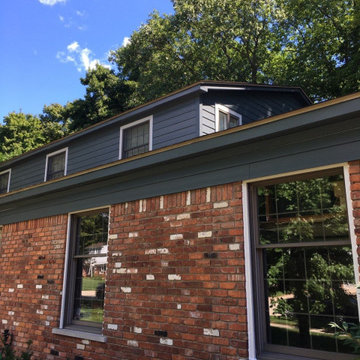
Grennan Construction is proud to showcase this stunning James Hardie Fiber Cement Siding installation in Troy, Michigan. The home now features 7” Horizontal Lap Siding in the Cedar Mill design, offering the rich texture of natural wood with the unbeatable durability of fiber cement. The sophisticated Evening Blue color brings a modern, elegant touch to the home’s exterior, perfectly complemented by matching Evening Blue Hardie Trim on corners and columns. To create contrast and brighten the façade, we installed White Rough Sawn Hardie Trim around windows and doors. For a sleek, polished finish, custom bent aluminum accents in Evening Blue were added to the rakes, friezes, and fascia. The garage received a final touch with white aluminum wrapping and weatherstripping for enhanced energy efficiency. This project highlights Grennan Construction’s commitment to quality craftsmanship, transforming homes with style and resilience.
Find the right local pro for your project
 Studioteka Design, LLC
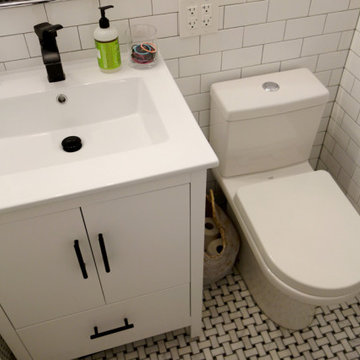
This beautiful, 1,600 SF duplex three-bedroom, two-bath apartment in the heart of the West Village was originally a diamond in the rough with great potential. The coop is located on a quiet, tree-lined street and, as a top floor unit, boasts lovely southern and eastern exposures with views of this charming neighborhood overlooking the Hudson. Our clients were making a big move from the West Coast and wanted the new home to be ready in time for the start of the new school year, so Studioteka’s architecture and interior design team rolled up our sleeves and got to work! Construction documents were prepared for the coop board and NYC Department of Buildings approval and our team coordinated the renovation. The entire unit had new hardwood flooring, moldings, and doors installed, the stairs were gently refinished, and we took down a wall separating the living room from a small den on the lower level, making the living space much more open, light-filled, and inviting. The hot water heater was tucked away in an unused space under the stair landing, allowing for the creation of a new kitchen pantry with additional storage. We gut-renovated the upstairs bathroom, creating a built-in shower niche as well as a brand new Duravit tub, Mirabelle high-efficiency toilet, American Standard matte black fixtures, and a white Strasser Woodenworks vanity with black hardware. Classic white subway tile lines the walls and shower enclosure, while black and white basketweave tile is used on the floor. The matte black towel hooks, toilet roll holder, and towel rod contrast with the white wall tile, and a shower curtain with a delicate black and white pattern completes the room. Finally, new mid-century modern furnishings were combined with existing pieces to create an apartment that is both a joy to come home to and a warm, inviting urban oasis for this family of four.
 DGK Design + Build
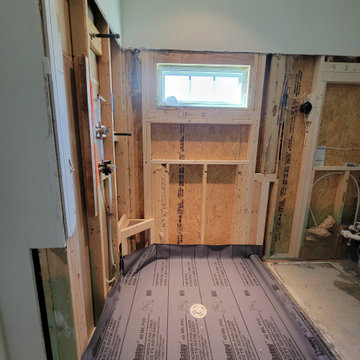
An in-progress bathroom renovation shows a newly installed Oatey shower pan liner set within exposed framing. Plumbing rough-ins and window framing are complete, preparing the space for waterproofing, tile backer board, and final shower finishes.
 Zobel & Co. Kitchens
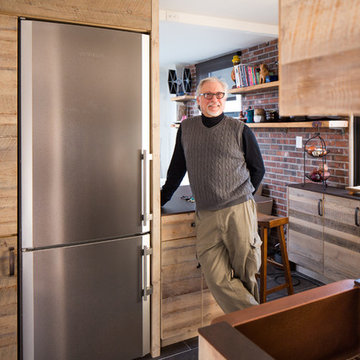
And the designer, Arthur Zobel, giving the kitchen a final inspection! Photo by Chris Sanders.
Small trendy u-shaped ceramic tile eat-in kitchen photo in New York with a farmhouse sink, flat-panel cabinets, distressed cabinets, quartz countertops, blue backsplash, glass tile backsplash, stainless steel appliances and no island
Small trendy u-shaped ceramic tile eat-in kitchen photo in New York with a farmhouse sink, flat-panel cabinets, distressed cabinets, quartz countertops, blue backsplash, glass tile backsplash, stainless steel appliances and no island
 Hull Historical
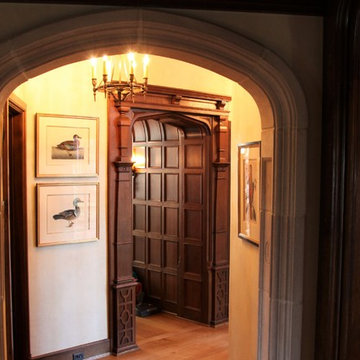
My clients had always been inspired by the grand Tudor Revival homes of the early 20th century and commissioned Hull Historical to recreate the authentic custom millwork, paneling and doors for their new Tudor Revival home. Our inspiration came from 2 great English homes, Stan Hywett, a great Tudor Revival home in Ohio, built for the founder of Goodyear Tires. Also, the Woodbine Mansion, built in 1911 for the son of the Pabst Brewing Company. We were fortunate to purchase three rooms of architectural millwork from the woodbine home, which was originally fabricated by the Huber Company of New York. Upon completion of this project, the architectural salvage comprised 15% of the final quantity of paneling installed. The remainder was custom fabricated by Hull Historical at our shop in Fort Worth, TX and installed at the clients home.
The commission, based on historic precedent, constituted antique paneling on the main floor, beamed ceilings and all the doors in the home. The new paneling, including the kitchen cabinetry is made from a combination of new quarter-sawn white oak and antique white oak salvaged from old barns and buildings. All the oak was fumed in an ammonia-filled chamber to produce a cocoa color and deep feel giving the millwork rough character and a timeless look that my client loved.
The millwork also served to give the home a hierarchy, with simple paneling combined with board and batten doors downstairs, then more ornate paneling, with carvings on the main floor. Additionally, the main floor features mostly 8 and 10 panel doors. All woodwork was hand-pegged with oak pegs. Some of the paneling features a unique Mason’s Miter, a historic joinery technique inspired from stone work.
For more information on residential renovation and new construction projects by Hull Historical, visit http://brenthullcompanies.com/residential.html

 Claude Clemaron Luxury Bespoke Furniture
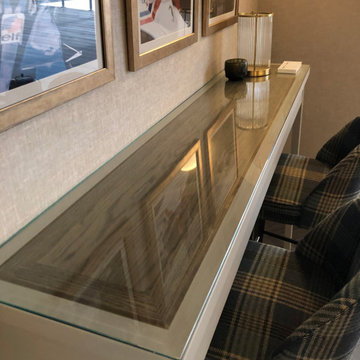
This luxury private members’ club bar and lounge interior was originally designed by The L&C Company, based in Surrey. The client then commissioned Clémaron to develop and built the bar and lounge based on these designs. With our commitment to exceptional quality and attention to detail, we brought the final design to life with materials sourced specifically for the project. Our cabinetmakers are expert at handcrafting fitted cabinetry with a superior finish and exquisite embellishments. The resulting furniture exudes style and sophistication with custom mirrors, beautiful display shelving and lighting.
The countertops are made from a classic black quartz stone from local Surrey firm Elliott Stone Works. The hand finished double ogee waterfall edge looks stunning.
Handcrafted in oak wood, the bar front has a matt chic blue-grey finish with enhanced elegant, raised beading and an antique brass heavy duty foot rail. The back bar furniture features a stainless-steel sink, drainer, storage and undercounter appliances. A smaller two-stool bar console table has a clear 6mm safety glass countertop which is easy to maintain and adds reflective sparkle. The TV screen on the wall has been framed and hand painted to match in Farrow & Ball Blackened with brass inlaid strips hand finished with an antique patina.
The built-in back bar and drinks unit combines display shelving and lower storage cupboards and drawers with matt black bar handles. The black quartz stonework under the central mirror is stepped to display bottles and backlit with recessed LED lights. The top cornice is also stepped to match. The unit’s antiqued mirror glass was produced by Rough Old Glass and installed by our cabinetmakers. All the mirrors are framed in real oak richly imbued with a warm cognac brown stain to enhance the grain.
 Vostok Construction
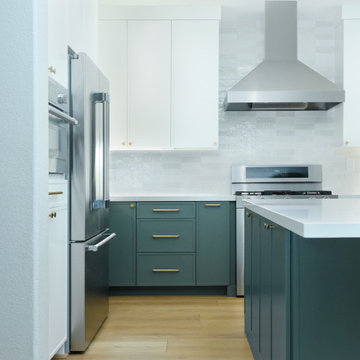
This kitchen remodel took roughly 6 weeks to complete and had a very sleek and contemporary design. The client was overjoyed with the final product!
Example of a kitchen design in Sacramento
Example of a kitchen design in Sacramento
 Vostok Construction
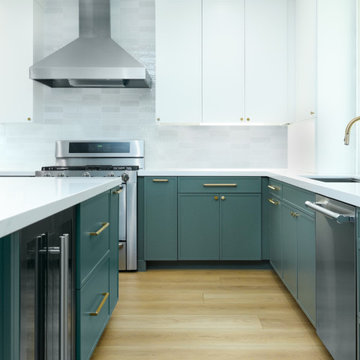
This kitchen remodel took roughly 6 weeks to complete and had a very sleek and contemporary design. The client was overjoyed with the final product!
Kitchen photo in Sacramento
Kitchen photo in Sacramento
 Refresh and Build
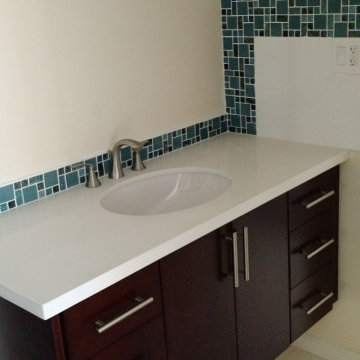
This striking master bathroom remodel in San Mateo was completed in 2016 with a $20,000 investment, delivering a bold, design-forward space built around a stunning custom teal glass mosaic tile feature. The signature cross pattern of mosaic tile running both vertically and horizontally through the shower creates a dramatic focal point that makes this bathroom truly one of a kind.
Key Features:
Custom teal and black glass mosaic tile in a signature cross pattern — floor to ceiling
Large format white subway tile surround — clean backdrop for the mosaic feature
Walk-in shower with linear drain — sleek and modern
Dark slate mosaic shower floor tile — dramatic contrast
Narrow privacy window in shower — natural light without sacrificing privacy
Dark espresso vanity with white quartz countertop and undermount sink
Glass mosaic backsplash behind vanity — cohesive design throughout
Brushed nickel fixtures and hardware throughout
Large format white porcelain floor tile — bright and seamless
Permits — Fully Managed:
All San Mateo building permits pulled and managed by Refresh and Build — rough and final inspections passed first time.
Project Stats:
Investment: $20,000
Location: San Mateo, CA 94401
Building Type: Single Family Home
Project Type: Full master bathroom remodel
Year Completed: 2016
Contractor: Refresh and Build — Licensed CA #1036042
 NeSmith Landscapes
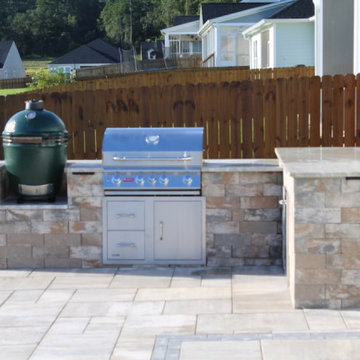
For this paver patio project, we used Belgard’s Dimensions 18 new paver in Napoli color. The patio is roughly 700 sq ft. Belgard’s Melville wall block was used to build the raised planter and outdoor kitchen. We added Belgard’s Moduline paver to elevate the area by adding design to the circle. Truscapes Lighting for the final touch.
 Studioteka Design, LLC
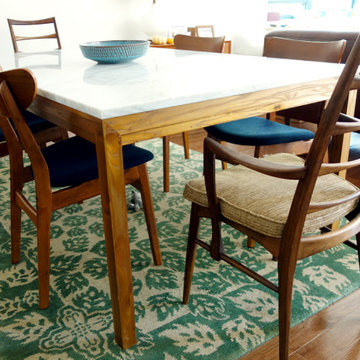
This beautiful, 1,600 SF duplex three-bedroom, two-bath apartment in the heart of the West Village was originally a diamond in the rough with great potential. The coop is located on a quiet, tree-lined street and, as a top floor unit, boasts lovely southern and eastern exposures with views of this charming neighborhood overlooking the Hudson. Our clients were making a big move from the West Coast and wanted the new home to be ready in time for the start of the new school year, so Studioteka’s architecture and interior design team rolled up our sleeves and got to work! Construction documents were prepared for the coop board and NYC Department of Buildings approval and our team coordinated the renovation. The entire unit had new hardwood flooring, moldings, and doors installed, the stairs were gently refinished, and we took down a wall separating the living room from a small den on the lower level, making the living space much more open, light-filled, and inviting. The hot water heater was tucked away in an unused space under the stair landing, allowing for the creation of a new kitchen pantry with additional storage. We gut-renovated the upstairs bathroom, creating a built-in shower niche as well as a brand new Duravit tub, Mirabelle high-efficiency toilet, American Standard matte black fixtures, and a white Strasser Woodenworks vanity with black hardware. Classic white subway tile lines the walls and shower enclosure, while black and white basketweave tile is used on the floor. The matte black towel hooks, toilet roll holder, and towel rod contrast with the white wall tile, and a shower curtain with a delicate black and white pattern completes the room. Finally, new mid-century modern furnishings were combined with existing pieces to create an apartment that is both a joy to come home to and a warm, inviting urban oasis for this family of four.
Sponsored
Columbus, OH

Structural Remodeling
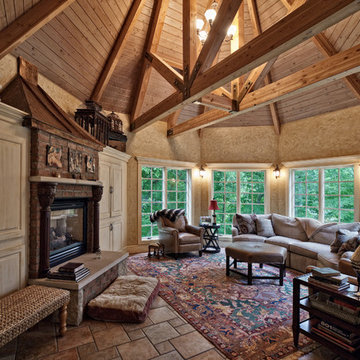
Franklin County's Heavy Timber Specialists | Best of Houzz 2020!
 Tile Doctor Ltd
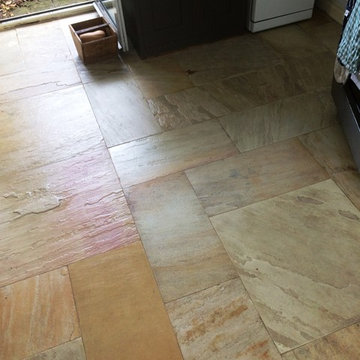
I was recently contacted by a client who had just moved into a house in Crowborough, a town in East Sussex which by the way was once home to Sir Arthur Conan Doyle, the author of the Sherlock Holmes novels and short stories. The riven Slate tiled floor in the kitchen had trapped bits of dirt and also food which had become ingrained in the tile. Needless to say, the new homeowner wanted to give the kitchen floor a thorough clean. However, she had tried every cleaning product she could find in the supermarket, but to no avail. Struggling to find a solution she sought out professional assistance and naturally I was happy to help.
My first task was to mix up a strong solution of Tile Doctor Pro-Clean. The product was only slightly diluted with water, since the floor was quite heavily soiled and a higher concentration of Pro-Clean was needed to help remove several layers of dirt and food waste. Once applied to the floor, the solution was left to dwell for roughly five minutes before I began to work it into the stone with a deck brush. I did the best I could here to clean the floor without using my buffing machine as, since the floor was riven, my black buffing pad would have been ruined by the ridges.
Making up for the lack of a buffing machine, I made sure to scrub the floor with Pro-Clean for several hours to remove as much grime as possible. One the cleaning was finally completed I rinsed the floor several times with clean, hot water. I then used a wet-dry vac machine to remove any excess moisture to clear the floor for sealing when I returned 48 hours later. Upon leaving, I left my client with instructions to avoid spilling anything on the floor as, again, any liquid left on the surface might affect the performance of the sealer.
After a period of two days, I returned to commence the sealing. My choice of sealer was Tile Doctor Seal & Go, which is suitable for use on internal, unsealed surfaces such as Slate, textured Quarry, Victorian tile, and others. Seal and Go is also a water based sealer so you there’s very little smell given off whilst it dries compares to solvent based sealers. In this case, the client did not want the surface of the floor to be too shiny, so I only used two coatings of Seal & Go, whereas for a shinier result I would have used a few more.
My client was exceptionally pleased with the results, which had not only cleaned the floor but brought out the beautiful colours in the stone that had once been hidden under several layers of muck.
 SUPERIOR CHIMNEY SERVICES CORPORATION
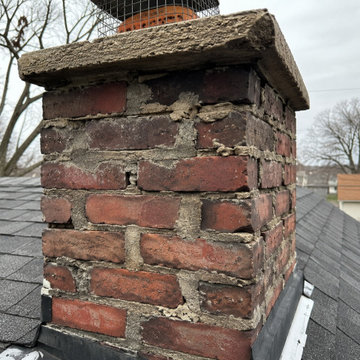
As the temperatures continue to climb, and we finally get a chance to enjoy some warm weather, we start to walk around the neighborhood, or even our own homes, to find that lots of work needs to be done. Whether it be weed picking or changing bulbs in the light fixtures there’s always something that needs to be done. However, there’s one thing that can’t wait for your attention and that’s chimney tuckpointing. Why is it so important? Let’s take a look.
Weather and Tuckpointing, Not a Good Match
You might have guessed that Chicago and Chicagoland’s weather is brutal on masonry. The city and suburbs average around 35 freeze-thaw cycles every single winter. Every time the cycle occurs, it takes a toll on the chimney's mortar joints. When water gets in and temperatures drop, the water freezes & expands as ice with enough force to crack brick and stone. When Spring comes around, what once was a hairline crack, now gets bigger and allows rain to enter into your home.
This is why the yearly chimney inspection is not optional, according to the CSIA (Chimney Safety Institute of America).
A Little Chicago History
Most homes in neighborhoods like Beverly, Oak Park, Evanston and across the North Shore were built between the 1890s and 1950s. The mortar used in that era had a lifespan of roughly 25–30 years under normal conditions. Under Chicago and Chicagoland conditions? It is reduced. Homeowners buying older properties frequently inherit chimneys that haven't been maintained in a very long time.
When the chimney along with the flashing, bricks, chimney cap and chimney crown are not checked and maintained, loss of structural integrity begins. Water working its way through deteriorated joints reaches the interior of the chimney. This is where it can cause damage to the fire liner while it finds its way into the home. In some situations, compromised masonry near the fireplace can create fire safety concerns.
Getting a Chimney Inspection Early Makes All the Difference
The good news is that chimney tuckpointing, diagnosed early, is simply a repair. The bad news is that homeowners who wait too long can turn the issue into a partial rebuild, or a full chimney rebuild. By the time mortar is visibly crumbling from the street, the damage has already progressed deeper into the chimney structure.
A professional inspection every year is the most cost-effective way to keep the chimney and home heathy. It's often the difference between a few hundred dollars and several thousand.
Not All Tuckpointing Is Equal
One thing worth understanding is that proper tuckpointing requires removing the old mortar to a depth of approximately three-quarters of an inch before new mortar can be applied. Anything less and the new mortar won't bond with longevity / correctly. DIY or companies that just smear new mortar over old joints are doing what's sometimes called "skim coating," and it's essentially cosmetic work that won't hold up.
The type of mortar mix matters too. More modern cement mortars are actually harder than historic brick, which causes the brick itself to absorb, stress and crack rather than the mortar joint. A knowledgeable mason from Superior Chimney will match mortar composition to the brick, only something a real expert can get right.
Contact Superior Chimney today to get a chimney inspection which includes inspecting the exterior chimney today at 877-244-6349.
 Hull Historical
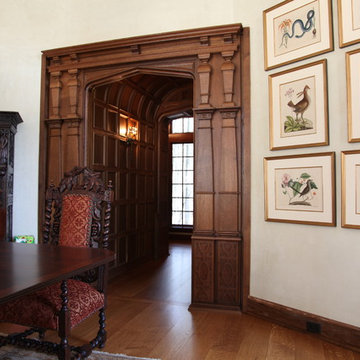
My clients had always been inspired by the grand Tudor Revival homes of the early 20th century and commissioned Hull Historical to recreate the authentic custom millwork, paneling and doors for their new Tudor Revival home. Our inspiration came from 2 great English homes, Stan Hywett, a great Tudor Revival home in Ohio, built for the founder of Goodyear Tires. Also, the Woodbine Mansion, built in 1911 for the son of the Pabst Brewing Company. We were fortunate to purchase three rooms of architectural millwork from the woodbine home, which was originally fabricated by the Huber Company of New York. Upon completion of this project, the architectural salvage comprised 15% of the final quantity of paneling installed. The remainder was custom fabricated by Hull Historical at our shop in Fort Worth, TX and installed at the clients home.
The commission, based on historic precedent, constituted antique paneling on the main floor, beamed ceilings and all the doors in the home. The new paneling, including the kitchen cabinetry is made from a combination of new quarter-sawn white oak and antique white oak salvaged from old barns and buildings. All the oak was fumed in an ammonia-filled chamber to produce a cocoa color and deep feel giving the millwork rough character and a timeless look that my client loved.
The millwork also served to give the home a hierarchy, with simple paneling combined with board and batten doors downstairs, then more ornate paneling, with carvings on the main floor. Additionally, the main floor features mostly 8 and 10 panel doors. All woodwork was hand-pegged with oak pegs. Some of the paneling features a unique Mason’s Miter, a historic joinery technique inspired from stone work.
For more information on residential renovation and new construction projects by Hull Historical, visit http://brenthullcompanies.com/residential.html
 Refresh and Build
Full Bathroom Remodel — Hayes Valley, San Francisco CA (2018)
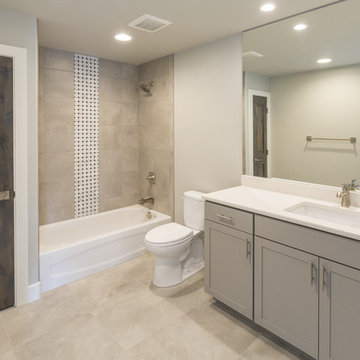
This complete bathroom remodel in Hayes Valley, San Francisco transformed an outdated condo bathroom into a modern, spa-inspired space in just 6 weeks. With a $25,000 investment, this like-for-like San Francisco bathroom renovation delivered premium finishes, custom craftsmanship and a full permit process — all managed by Refresh and Build.
San Francisco Condo Bathroom Remodel — Key Features:
Custom grey shaker vanity with white quartz countertop
Large format porcelain floor and wall tile — timeless and durable
Stunning mosaic accent strip in the shower — a signature San Francisco design detail
Full tub and shower surround with premium tile work
New toilet and brushed nickel fixtures throughout
Recessed LED lighting — bright, energy efficient and modern
Custom dark stained solid wood door — bold contrast against the neutral palette
Full mirror wall — maximizing light and space in a San Francisco condo
San Francisco Permits — Fully Managed:
All San Francisco building permits pulled and managed by Refresh and Build — including rough and final inspections — all passed first time. We navigate the San Francisco Department of Building Inspection so you don't have to.
Project Stats:
Duration: 6 weeks
Investment: $25,000
Location: Hayes Valley, San Francisco CA 94102
Building Type: San Francisco Condominium
Project Type: Like-for-like bathroom remodel
Year Completed: 2018
Contractor: Refresh and Build — Licensed CA #1036042
 Tile Doctor Ltd
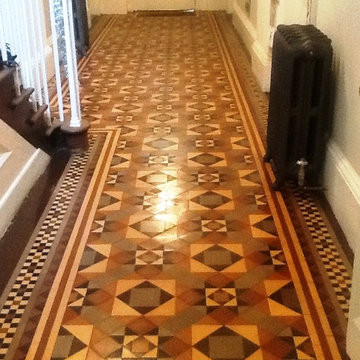
This hallway floor was actually at a house in the town of Stamford which is just over the northern border of Northamptonshire and slightly out of my area; however I was recommended to the owner by another client which is always welcome and a testimonial in itself. I work right across the county so it wasn’t long before I was in the general area and arranged a visit to carry out an inspection of the Victorian Quarry tiled floor and provide a quote for a full restoration.
The owner of the house had just moved in recently and although the floor was in good overall physical, it was in need of a thorough clean and new seal to bring back some life to the tiles. Additionally she was having lots of other building work done to the house and she wanted to retain this as an original feature of the property. My quote was accepted and I was able to book the work in for the following week.
These first photos show how dull the floor looked due to a build-up of builder’s dust and general wear and tear. They also show some of the equipment needed to undertake the following cleaning process.
I used a brush and vacuum to remove as much loose debris and dust from the surface of the floor as possible. I then applied a strong dilution of Tile Doctor Pro Clean to the floor which is a strong alkaline cleaner which can also be used to remove sealers; the solution was left it to dwell for roughly ten minutes before agitating it with scrubbing pads and brushes to remove the muck that was lifted to the surface. This was then wet-vacuumed twice to remove all the slurry and neutralise any chemicals.
As it was such an old property I then used a steamer to heat up the tiles and draw up any contaminants and assist with the drying process. I also chose to install two fans and a dehumidifier to dry the floor even further.
With the cleaning process complete – and achieving a marked difference to the appearance of the floor – I left the tiles to finish drying for 24 hours.
Upon my return to the house, I checked for any excess moisture by running damp tests as this has the potential to affect the performance of the sealer. Once satisfied with the results, I sealed the floor with two coats of Tile Doctor Colour Grow, a colour enhancing sealant which offers both a robust surface seal and an aesthetically pleasing finish.
I also carried out water repellency tests to ensure the sealer was working as expected and the floor had sufficient protection and will be hard-wearing for a hallway which is a high traffic area.
On my client’s return to the house she was very happy with the final results – in fact, she was also in contact about some further work in the New Year!
Phil Vissian
Northamptonshire Tile Doctor
 John Rogers Design
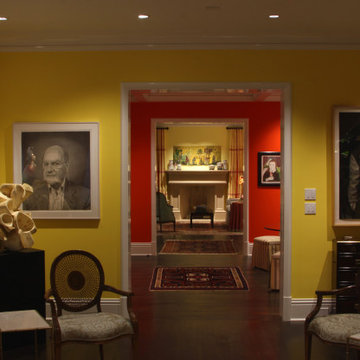
This home is located in an area of Little Rock we call the upper heights by the Little Rock Country Club.
What was difficult about this project, was it had been under construction for one year. The house roof was installed and the rough-in framing almost complete.
On a nice spring day, I just happened to see the builder Jack Hartsell in the front yard. We have worked together on several projects and I inquired as to the status of the interior lighting design. Jack informed me the lighting plans had not been finalized. Jack gave me the architectural firm's name, Lindsey Yeary Architects in Little Rock. I have worked with the firm before but not with this architect, Carolyn Lindsey.
We met and she introduced me to the owner who has a vast art collection that they rotate. In review of my lighting design portfolio with my focus on art lighting I was hired.
Now the lighting design became the project priority. The builder was a month away from needing recessed can lighting housings and I had to produce the lighting plans, with lighting specifications, in two weeks.
I met their schedule, lighting was ordered.
To accent art, furnishings and architectural features, the recessed lighting distance placement from the wall is critical. All good lighting designers show in their lighting plans the recessed cans measurements from the walls. This helps the electricians know exactly where to place the art accent lighting.
Once the house is completed, the recessed cans cannot be relocated without creating a mess and extra cost.
I worked with the architect to re-layout the dining room coffered ceiling placement in order to place the lighting according to my lighting plan. All the recessed cans featured ceiling trims with a four inch diameter opening, rotated 360 degrees and a forty-five degree vertical adjustability. Recessed can fixtures must have the ability to adjust. it is the key to accent lighting.
This was the typical lighting approach for all the rooms in the house with art.
Credits:
Client: DES Rogers , AR Contracted JRD
https://www.des3s.com/
Architects : Yeary Lindsey Architects Little Rock, Ar
https://www.yearylindsey.com
Builder: Jack Hartsell Constuction Little Rock, AR
Electrician: Jacobs Electric & Communications LLC
Little Rock, AR
 Studioteka Design, LLC
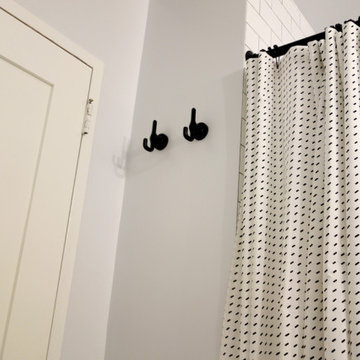
This beautiful, 1,600 SF duplex three-bedroom, two-bath apartment in the heart of the West Village was originally a diamond in the rough with great potential. The coop is located on a quiet, tree-lined street and, as a top floor unit, boasts lovely southern and eastern exposures with views of this charming neighborhood overlooking the Hudson. Our clients were making a big move from the West Coast and wanted the new home to be ready in time for the start of the new school year, so Studioteka’s architecture and interior design team rolled up our sleeves and got to work! Construction documents were prepared for the coop board and NYC Department of Buildings approval and our team coordinated the renovation. The entire unit had new hardwood flooring, moldings, and doors installed, the stairs were gently refinished, and we took down a wall separating the living room from a small den on the lower level, making the living space much more open, light-filled, and inviting. The hot water heater was tucked away in an unused space under the stair landing, allowing for the creation of a new kitchen pantry with additional storage. We gut-renovated the upstairs bathroom, creating a built-in shower niche as well as a brand new Duravit tub, Mirabelle high-efficiency toilet, American Standard matte black fixtures, and a white Strasser Woodenworks vanity with black hardware. Classic white subway tile lines the walls and shower enclosure, while black and white basketweave tile is used on the floor. The matte black towel hooks, toilet roll holder, and towel rod contrast with the white wall tile, and a shower curtain with a delicate black and white pattern completes the room. Finally, new mid-century modern furnishings were combined with existing pieces to create an apartment that is both a joy to come home to and a warm, inviting urban oasis for this family of four.
17