
Search results for "Gallon" in Home Design Ideas
 Steve Masley Consulting and Design
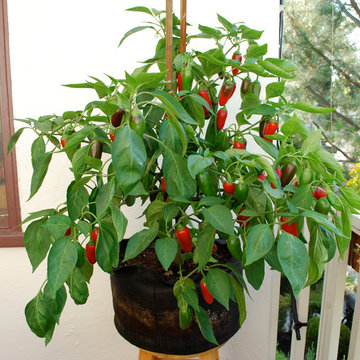
Jalapeño grown organically in a 7-gallon Smart Pot. This plant produced 69 jalapeños! Photo by Steve Masley
Example of an eclectic home design design in San Francisco
Example of an eclectic home design design in San Francisco


Find the right local pro for your project

 CCS ARCHITECTURE
Photovoltaic panels generate all the home’s electricity, sending surplus energy back to the grid. All the home’s systems—hot water, HVAC, and radiant heating—are integrated, electric-based, and powered by the PV panels on the roof. The only use of natural gas is at the cooking range, which draws from a 50-gallon propane tank. With the exception of the propane tank, the home is net-zero in terms of its energy consumption. Photographer: Matthew Millman

 Reier Construction
The white farmhouse sink is so perfect for this house. And the quartz compliments the gray cabinet with its flecks of black and gray.
Kitchen - mid-sized craftsman galley kitchen idea in Seattle with a farmhouse sink, shaker cabinets, gray cabinets, quartzite countertops, white backsplash, subway tile backsplash, white appliances and no island
Kitchen - mid-sized craftsman galley kitchen idea in Seattle with a farmhouse sink, shaker cabinets, gray cabinets, quartzite countertops, white backsplash, subway tile backsplash, white appliances and no island


 Home & Garden Design, Atlanta - Danna Cain, ASLA
Raised beds hold organic garden soil mix that ranges from 8" - 2' deep. Here you see a late winter, very early spring view of this salad garden in metro Atlanta. Various types of lettuce, kale, parsley, and chives are accented by pansies which have edible flowers. After our frost date, most of this will be removed. Tomatoes will be planted in the center where the soil is deepest. Basil and mesclun will be planted around.
THIS PHOTO HAS BEEN FEATURED TWICE IN A HOUZZ EDITORIAL LINK! Here is the link!
EDIBLE GARDENING ESSENTIALS - WATERING ITPS IDEAS WORTH SOAKING UP - https://www.houzz.com/ideabooks/27368798/list/edible-gardening-essentials-watering-tips-worth-soaking-up
Photographer: Danna Cain, Home & Garden Design, Inc.


 Yellowstone Traditions
MillerRoodell Architects // Benjamin Benschneider Photography
Bathroom - small rustic bathroom idea with a drop-in sink, beige cabinets and beige walls
Bathroom - small rustic bathroom idea with a drop-in sink, beige cabinets and beige walls

 Living Gardens Landscape Design
custom potting bench
Photo of a small contemporary partial sun backyard brick landscaping in Orange County.
Photo of a small contemporary partial sun backyard brick landscaping in Orange County.

 Van Nice Design
2014 Home Show Expo. Ground Breaker Homes, builder with interior design work by Van Nice Design. Cameron Sadeghpour Photography.
Inspiration for a mid-sized contemporary single-wall carpeted utility room remodel with an undermount sink, raised-panel cabinets, gray cabinets, quartz countertops, a stacked washer/dryer and brown walls
Inspiration for a mid-sized contemporary single-wall carpeted utility room remodel with an undermount sink, raised-panel cabinets, gray cabinets, quartz countertops, a stacked washer/dryer and brown walls

 Manou Design Group
Jeremy Fukunaga
Great room - contemporary medium tone wood floor great room idea in San Francisco
Great room - contemporary medium tone wood floor great room idea in San Francisco


 User
UserOpen concept kitchen - large transitional dark wood floor open concept kitchen idea in Kansas City with white cabinets, stainless steel appliances, two islands, flat-panel cabinets and beige backsplash

 Good Earth Water Gardens
4,000 gallon per hour pondless waterfall with 10' stream.
Inspiration for a small asian full sun backyard gravel water fountain landscape in Kansas City for spring.
Inspiration for a small asian full sun backyard gravel water fountain landscape in Kansas City for spring.



9