
Search results for "Increase discovering" in Home Design Ideas
 Middlefork Luxury Home Builders
Rising amidst the grand homes of North Howe Street, this stately house has more than 6,600 SF. In total, the home has seven bedrooms, six full bathrooms and three powder rooms. Designed with an extra-wide floor plan (21'-2"), achieved through side-yard relief, and an attached garage achieved through rear-yard relief, it is a truly unique home in a truly stunning environment.
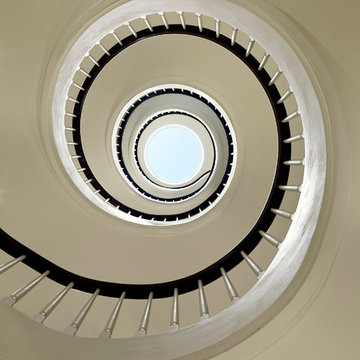
The centerpiece of the home is its dramatic, 11-foot-diameter circular stair that ascends four floors from the lower level to the roof decks where panoramic windows (and views) infuse the staircase and lower levels with natural light. Public areas include classically-proportioned living and dining rooms, designed in an open-plan concept with architectural distinction enabling them to function individually. A gourmet, eat-in kitchen opens to the home's great room and rear gardens and is connected via its own staircase to the lower level family room, mud room and attached 2-1/2 car, heated garage.
The second floor is a dedicated master floor, accessed by the main stair or the home's elevator. Features include a groin-vaulted ceiling; attached sun-room; private balcony; lavishly appointed master bath; tremendous closet space, including a 120 SF walk-in closet, and; an en-suite office. Four family bedrooms and three bathrooms are located on the third floor.
This home was sold early in its construction process.
Nathan Kirkman
 Renewal by Andersen of NJ-NY Metro
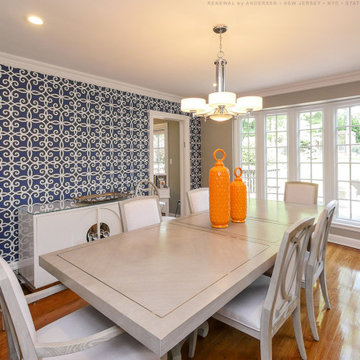
Sensational dining room with new bow window we installed. This chic dining room with wood floors, modern decor and an eye-catching accent wall looks fantastic with a large new bow window overlooking a beautiful yard. Discover all the amazing windows and doors we offer at Renewal by Andersen New Jersey, New York City, Staten Island and the Bronx.
. . . . . . . . . .
Increase the value and improve the look of your home with new windows -- Contact us today: (844) 245-2799

 Precision Roofing, Inc.
This roof was 10 yrs old with new plywood at the time of original install. The contractor at that time did not take the time to evaluate why the plywood was such bad shape and installed new plywood into the same condition that deteriorated the original plywood.
During our initial evaluation we discovered the shingles were in great shape, but there was a lack of proper ventilation and not enough insulation in the attic. With this combination, there was a consistent presence of moisture due to condensation. Year after year this condensation destroys the glue of the plywood and the shingles and plywood can sag between the roof rafters. With the added weight of the moisture and 2-1/2' of snow, the roof rafters cracked. Increase cost of fuel needed to heat the home and the additional electrical usage to cool the home has now been reduced. Throw in the GAF Golden Pledge Warranty and they now have to best performing and protected roof for years to come.
Find the right local pro for your project

 Richard Morris Architecture, LLC
A one story dog trot connected the two original sections of the house. Since the client wanted to make the house as user friendly as possible, our firm designed a one and a half story connector to join the upper floors. In the new space I created a full bath and storage areas for the three bedrooms and improved egress that was not adequate before. The entry stoop was replaced with a full porch. To keep the roof from growing too steep, the porch was recessed into the structure, which in turn increased the porch's depth and made it usable. We also shifted the entry door to the right instead of the middle like it was originally. The columns were milled out of Fir and then chamfered to copy an original porch post that had been discovered during demolition. A standing seam metal roof was installed on the entire original house and new additions. Concrete siding and composite materials were used to mimic the original exterior trim.
Since this project is being done in phases, wooden steps will be built to coincide with the location of the door and period horizontal rails will be added.
 SunPower Builders
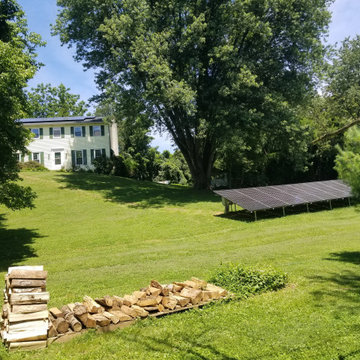
Trees and slopes, oh my! Discover how we designed an effective solar system on this shaded and rolling property that not only exceeds production estimates but maintains the aesthetics and beauty of this gorgeous home and landscape.
We work hard to get our customers what they want. This project required 44 modules. The roof area was constrained by trees, and the ground was constrained by a steep slope, property line setbacks. Additionally, we did not want to interrupt the views from the house across this lovely country property and into the woods.
Our solution, split the system up by using approx. 1/3rd of the modules on the roof with microinverters (due to shade possibilities), and the remaining 2/3rds on the ground. We kept the ground array at a low slope* to better conceal it from view. It was remarkably successful and has been exceeding production estimates.
*Tilt or slope of an array is not nearly as critical as orientation. 42*, roughly equal to our latitude, is good for a better average monthly production. A steeper slope will give you increased winter production, and a lower slope will give you greater summer production, which is really the best choice.
Why? The ideal angle of incidence at which the sun hits a module is 90*. At our latitude, on winter solstice Dec.21st, the sun is roughly 22.5* degrees above the horizon. At summer solstice it is approximately 70* above the horizon. Therefore, when the days are longer in the summer, a lower sloped array will be closer to 90* to the sun, and since the days are longer, the collection time is greatly increased.

 Martins Construction
Multiuse home gym - contemporary blue floor multiuse home gym idea in Los Angeles

 TOC design & construction inc.
DESIGNED BY TOC design
CONSTRUCTION BY TOC design & Construction inc.
PHOTOS BY : Tania Scardellato
I was fortunate to have a young family approach me in desperate need to renovate there only 3 piece bathroom. This space was In dire need of a remodel, with old brown wall to wall tiles and a dated bulky yellow brown single sink vanity.
Storage was a must, lighting a necessity, and proper accessibility to the shower bath area.
We had a tight budget to respect, but a full gut of this bathroom was required. And a good thing too, once we started doing the demolition we noticed that mildew and rotting floors and walls had accumulated throughout the years. Doing it right the first time is no joke when dealing with water and electrical issues.
We discarded all reminisce of old and built from scratch, new walls, new plumbing, new electrical ,new insulation and a new window, a new fan that actually exhausted outside ( I say this laughing as you would be amazed at how many fans are installed but don’t exhaust outside, and you the client would never know unless you go inside the attic space.
Once all the hard stuff was done, the rest is just a matter of smart design. If you have a small bathroom here are some tips to guide you.
10 tips for making a small bathroom feel larger
Is your tiny bathroom cramping your functionality and style, leaving you longing for the enormous bathrooms gracing the pages of design magazines? Even if your bathroom is a fraction of the size, all it takes is some design savvy to make the most of the space you have. Consider these 10 smart tips that will help your bathroom look, feel and function like those larger contenders.
1-Get creative with corners
Space is at a premium in small bathrooms, so it's important to maximize every inch. Corners, for example, provide extra space for shelving, storage units and even hooks. Get creative and install unique design solutions that are not only functional, but also eye-catching. If you love the airiness of floating cabinets, add baskets or decorative boxes under for extra storage. If you are installing floating cabinets insure that they are installed securely to studs or plywood at wall.
2- Let solid colors shine
Busy patterns have a shrinking effect and make small bathrooms seem even smaller. Conversely, light natural hues make a space feel more open. If you're itching to get creative with design, experiment with textures but keep overpowering patterns to a minimum. Tone on tone is the best to achieve this.
3 - Maximize your bathtub
A bathtub takes up a significant portion of the room, but modern, compact options with curved basins, can make the tub feel larger when in use, all while conserving space.
4 - Select a smaller faucet
A faucet is jewelry for the bathroom. And just as accessories can overpower an outfit, a big bulky faucet isn't flattering in a small bath. Single-handle designs conserve counter space, while a wall-mount installation frees it up all together and can create quite the wow-factor, if the budget can accommodate the required changes to plumbing behind the wall.
5 - Make vanity storage simple
If you're in a storage war with your small bathroom, you're not alone in the battle. Toiletries and personal supplies without a place to call home only add clutter and chaos. Store smart with a space-saving vanity, the dual sink vanity shown here, looks quite simple, but in reality it has 4 sets of full extension drawers, and the vanity tower adds extra storage without overpowering the use of space.
6 - Show off the shower
Shower curtains may be pretty, but they interrupt the visual flow of a bathing space and make it feel significantly smaller. In bathrooms with small footprints, opt for a clear glass sliding shower door that doesn't require the clearance of one with a hinged design. Or as shown in this design and for fraction less expensive a half hinged panel installed on a fixed tempered glass panel. If you're embarking on a big remodel, create the illusion of more space by using same tile in the shower that's used throughout; instead of seeing them as two separate zones, the eye will read them as one.
7 - Discover the treasure of hidden storage
Work with a contractor, and you just might find some serious storage potential hidden behind your walls. Whether it's utilizing space between the studs for shallow shelving or a creating a small linen closet by annexing space from an adjacent room, even small additions can make a big difference.
8 - Focal Point
Tile is a beautiful, durable addition to any bathroom. For dainty spaces, consider installing tile at a diagonal to accentuate the focal point or as in this bathroom I used an oversized textured pattern to bring depth to the space at the window wall.
9 - Choose the right lights
Strategically install light to reflect and brighten a small bathroom to make it appear larger. Recessed lighting is an affordable solution for tiny rooms, offering ample light while taking up little space. Wall sconces alongside a mirror also reflect off the walls and make a room feel bright and airy. I always recommend going with LED lighting at 2800 to 3000K.
10 – Accessorize
This is your time to shine in your decorating skills, have fun with your towels, you can change the color scheme daily just by adding pops of color in your accessories, make sure to get items that serve a dual purpose, like baskets, boxes they can always be used as hampers, storing of towels and even a nice display for your guest.


 Progressive Design Build
Here in Florida, we’re blessed with great weather year-round. So it’s no surprise that outdoor entertaining areas are an extremely popular way to enhance outdoor living. When our clients requested an update to their existing outdoor kitchen while they were away on vacation, we were ready to hit the ground running. While their beautiful 2-story home on a golf course had a pool and covered lanai area, the existing outdoor kitchen just didn’t function well for their needs. Mainly, they craved additional counter space and more seating. And, as avid football fans, with a son playing on a renown Division 1 college team, they also wanted a large screen TV to watch games. After all, what better way to share game day excitement than at a barbecue with family and friends?
A Bigger, Better Kitchen Layout
Our brilliant design team came up with a much larger, u-shaped outdoor kitchen layout for increased functionality. The extra base cabinets provided plenty of storage as well as a foundation for additional countertop space. Adjacent to the sink, we added a 24” outdoor refrigerator to keep food and beverages chilled, and the high top bar allowed for more seating around the perimeter.
For cooking, our clients selected a much larger Lynx grill and side burner to replace the original grill. While the kitchen was already set up for a grilling area, it required a hood, so we built and installed a custom hood for proper ventilation. Then, we added a large screen TV above the hood for easy viewing.
Finishing Touches
To softly illuminate the entire space at night, we installed additional recessed light fixtures into the ceiling and under the grill hood. We also tied the Cypress wood ceiling and the crown molding together into the design with a luxurious cabinet stain. Along with these finishing touches, we added a decorative travertine stone backsplash behind the grill and homogenized the front face of the bar for a polished, matching look.
Ventilation Challenges
With the outdoor kitchen lanai located directly under a second-floor living area, we had expected to tuck away ventilation ductwork between the second-level floor joists and the exterior wall running parallel to the grill hood. However, upon further investigation, we discovered the second floor joist system, in fact, ran perpendicular to the grill hood. In short, we needed a new way to hide the venting without compromising the original design.
Our team came up with an inspired solution: Construction of a false wall behind the outdoor kitchen allowed us to run ductwork without creating a visible chase for the vent, thus maintaining a symmetrical look on both sides of the grill and decorative hood.
Exceeding Expectations
In the end, we didn’t just meet our clients’ needs for a beautiful outdoor kitchen update – we exceeded them. As planned, we completed the new outdoor kitchen while they were out of town. But when our clients returned from vacation, they were so impressed with the results (and the stress-free design/build experience) that they promptly hired us for another extensive remodel – a stunning home addition!

 IQ Glass UK
 | Small Glass Box Extension in London
Small modern beige one-story glass exterior home idea in London
Small modern beige one-story glass exterior home idea in London

 Katie Hutchison Studio
After returning from a winter trip to discover his house had been flooded by a burst second-floor pipe, this homeowner was ready to address the renovations and additions that he had been pondering for about a decade. It was important to him to respect the original character of the c. +/- 1910 two-bedroom small home that had been in his family for years, while re-imagining the kitchen and flow.
In response, KHS proposed a one-story addition, recalling an enclosed porch, which springs from the front roof line and then wraps the house to the north. An informal front dining space, complete with built-in banquette, occupies the east end of the addition behind large double-hung windows sized to match those on the original house, and a new kitchen occupies the west end of the addition behind smaller casement windows at counter height. New French doors to the rear allow the owner greater access to an outdoor room edged by the house to the east, the existing one-car garage to the south, and a rear rock wall to the west. Much of the lot to the north was left open for the owner’s annual summer volley ball party.
The first-floor was then reconfigured, capturing additional interior space from a recessed porch on the rear, to create a rear mudroom entrance hall, full bath, and den, which could someday function as a third bedroom if needed. Upstairs, a rear shed dormer was extended to the north and east so that head room could be increased, rendering more of the owner’s office/second bedroom usable. Windows and doors were relocated as necessary to better serve the new plan and to capture more daylight.
Having expanded from its original 1100 square feet to approximately 1700 square feet, it’s still a small, sweet house – only freshly updated, and with a hint of porchiness.
Photos by Katie Hutchison

 Travis Mark Photography
Travis Mark
Inspiration for a contemporary straight staircase remodel in New York
Inspiration for a contemporary straight staircase remodel in New York

 Vision Interiors
The focal point of the kitchen is the blue subway tiles on the range wall. Having only one wall of backsplash allowed for a bit more fun with tile without any worry of getting too much color or becoming too busy. The shiplap on the window wall adds a nice texture and detail to the space. Shutters painted in the wall color rather stand out against the white trim.
Photographer: Ashley Avila Photography
Interior Design: Vision Interiors by Visbeen
Builder: Joel Peterson Homes
 Progressive Design Build
Here in Florida, we’re blessed with great weather year-round. So it’s no surprise that outdoor entertaining areas are an extremely popular way to enhance outdoor living. When our clients requested an update to their existing outdoor kitchen while they were away on vacation, we were ready to hit the ground running. While their beautiful 2-story home on a golf course had a pool and covered lanai area, the existing outdoor kitchen just didn’t function well for their needs. Mainly, they craved additional counter space and more seating. And, as avid football fans, with a son playing on a renown Division 1 college team, they also wanted a large screen TV to watch games. After all, what better way to share game day excitement than at a barbecue with family and friends?
A Bigger, Better Kitchen Layout
Our brilliant design team came up with a much larger, u-shaped outdoor kitchen layout for increased functionality. The extra base cabinets provided plenty of storage as well as a foundation for additional countertop space. Adjacent to the sink, we added a 24” outdoor refrigerator to keep food and beverages chilled, and the high top bar allowed for more seating around the perimeter.
For cooking, our clients selected a much larger Lynx grill and side burner to replace the original grill. While the kitchen was already set up for a grilling area, it required a hood, so we built and installed a custom hood for proper ventilation. Then, we added a large screen TV above the hood for easy viewing.
Finishing Touches
To softly illuminate the entire space at night, we installed additional recessed light fixtures into the ceiling and under the grill hood. We also tied the Cypress wood ceiling and the crown molding together into the design with a luxurious cabinet stain. Along with these finishing touches, we added a decorative travertine stone backsplash behind the grill and homogenized the front face of the bar for a polished, matching look.
Ventilation Challenges
With the outdoor kitchen lanai located directly under a second-floor living area, we had expected to tuck away ventilation ductwork between the second-level floor joists and the exterior wall running parallel to the grill hood. However, upon further investigation, we discovered the second floor joist system, in fact, ran perpendicular to the grill hood. In short, we needed a new way to hide the venting without compromising the original design.
Our team came up with an inspired solution: Construction of a false wall behind the outdoor kitchen allowed us to run ductwork without creating a visible chase for the vent, thus maintaining a symmetrical look on both sides of the grill and decorative hood.
Exceeding Expectations
In the end, we didn’t just meet our clients’ needs for a beautiful outdoor kitchen update – we exceeded them. As planned, we completed the new outdoor kitchen while they were out of town. But when our clients returned from vacation, they were so impressed with the results (and the stress-free design/build experience) that they promptly hired us for another extensive remodel – a stunning home addition!

 Distinctive Landscaping
Susan Teare
Inspiration for a mid-sized rustic partial sun backyard garden path in Burlington with decking for summer.
Inspiration for a mid-sized rustic partial sun backyard garden path in Burlington with decking for summer.

 LaurelRock
Neil Landino. Design Credit: Steven Stimson Associates
This is an example of a contemporary landscaping in New York.
This is an example of a contemporary landscaping in New York.
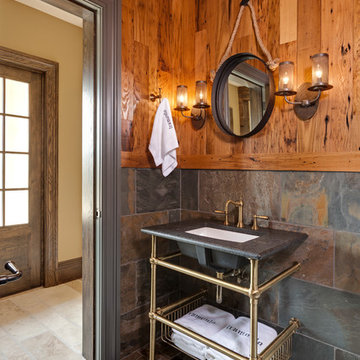
 Manomin Resawn Timbers
Reclaimed Wormy Chestnut Paneling from Manomin Resawn Timbers covers the walls of this rustic powder room, showing off deep brown and red hues that range from honeyed to dark and moody. The distinct channels and grooves left behind by the worms that followed the Chestnut Blight of 1904 give this rare wood its unmistakable character, pairing beautifully with the slate tile and brass fixtures below and the exposed timber beam overhead.
Very rare and wonderfully unique, this antique wood gets its name from the wormholes left behind before the blight nearly wiped out the American Chestnut tree, making it increasingly difficult to find today. Through our detailed process of denailing, kiln drying, and precision milling, we preserve those distinctive channels and grooves while preparing the wood for a prominent place in a modern home.
Whether you are a homebuilder, a home remodeling contractor, or a homeowner shopping for paneling with real rarity and history, Manomin Resawn Timbers has stunning reclaimed wood to suit your needs. Visit our showroom in Hugo, MN or reach out to us with a call or a message to discover the antique charm of reclaimed wood.
-- Landmark Photography

 Lisa Tharp Design
Governor's House Entry by Lisa Tharp. 2019 Bulfinch Award - Interior Design. Photo by Michael J. Lee
Transitional painted wood floor foyer photo with white walls and a black front door
Transitional painted wood floor foyer photo with white walls and a black front door


 Pool & Hot Tub Alliance
The transitional modern home was designed with large amount of glass opening into the courtyard, creating an indoor-outdoor feel, and a visual connection among the spaces that could not be ignored. The neighboring wall, however, was not only rather imposing, but also of a style completely disconnected from our clients home. Our goal was to create a layering effect, with features of varying heights, both to add depth and dimension to the space, and to take the focus of the viewer off of the neighbors wall. Many designers would have squared off the pool, with the thought of maximizing the size of the pool in this small space. Our designer felt it more important to incorporate a graceful curve on the back of the pool. The small amount of square footage lost in the water area was more than regained in the visual interest added to the space. By creating a raised stucco wall on this curve, anchored by a simple sheer descent waterfall, the eye is drawn down the length of this petite pool. Separated by a simple bed of Horsetail Reed, the main feature wall, clad in deep plum stucco, includes three vertical windows, with LED up-lighting. Leaving these windows open on the top, increases the feel of height in the space. The final step in the layering effect is the planting space behind the plum wall. Banana trees were selected here, for their deep green color, and for the large, simple texture of their leaves. The main outdoor seating area is situated just outside the master suite, and is separated from the pool by a Leuder limestone fire pit. The floating stepper pads adjacent the fire pit serve the multiple functions of a walkway, a poolside table for beverages, and as seating near the fire. The tempered glass fire surround was added after the fact, when the client discovered the courtyard was a bit of a wind tunnel, and found the fire a bit uncontrollable. This simple addition, solved the problem, and pleased the client visually, as well.
3