
Search results for "Mistake">mistake" in Home Design Ideas
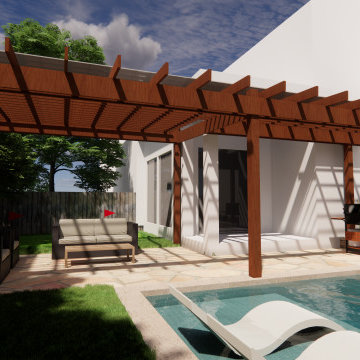
 Cosmic Design Studio
There are several advantages for homeowners to see 3D renderings of their pool outdoor projects before construction begins. Here are some of the key benefits:
Visualization: 3D renderings provide homeowners with a realistic visualization of their pool design. They can see how the design will look in their outdoor space from various angles, which helps them make informed decisions about the design.
Design Changes: If homeowners want to make changes to the pool design, 3D renderings make it easy to see how those changes will look in the final product. They can make adjustments to the design and see the results in real time, which saves time and money in the long run.
Cost-Efficiency: 3D renderings can help homeowners save money on their pool projects. They can make design changes before construction begins, which can prevent costly mistakes and delays.
Planning: 3D renderings allow homeowners to plan their outdoor space more efficiently. They can see how the pool design interacts with their landscaping, patio, and other outdoor features. This helps them plan the layout of their outdoor space and make informed decisions about other outdoor features.
Peace of Mind: 3D renderings provide homeowners with peace of mind. They can see the final product before construction begins, which reduces stress and anxiety about the project.
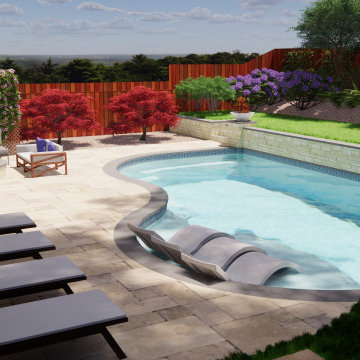 Cosmic Design Studio
There are several advantages for homeowners to see 3D renderings of their pool outdoor projects before construction begins. Here are some of the key benefits:
Visualization: 3D renderings provide homeowners with a realistic visualization of their pool design. They can see how the design will look in their outdoor space from various angles, which helps them make informed decisions about the design.
Design Changes: If homeowners want to make changes to the pool design, 3D renderings make it easy to see how those changes will look in the final product. They can make adjustments to the design and see the results in real time, which saves time and money in the long run.
Cost-Efficiency: 3D renderings can help homeowners save money on their pool projects. They can make design changes before construction begins, which can prevent costly mistakes and delays.
Planning: 3D renderings allow homeowners to plan their outdoor space more efficiently. They can see how the pool design interacts with their landscaping, patio, and other outdoor features. This helps them plan the layout of their outdoor space and make informed decisions about other outdoor features.
Peace of Mind: 3D renderings provide homeowners with peace of mind. They can see the final product before construction begins, which reduces stress and anxiety about the project.

Find the right local pro for your project

 Katie Hutchison Studio
With two small children and a third on the way, the owners of an original eighteenth century Cape were quickly out-growing it, but they had no desire to move away from the Cape Cod home and location they loved. They simply needed a reconfigured layout and more space. Their goals included repurposing some existing rooms, adding a new kitchen/family area plus screen porch on the first level, and creating a master suite and roof deck with an outdoor shower on the second level, connected by a new stair.
Our challenge was to improve the flow between existing spaces, and design the two-story addition without overwhelming the pint-sized original Cape. We took advantage of the lower grade at the rear of the property to step the first floor of the addition down two steps from the existing main level. This allowed us to align the second floor in the addition with the existing second floor, while gaining ceiling height in the new first-floor kitchen/family area. We composed a cross-gabled form for the addition to improve the second floor headroom, while maintaining the existing eave line. We then extended some existing shed dormers to gain headroom and enhance function. We also expanded the outdoor living area with privacy walls along the roof deck.
New, larger, double–hung windows that match the lite configuration of the existing windows, along with new side-wall shingles and trim which resemble the existing exterior treatment help to tie the new addition to the old Cape. Though there’s no mistaking the new for the old, the two are simpatico.
Katie Hutchison Studio collaborated with Geoffrey Koper Architect of Yarmouth Port, Mass. on the Yarmouth Port Antique Cape Renovation and Addition. Kitchen fit-out and interior finishes, fixtures, and furnishings by others.
photo by Katie Hutchison
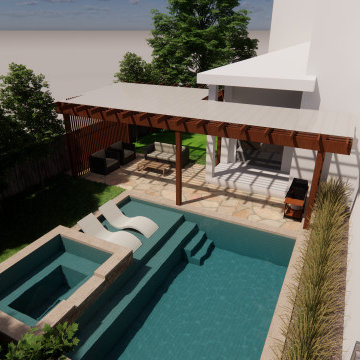 Cosmic Design Studio
There are several advantages for homeowners to see 3D renderings of their pool outdoor projects before construction begins. Here are some of the key benefits:
Visualization: 3D renderings provide homeowners with a realistic visualization of their pool design. They can see how the design will look in their outdoor space from various angles, which helps them make informed decisions about the design.
Design Changes: If homeowners want to make changes to the pool design, 3D renderings make it easy to see how those changes will look in the final product. They can make adjustments to the design and see the results in real time, which saves time and money in the long run.
Cost-Efficiency: 3D renderings can help homeowners save money on their pool projects. They can make design changes before construction begins, which can prevent costly mistakes and delays.
Planning: 3D renderings allow homeowners to plan their outdoor space more efficiently. They can see how the pool design interacts with their landscaping, patio, and other outdoor features. This helps them plan the layout of their outdoor space and make informed decisions about other outdoor features.
Peace of Mind: 3D renderings provide homeowners with peace of mind. They can see the final product before construction begins, which reduces stress and anxiety about the project.
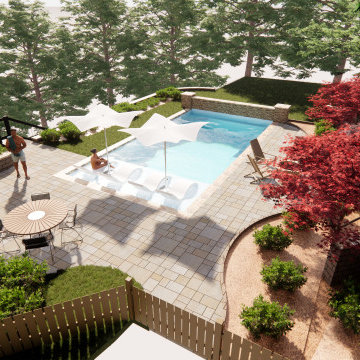 Cosmic Design Studio
There are several advantages for homeowners to see 3D renderings of their pool outdoor projects before construction begins. Here are some of the key benefits:
Visualization: 3D renderings provide homeowners with a realistic visualization of their pool design. They can see how the design will look in their outdoor space from various angles, which helps them make informed decisions about the design.
Design Changes: If homeowners want to make changes to the pool design, 3D renderings make it easy to see how those changes will look in the final product. They can make adjustments to the design and see the results in real time, which saves time and money in the long run.
Cost-Efficiency: 3D renderings can help homeowners save money on their pool projects. They can make design changes before construction begins, which can prevent costly mistakes and delays.
Planning: 3D renderings allow homeowners to plan their outdoor space more efficiently. They can see how the pool design interacts with their landscaping, patio, and other outdoor features. This helps them plan the layout of their outdoor space and make informed decisions about other outdoor features.
Peace of Mind: 3D renderings provide homeowners with peace of mind. They can see the final product before construction begins, which reduces stress and anxiety about the project.
 Katie Hutchison Studio
With two small children and a third on the way, the owners of an original eighteenth century Cape were quickly out-growing it, but they had no desire to move away from the Cape Cod home and location they loved. They simply needed a reconfigured layout and more space. Their goals included repurposing some existing rooms, adding a new kitchen/family area plus screen porch on the first level, and creating a master suite and roof deck with an outdoor shower on the second level, connected by a new stair.
Our challenge was to improve the flow between existing spaces, and design the two-story addition without overwhelming the pint-sized original Cape. We took advantage of the lower grade at the rear of the property to step the first floor of the addition down two steps from the existing main level. This allowed us to align the second floor in the addition with the existing second floor, while gaining ceiling height in the new first-floor kitchen/family area. We composed a cross-gabled form for the addition to improve the second floor headroom, while maintaining the existing eave line. We then extended some existing shed dormers to gain headroom and enhance function. We also expanded the outdoor living area with privacy walls along the roof deck.
New, larger, double–hung windows that match the lite configuration of the existing windows, along with new side-wall shingles and trim which resemble the existing exterior treatment help to tie the new addition to the old Cape. Though there’s no mistaking the new for the old, the two are simpatico.
Katie Hutchison Studio collaborated with Geoffrey Koper Architect of Yarmouth Port, Mass. on the Yarmouth Port Antique Cape Renovation and Addition. Kitchen fit-out and interior finishes, fixtures, and furnishings by others.
photo by Katie Hutchison

 OCTOBER 5 Fine Home Builders
Sometimes, I can’t help but smile. Recently October 5 met a beautiful couple, Al and Shawn. With their two sons gone, they decided to remodel their kitchen. The house was built in 1957, with the original kitchen remaining.
When I first met Shawn, she was determined, make no mistake about it. She wanted, “. . . dark cabinets with a dark floor.” End of story! Hmmm . . . I just smiled and listened. She finally asked me what I thought. I told her, “Well, I don’t really see dark cabinets with a dark floor.”
Beautifully carved wooden beams supported the living room ceiling, along with a well design wrap-around comfortable bay-window seat. All of it painted white, which looked beautiful and enjoyed architectural significance. I guess after living in a house for 27 years, we tend to overlook its natural treasures. Shawn was having none of it. “Oh my god, white? Who’s going to keep it clean? No way? Dark, dark, dark!”
Sometimes, you just have to let an idea sit and marinate. You might guess as to who won . . . remember, I am writing this. Shawn and Al have to be one of my favorite clients of all times. We debated, argued and even kept score. Shawn won on the countertops, Arabian Nights, I have to give her credit, and the backsplash. She did not want outlets in the Carrera Marble backsplash, which surprisingly has changed my opinion, but I won everything else.
At the end of the project the score was Shawn = 2 (may be 3) and Jim = 12+ (I eventually lost count, but who’s counting anyway.)
Sometimes, I can’t help but smile. Hope you do too, when you look at the pictures below.
 Katie Hutchison Studio
With two small children and a third on the way, the owners of an original eighteenth century Cape were quickly out-growing it, but they had no desire to move away from the Cape Cod home and location they loved. They simply needed a reconfigured layout and more space. Their goals included repurposing some existing rooms, adding a new kitchen/family area plus screen porch on the first level, and creating a master suite and roof deck with an outdoor shower on the second level, connected by a new stair.
Our challenge was to improve the flow between existing spaces, and design the two-story addition without overwhelming the pint-sized original Cape. We took advantage of the lower grade at the rear of the property to step the first floor of the addition down two steps from the existing main level. This allowed us to align the second floor in the addition with the existing second floor, while gaining ceiling height in the new first-floor kitchen/family area. We composed a cross-gabled form for the addition to improve the second floor headroom, while maintaining the existing eave line. We then extended some existing shed dormers to gain headroom and enhance function. We also expanded the outdoor living area with privacy walls along the roof deck.
New, larger, double–hung windows that match the lite configuration of the existing windows, along with new side-wall shingles and trim which resemble the existing exterior treatment help to tie the new addition to the old Cape. Though there’s no mistaking the new for the old, the two are simpatico.
Katie Hutchison Studio collaborated with Geoffrey Koper Architect of Yarmouth Port, Mass. on the Yarmouth Port Antique Cape Renovation and Addition. Kitchen fit-out and interior finishes, fixtures, and furnishings by others.
photo by Katie Hutchison
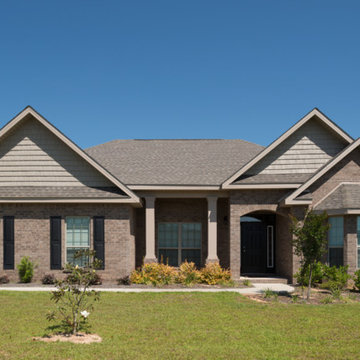
 Acme Brick Company
The brick color featured on this home is Signal Mountain. This blend comes in Modular and Queen Size. This brick is available at the Birmingham Plant. Please visit brick.com for availability in your area. © 2016 Acme Brick Company

 Moderne Builders
Gorgeous master bath with dramatic retro "wave" tile. Peak Photography
Example of a 1950s bathroom design in Los Angeles
Example of a 1950s bathroom design in Los Angeles

 Modern Mecca™ | Los Angeles Home Staging
photos by Everett Fenton Gidley
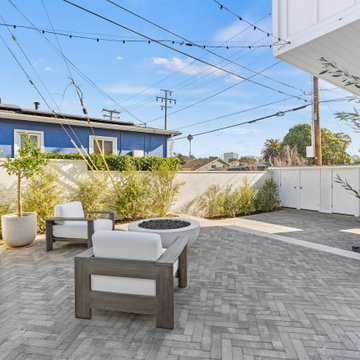
Inspiration for a modern exterior home remodel in Los Angeles
Inspiration for a modern exterior home remodel in Los Angeles

 Bilotta Kitchen & Home
This expansive kitchen was done by Bilotta senior designer in collaboration with Nancy Epstein, founder and CEO of Artistic Tile, for Nancy’s son and daughter-in-law’s home. Frameless Rutt Regency cabinetry is featured in two different finishes: linen white paint on the perimeter and stained walnut on the island. Almost all surfaces are Calacatta Gold marble but in a variety of formats and finishes, obviously all by Artistic Tile. The backsplash, including the dramatic arched wall the houses the range and hood, features elongated brick tiles with a honed finish. The underside of the arch is lined with polished mosaics and the countertops are 2” thick slabs, polished. The flooring is the only surface in a different material – for that they used Artistic Tile’s “Vestige Ash”, a limestone with a brushed finish in a chevron pattern that creates texture and really shows the stone’s veining. In an article in Traditional Home, written by Amy Elbert, Nancy commented, “Everything has some weight, some girth to it. A common design mistake is making things too skinny. You want to feel the tile’s majesty and its beauty.” Rita added, “We always played with a delicate balance between contemporary and traditional elements.” The two stainless steel undermount sinks are Franke with Dornbracht faucets. There are various different work zones making it also a very functional space, aside from being sophisticated and elegant overall. There is the cooking area with the 36” range and custom hood on one wall; the island holds the main sink and a dishwasher; another wall houses the full height, 36” wide stainless steel refrigerator and freezer; and the sink wall (with a beautiful view to the backyard) has another dishwasher as well as refrigerator drawers. The circular dining table for six is by Zoffany and the chairs are “Normandie” by Artistic Frame with Duralee fabric.
Photo Credit Francesco Lagnese

 Aspen White Star, LLC
Inspiration for a large rustic u-shaped brick floor and orange floor eat-in kitchen remodel in Denver with an undermount sink, green cabinets, multicolored backsplash, an island, multicolored countertops, paneled appliances, raised-panel cabinets, granite countertops and stone slab backsplash

 ProPacific Builders, Inc.
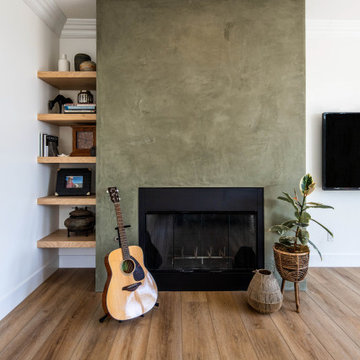
Inspiration for a mid-sized 1950s formal and open concept laminate floor, brown floor and wood wall living room remodel in San Diego with green walls, a standard fireplace, a plaster fireplace and a corner tv

 Great Rooms Building Group
Enclosed dining room - mid-sized transitional medium tone wood floor and brown floor enclosed dining room idea in Chicago with beige walls, a standard fireplace and a brick fireplace

 SDG Architects
Open Concept Kitchen - Living
Small minimalist u-shaped ceramic tile open concept kitchen photo in San Francisco with an integrated sink, shaker cabinets, dark wood cabinets, granite countertops, metallic backsplash, metal backsplash, stainless steel appliances and an island
Small minimalist u-shaped ceramic tile open concept kitchen photo in San Francisco with an integrated sink, shaker cabinets, dark wood cabinets, granite countertops, metallic backsplash, metal backsplash, stainless steel appliances and an island

 Architectural Designs
Exclusive House Plan 73345HS is a 3 bedroom 3.5 bath beauty with the master on main and a 4 season sun room that will be a favorite hangout.
The front porch is 12' deep making it a great spot for use as outdoor living space which adds to the 3,300+ sq. ft. inside.
Ready when you are. Where do YOU want to build?
Plans: http://bit.ly/73345hs
Photo Credit: Garrison Groustra

 Revealing Redesign
It would be great to take over your husband's office...the room you've been eyeing for a while and dreaming of making your own, wouldn't it??
Well, maybe...but what to do with it once you had it?
This was exactly the situation when I got the call from one of my favorite clients. She was worried that maybe she had made a mistake. Would the room ever be the feminine, artsy space she hoped it could be??
Using the existing rug to form our color palette, we found new office furniture that offered beautiful display space as well as a more feminine flavor.
There is nothing more important when making a room uniquely yours than surrounding yourself with things you love. Accents throughout the room focus on my client's love of sewing, reading, and, of course, her family (her new grandson in particular)...
We commissioned a local artist to make four original cut paper collages to adorn the walls in my clients favorite color combinations.
These one-of-a-kind pieces made with lovingly hand-dyed papers, are reminiscent of quilt squares and colorful buttons--the perfect centerpiece for the space.
The sewing machine on which my client sewed for hours as a teenager has a prominent place in the room, and over it is hung a collection of beautiful family portraits...
Finding the perfect items to create a cozy reading nook was the next challenge. We found a set of vintage chairs with a matching ottoman. All were reupholstered to compliment the room, and they are sooooo comfortable. Seems that everyone in the house now wants to sit in HERE rather than the living room because of the soothing atmosphere and cheerful seating.
Now, where there once was little color or coziness, there is a space that is beautiful, nurturing, bright and joyful. What a wonderful blessing!
Photos by Laura Kicey
46