
Search results for "Post explores" in Home Design Ideas
 I'm The Man Services
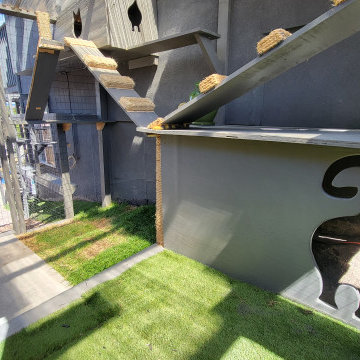
At I'm The Man Services, we had the pleasure of transforming an ordinary backyard corner into a feline paradise designed for play, relaxation, and adventure. This thoughtfully crafted cat oasis features a multi-level enclosure with climbing ramps, perches, scratching posts, and plenty of vertical space for endless exploration.
Durable yet stylish rope-wrapped steps add a playful touch, giving curious kitties the freedom to climb and roam. The outdoor area is landscaped with lush artificial turf, providing a soft, low-maintenance surface that’s easy on paws and easy to clean. Natural light filters through the clear corrugated roofing, ensuring a warm, sunny environment while keeping cats protected from the elements.
The enclosed garden bed offers a slice of nature with carefully chosen plants and rocks, giving cats a safe taste of the outdoors. Every detail, from the secure wire mesh to the sturdy construction, ensures both safety and fun—so owners can relax while their furry friends live their best lives.
This cat oasis is more than a play space; it’s a testament to how thoughtful design can bring joy and enrichment to both pets and their owners. At I'm The Man Services, we believe every project should make tails wag—and this one definitely does!
 I'm The Man Services
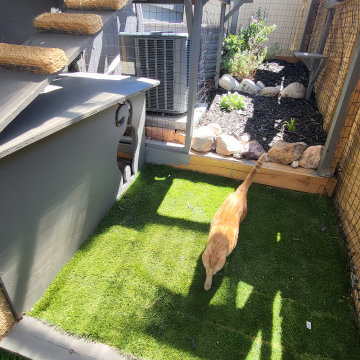
At I'm The Man Services, we had the pleasure of transforming an ordinary backyard corner into a feline paradise designed for play, relaxation, and adventure. This thoughtfully crafted cat oasis features a multi-level enclosure with climbing ramps, perches, scratching posts, and plenty of vertical space for endless exploration.
Durable yet stylish rope-wrapped steps add a playful touch, giving curious kitties the freedom to climb and roam. The outdoor area is landscaped with lush artificial turf, providing a soft, low-maintenance surface that’s easy on paws and easy to clean. Natural light filters through the clear corrugated roofing, ensuring a warm, sunny environment while keeping cats protected from the elements.
The enclosed garden bed offers a slice of nature with carefully chosen plants and rocks, giving cats a safe taste of the outdoors. Every detail, from the secure wire mesh to the sturdy construction, ensures both safety and fun—so owners can relax while their furry friends live their best lives.
This cat oasis is more than a play space; it’s a testament to how thoughtful design can bring joy and enrichment to both pets and their owners. At I'm The Man Services, we believe every project should make tails wag—and this one definitely does!
 Etheredge Design Associates, Inc.
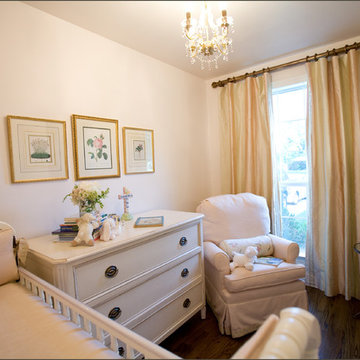
Converting a home office into a nursery for a growing family presented some interesting challenges because of the spatial limitations. Originally, the space housed an enclosed side porch in this small 1940's post war cottage style home. During the planning stage, the decision was made that the design elements of the nursery would be consistent with those previously used in the refurbished home…a soft, sophisticated mix of traditional furnishings accented with contemporary styled pieces and elements set within a monochromatic color scheme. Knowing that the expected child was a girl enabled the exploration of a full range of feminine options. To maximize style, unify the space, and preserve the impression of childlike innocence a decision was reached to use minimalist colors. Winter Morning coats the walls with just a hint of pink as seen in the sky at sunrise. Texture is introduced in a blush linen; its hue was chosen to increase spatial perception within this compact nursery. The same linen covers the crib bumper pads and upholsters the small scale glider. Blush is repeated in the chenille braid on the bumper pads, the pleat closures for the tailored striped silk crib skirt and, again, on the trim of the stripped silk drapery panels which are hung to the ceiling adding visual height and providing yards of gentle softness to the area. Antique botanicals from the owner's childhood provide femininity and a connection to the past. Mounted from the ceiling is a small glazed chandelier with clear crystal and rose quartz pendants perfectly suited for the little charmer who will occupy this room. The space may be small in size, but it is large in style, functionality, and filled with love.
Find the right local pro for your project
 Etheredge Design Associates, Inc.
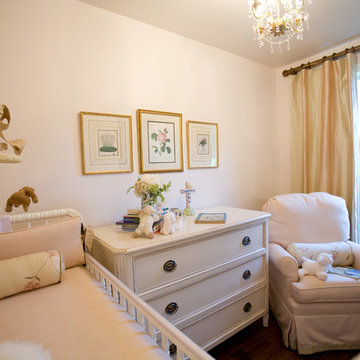
Converting a home office into a nursery for a growing family presented some interesting challenges because of the spatial limitations. Originally, the space housed an enclosed side porch in this small 1940's post war cottage style home. During the planning stage, the decision was made that the design elements of the nursery would be consistent with those previously used in the refurbished home…a soft, sophisticated mix of traditional furnishings accented with contemporary styled pieces and elements set within a monochromatic color scheme. Knowing that the expected child was a girl enabled the exploration of a full range of feminine options. To maximize style, unify the space, and preserve the impression of childlike innocence a decision was reached to use minimalist colors. Winter Morning coats the walls with just a hint of pink as seen in the sky at sunrise. Texture is introduced in a blush linen; its hue was chosen to increase spatial perception within this compact nursery. The same linen covers the crib bumper pads and upholsters the small scale glider. Blush is repeated in the chenille braid on the bumper pads, the pleat closures for the tailored striped silk crib skirt and, again, on the trim of the stripped silk drapery panels which are hung to the ceiling adding visual height and providing yards of gentle softness to the area. Antique botanicals from the owner's childhood provide femininity and a connection to the past. Mounted from the ceiling is a small glazed chandelier with clear crystal and rose quartz pendants perfectly suited for the little charmer who will occupy this room. The space may be small in size, but it is large in style, functionality, and filled with love.
 Rudloff Custom Builders
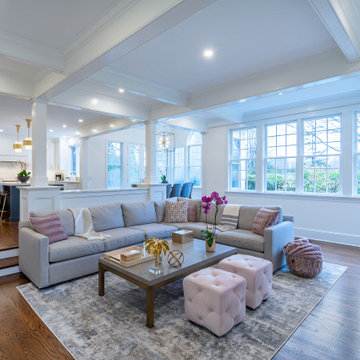
This step-down family room features a coffered ceiling and a fireplace with a black slate hearth. We made the fireplace’s surround and mantle to match the raised paneled doors on the built-in storage cabinets on the right. For a unified look and to create a subtle focal point, we added moulding to the rest of the wall and above the fireplace.
Sleek and contemporary, this beautiful home is located in Villanova, PA. Blue, white and gold are the palette of this transitional design. With custom touches and an emphasis on flow and an open floor plan, the renovation included the kitchen, family room, butler’s pantry, mudroom, two powder rooms and floors.
Rudloff Custom Builders has won Best of Houzz for Customer Service in 2014, 2015 2016, 2017 and 2019. We also were voted Best of Design in 2016, 2017, 2018, 2019 which only 2% of professionals receive. Rudloff Custom Builders has been featured on Houzz in their Kitchen of the Week, What to Know About Using Reclaimed Wood in the Kitchen as well as included in their Bathroom WorkBook article. We are a full service, certified remodeling company that covers all of the Philadelphia suburban area. This business, like most others, developed from a friendship of young entrepreneurs who wanted to make a difference in their clients’ lives, one household at a time. This relationship between partners is much more than a friendship. Edward and Stephen Rudloff are brothers who have renovated and built custom homes together paying close attention to detail. They are carpenters by trade and understand concept and execution. Rudloff Custom Builders will provide services for you with the highest level of professionalism, quality, detail, punctuality and craftsmanship, every step of the way along our journey together.
Specializing in residential construction allows us to connect with our clients early in the design phase to ensure that every detail is captured as you imagined. One stop shopping is essentially what you will receive with Rudloff Custom Builders from design of your project to the construction of your dreams, executed by on-site project managers and skilled craftsmen. Our concept: envision our client’s ideas and make them a reality. Our mission: CREATING LIFETIME RELATIONSHIPS BUILT ON TRUST AND INTEGRITY.
Photo Credit: Linda McManus Images
 CliqStudios Cabinets
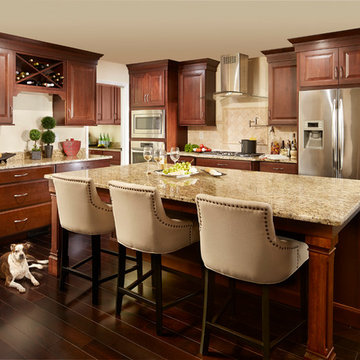
Atlanta Georgia 12’ by 19’ kitchen renovation featuring CliqStudios Carlton full-overlay cabinets finished in a gorgeous Cherry Russet, an impressive 8-foot by 5-foot island and two extra feet of cabinet storage along a side wall where a garage access door was moved.
CliqStudios Kitchen Designer: Karla R
Cabinet Style: Carlton
Cabinet Finish: Cherry Russet
 Twelve Stones Designs, LLC
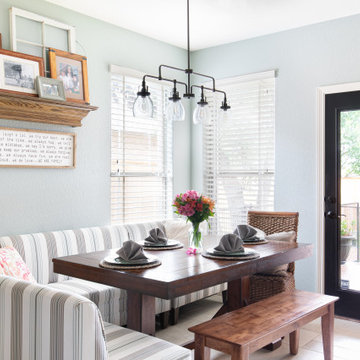
The owners of this kitchen had spent the money to upgrade the finishes in their kitchen upon building the home 12 years ago, but after living in the space for several years they realized how nonfunctional the layout really was. The (then) two preschool aged children had grown into busy, hungry teenagers with many friends who also liked to hang out at the house. So the family needed a more functional kitchen with better traffic flow, space for daily activities revolving around the kitchen at different times of day, and a kitchen that could accommodate cooking for and serving large groups. Furthermore, the dark, traditional finishes no longer reflected the homeowners’ style. They requested a brighter, more relaxed, coastal style that reflected their love of the seaside cities they like to visit.
Originally, the kitchen was U-shaped with a narrow island in the middle. The island created narrow aisles that bottle-necked at the dishwasher, refrigerator, and cooktop areas. There was a pass-through from the foyer into the kitchen, but the owners never liked that the pass-through was also located so close to the powder room. The awkward proximity was unappealing and made guests feel uncomfortable.
The kitchen’s storage was made up of lots of narrow cabinets, apothecary drawers, clipped corner units, and very few drawers. It lacked useful storage for the larger items the family used on a daily basis. And the kitchen’s only pantry was small closet that had only builder-grade, narrow shelving with no illumination to be able to see the contents inside.
Overall, the kitchen’s lighting plan was poorly executed. Only six recessed cans illuminated the entire kitchen and nook areas. The under cabinet lighting was not evenly distributed either. In fact, the builder had mis-placed the under cabinet lighting around the decorative pilasters which made for choppy, dark cubbies. Further, the builder didn’t include any lighting over the sink or the bar area, which meant whoever was doing the dishes was always in their own shadow. That, coupled with the steep overhang of the game room above made the bar area feel like a dim, cavernous space that wasn’t inviting or task oriented. The kitchen looked out into the main living space, but the raised bar and a narrow wall (which held the only large cabinet in the kitchen) created more of a barrier than a relationship to the living room or breakfast nook. In fact, one couldn’t even see the breakfast nook from the cooktop or sink areas due to its orientation. The raised bar top was too narrow to comfortably sit to either dine at or chat from due to the lack of knee space. The the homeowners confided that the kitchen felt more like a dark, dirty prison than place where the family, or their guests, wanted to gather and commune.
The clients' needs and desires were:
➢ to create a kitchen that would be a space the family loved to be in; to relate to the adjacent spaces all around, and to have better flow for entertaining large groups
➢ to remove the walls between the breakfast nook and living area and to be able to utilize the natural light from the windows in both those areas
➢ to incorporate a functional chopping block for prepping fresh food for home cooked meals, an island with a large sink and drain board, 2 pull out trash cans, and seating for at least the 2 teens to eat or do homework
➢ to design a kitchen and breakfast nook with an airy, coastal, relaxed vibe that blended with the rest of the house's coastal theme
➢ to integrate a layered lighting plan which would include ample general illumination, specific task lighting, decorative lighting, and lots of illuminated storage
➢ to design a kitchen with not only more storage for all the husband’s kitchen gadgets and collection of oils and spices, but smart storage, including a coffee/breakfast bar and a place to store and conceal the toaster oven and microwave
➢ to find a way to utilize the large open space between the kitchen, pantry area, and breakfast nook
Twelve Stones Designs achieved the owner's goals by:
➢ removing the walls between the kitchen and living room to allow the natural light to filter in from the adjacent rooms and to create a connection between the kitchen, nook, and living spaces for a sense of unity and communion
➢ removing the existing pantry and designing 3 large pantry style cabinets with LED tape lights and rollout drawers to house lots of kitchen appliances, gadgets, and tons of groceries. We also took the cabinets all the way up to the 9’ ceiling for additional storage for seasonal items and bulk storage.
➢ designing 2 islands - 1 with a gorgeous black walnut chopping block that houses a drawer for chopping and carving knives and a custom double pull out trash unit for point of use utilization - and 1 that houses the dishwasher, a large Blanco Gourmet sink with integrated drain board, woven baskets for fresh root vegetables and kitchen towels, plenty of drawer storage for kitchen items, and bar seating for up to 4 diners.
➢ closing off the space between the kitchen and the powder room to create a beautiful new private alcove for the powder room as well as adding some decorative storage. This also gave us space to include more tall storage near the new range for precision placement of the husband’s extensive oil and spice collection as well as a location for a combo-steam oven the wife wanted for baking and cooking healthy meals.
The project is enhanced functionally by:
➢ incorporated USB and standard receptacles for the kids’ laptops and phone charging in the large island
➢ designing the small island to include additional open shelving for items used on a daily basis such as a variety of bowls, plates, and colanders. This set up also works well for the husband who prefers to “plate” his dinners in restaurant-style fashion before presenting them to the table.
➢ the integration of specific storage units, such as double stacked cutlery drawers, a custom spice pull-out, a Kuerig coffee and tea pod drawer, and custom double stacked utensil drawers
➢ moving the refrigerator to the old oven location - this eliminated the bottle neck as well as created a better relationship to the eating table. It also utilizes the floor space between the pantry, nook, and kitchen
➢ creating a banquet style breakfast nook - this banquette seating not only doubles the amount of seating for large gatherings but it better utilizes the odd space between the kitchen and the previous nook area. It also helps to create a distinct pathway from the mudroom room through the pantry area, kitchen, nook, and living room.
➢ the coffee/breakfast bar area which includes the perfect location for the concealed microwave and toaster oven, convenient storage for the coffee pods and tea accoutrements. Roll-out drawers below also house the smoothie maker, hot water kettle, and a plethora of smoothie-making ingredients such as protein powders, smoothie additives, etc. Furthermore, the drawers below the Keurig house measuring utensil, cutlery, baking supplies and tupperware storage.
➢ incorporating lots of wide drawers and pullouts to accommodate large cookware.
➢ utilizing as much vertical space as possible by building storage to the ceiling which accommodates the family’s abundant amount of serving platters, baking sheets, bakeware, casserole dishes, and additional cutting boards.
The project is enhanced aesthetically by:
➢ new 5-piece Versailles pattern porcelain tile that now seamlessly joins the entire down stairs area together creating a bright, cohesiveness feeling instead of choppy separated spaces - it also adds a coastal feeling
➢ designing a cabinet to conceal the microwave and toaster oven
➢ the coastal influenced light fixtures over the nook table and island
➢ the sandy colors of the Langdon Cambria countertops. The swirling pattern and sparkling quartz pieces remind the homeowner of black-and-tan sandy beaches
➢ the striped banquet seating whose creamy white background and blue-green stripes were the inspiration for the cabinet and wall colors.
➢ All the interior doors were painted black to coordinate with the blacks and grays in the backsplash tile and countertop. This also adds a hint of tailored formality to an otherwise casual space.
➢ the use of WAC's Oculux small aperture LED units for the overhead lighting complimented with Diode LED strips for task lighting under the cabinets and inside the pantry and glass wall cabinets. All of the lighting applications are on separate dimmer switches.
Innovative uses of materials or construction methods by Realty Restoration LLC:
➢ Each 1-1/2” x 3” block of reclaimed end-grain black walnut that makes up the center island chopping block was hand milled and built in the shop. It was designed to look substantial and proportional to the surrounding elements, executed by creating the 4 inch tall top with a solid wood chamfered edge band.
➢ The metal doors on either side of the vent hood were also custom designed for this project and built in the Realty Restoration LLC shop. They are made 1x2, 11-gauge mild steel with ribbed glass. Weighing 60 lbs a piece, heavy duty cabinet hinges were added to support the weight of the door and keep them from sagging.
➢ Under-cabinet receptacles were added along the range wall in order to have a clean, uninterrupted backsplash.
Design obstacles to overcome:
➢ Because we were removing the demising walls between the kitchen and living room, we had to find a way to plumb and vent the new island. We did this by tunneling through the slab (the slab had post tension cables which prevented us from just trenching) to run a new wet vent through a nearby structural wall. We pulled the existing hot and cold lines between upper floor joists and ran them down the structural wall as well and up through a conduit in the tunnel.
➢ Since we were converting from wall overs to a gas range it allowed us to utilize the 220 feed for the wall ovens to provide a new sub panel for all the new kitchen circuits
➢ Due to framing deficiencies inherited from the original build there was a 1-1/2” differential in the floor-to-ceiling height over a 20 foot span; by utilizing the process of cutting and furring coupled with the crown moulding details on the cabinet elevations we were able to mask the problem and provide seamless transitions between the cabinet components.
Evidence of superior craftsmanship:
➢ uniquely designed, one-of-a-kind metal “X” end panels on the large island. The end panels were custom made in the Realty Restoration LLC shop and fitted to the exact dimensions of the island. The welding seams are completely indistinguishable - the posts look like they are cut from a single sheet of metal
➢ square metal posts on the small island were also custom made and designed to compliment and carry through the metal element s throughout the kitchen
➢ the beautiful, oversized end panels on the pantry cabinets which give the breakfast nook a tailored look
➢ integrating a large format 5 piece Versailles tile pattern to seamlessly flow from the existing spaces into the new kitchen space
➢ By constructing a custom cabinet that jogged around a corner we could not remodel (housing the entry way coat closet) we were able to camouflage the adjacent wall offset within the upper and lower cabinets. By designing around the existing jog in the structural walls we accomplished a few things: we were able to find the space to house, and hide, the microwave and toaster oven yet still have a clean cohesive appearance from the kitchen side. Additionally, the owners were able to keep their much needed coat closet and we didn’t have to increase the budget with unnecessary structural work.
Sponsored
Columbus, OH
Free consultation for landscape design!

Peabody Landscape Group
Columbus' Reliable Landscape Design & Contracting
 MOTIV Interiors
Interior Designer: MOTIV Interiors LLC
Photography: Laura Rockett Photography
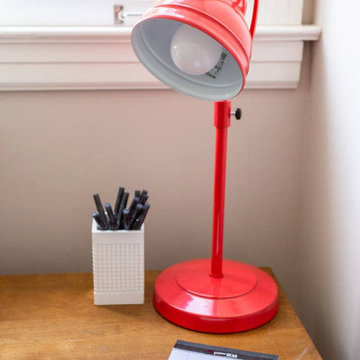
Design Challenge: MOTIV Interiors created this colorful yet relaxing retreat - a space for guests to unwind and recharge after a long day of exploring Nashville! Luxury, comfort, and functionality merge in this AirBNB project we completed in just 2 short weeks. Navigating a tight budget, we supplemented the homeowner’s existing personal items and local artwork with great finds from facebook marketplace, vintage + antique shops, and the local salvage yard. The result: a collected look that’s true to Nashville and vacation ready!
 Dianne Davant and Associates
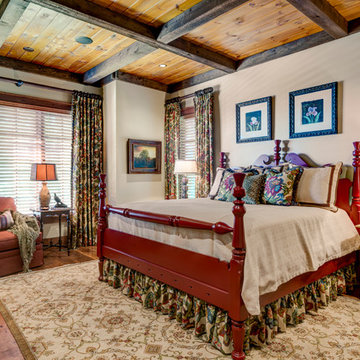
Master Bedroom with Red Bed Frame and custom drapery and bedding.
Bedroom - traditional master light wood floor bedroom idea in Charlotte
Bedroom - traditional master light wood floor bedroom idea in Charlotte
 Envision Web
Becky Hulsey, Envision Virtual Tours
The Lodge at Gold Mine Falls
A Once in a Lifetime Opportunity Awaits….
Have you dreamed of owning your own spectacular waterfall, a serene trout pond, or a one of a kind mountain lodge filled with high end touches, all near Lake Burton? If the answer is yes…..then “The Lodge at Gold Mine Falls” is for you!
Located just off HW 76 .3 miles to Anchorage Marina, this unique 2.8 acre property borders the National Forest, boasts a fully remodeled 3 bedroom, 3 bath, 2000+ square foot rock lodge that is adjacent to its own private, spectacular 60 foot waterfall all surrounded by native landscape such as rhododendron and mountain laurel. Tumbling under the 40 foot suspension bridge, the pristine, crystal clear water continues to ramble on its way to large pond ready to be stocked with trout. Picture yourself fly fishing for a trout dinner right at your front door, or delight your friends or family while entertaining on your new porch or extensive, multi-level deck that connects your new home to your own waterfall. The kids or grandkids will be entertained for hours wading in the pool at the base of the waterfall, exploring the crooks and crannies among the stream’s boulders while looking for salamanders, or panning for “fool’s gold” in the stream. Just imagine….The Lodge at Gold Mine Falls has all this and more!
As you walk up the front steps to The Lodge at Gold Mine Falls, you will notice the craftsmanship of this uniquely one of a kind home made from local stone and granite from a period gone by. If you look closely at some of the stones, you will find raw garnets, some the size of a nail head. Upon opening the front door constructed of solid oak and a tasteful piece of leaded glass, you will be amazed at the spaciousness of the lodge room. Once upon a time, the 20 x 30 foot room with 10 foot ceilings was the entire home. The focal piece of the room is the new floor to ceiling field stone fireplace, hand honed solid maple mantel, rounded hearth, accentuated by a hand-cut keystone, and flanked by raw cedar columns. The new gas logs can be remotely controlled with programmable heat. A built-in floor to ceiling cherry wood wall unit, with granite serving surface, highlights a side wall and is topped off with a large piece of stained glass from an English pub. The mood lighting behind the stained glass and the antique library ladder really highlights this unique bookcase. Distinctive lighting fixtures and fans provide dining area lighting and circulation from the cool breezes off of Lake Burton. On the bottom, the solid oak 1.5 inch flooring is a remnant of the past on the top, the height of the ceilings is enhanced by double crown moldings throughout and a touch of the outdoors is brought indoors by the three new skylights. Surrounded by rustic cedar window boxes, additional ambient light streams through the four windows facing south, and the new French doors.
As you open the French doors to the new porch, you are immediately struck by the sights and sound produced by the rushing water as it cascades over the spectacular multilevel waterfall. You will also notice that the mountain has literally been carved away as you view the layers and striations in the granite that surround the back of the porch. The peaked cathedral ceiling sports a glass apex and the bead board on the ceiling accentuated by the raw cedar plank framing and the five cedar trees used as cornerstones all bring the outdoors within your reach. The addition of “E-Z Breeze” vinyl windows along with the cast iron gas stove will allow you and your family to enjoy the beauty and continually changing scenery at The Lodge at Gold Mine Fall during all four seasons.
Opening the Adirondack style door on the other side of the lodge room allows you to step into the Lodge’s addition built at a later date. The four foot wide hallway boasts stained glass light fixtures and an architectural feature from the new stairwell that divides the living and the bedroom spaces. Knowing that the east wall in the kitchen and study were once on the home’s exterior allowed us to investigate and reveal the true character of these walls by removing the two layers of drywall and 4 inches of plaster exposing a striking addition to both rooms…… beautiful granite rock walls. The hallway flows into the granite breakfast bar which fully complements the newly exposed granite wall. From the Viking SS refrigerator to gas Jenn Air ceramic cooktop and microwave the appliances are a chef’s delight. Lighting is a critical component in a gourmet kitchen and the light from the double window is enhanced by two spotlights over the cooking area, LED task lighting under the cabinets, mood lighting over the top cabinets, and four “Murano” hand blown glass pendant lights over the sink and bar area. Scoring points in the design category, the full wood “Thomasville” two tone glazed cabinets that are country white and palomino scream style and sophistication, and are accentuated by the cool copper glass backsplash and refined stainless steel hardware. The porcelain, two bowl farmhouse sink is large enough for your biggest pots while the stainless steel sink guards will protect it from scratches. The SS faucet is professional quality and the Insinkerator will help the chef in the house save time with instant 190 degree water. An eight foot long exposed cedar tree trunk hangs over the cooking area allowing the chef to hang his/her favorite utensils and pots or pans in full lodge style. And who wouldn’t crave a large walk in pantry with commercial grade slides that will up to 120 pounds. With all these features, the cook/cooks in the family will love spending time in this room.
Across from the kitchen is a study/office area which can be closed off from the hallway by a double barn door. Except for the remarkable exposed granite rock wall mentioned earlier, the entire room has been paneled with raw cedar boards treated with Australian Tree Oil for true lodge feel. The triple crank out window provides a superb view of the pond and blazing Japanese maple trees in the fall. Outside, the hallway leads to the utility room which has been fully upgraded with all the modern amenities. The oak cabinetry with granite tops also has an extra deep sink with commercial kitchen sprayer. The sink area is surrounded by white subway tile while slate and green glass mini tile accents bring the outdoor colors inside. The doggy door, new exterior door and crank out window provide access to the back yard and additional light. From the new “Rinnai” point of use, gas hot water heater to the new “LG” full size, stackable washer and dryer, this utility room delivers.
The master bedroom has four windows which provide outstanding light and air circulation. To take the chill off of nippy evenings, this bedroom also has its own romantic fireplace with travertine marble surround, remote controlled gas logs, and a beautiful antique oak and mirror mantle. To top it off, the en-suite bath contains high end fixtures, a spacious vanity, and floor to ceiling rain shower with independent valves allowing you to turn on the shower and not get wet. Multiple safety handrails and a fold down shower seat give bathers assurance and provide an additional measure of safety. The earthy color tiles, glass tile accents and hand blown light fixtures continue the lodge theme in this end of the house. Located across the hall, the guest bedroom is light and airy with its white window boxes and double crown molding, and also has an attached bathroom. This bathroom also has an entrance door leading to the hallway and doubles as the guest bathroom for the house. Its antique oak vanity and mirror, stained glass lights and wrought iron accents remind me of a past era while the vessel sink, modern fixtures, and floor to ceiling travertine and glass tile rain shower all bring the bathroom up to modern standards.
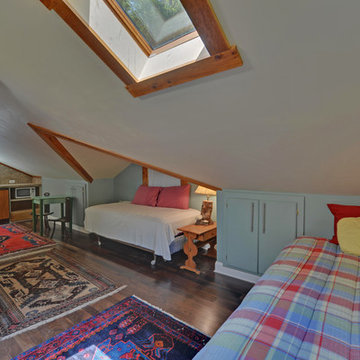
Located at the end of the hallway, and next to the guest bathroom, is the handcrafted stairwell leading to the sleeping loft. The distinctive maple stair treads with their grain and raw edge being displayed, were milled locally in Clayton and then installed from underneath so that no screw or nail heads are visible. The staircase was completed with wrought iron spindles, raw cedar handrail and floor to ceiling end post. Upon your entry into the sleeping loft, you will notice the amount of light that enters through the two skylights and large window facing the pond. The sound of water rushing over the pond’s spillway is a delightful addition to this large sleeping loft. Finished with engineered hardwood flooring and two built in double beds with tree trunks for legs, the room can accommodate four additional twin beds. The sleeping loft is also equipped with a kitchenette and a distinctive cedar and rock walled bathroom. The bath features an antique dresser vanity with marble vessel sink, distinctive fixtures and a floor to ceiling polished travertine marble shower with rain head. This bathroom also has an exterior door leading to a secondary upstairs staircase in the back yard. Just envision the great sleepovers the kids or grandkids will have here or how your out of town friends or family will just love this special area designed with their comfort and needs in mind.
Originally constructed in 1925 by “off Broadway” star Rose Grant, this property is rich in history. In the early years, this home was one of the first in Rabun County to generate its own electric from the waterfall. Several small cabins were also built on the property and rented out to guests who came for the waterfall, swim in the pond and connect with nature. Other notable residents were Mrs. and Doctor Fowler who was a local pediatrician. According to an aged newspaper article, Mrs. Fowler was very interested in the indigenous flora and fauna and grew a variety of native plants on the property including some that were rare or endangered. Many metal name tags still remain along the various paths on the property thus reminding you of times gone by and the true beauty of property.
Lastly, this solidly built home has just been structurally solidified, become more energy efficient, and reconfigured to further usable space all while retaining the Lodge’s original charm. After removing the flooring in the kitchen, hall and both bathrooms, the home’s structure and roof were fortified with numerous concrete footers to support both bathrooms, kitchen, and stairwell walls that extend from floor to roof. To make this home more comfortable, energy efficient, and bring it up to modern standards, the electrical system was upgraded to 220 service with the wiring, outlets, electrical panels and fixtures replaced throughout the entire home. A whole house surge protector was also installed to protect against damage that may occur with lightning strikes. Speaking of electric…..the pond’s newly poured formed concrete wall contains a pipe enabling you to install your own hydro-electric system. And whether you might decide to tie into the grid or store you energy in a battery system, you could generate your own electric 24/7. The homes plumbing was also replaced with new pipes, energy/water efficient fixtures in each bathroom (including three Toto toilets), and a new cistern was installed behind the garage with a laboratory grade water filtration system. The task of water heating was completed by a gas Rinnai point of use hot water heater in the utility room and all windows were replaced with Anderson thermal pane and 6 Velux skylights were mounted to bring the outdoors inside. The home’s HVAC system was top of the line several years ago and both sets of new gas logs are controlled with remotes. Formerly a summer home, all exterior walls were studded out with insulation added, and whole house fans were installed in the attic and upstairs bathroom. Although many of these upgrades may not be visible, they allow the home to be more energy efficient and more comfortable……allowing The Lodge at Gold Mine Falls to become your four season retreat.

 Industrial Projects
Creating a comfortable outdoor living space is a priority for many homeowners and DIY enthusiasts. With rising summer temperatures, installing a shade tarp in your backyard offers an affordable and effective solution for sun protection. We’ve developed this detailed, step-by-step guide to help you confidently install a shade tarp that not only shields you from the sun but also adds aesthetic appeal to your outdoor area.
Benefits of Installing a Backyard Shade Tarp
Before diving into the installation process, let’s explore the key benefits of having a backyard shade tarp:
Provides UV Protection: Keeps your family and guests safe from harmful sun exposure.
Reduces Outdoor Temperatures: Creates a cooler, more enjoyable outdoor space.
Protects Outdoor Furniture: Extends the life of patio furniture by reducing sun damage.
Enhances Outdoor Aesthetics: Adds a modern, stylish look to your yard.
Budget-Friendly: More affordable compared to permanent structures like pergolas.
Materials and Tools You’ll Need
To begin your DIY backyard shade project, gather the following materials and tools:
Materials:
Shade tarp (UV-resistant and breathable)
Sturdy posts or existing structures (trees, fences, walls)
Mounting hardware (eye bolts, D-rings, turnbuckles, snap hooks)
Nylon or polyester rope, or stainless-steel wire
Concrete (if installing new posts)
Tools:
Power drill
Measuring tape
Level
Ladder
Wrench or adjustable spanner
Post hole digger (if installing new posts)
Step 1: Plan Your Shade Tarp Layout
The first step in installing your backyard shade tarp is careful planning. Take time to assess your outdoor area and answer these key questions:
Where is the sun’s path throughout the day?
What size and shape of tarp best suits your space?
Will you anchor the tarp to existing structures or install new posts?
What height do you want the tarp to sit at for maximum shade and airflow?
Pro Tip: Use string or garden hoses to visualize the tarp layout on the ground before making permanent decisions.
Step 2: Measure and Mark Anchor Points
Once you’ve determined the tarp’s location and orientation:
Measure the tarp dimensions.
Mark the exact points where each corner of the tarp will be anchored.
Ensure that the anchor points are at least 5–10% longer than the tarp size to allow for tensioning and slight adjustments.
Consider slope angles for water runoff. Aim for at least a 20-degree angle to prevent water pooling on the tarp.
Step 3: Install Support Posts (If Necessary)
If your backyard lacks existing anchor points like trees or fences, you’ll need to install sturdy support posts:
Dig post holes at least 24 inches deep and 8-12 inches wide for stability.
Set posts in concrete, making sure they remain plumb and level.
Allow the concrete to cure for at least 24–48 hours before applying tension from the tarp.
We recommend using pressure-treated wood, galvanized steel poles, or aluminum posts for longevity and strength.
Step 4: Install Mounting Hardware
With your anchor points ready, it’s time to install the necessary hardware:
Attach eye bolts or pad eyes securely into walls, posts, or other fixed structures.
For added flexibility and adjustability, install turnbuckles or tensioners to fine-tune the tarp’s tightness.
Connect snap hooks, D-rings, or carabiners to make assembly and disassembly easier.
Make sure all hardware is rated for outdoor use to prevent rust and corrosion.
Step 5: Attach and Tension the Shade Tarp
Now it’s time for the most satisfying part—mounting the shade tarp:
Begin by attaching one corner of the tarp to an anchor point.
Gradually attach the remaining corners, moving diagonally for even tension.
Adjust each connection point using your turnbuckles, ropes, or cables.
Pull the tarp tight enough to avoid sagging, but not so tight that it risks tearing.
Check that the tarp maintains the desired slope for rainwater runoff and adjust tension as needed.
Step 6: Final Adjustments and Safety Check
Before enjoying your new shaded area:
Inspect all anchor points and hardware for stability.
Test the tarp’s tension and make adjustments for even distribution.
Ensure that no sharp edges or loose connections remain that could damage the tarp or pose a safety hazard.
Confirm that the tarp is secure in windy conditions by giving it a gentle tug.
If you live in an area with frequent high winds, consider removing the tarp during storms to prevent damage.
Step 7: Enjoy Your Shaded Backyard Oasis
Once installed, your backyard shade tarp provides a comfortable and protective space for outdoor gatherings, relaxation, or family activities. You can decorate underneath with outdoor furniture, string lights, or potted plants to create a personalized outdoor retreat.
Maintenance Tips for Long-Lasting Shade Tarp Performance
To extend the life of your shade tarp, follow these maintenance guidelines:
Regularly check for wear and tear, especially around anchor points and seams.
Clean the tarp periodically with mild soap and water to prevent mildew buildup.
Store the tarp indoors during harsh weather seasons if it's not designed for year-round use.
Tighten hardware as needed to maintain proper tension and avoid sagging.
By following these simple care steps, your shade tarp will continue to deliver years of sun protection and outdoor comfort.
Conclusion: Upgrade Your Outdoor Space with a DIY Shade Tarp
Installing a shade tarp in your backyard is a cost-effective and rewarding DIY project. With careful planning, quality materials, and proper installation techniques, you’ll enjoy cool, shaded outdoor living all season long. This step-by-step guide ensures your project goes smoothly from start to finish.
 User
UserIn the early days of the 3d architectural visualisation studio, the focus was on creating photo-realistic images of buildings that didn't yet exist. This allowed potential buyers or renters to see what their future home or office would look like.
Nowadays, the role of the 3d architectural visualizer has evolved. While still involved in the sale or rental of property, they are also heavily involved in the design process. By using 3d architectural visualization, architects and designers can explore different design options and make sure that the final product meets the needs of the client.
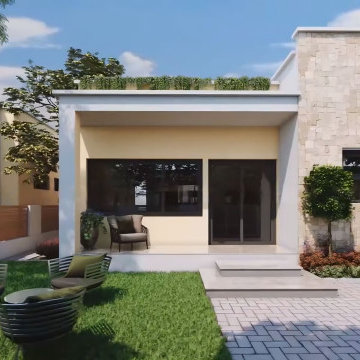
In this blog post, we will take a look at a recent project by a 3d architectural visualizer - the Visualize a Residential Colony in Meridian Idaho.
A 3D architectural visualisation is an important tool for architects and engineers. It allows them to create realistic images of their designs, which can be used to present their ideas to clients or investors.
The studio Visualize was commissioned to create a 3D visualisation of a proposed residential colony in Meridian, Idaho. The colony will be built on a site that is currently occupied by a golf course.
The studio used a variety of software to create the visualisation, including 3ds Max, V-Ray, and Photoshop. The finished product is a realistic and accurate representation of the proposed colony.
The 3D visualisation has been used to convince the local authorities to approve the project. It has also been used to help raise investment for the colony.
 Etheredge Design Associates, Inc.
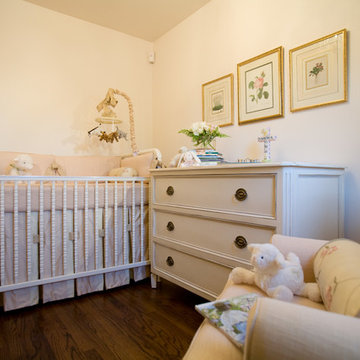
Converting a home office into a nursery for a growing family presented some interesting challenges because of the spatial limitations. Originally, the space housed an enclosed side porch in this small 1940's post war cottage style home. During the planning stage, the decision was made that the design elements of the nursery would be consistent with those previously used in the refurbished home…a soft, sophisticated mix of traditional furnishings accented with contemporary styled pieces and elements set within a monochromatic color scheme. Knowing that the expected child was a girl enabled the exploration of a full range of feminine options. To maximize style, unify the space, and preserve the impression of childlike innocence a decision was reached to use minimalist colors. Winter Morning coats the walls with just a hint of pink as seen in the sky at sunrise. Texture is introduced in a blush linen; its hue was chosen to increase spatial perception within this compact nursery. The same linen covers the crib bumper pads and upholsters the small scale glider. Blush is repeated in the chenille braid on the bumper pads, the pleat closures for the tailored striped silk crib skirt and, again, on the trim of the stripped silk drapery panels which are hung to the ceiling adding visual height and providing yards of gentle softness to the area. Antique botanicals from the owner's childhood provide femininity and a connection to the past. Mounted from the ceiling is a small glazed chandelier with clear crystal and rose quartz pendants perfectly suited for the little charmer who will occupy this room. The space may be small in size, but it is large in style, functionality, and filled with love.
Sponsored
Delaware, OH

Buckeye Basements, Inc.
Central Ohio's Basement Finishing ExpertsBest Of Houzz '13-'21
 Saltwater Kitchen & Bath Studio
Mike Kaskel
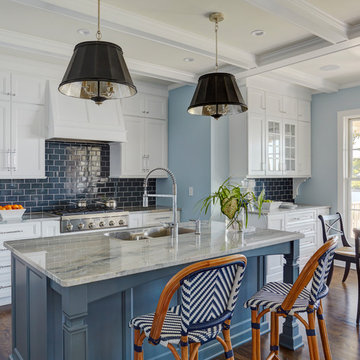
Mid-sized transitional l-shaped medium tone wood floor and brown floor open concept kitchen photo in Jacksonville with a single-bowl sink, flat-panel cabinets, white cabinets, quartzite countertops, blue backsplash, ceramic backsplash, paneled appliances and an island
Mid-sized transitional l-shaped medium tone wood floor and brown floor open concept kitchen photo in Jacksonville with a single-bowl sink, flat-panel cabinets, white cabinets, quartzite countertops, blue backsplash, ceramic backsplash, paneled appliances and an island
 User
UserIn the early days of the 3d architectural visualisation studio, the focus was on creating photo-realistic images of buildings that didn't yet exist. This allowed potential buyers or renters to see what their future home or office would look like.
Nowadays, the role of the 3d architectural visualizer has evolved. While still involved in the sale or rental of property, they are also heavily involved in the design process. By using 3d architectural visualization, architects and designers can explore different design options and make sure that the final product meets the needs of the client.
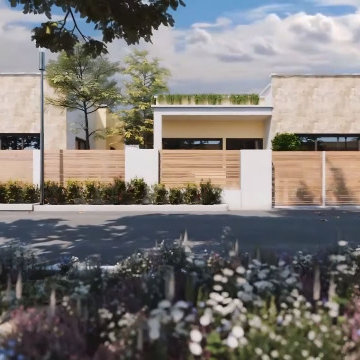
In this blog post, we will take a look at a recent project by a 3d architectural visualizer - the Visualize a Residential Colony in Meridian Idaho.
A 3D architectural visualisation is an important tool for architects and engineers. It allows them to create realistic images of their designs, which can be used to present their ideas to clients or investors.
The studio Visualize was commissioned to create a 3D visualisation of a proposed residential colony in Meridian, Idaho. The colony will be built on a site that is currently occupied by a golf course.
The studio used a variety of software to create the visualisation, including 3ds Max, V-Ray, and Photoshop. The finished product is a realistic and accurate representation of the proposed colony.
The 3D visualisation has been used to convince the local authorities to approve the project. It has also been used to help raise investment for the colony.
 Amy Martin Landscape Design
Location: Cohasset, MA, USA
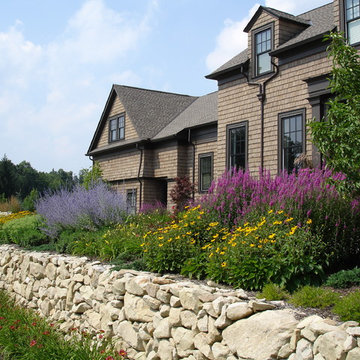
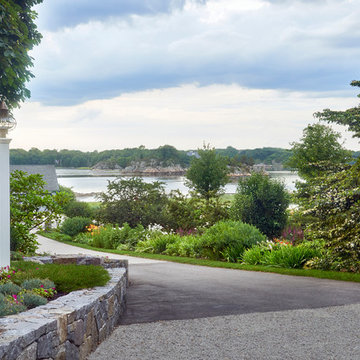
When my clients purchased this historic house, they saw that this garden held great potential, even though the property had been somewhat neglected. They wanted the new landscape to evoke the feeling of an Olde Maine house that time had forgotten. Sitting on the front veranda in the shade of the treasured Horse Chestnut and Maple trees that flank each side of the house, we explored the possibilities together.
The front yard sloped a bit too much for comfort, so we determined that building a stone wall in the middle would create a terrace, making both parts of the lawn more usable. Visions of parties and children's weddings came to mind. We put a set of elegant arching steps in the middle, leading down to the sunken garden.
Large, mature Rhododendrons were planted at the base of the Horse Chestnut and Maple trees just off the front veranda. Boxwoods undulate beneath the trees with Vinca as a ground cover.
Ticonderoga stone was used for the walls and steps, which was the closest match to the existing stone foundation. The exquisite masonry by Doug Brooks Masonry makes this staircase as elegant as a tiered wedding cake.
A riot of perennials offer a beautiful foreground to the views of the harbor.
 Etheredge Design Associates, Inc.
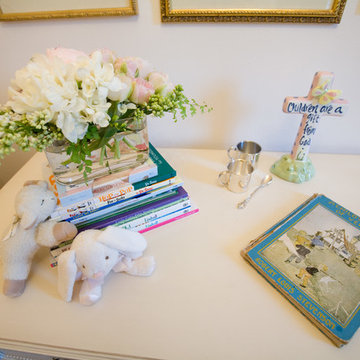
Converting a home office into a nursery for a growing family presented some interesting challenges because of the spatial limitations. Originally, the space housed an enclosed side porch in this small 1940's post war cottage style home. During the planning stage, the decision was made that the design elements of the nursery would be consistent with those previously used in the refurbished home…a soft, sophisticated mix of traditional furnishings accented with contemporary styled pieces and elements set within a monochromatic color scheme. Knowing that the expected child was a girl enabled the exploration of a full range of feminine options. To maximize style, unify the space, and preserve the impression of childlike innocence a decision was reached to use minimalist colors. Winter Morning coats the walls with just a hint of pink as seen in the sky at sunrise. Texture is introduced in a blush linen; its hue was chosen to increase spatial perception within this compact nursery. The same linen covers the crib bumper pads and upholsters the small scale glider. Blush is repeated in the chenille braid on the bumper pads, the pleat closures for the tailored striped silk crib skirt and, again, on the trim of the stripped silk drapery panels which are hung to the ceiling adding visual height and providing yards of gentle softness to the area. Antique botanicals from the owner's childhood provide femininity and a connection to the past. Mounted from the ceiling is a small glazed chandelier with clear crystal and rose quartz pendants perfectly suited for the little charmer who will occupy this room. The space may be small in size, but it is large in style, functionality, and filled with love.
Sponsored
Columbus, OH

Structural Remodeling
Franklin County's Heavy Timber Specialists | Best of Houzz 2020!
 Etheredge Design Associates, Inc.
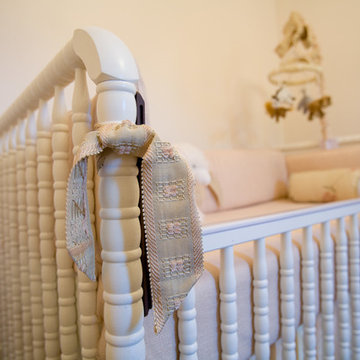
Converting a home office into a nursery for a growing family presented some interesting challenges because of the spatial limitations. Originally, the space housed an enclosed side porch in this small 1940's post war cottage style home. During the planning stage, the decision was made that the design elements of the nursery would be consistent with those previously used in the refurbished home…a soft, sophisticated mix of traditional furnishings accented with contemporary styled pieces and elements set within a monochromatic color scheme. Knowing that the expected child was a girl enabled the exploration of a full range of feminine options. To maximize style, unify the space, and preserve the impression of childlike innocence a decision was reached to use minimalist colors. Winter Morning coats the walls with just a hint of pink as seen in the sky at sunrise. Texture is introduced in a blush linen; its hue was chosen to increase spatial perception within this compact nursery. The same linen covers the crib bumper pads and upholsters the small scale glider. Blush is repeated in the chenille braid on the bumper pads, the pleat closures for the tailored striped silk crib skirt and, again, on the trim of the stripped silk drapery panels which are hung to the ceiling adding visual height and providing yards of gentle softness to the area. Antique botanicals from the owner's childhood provide femininity and a connection to the past. Mounted from the ceiling is a small glazed chandelier with clear crystal and rose quartz pendants perfectly suited for the little charmer who will occupy this room. The space may be small in size, but it is large in style, functionality, and filled with love.
 Etheredge Design Associates, Inc.
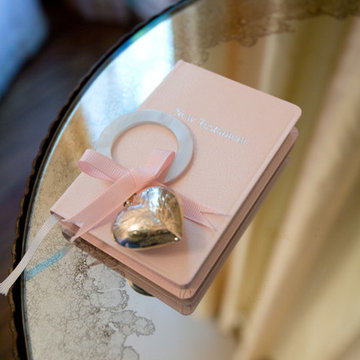
Converting a home office into a nursery for a growing family presented some interesting challenges because of the spatial limitations. Originally, the space housed an enclosed side porch in this small 1940's post war cottage style home. During the planning stage, the decision was made that the design elements of the nursery would be consistent with those previously used in the refurbished home…a soft, sophisticated mix of traditional furnishings accented with contemporary styled pieces and elements set within a monochromatic color scheme. Knowing that the expected child was a girl enabled the exploration of a full range of feminine options. To maximize style, unify the space, and preserve the impression of childlike innocence a decision was reached to use minimalist colors. Winter Morning coats the walls with just a hint of pink as seen in the sky at sunrise. Texture is introduced in a blush linen; its hue was chosen to increase spatial perception within this compact nursery. The same linen covers the crib bumper pads and upholsters the small scale glider. Blush is repeated in the chenille braid on the bumper pads, the pleat closures for the tailored striped silk crib skirt and, again, on the trim of the stripped silk drapery panels which are hung to the ceiling adding visual height and providing yards of gentle softness to the area. Antique botanicals from the owner's childhood provide femininity and a connection to the past. Mounted from the ceiling is a small glazed chandelier with clear crystal and rose quartz pendants perfectly suited for the little charmer who will occupy this room. The space may be small in size, but it is large in style, functionality, and filled with love.
 Klopf Architecture
From Mid-Century Classic to the Present
An iconic design updated with comfort, function, and flow for today.
A Remodel That Balances Past and Present
What started as a desire to update a classic Eichler soon became an exploration of how Mid-Century Modern design can successfully evolve for today. The client, a tech professional with a passion for scuba diving and underwater photography, wanted a home that would both honor its original character and feel tailored to his daily life. A lifelong technology enthusiast, he still owns the very first Mac desktop he saved up for as a teenager working at Radio Shack, a detail that underscores his appreciation for design that melds function and form.
Honoring Separation While Expanding Possibility
Unlike many contemporary remodels where walls are opened up to create expansive living spaces, this project took a more restrained approach. The client valued the defined rooms of the original plan and wanted to preserve as much wall space as possible for displaying his large-format underwater photography. The emphasis was not on dramatic spatial reinvention, but on thoughtful refinements. Klopf Architecture shaped a gallery-like backdrop while also expanding the primary suite, modernizing materials and fixtures throughout the home, and improving the functionality and layout of the kitchen. The finished home feels at once timeless and renewed, an Eichler that continues to inspire while fully supporting the lifestyle of its present-day owner.
A major turning point came mid-design. The original project brief had not included an addition, but as the reconfiguration of the primary bedroom and bath unfolded, it became clear that an expansion was the best approach to achieve the client’s vision of a more spacious suite. Fortunately, the adjustment came at a stage when revisions were still manageable and was integrated seamlessly, showing how thoughtful course corrections can strengthen a project rather than hinder it.
Navigating Challenges With Precision
The design development included multiple conceptual rounds, balancing preservation with subtle expansion. During construction, an existing post previously thought to be load-bearing turned out not to be. The structural engineer was able to pivot quickly, and both the post and the cross beam that had been intended to replace it could be omitted, allowing the original rhythm of the Eichler beam bays to be preserved.
Sustainability was not just a checklist item, but a way to align the home with the client’s values of simplicity, efficiency, and long-term functionality. R-38 roof insulation reduced energy usage, solar panels with battery storage provided independence and resilience, and passive comfort strategies eliminated the need forenergy-intensive air conditioning. An electric vehicle charger and an on-demand hot water recirculation system (with call buttons as opposed to having constant circulation) add to the home’s long-term efficiency factors. Together, these moves created a home that is quieter, more comfortable, and better equipped for the future, qualities that supported the client’s pragmatic approach to design and living lightly.
Details That Respect the Eichler DNA
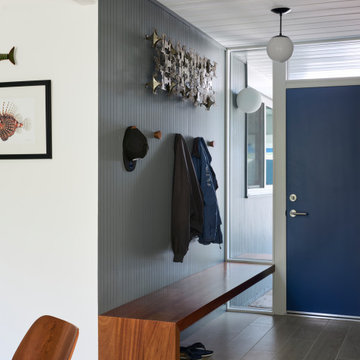
The remodel carries forward the Eichler’s original spirit while introducing new layers of modern livability. Originally, the house was approached along a deep, narrow walk, with the garage on one side and the house on the other, leaving the front door tucked far back within this chasm-like space. By pulling the entry forward, the design reshaped the arrival experience, creating a clearer threshold and a natural drop-off zone for bags, shoes, and keys. This shift also made room for a custom bench at the entry that extends seamlessly through the glass sidelight. The bench and drop-off zone now work together as a single, integrated sequence that supports everyday living while offering a tactile reminder of Eichler’s philosophy of connectedness.
At the client’s request, Klopf reintroduced a classic Eichler gesture by extending the exterior siding into the entry and living room. The detail reinforces a sense of indoor/outdoor continuity while providing a subtle architectural surface that allows the client’s photography to take visual precedence.
The signature concrete masonry wall at the front was reconstructed using blocks sourced to match the originals, now strengthened with rebar for seismic resilience while maintaining a private outdoor courtyard, visually extending the kitchen outward. A decorative trellis element, a detail borrowed from a neighboring Eichler, restores a familiar mid-century modern architectural motif. At the courtyard entry door, a custom etched glass sidelight with an ocean-themed design featuring kelp and jellyfish serves as a subtle homage to the client’s passion for deep-sea diving.
Landscaping became an integral part of the overall transformation. The homeowner engaged landscape architect Randi Johnsen of Third Nature Studio to shape a series of calm, inviting outdoor rooms that read as a natural extension of the interiors. While technically outside of the core construction scope, the landscape design proved central to achieving a sense of completeness and connectedness across the property. Such whole-property considerations often emerge as design ideas take shape, underscoring the importance of flexibility in planning and budgeting, as well as close collaboration among the design team starting early in the process.
The Value of Evolving Scope
As with many custom residential projects, the scope evolved during the design process. What began as a targeted remodel grew to include a new/expanded primary suite, a rebuilt CMU patio wall for strength and longevity, and a solar panel array and battery storage for energy resilience and carbon-reduction. Each thoughtful decision represented a conscious investment in the home’s performance and character, rather than a cost overrun.
The result was a project delivered on schedule, tailored precisely to the client’s lifestyle, and positioned to add long-term value both functionally and aesthetically. By embracing scope evolution as an opportunity rather than a challenge, and relying on good design paired with transparent communication, this remodel demonstrates how Eichler homes can be adapted for contemporary living without erasing their DNA.
Klopf Architecture project team: John Klopf, AIA, and Klara Kevane, Elise Webb and Nicholas LaNasa.
Contractor: Golden Cove Construction
Landscape Design: Third Nature Studio
Structural Engineer: Daniel Bastiao Design
Photography: ©2025 Mariko Reed
Year Completed: 2024
Location: Sunnyvale, CA
12