
Search results for "Protect sensitive" in Home Design Ideas

 Flooring Supply Shop
WARMUP STICKYMAT HEATING MAT
NADWM StickyMatt Use under tile, stone & LVT
The Warmup StickyMat is designed for use within an adhesive layer under tiles or within a leveling compound under other floor finishes.
The fixed spacing and self-adhesive mat makes installation of regularly shaped rooms quick and easy, whilst ensuring precision is maintained.
The NADWM floor heating mats are comprised of a low-profile twin conductor cable applied to a sturdy fiberglass mesh. The mats are self-adhesive on both sides and allow freedom of design and speed of installation thanks to the pre-spaced format of the heating cable.
ADVANTAGES
• The NADWM mats have been specifically designed to provide Primary Heating under a variety of floors. The cable has been pre assembled onto the mat to allow for an easy ’tape-down’ installation. At 132°F peak cable temperature, the NADWM system heats up fast and has been tested and proven to provide 70°F ambient temperature at 4ft in height in 1 hour.
• The NADWM mats come with double-sided tape on both sides for a flexible installation over all subfloors. Warmup’s StickyMAT range also provides for a pressure-sensitive adhesive on the mesh to ensure a very low installation profile.
• Using the 4iE® Programmable Thermostat, the product can be programmed to suit the user’s needs. The 4iE® monitors the systems’ power usage and will optimize comfort and consumption costs. The 4iE® controller combines the efficiency of built in floor and room sensors.
• The cable on the NADWM mats is insulated with ETFE advanced fluoropolymers both on the conductors and the outer jacket for maximum protection. The system is fully grounded with a 10ft lead cable for connection to power.
Specifications;
Operating voltage - 120V, 208V & 240V; 50/60Hz
Width 20” (500mm)
Mat thickness - 1/8” (3mm)
Inner / Outer Insulation - Advanced fluoropolymer (ETFE)
Output rating - 14W/sq ft
Coil tail length - 10ft (3m)
Approvals - cULus
The StickyMatTM System is ideal for installations within regularly shaped areas, where mats can be quickly rolled out across the floor in parallel runs, cut and turned.
WARRANTY & MAINTENANCE
When installed according to the installation manual and proper testing has been performed throughout, the system requires no maintenance for the duration of its warrantied life.
The NADWM mat is warrantied for 30 years against manufacturer’s defects and is protected by Warmup’s SAFETYnet guarantee. See www.warmup.com for full warranty details.
 Flooring Supply Shop
WARMUP STICKYMAT HEATING MAT
NADWM StickyMatt Use under tile, stone & LVT
The Warmup StickyMat is designed for use within an adhesive layer under tiles or within a leveling compound under other floor finishes.
The fixed spacing and self-adhesive mat makes installation of regularly shaped rooms quick and easy, whilst ensuring precision is maintained.
The NADWM floor heating mats are comprised of a low-profile twin conductor cable applied to a sturdy fiberglass mesh. The mats are self-adhesive on both sides and allow freedom of design and speed of installation thanks to the pre-spaced format of the heating cable.
ADVANTAGES
• The NADWM mats have been specifically designed to provide Primary Heating under a variety of floors. The cable has been pre assembled onto the mat to allow for an easy ’tape-down’ installation. At 132°F peak cable temperature, the NADWM system heats up fast and has been tested and proven to provide 70°F ambient temperature at 4ft in height in 1 hour.
• The NADWM mats come with double-sided tape on both sides for a flexible installation over all subfloors. Warmup’s StickyMAT range also provides for a pressure-sensitive adhesive on the mesh to ensure a very low installation profile.
• Using the 4iE® Programmable Thermostat, the product can be programmed to suit the user’s needs. The 4iE® monitors the systems’ power usage and will optimize comfort and consumption costs. The 4iE® controller combines the efficiency of built in floor and room sensors.
• The cable on the NADWM mats is insulated with ETFE advanced fluoropolymers both on the conductors and the outer jacket for maximum protection. The system is fully grounded with a 10ft lead cable for connection to power.
Specifications;
Operating voltage - 120V, 208V & 240V; 50/60Hz
Width 20” (500mm)
Mat thickness - 1/8” (3mm)
Inner / Outer Insulation - Advanced fluoropolymer (ETFE)
Output rating - 14W/sq ft
Coil tail length - 10ft (3m)
Approvals - cULus
The StickyMatTM System is ideal for installations within regularly shaped areas, where mats can be quickly rolled out across the floor in parallel runs, cut and turned.
WARRANTY & MAINTENANCE
When installed according to the installation manual and proper testing has been performed throughout, the system requires no maintenance for the duration of its warrantied life.
The NADWM mat is warrantied for 30 years against manufacturer’s defects and is protected by Warmup’s SAFETYnet guarantee. See www.warmup.com for full warranty details.

 International Landscaping Inc.
This project located in Muskoka blends modern sophistication into the natural setting.
Due to the adjacent lake and forest environments, a great deal of care was taken to ensure there were no impacts on these sensitive environments. The blast rock was salvaged to create “planting pockets” on the steep slopes allowing for nearly 700 mature trees to be craned into these locations. Working with local arborists, native species of trees and understory planting were selected to ensure ecosystems weren’t negatively impacted.
East of the residence, Poolscape Inc. constructed a cast-in-place, vanishing edge pool that was formed to sit above a 1200sqft. underground concrete bunker. The bunker houses the pool equipment & boiler, as-well-as site utility controllers for site irrigation and lighting.
Surrounding the pool and wrapping around the residence, extensive concrete slabs were poured and granite tiles laid to create multilevel patios and walkways.
Areas of the patios overlooking the lake cantilevered out over the edge of the rock face and required the installation of custom iron and glass railings between stone pillars to provide safety due to the severity of the slope.
On the west side of the site, a penetration asphalt sport court surface was suspended atop a 4-car concrete garage, more than 45ft above grade level. Enclosed by chain-link fencing, this elevated “sky-court” offers a stunning setting for recreational play.
Working with a local contractor, an existing dock was removed by barge, and a new steel frame was constructed while the lake was frozen. ‘Off-season’ prep-work allowed for seamless continuation of work in the spring when the dock surface, ipe, was installed. Shaped to provide a protected swimming area, the three boat-slip dock is complete with barbecue, built-in umbrella, flush mounted light fixtures, and custom pedestal that provides power and water to boats while docked.
To permit easy access between the residence and dock, natural Muskoka granite steps were craned in to create a safe path down the steep slope.
Find the right local pro for your project

 Pearl Remodeling
Laura
Inspiration for a large timeless u-shaped dark wood floor and brown floor kitchen remodel in Los Angeles with a farmhouse sink, shaker cabinets, white cabinets, quartz countertops, white backsplash, porcelain backsplash, stainless steel appliances, an island and black countertops
Inspiration for a large timeless u-shaped dark wood floor and brown floor kitchen remodel in Los Angeles with a farmhouse sink, shaker cabinets, white cabinets, quartz countertops, white backsplash, porcelain backsplash, stainless steel appliances, an island and black countertops
 Pearl Remodeling
Kitchen with brick wall
Mid-sized elegant galley medium tone wood floor and brown floor kitchen photo in Los Angeles with a single-bowl sink, shaker cabinets, white cabinets, quartz countertops, white backsplash, porcelain backsplash, stainless steel appliances, an island and black countertops
Mid-sized elegant galley medium tone wood floor and brown floor kitchen photo in Los Angeles with a single-bowl sink, shaker cabinets, white cabinets, quartz countertops, white backsplash, porcelain backsplash, stainless steel appliances, an island and black countertops

 RWH Architect PLLC
The Whistle Hill Residence anchors a ten home modern development and introduces a refined contemporary language to the region. Clean lines, controlled massing, and expansive glazing allow the home to sit confidently within its wooded site while maintaining sensitivity to the natural landscape. Strategic elevation changes and selective steel framing create open spans and cantilevered forms without sacrificing envelope performance.
Below grade, the design integrates a full wellness program—including a massage room, sauna, and locker area—supported by multi-zone mechanical controls, advanced vapor management, and acoustically isolated assemblies. The level also features a recreation area with a mini bar, poker lounge, and substantial built-in storage, all finished to create a warm, spa-like environment.
On the main level, the open kitchen and living area transition seamlessly to a protected patio with retractable screens and high-performance sliders, enabling year-round indoor–outdoor living. A private master wing includes dual closets, an electric fireplace, an oversized walk-in shower, and a secluded patio. Supporting spaces such as the office with custom millwork, walk-in pantry, and mudroom with laundry are integrated along a clear circulation spine.
The upper floors continue the home’s emphasis on clarity and light. Two third-floor bedrooms with walk-in closets share a spacious bath, while the rooftop level offers more than 1,500 square feet of engineered outdoor living space with sweeping woodland views and direct access to a greenhouse.
With its performance-driven detailing, thoughtful spatial organization, and modern architectural expression, the Whistle Hill Residence establishes a new benchmark for contemporary residential design in the area.
The project is a partnership with DHB Homes.
 RWH Architect PLLC
The Whistle Hill Residence anchors a ten home modern development and introduces a refined contemporary language to the region. Clean lines, controlled massing, and expansive glazing allow the home to sit confidently within its wooded site while maintaining sensitivity to the natural landscape. Strategic elevation changes and selective steel framing create open spans and cantilevered forms without sacrificing envelope performance.
Below grade, the design integrates a full wellness program—including a massage room, sauna, and locker area—supported by multi-zone mechanical controls, advanced vapor management, and acoustically isolated assemblies. The level also features a recreation area with a mini bar, poker lounge, and substantial built-in storage, all finished to create a warm, spa-like environment.
On the main level, the open kitchen and living area transition seamlessly to a protected patio with retractable screens and high-performance sliders, enabling year-round indoor–outdoor living. A private master wing includes dual closets, an electric fireplace, an oversized walk-in shower, and a secluded patio. Supporting spaces such as the office with custom millwork, walk-in pantry, and mudroom with laundry are integrated along a clear circulation spine.
The upper floors continue the home’s emphasis on clarity and light. Two third-floor bedrooms with walk-in closets share a spacious bath, while the rooftop level offers more than 1,500 square feet of engineered outdoor living space with sweeping woodland views and direct access to a greenhouse.
With its performance-driven detailing, thoughtful spatial organization, and modern architectural expression, the Whistle Hill Residence establishes a new benchmark for contemporary residential design in the area.
The project is a partnership with DHB Homes.
Sponsored
Sunbury, OH

J.Holderby - Renovations
Franklin County's Leading General Contractors - 2X Best of Houzz!

 Fidelity General Contractors Inc.
Mid-century modern white tile claw-foot bathtub photo in Los Angeles with a pedestal sink
 Tile Doctor Ltd
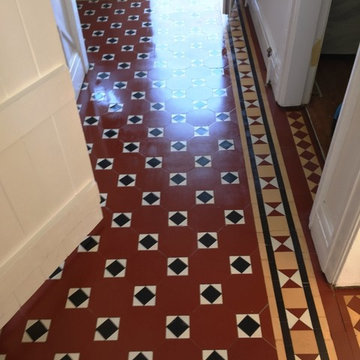
This Victorian tiled hallway was one of the most beautiful Victorian floors I have ever had the pleasure to work on. With the wide range of patterns and colours they are available in, it seems no two Victorian tiled floors are exactly the same, and this uniqueness is part of what makes them so appealing to property owners.
Unfortunately, this floor had been poorly maintained over the years, even suffering from a few loose and missing tiles. There was a thick coating of dust and dirt soiling its appearance, and the property owner was understandably keen to remedy the situation. Having realised that everyday household cleaners are not likely to achieve great results, she asked me to carry out a full professional restoration, including making some repairs where necessary. I was pleasantly surprised to find out that this property was situated in the town of Wyken, which is a few miles outside of Coventry city centre and in fact just down the road from where I live myself!
Before making a start on the cleaning process, it was first necessary to re-fix the small number of loose tiles and replace a single missing tile by the radiator. Fortunately, I’ve been working on these types of floors for some time and have built up a good collection of replacement Victorian tiles so I was able to find one that matched in nicely with the rest of the floor without too much problem.
To clean the tiles, I began by applying a layer of Tile Doctor Oxy-Gel directly into the floor with a small brush. This product is very similar to the popular Tile Doctor Pro Clean: both are strong alkaline cleaners, strippers and degreasers, with the main difference being that Oxy-Clean comes in a gel form, making it easier to control and therefore ideal for precise cleaning, or for application to vertical surfaces. Like Pro Clean and being an alkaline base it is suitable for use on all types of natural stone and tile. The Oxy-Gel was left to soak into the tiles for around ten minutes before being scrubbed in and then rinsed off carefully with water, I then used a wet vacuum to extract the now soiled cleaning solution off the floor.
The next step was to acid wash the floor using Tile Doctor Acid Gel; this served to break down alkaline mineral deposits inherent in the grout along with some excess grout that had been left on the untidily left on tile from installation. It is recommended not to use this product on acid-sensitive soon such as Marble and Limestone as it can cause irreparable etching but its fine on Victorian tiles as long as you don’t leave it on too long.
Finally, the floor was given a rinse with clean water to remove any trace of chemicals from the cleaning and to neutralise the area in preparation for sealing.
I left the floor for 48 hours to dry before returning to the property to seal the tiles. This allowed plenty of time for the floor to dry completely, which is important as any excess moisture can damage the ability of the sealer to protect against dirt and stains.
My choice of sealer for this floor was Tile Doctor High Shine; three coats in total were applied, providing – as the product name suggests – the high shine finish that the customer had requested. The sealer will provide durable surface protection going forward preventing dirt from becoming ingrained into the pores of the tile and ensuring it remains easy to clean and keeping its appearance for some time to come.
As a big fan of Victorian tiles, it was a great pleasure to restore this floor, and my customer was certainly pleased too. It’s amazing how far a little professional maintenance can go to improving the appearance of these fantastic types of floor.
Mick Gayton
Warwickshire Tile Doctor
 Tile Doctor Ltd
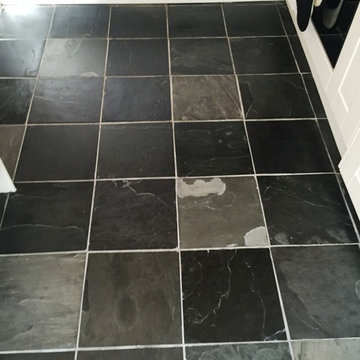
These Slate kitchen floor tiles at a property in Oxford were in good physical condition, but had become dull over time due to heavy usage, and upon close inspection the grout was stained. The customer contacted me as she was keen to get the tiles back to looking their best. This would require a thorough clean and the application of a fresh sealer.
While Slate floor tiles are reputed to be hard wearing and damage resistant – and are therefore a popular choice for high traffic areas like kitchens – this does not exclude them from needing regular maintenance.
To begin, I mixed a strong solution of Tile Doctor Pro Clean and water. Pro-Clean is a versatile cleaner that when used in a weak dilution can be used as a regular cleaner for most types of natural stone floor, including more sensitive stones such as Limestone and Marble.
The cleaning was then spread across the surface area of the floor, and left it to dwell for ten minutes to allow the solution to seep into the pores of the stone and lift the ingrained dirt to the surface. Pro-Clean in a strong dilution also functions as a stripping product, meaning it works to strip away any old and ineffectual sealer.
I then scrubbed the solution into the floor using a stiff scrubbing brush, paying particular attention to the grout in order to break down the visible staining. The tiles and grout lines came up really well during the cleaning process – this became clear once I had rinsed the floor and removed the residue using a wet vacuum.
With the customer eager to have the job completed quickly, I installed portable room dryers and utilised a heat gun to dry the floor, allowing me to seal it on the same day.
Once I had ensured the floor was completely dry, I commenced the sealing process by firstly applying a coat of Tile Doctor Stone Oil, a product which is designed to bring out all of the natural dark shades in the Slate.
When this was dry, I applied a single coat of Tile Doctor Colour Grow. This is an impregnating sealer, meaning that it soaks into pores of the stone to provide durable protection from within against ingrained dirt and stains. Colour Grow also enhances the natural colours in the stone even further.
The customer was amazed by just how big a difference could be made to the tiles in the space of just a day. Although the tiles were generally in very good nick, my main task was to be liven them up – judging by the before and after photos, I think this was achieved. And, now that they have been treated to a fresh seal, the tiles will be prevented from quickly becoming dull again.
Barry Woodward
Oxfordshire Tile Doctor
 Tile Doctor Ltd
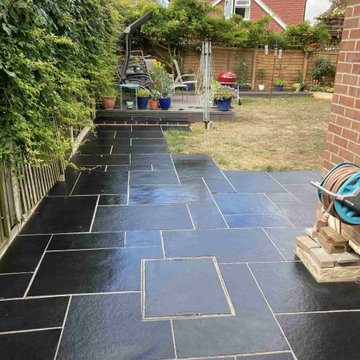
We were called out to look at this new Black Limestone patio in Ashford which was not looking as it should. The client had laid it himself but unfortunately had not managed to polish off all the grout from the surface of the Limestone thereby degrading the appearance of the stone.
Grout Smearing or Grout Haze is a common problem when it comes to tiling and this problem seems to be on the increase due to new grout formula’s which are tougher but dry a lot faster. Usually, the excess grout can be removed using a mild acid however it is not possible to do that on Limestone as this Stone is acid sensitive and as well as etching the stone can cause it to turn white. I know Tile Doctor has resolved a few jobs like this in the past for builders who do not always understand the unique characteristics of the stone.
I discussed with the client how Tile Doctor could help and gave him a quote for the work to be carried out. He was happy to go ahead so having consulted the weather forecast for a couple of dry days we agreed a date to return.
To remove the Grout Haze and clean the appearance of the Limestone I applied a Tile Doctor Brick and Patio Cleaner and worked it in with a coarse 400 grit diamond encrusted burnishing pad. The coarse pad does leave the stone looking a little rough, so the surface was then renovated using the finer burnishing pads of 800 and 1500 grit using water for lubrication. By using the pads in sequence, it gradually smooths the surface of the stone. Once done the tiles were rinsed with water and the soil removed with an industrial wet vacuum. The patio was looking good, the day was nice and bright, so we left the patio for a few hours to dry in the sun.
Once the stone was dry the patio was sealed with single coat of Tile Doctor Stone Oil which is an impregnating sealer that improves strength and restores colour to the stone.
Once dry the Stone Oil was followed by a coat of Tile Doctor Colour Grow sealer which like the Stone Oil penetrates the pores of the stone improving colour and adding protection. The treatment and combination of products transformed the appearance of the patio and provided the client with exactly the look he required.
As you can see from the after pictures the patio had a rich black colour and looked as it should. The client was over the moon with the result and was thankful that we had managed to rescue his work. Lesson learned for any future project he might take on, beware of grout haze!
Michael Conlon
South Kent Tile Doctor


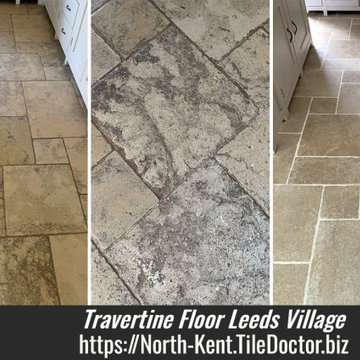 Tile Doctor Ltd
I was contacted about a Georgian property in the Kent village of Leeds , to see if I could do anything to improve a Travertine tiled floor. The use of Travertine was extensive and had been installed throughout the ground floor including the kitchen, dining room, utility and bathroom WC. Travertine is probably my favourite stone, but it is acid sensitive and attracts dirt easily, due to its ‘holey’ composition.
Initially we discussed the floor over the phone where I got to know about the issues they were experiencing, and I detailed the renovation process I normally use to restore it including the products and timelines. Naturally they wanted to me to provide a quote for the work however its tricky to do that accurately without seeing the floor, so I arranged a date to pop over.
Upon arriving I could see the tiles and the wide grout joints had extensive, ingrained dirt indicating the previous sealer had long since worn away. This is a common issue with stone floors, and to re-assure myself and the client it could be resolved I cleaned a small area in the utility room with pleasing results!
This test clean helped me to understand which products and methods would work best on the floor and later that day I emailed over a detailed quote for the renovation. Happy with the quote I received a reply the same day asking when I could start.
My colleague and I arrived on the agreed date and work started with adding protection to all areas that required it. We use a lot of water during the cleaning process and some materials such as MDF can become damaged with water ingress, so it makes sense to do this.
To get the floor clean, a coarse Carbide Brush fitted to a rotary machine was run over the Travertine tiles to scrub in a strong solution of Tile Doctor Pro-Clean. This process generates a lot of slurry as the dirt was washed out of the stone and grout which is extracted with a wet vacuum as we progressed.
Next it was on hands and knees with more Tile Doctor Pro-Clean and handheld brushes run over stubborn areas and along the grout lines to take them from 80% up to 100%.
Happy with the results, the next step was to renovate the stone using a series of diamond encrusted burnishing pads. Using only water for lubrication this process starts with the application of a coarse 400-grit burnishing pad attached to the floor buffer. This produces a lot of slurry which again was removed with a wet vacuum.
This left the Travertine clean, but the pores of the stone had been opened giving the floor a matt finish and more absorbent than it was originally. To further refine the appearance of the stone the next two burnishing pads were applied which are 800 and 1500-grit. These pads polish the stone and close the pores, restoring the natural sheen in the process. After each pad was applied the slurry was rinsed off the floor with water and extracted with the wet vacuum. Once complete the floor was left to dry off fully overnight.
I arrived the next day and took several moisture readings from the floor to check that it had dried off sufficiently overnight. The results were good, so work moved onto sealing the Travertine with two coats of Tile Doctor Ultra Seal which is a natural look impregnating sealer. It works by soaking into the stone, occupying the pores and thereby preventing dirt from becoming ingrained there. This ensures dirt remains on the surface where it is easily cleaned away.
The final step in the floor’s renovation was to apply the last of the diamond polishing pads which is a very fine 3000-grit. This pad further improves the polished appearance of the stone resulting in a satisfying sheen.
The work made a massive difference to the floor, and I received an email the next day from one of the owners who was really pleased with the transformation:
”Floors look brilliant. Very pleased.”
For the care and maintenance of polished sealed floors I recommend the use of Tile Doctor’s Stone Soap which is a gentle but effective cleaning product that won’t impact the sealer and contains a patina enhancer. When it comes to sealed floors my mantra is:
“If you look after the sealer, the sealer will look after the floor!”
Graham Davis
North Kent Tile Doctor
Sponsored
Sunbury, OH
J.Holderby - Renovations
Franklin County's Leading General Contractors - 2X Best of Houzz!

 Stonelace Designs
Originally, the exterior of the Napa ranch residence was a standard knocked down stucco finish. We covered over the entire exterior of the house with a natural plaster product that has been made in Italy for centuries, known as Rialto or Vero. This product is a combination of slaked lime mixed with 60% reconstituted crushed marble dust. Quarried from the legendary Carrara marble mines. The finish itself is a vertically combed striated texture embedded into the plaster. While it cures, a transparent group of patinas are applied to the stone-like plaster substance to create a look of an aged villa.

 BAUFORMAT
Wavy mother of pearl porcelain tile, wavy white tile for bathroom shower or backsplash. Perfect for fireplace or accent wall
Example of a trendy bathroom design in Los Angeles
Example of a trendy bathroom design in Los Angeles

 OC Dutch Doors - By Creative Co.
Inspiration for a mid-sized transitional front door remodel in Orange County with a blue front door


 Bella Tile and Stone
Mid-sized transitional enclosed light wood floor and beige floor family room photo with white walls, a standard fireplace, a tile fireplace and no tv


7