
Search results for "Remodeling task" in Home Design Ideas

 Talon Construction Inc.
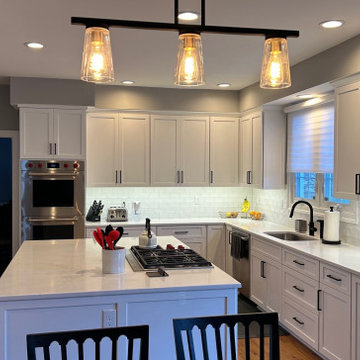
This kitchen remodel in Olney showcases a transitional design that balances clean, modern lines with a warm, inviting atmosphere. The space is anchored by a large, multi-functional center island and a bright, monochromatic color palette.
Cabinetry and Hardware
• Style: The kitchen features white Shaker-style cabinetry that extends to the ceiling, maximizing storage and creating a sense of height in the room.
• Hardware: A bold contrast is achieved using matte black linear pulls on both the drawers and cabinets, providing a modern, industrial touch to the traditional door style.
Countertops and Backsplash
• Surfaces: The countertops are a polished white quartz with subtle gray veining, offering a durable and sleek workspace.
• Backsplash: A classic white subway tile backsplash is used throughout, featuring a glossy finish that reflects the under-cabinet LED lighting.
Key Features and Appliances
• Center Island: The oversized island serves as the heart of the kitchen, housing a gas cooktop and providing ample space for food preparation and casual dining. It also features integrated electrical outlets and deep drawer storage.
• High-End Appliances: The layout includes a professional-grade stainless steel double wall oven and a built-in refrigerator, seamlessly integrated into the cabinetry.
• Wet Bar/Coffee Station: A dedicated beverage area includes a wine cooler, additional storage, and plenty of counter space for a coffee maker and accessories.
Lighting and Flooring
• Illumination: The design utilizes a layered lighting plan, including recessed ceiling lights, under-cabinet task lighting, and a modern industrial chandelier over the adjacent dining table.
• Flooring: The cool tones of the cabinetry and counters are balanced by warm-toned hardwood flooring, which runs throughout the open-concept space.
 Talon Construction Inc.
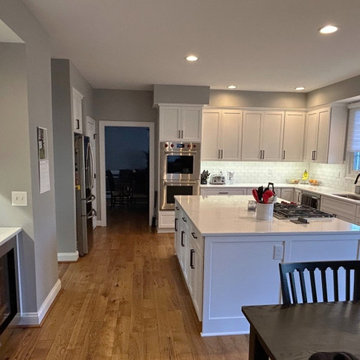
This kitchen remodel in Olney showcases a transitional design that balances clean, modern lines with a warm, inviting atmosphere. The space is anchored by a large, multi-functional center island and a bright, monochromatic color palette.
Cabinetry and Hardware
• Style: The kitchen features white Shaker-style cabinetry that extends to the ceiling, maximizing storage and creating a sense of height in the room.
• Hardware: A bold contrast is achieved using matte black linear pulls on both the drawers and cabinets, providing a modern, industrial touch to the traditional door style.
Countertops and Backsplash
• Surfaces: The countertops are a polished white quartz with subtle gray veining, offering a durable and sleek workspace.
• Backsplash: A classic white subway tile backsplash is used throughout, featuring a glossy finish that reflects the under-cabinet LED lighting.
Key Features and Appliances
• Center Island: The oversized island serves as the heart of the kitchen, housing a gas cooktop and providing ample space for food preparation and casual dining. It also features integrated electrical outlets and deep drawer storage.
• High-End Appliances: The layout includes a professional-grade stainless steel double wall oven and a built-in refrigerator, seamlessly integrated into the cabinetry.
• Wet Bar/Coffee Station: A dedicated beverage area includes a wine cooler, additional storage, and plenty of counter space for a coffee maker and accessories.
Lighting and Flooring
• Illumination: The design utilizes a layered lighting plan, including recessed ceiling lights, under-cabinet task lighting, and a modern industrial chandelier over the adjacent dining table.
• Flooring: The cool tones of the cabinetry and counters are balanced by warm-toned hardwood flooring, which runs throughout the open-concept space.
Find the right local pro for your project
 FBC Remodel
Bright and Functional Kitchen Sink Area with Natural Light and Modern Elegance
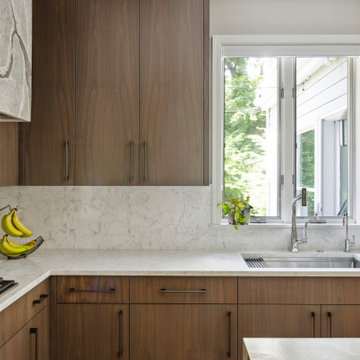
This beautifully designed kitchen sink area brings together functionality and sophisticated style, making daily tasks a joy. A large picture window over the sink floods the space with natural light, offering views of the outdoors and creating a bright, refreshing workspace.
The sink is sleekly integrated into the countertop, which extends up as a seamless backsplash — adding a clean, continuous look while making maintenance effortless. Modern chrome fixtures, including a high-arc faucet and filtered water tap, add both function and shine to the space.
Warm wood cabinetry with minimalist matte pulls frames the area beautifully, offering ample storage while keeping the design grounded and cohesive with the rest of the kitchen. A pop of greenery by the window adds life and softness to the clean-lined aesthetic, making this kitchen as inviting as it is practical.
Perfectly aligned with the kitchen's open-concept design, this sink zone elevates everyday living with thoughtful details and a luxurious yet approachable feel.
 Buildwright Construction Inc
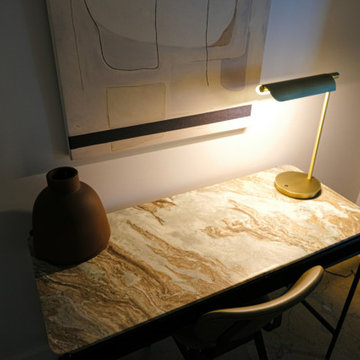
Detailed view of the workspace area with a stone desktop, warm task lighting, and simple modern styling.
Home office - mid-sized modern freestanding desk home office idea in Los Angeles
Home office - mid-sized modern freestanding desk home office idea in Los Angeles
 Morey Remodeling Group
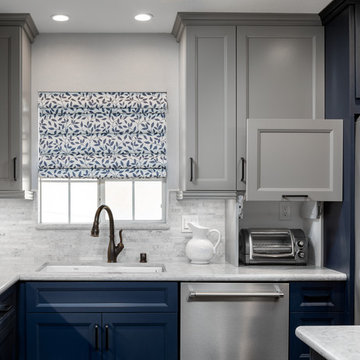
Morey Remodeling Group's kitchen design and remodel helped this multi-generational household in Garden Grove, CA achieve their desire to have two cooking areas and additional storage. The custom mix and match cabinetry finished in Dovetail Grey and Navy Hale were designed to provide more efficient access to spices and other kitchen related items. Flat Black hardware was added for a hint of contrast. Durable Pental Quartz counter tops in Venoso with Carrara white polished marble interlocking pattern backsplash tile is displayed behind the range and undermount sink areas. Energy efficient LED light fixtures and under counter task lighting enhances the entire space. The flooring is Paradigm water proof luxury vinyl.
 Talon Construction Inc.
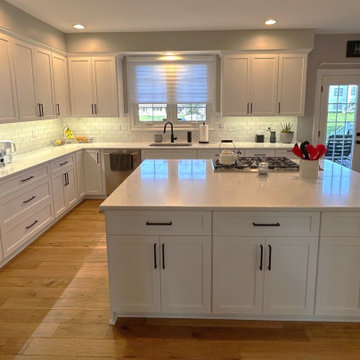
This kitchen remodel in Olney showcases a transitional design that balances clean, modern lines with a warm, inviting atmosphere. The space is anchored by a large, multi-functional center island and a bright, monochromatic color palette.
Cabinetry and Hardware
• Style: The kitchen features white Shaker-style cabinetry that extends to the ceiling, maximizing storage and creating a sense of height in the room.
• Hardware: A bold contrast is achieved using matte black linear pulls on both the drawers and cabinets, providing a modern, industrial touch to the traditional door style.
Countertops and Backsplash
• Surfaces: The countertops are a polished white quartz with subtle gray veining, offering a durable and sleek workspace.
• Backsplash: A classic white subway tile backsplash is used throughout, featuring a glossy finish that reflects the under-cabinet LED lighting.
Key Features and Appliances
• Center Island: The oversized island serves as the heart of the kitchen, housing a gas cooktop and providing ample space for food preparation and casual dining. It also features integrated electrical outlets and deep drawer storage.
• High-End Appliances: The layout includes a professional-grade stainless steel double wall oven and a built-in refrigerator, seamlessly integrated into the cabinetry.
• Wet Bar/Coffee Station: A dedicated beverage area includes a wine cooler, additional storage, and plenty of counter space for a coffee maker and accessories.
Lighting and Flooring
• Illumination: The design utilizes a layered lighting plan, including recessed ceiling lights, under-cabinet task lighting, and a modern industrial chandelier over the adjacent dining table.
• Flooring: The cool tones of the cabinetry and counters are balanced by warm-toned hardwood flooring, which runs throughout the open-concept space.

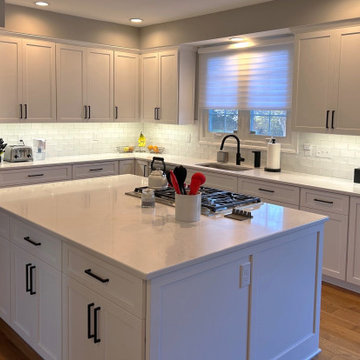 Talon Construction Inc.
This kitchen remodel in Olney showcases a transitional design that balances clean, modern lines with a warm, inviting atmosphere. The space is anchored by a large, multi-functional center island and a bright, monochromatic color palette.
Cabinetry and Hardware
• Style: The kitchen features white Shaker-style cabinetry that extends to the ceiling, maximizing storage and creating a sense of height in the room.
• Hardware: A bold contrast is achieved using matte black linear pulls on both the drawers and cabinets, providing a modern, industrial touch to the traditional door style.
Countertops and Backsplash
• Surfaces: The countertops are a polished white quartz with subtle gray veining, offering a durable and sleek workspace.
• Backsplash: A classic white subway tile backsplash is used throughout, featuring a glossy finish that reflects the under-cabinet LED lighting.
Key Features and Appliances
• Center Island: The oversized island serves as the heart of the kitchen, housing a gas cooktop and providing ample space for food preparation and casual dining. It also features integrated electrical outlets and deep drawer storage.
• High-End Appliances: The layout includes a professional-grade stainless steel double wall oven and a built-in refrigerator, seamlessly integrated into the cabinetry.
• Wet Bar/Coffee Station: A dedicated beverage area includes a wine cooler, additional storage, and plenty of counter space for a coffee maker and accessories.
Lighting and Flooring
• Illumination: The design utilizes a layered lighting plan, including recessed ceiling lights, under-cabinet task lighting, and a modern industrial chandelier over the adjacent dining table.
• Flooring: The cool tones of the cabinetry and counters are balanced by warm-toned hardwood flooring, which runs throughout the open-concept space.
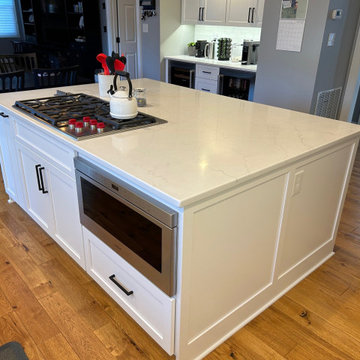 Talon Construction Inc.
This kitchen remodel in Olney showcases a transitional design that balances clean, modern lines with a warm, inviting atmosphere. The space is anchored by a large, multi-functional center island and a bright, monochromatic color palette.
Cabinetry and Hardware
• Style: The kitchen features white Shaker-style cabinetry that extends to the ceiling, maximizing storage and creating a sense of height in the room.
• Hardware: A bold contrast is achieved using matte black linear pulls on both the drawers and cabinets, providing a modern, industrial touch to the traditional door style.
Countertops and Backsplash
• Surfaces: The countertops are a polished white quartz with subtle gray veining, offering a durable and sleek workspace.
• Backsplash: A classic white subway tile backsplash is used throughout, featuring a glossy finish that reflects the under-cabinet LED lighting.
Key Features and Appliances
• Center Island: The oversized island serves as the heart of the kitchen, housing a gas cooktop and providing ample space for food preparation and casual dining. It also features integrated electrical outlets and deep drawer storage.
• High-End Appliances: The layout includes a professional-grade stainless steel double wall oven and a built-in refrigerator, seamlessly integrated into the cabinetry.
• Wet Bar/Coffee Station: A dedicated beverage area includes a wine cooler, additional storage, and plenty of counter space for a coffee maker and accessories.
Lighting and Flooring
• Illumination: The design utilizes a layered lighting plan, including recessed ceiling lights, under-cabinet task lighting, and a modern industrial chandelier over the adjacent dining table.
• Flooring: The cool tones of the cabinetry and counters are balanced by warm-toned hardwood flooring, which runs throughout the open-concept space.
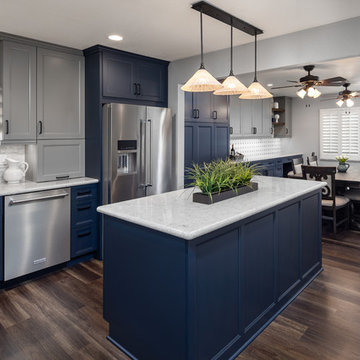 Morey Remodeling Group
Morey Remodeling Group's kitchen design and remodel helped this multi-generational household in Garden Grove, CA achieve their desire to have two cooking areas and additional storage. The custom mix and match cabinetry finished in Dovetail Grey and Navy Hale were designed to provide more efficient access to spices and other kitchen related items. Flat Black hardware was added for a hint of contrast. Durable Pental Quartz counter tops in Venoso with Carrara white polished marble interlocking pattern backsplash tile is displayed behind the range and undermount sink areas. Energy efficient LED light fixtures and under counter task lighting enhances the entire space. The flooring is Paradigm water proof luxury vinyl.
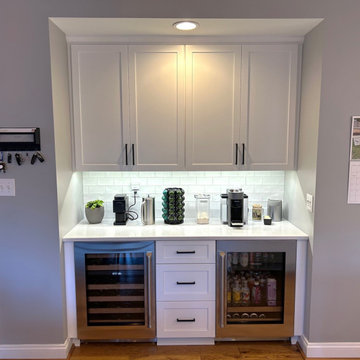 Talon Construction Inc.
This kitchen remodel in Olney showcases a transitional design that balances clean, modern lines with a warm, inviting atmosphere. The space is anchored by a large, multi-functional center island and a bright, monochromatic color palette.
Cabinetry and Hardware
• Style: The kitchen features white Shaker-style cabinetry that extends to the ceiling, maximizing storage and creating a sense of height in the room.
• Hardware: A bold contrast is achieved using matte black linear pulls on both the drawers and cabinets, providing a modern, industrial touch to the traditional door style.
Countertops and Backsplash
• Surfaces: The countertops are a polished white quartz with subtle gray veining, offering a durable and sleek workspace.
• Backsplash: A classic white subway tile backsplash is used throughout, featuring a glossy finish that reflects the under-cabinet LED lighting.
Key Features and Appliances
• Center Island: The oversized island serves as the heart of the kitchen, housing a gas cooktop and providing ample space for food preparation and casual dining. It also features integrated electrical outlets and deep drawer storage.
• High-End Appliances: The layout includes a professional-grade stainless steel double wall oven and a built-in refrigerator, seamlessly integrated into the cabinetry.
• Wet Bar/Coffee Station: A dedicated beverage area includes a wine cooler, additional storage, and plenty of counter space for a coffee maker and accessories.
Lighting and Flooring
• Illumination: The design utilizes a layered lighting plan, including recessed ceiling lights, under-cabinet task lighting, and a modern industrial chandelier over the adjacent dining table.
• Flooring: The cool tones of the cabinetry and counters are balanced by warm-toned hardwood flooring, which runs throughout the open-concept space.

 Allreno
How Can I Reduce the Cost of Remodeling a Bathroom? Allreno Design AI
Renovating a bathroom is an exciting but often expensive project. Homeowners frequently worry about how to balance quality with affordability. Fortunately, there are smart strategies to cut costs without sacrificing style. Whether you're updating a bathroom vanity, retiling the floor, or overhauling the entire space, making informed decisions can help you save thousands.
At Allreno, we understand that affordability and quality go hand in hand. That’s why we developed the Allreno Design App, a cutting-edge tool that simplifies the bath renovation process and helps homeowners make cost-effective choices. Here’s how you can reduce expenses on your next bathroom remodel:
1. Plan Ahead with a Budget
One of the biggest mistakes homeowners make is starting a renovation without a clear budget. Before you begin, list all the necessary expenses, including labor, materials, and unexpected costs. Using tools like the Allreno Design App, you can visualize your remodel and get instant cost estimates based on your selections.
2. Choose a Cost-Effective Bathroom Vanity
A bathroom vanity is often the focal point of a bathroom remodel. Instead of opting for a custom-built unit, consider ready-to-assemble or pre-designed vanities. Allreno partners with top manufacturers to offer stylish, high-quality vanities at competitive prices, helping you save money without compromising on design.
3. Keep the Plumbing Where It Is
Relocating plumbing fixtures—such as sinks, toilets, and showers—can significantly increase labor costs. Keeping your layout intact can save you thousands in contractor fees. The Allreno Design App allows you to experiment with different configurations while ensuring you stay within your budget.
4. Refinish Instead of Replacing
Instead of replacing your bathtub, tiles, or countertops, consider refinishing them. Reglazing a tub, repainting cabinets, or updating hardware can make a huge difference at a fraction of the cost. Small changes can have a big impact without the need for a full replacement.
5. Shop Smart for Materials
Purchasing materials strategically can lead to big savings. Look for clearance items, buy in bulk, and compare prices across different suppliers. Allreno simplifies this by connecting you with trusted vendors and providing access to exclusive discounts on bath renovation materials.
6. Do Some of the Work Yourself
While some tasks require professionals, there are many things you can do on your own, such as painting, installing new hardware, or even assembling a pre-made bathroom vanity. If you're comfortable with DIY projects, this can significantly reduce labor costs.
7. Use Technology to Your Advantage
The Allreno Design App is a game-changer in the renovation industry. It helps homeowners design their ideal bathroom, estimate costs, and even connect with local professionals. By using AI-driven recommendations, the app ensures you get the best value without unnecessary expenses.
Conclusion
Bathroom remodeling doesn’t have to break the bank. By planning ahead, making smart material choices, and leveraging technology like the Allreno Design App, you can achieve a beautiful, budget-friendly bathroom. Whether you're upgrading a bathroom vanity or tackling a full bath renovation, these strategies will help you save money while creating a space you love.
www.allreno.co
 Twelve Stones Designs, LLC
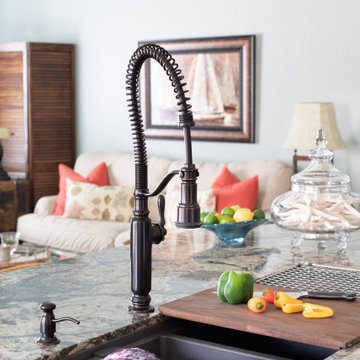
The owners of this kitchen had spent the money to upgrade the finishes in their kitchen upon building the home 12 years ago, but after living in the space for several years they realized how nonfunctional the layout really was. The (then) two preschool aged children had grown into busy, hungry teenagers with many friends who also liked to hang out at the house. So the family needed a more functional kitchen with better traffic flow, space for daily activities revolving around the kitchen at different times of day, and a kitchen that could accommodate cooking for and serving large groups. Furthermore, the dark, traditional finishes no longer reflected the homeowners’ style. They requested a brighter, more relaxed, coastal style that reflected their love of the seaside cities they like to visit.
Originally, the kitchen was U-shaped with a narrow island in the middle. The island created narrow aisles that bottle-necked at the dishwasher, refrigerator, and cooktop areas. There was a pass-through from the foyer into the kitchen, but the owners never liked that the pass-through was also located so close to the powder room. The awkward proximity was unappealing and made guests feel uncomfortable.
The kitchen’s storage was made up of lots of narrow cabinets, apothecary drawers, clipped corner units, and very few drawers. It lacked useful storage for the larger items the family used on a daily basis. And the kitchen’s only pantry was small closet that had only builder-grade, narrow shelving with no illumination to be able to see the contents inside.
Overall, the kitchen’s lighting plan was poorly executed. Only six recessed cans illuminated the entire kitchen and nook areas. The under cabinet lighting was not evenly distributed either. In fact, the builder had mis-placed the under cabinet lighting around the decorative pilasters which made for choppy, dark cubbies. Further, the builder didn’t include any lighting over the sink or the bar area, which meant whoever was doing the dishes was always in their own shadow. That, coupled with the steep overhang of the game room above made the bar area feel like a dim, cavernous space that wasn’t inviting or task oriented. The kitchen looked out into the main living space, but the raised bar and a narrow wall (which held the only large cabinet in the kitchen) created more of a barrier than a relationship to the living room or breakfast nook. In fact, one couldn’t even see the breakfast nook from the cooktop or sink areas due to its orientation. The raised bar top was too narrow to comfortably sit to either dine at or chat from due to the lack of knee space. The the homeowners confided that the kitchen felt more like a dark, dirty prison than place where the family, or their guests, wanted to gather and commune.
The clients' needs and desires were:
➢ to create a kitchen that would be a space the family loved to be in; to relate to the adjacent spaces all around, and to have better flow for entertaining large groups
➢ to remove the walls between the breakfast nook and living area and to be able to utilize the natural light from the windows in both those areas
➢ to incorporate a functional chopping block for prepping fresh food for home cooked meals, an island with a large sink and drain board, 2 pull out trash cans, and seating for at least the 2 teens to eat or do homework
➢ to design a kitchen and breakfast nook with an airy, coastal, relaxed vibe that blended with the rest of the house's coastal theme
➢ to integrate a layered lighting plan which would include ample general illumination, specific task lighting, decorative lighting, and lots of illuminated storage
➢ to design a kitchen with not only more storage for all the husband’s kitchen gadgets and collection of oils and spices, but smart storage, including a coffee/breakfast bar and a place to store and conceal the toaster oven and microwave
➢ to find a way to utilize the large open space between the kitchen, pantry area, and breakfast nook
Twelve Stones Designs achieved the owner's goals by:
➢ removing the walls between the kitchen and living room to allow the natural light to filter in from the adjacent rooms and to create a connection between the kitchen, nook, and living spaces for a sense of unity and communion
➢ removing the existing pantry and designing 3 large pantry style cabinets with LED tape lights and rollout drawers to house lots of kitchen appliances, gadgets, and tons of groceries. We also took the cabinets all the way up to the 9’ ceiling for additional storage for seasonal items and bulk storage.
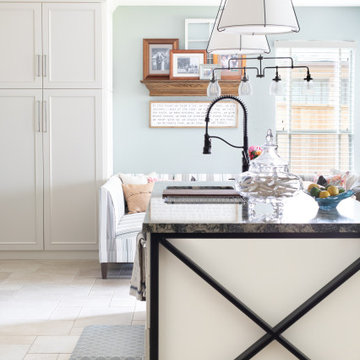
➢ designing 2 islands - 1 with a gorgeous black walnut chopping block that houses a drawer for chopping and carving knives and a custom double pull out trash unit for point of use utilization - and 1 that houses the dishwasher, a large Blanco Gourmet sink with integrated drain board, woven baskets for fresh root vegetables and kitchen towels, plenty of drawer storage for kitchen items, and bar seating for up to 4 diners.
➢ closing off the space between the kitchen and the powder room to create a beautiful new private alcove for the powder room as well as adding some decorative storage. This also gave us space to include more tall storage near the new range for precision placement of the husband’s extensive oil and spice collection as well as a location for a combo-steam oven the wife wanted for baking and cooking healthy meals.
The project is enhanced functionally by:
➢ incorporated USB and standard receptacles for the kids’ laptops and phone charging in the large island
➢ designing the small island to include additional open shelving for items used on a daily basis such as a variety of bowls, plates, and colanders. This set up also works well for the husband who prefers to “plate” his dinners in restaurant-style fashion before presenting them to the table.
➢ the integration of specific storage units, such as double stacked cutlery drawers, a custom spice pull-out, a Kuerig coffee and tea pod drawer, and custom double stacked utensil drawers
➢ moving the refrigerator to the old oven location - this eliminated the bottle neck as well as created a better relationship to the eating table. It also utilizes the floor space between the pantry, nook, and kitchen
➢ creating a banquet style breakfast nook - this banquette seating not only doubles the amount of seating for large gatherings but it better utilizes the odd space between the kitchen and the previous nook area. It also helps to create a distinct pathway from the mudroom room through the pantry area, kitchen, nook, and living room.
➢ the coffee/breakfast bar area which includes the perfect location for the concealed microwave and toaster oven, convenient storage for the coffee pods and tea accoutrements. Roll-out drawers below also house the smoothie maker, hot water kettle, and a plethora of smoothie-making ingredients such as protein powders, smoothie additives, etc. Furthermore, the drawers below the Keurig house measuring utensil, cutlery, baking supplies and tupperware storage.
➢ incorporating lots of wide drawers and pullouts to accommodate large cookware.
➢ utilizing as much vertical space as possible by building storage to the ceiling which accommodates the family’s abundant amount of serving platters, baking sheets, bakeware, casserole dishes, and additional cutting boards.
The project is enhanced aesthetically by:
➢ new 5-piece Versailles pattern porcelain tile that now seamlessly joins the entire down stairs area together creating a bright, cohesiveness feeling instead of choppy separated spaces - it also adds a coastal feeling
➢ designing a cabinet to conceal the microwave and toaster oven
➢ the coastal influenced light fixtures over the nook table and island
➢ the sandy colors of the Langdon Cambria countertops. The swirling pattern and sparkling quartz pieces remind the homeowner of black-and-tan sandy beaches
➢ the striped banquet seating whose creamy white background and blue-green stripes were the inspiration for the cabinet and wall colors.
➢ All the interior doors were painted black to coordinate with the blacks and grays in the backsplash tile and countertop. This also adds a hint of tailored formality to an otherwise casual space.
➢ the use of WAC's Oculux small aperture LED units for the overhead lighting complimented with Diode LED strips for task lighting under the cabinets and inside the pantry and glass wall cabinets. All of the lighting applications are on separate dimmer switches.
Innovative uses of materials or construction methods by Realty Restoration LLC:
➢ Each 1-1/2” x 3” block of reclaimed end-grain black walnut that makes up the center island chopping block was hand milled and built in the shop. It was designed to look substantial and proportional to the surrounding elements, executed by creating the 4 inch tall top with a solid wood chamfered edge band.
➢ The metal doors on either side of the vent hood were also custom designed for this project and built in the Realty Restoration LLC shop. They are made 1x2, 11-gauge mild steel with ribbed glass. Weighing 60 lbs a piece, heavy duty cabinet hinges were added to support the weight of the door and keep them from sagging.
➢ Under-cabinet receptacles were added along the range wall in order to have a clean, uninterrupted backsplash.
Design obstacles to overcome:
➢ Because we were removing the demising walls between the kitchen and living room, we had to find a way to plumb and vent the new island. We did this by tunneling through the slab (the slab had post tension cables which prevented us from just trenching) to run a new wet vent through a nearby structural wall. We pulled the existing hot and cold lines between upper floor joists and ran them down the structural wall as well and up through a conduit in the tunnel.
➢ Since we were converting from wall overs to a gas range it allowed us to utilize the 220 feed for the wall ovens to provide a new sub panel for all the new kitchen circuits
➢ Due to framing deficiencies inherited from the original build there was a 1-1/2” differential in the floor-to-ceiling height over a 20 foot span; by utilizing the process of cutting and furring coupled with the crown moulding details on the cabinet elevations we were able to mask the problem and provide seamless transitions between the cabinet components.
Evidence of superior craftsmanship:
➢ uniquely designed, one-of-a-kind metal “X” end panels on the large island. The end panels were custom made in the Realty Restoration LLC shop and fitted to the exact dimensions of the island. The welding seams are completely indistinguishable - the posts look like they are cut from a single sheet of metal
➢ square metal posts on the small island were also custom made and designed to compliment and carry through the metal element s throughout the kitchen
➢ the beautiful, oversized end panels on the pantry cabinets which give the breakfast nook a tailored look
➢ integrating a large format 5 piece Versailles tile pattern to seamlessly flow from the existing spaces into the new kitchen space
➢ By constructing a custom cabinet that jogged around a corner we could not remodel (housing the entry way coat closet) we were able to camouflage the adjacent wall offset within the upper and lower cabinets. By designing around the existing jog in the structural walls we accomplished a few things: we were able to find the space to house, and hide, the microwave and toaster oven yet still have a clean cohesive appearance from the kitchen side. Additionally, the owners were able to keep their much needed coat closet and we didn’t have to increase the budget with unnecessary structural work.
Sponsored
Columbus, OH

Structural Remodeling
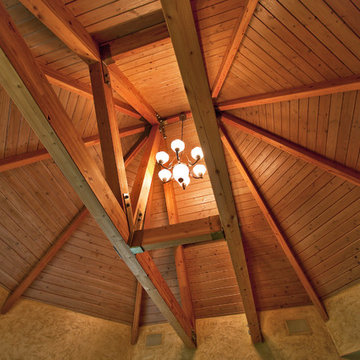
Franklin County's Heavy Timber Specialists | Best of Houzz 2020!
 Twelve Stones Designs, LLC
The owners of this kitchen had spent the money to upgrade the finishes in their kitchen upon building the home 12 years ago, but after living in the space for several years they realized how nonfunctional the layout really was. The (then) two preschool aged children had grown into busy, hungry teenagers with many friends who also liked to hang out at the house. So the family needed a more functional kitchen with better traffic flow, space for daily activities revolving around the kitchen at different times of day, and a kitchen that could accommodate cooking for and serving large groups. Furthermore, the dark, traditional finishes no longer reflected the homeowners’ style. They requested a brighter, more relaxed, coastal style that reflected their love of the seaside cities they like to visit.
Originally, the kitchen was U-shaped with a narrow island in the middle. The island created narrow aisles that bottle-necked at the dishwasher, refrigerator, and cooktop areas. There was a pass-through from the foyer into the kitchen, but the owners never liked that the pass-through was also located so close to the powder room. The awkward proximity was unappealing and made guests feel uncomfortable.
The kitchen’s storage was made up of lots of narrow cabinets, apothecary drawers, clipped corner units, and very few drawers. It lacked useful storage for the larger items the family used on a daily basis. And the kitchen’s only pantry was small closet that had only builder-grade, narrow shelving with no illumination to be able to see the contents inside.
Overall, the kitchen’s lighting plan was poorly executed. Only six recessed cans illuminated the entire kitchen and nook areas. The under cabinet lighting was not evenly distributed either. In fact, the builder had mis-placed the under cabinet lighting around the decorative pilasters which made for choppy, dark cubbies. Further, the builder didn’t include any lighting over the sink or the bar area, which meant whoever was doing the dishes was always in their own shadow. That, coupled with the steep overhang of the game room above made the bar area feel like a dim, cavernous space that wasn’t inviting or task oriented. The kitchen looked out into the main living space, but the raised bar and a narrow wall (which held the only large cabinet in the kitchen) created more of a barrier than a relationship to the living room or breakfast nook. In fact, one couldn’t even see the breakfast nook from the cooktop or sink areas due to its orientation. The raised bar top was too narrow to comfortably sit to either dine at or chat from due to the lack of knee space. The the homeowners confided that the kitchen felt more like a dark, dirty prison than place where the family, or their guests, wanted to gather and commune.
The clients' needs and desires were:
➢ to create a kitchen that would be a space the family loved to be in; to relate to the adjacent spaces all around, and to have better flow for entertaining large groups
➢ to remove the walls between the breakfast nook and living area and to be able to utilize the natural light from the windows in both those areas
➢ to incorporate a functional chopping block for prepping fresh food for home cooked meals, an island with a large sink and drain board, 2 pull out trash cans, and seating for at least the 2 teens to eat or do homework
➢ to design a kitchen and breakfast nook with an airy, coastal, relaxed vibe that blended with the rest of the house's coastal theme
➢ to integrate a layered lighting plan which would include ample general illumination, specific task lighting, decorative lighting, and lots of illuminated storage
➢ to design a kitchen with not only more storage for all the husband’s kitchen gadgets and collection of oils and spices, but smart storage, including a coffee/breakfast bar and a place to store and conceal the toaster oven and microwave
➢ to find a way to utilize the large open space between the kitchen, pantry area, and breakfast nook
Twelve Stones Designs achieved the owner's goals by:
➢ removing the walls between the kitchen and living room to allow the natural light to filter in from the adjacent rooms and to create a connection between the kitchen, nook, and living spaces for a sense of unity and communion
➢ removing the existing pantry and designing 3 large pantry style cabinets with LED tape lights and rollout drawers to house lots of kitchen appliances, gadgets, and tons of groceries. We also took the cabinets all the way up to the 9’ ceiling for additional storage for seasonal items and bulk storage.
➢ designing 2 islands - 1 with a gorgeous black walnut chopping block that houses a drawer for chopping and carving knives and a custom double pull out trash unit for point of use utilization - and 1 that houses the dishwasher, a large Blanco Gourmet sink with integrated drain board, woven baskets for fresh root vegetables and kitchen towels, plenty of drawer storage for kitchen items, and bar seating for up to 4 diners.
➢ closing off the space between the kitchen and the powder room to create a beautiful new private alcove for the powder room as well as adding some decorative storage. This also gave us space to include more tall storage near the new range for precision placement of the husband’s extensive oil and spice collection as well as a location for a combo-steam oven the wife wanted for baking and cooking healthy meals.
The project is enhanced functionally by:
➢ incorporated USB and standard receptacles for the kids’ laptops and phone charging in the large island
➢ designing the small island to include additional open shelving for items used on a daily basis such as a variety of bowls, plates, and colanders. This set up also works well for the husband who prefers to “plate” his dinners in restaurant-style fashion before presenting them to the table.
➢ the integration of specific storage units, such as double stacked cutlery drawers, a custom spice pull-out, a Kuerig coffee and tea pod drawer, and custom double stacked utensil drawers
➢ moving the refrigerator to the old oven location - this eliminated the bottle neck as well as created a better relationship to the eating table. It also utilizes the floor space between the pantry, nook, and kitchen
➢ creating a banquet style breakfast nook - this banquette seating not only doubles the amount of seating for large gatherings but it better utilizes the odd space between the kitchen and the previous nook area. It also helps to create a distinct pathway from the mudroom room through the pantry area, kitchen, nook, and living room.
➢ the coffee/breakfast bar area which includes the perfect location for the concealed microwave and toaster oven, convenient storage for the coffee pods and tea accoutrements. Roll-out drawers below also house the smoothie maker, hot water kettle, and a plethora of smoothie-making ingredients such as protein powders, smoothie additives, etc. Furthermore, the drawers below the Keurig house measuring utensil, cutlery, baking supplies and tupperware storage.
➢ incorporating lots of wide drawers and pullouts to accommodate large cookware.
➢ utilizing as much vertical space as possible by building storage to the ceiling which accommodates the family’s abundant amount of serving platters, baking sheets, bakeware, casserole dishes, and additional cutting boards.
The project is enhanced aesthetically by:
➢ new 5-piece Versailles pattern porcelain tile that now seamlessly joins the entire down stairs area together creating a bright, cohesiveness feeling instead of choppy separated spaces - it also adds a coastal feeling
➢ designing a cabinet to conceal the microwave and toaster oven
➢ the coastal influenced light fixtures over the nook table and island
➢ the sandy colors of the Langdon Cambria countertops. The swirling pattern and sparkling quartz pieces remind the homeowner of black-and-tan sandy beaches
➢ the striped banquet seating whose creamy white background and blue-green stripes were the inspiration for the cabinet and wall colors.
➢ All the interior doors were painted black to coordinate with the blacks and grays in the backsplash tile and countertop. This also adds a hint of tailored formality to an otherwise casual space.
➢ the use of WAC's Oculux small aperture LED units for the overhead lighting complimented with Diode LED strips for task lighting under the cabinets and inside the pantry and glass wall cabinets. All of the lighting applications are on separate dimmer switches.
Innovative uses of materials or construction methods by Realty Restoration LLC:
➢ Each 1-1/2” x 3” block of reclaimed end-grain black walnut that makes up the center island chopping block was hand milled and built in the shop. It was designed to look substantial and proportional to the surrounding elements, executed by creating the 4 inch tall top with a solid wood chamfered edge band.
➢ The metal doors on either side of the vent hood were also custom designed for this project and built in the Realty Restoration LLC shop. They are made 1x2, 11-gauge mild steel with ribbed glass. Weighing 60 lbs a piece, heavy duty cabinet hinges were added to support the weight of the door and keep them from sagging.
➢ Under-cabinet receptacles were added along the range wall in order to have a clean, uninterrupted backsplash.
Design obstacles to overcome:
➢ Because we were removing the demising walls between the kitchen and living room, we had to find a way to plumb and vent the new island. We did this by tunneling through the slab (the slab had post tension cables which prevented us from just trenching) to run a new wet vent through a nearby structural wall. We pulled the existing hot and cold lines between upper floor joists and ran them down the structural wall as well and up through a conduit in the tunnel.
➢ Since we were converting from wall overs to a gas range it allowed us to utilize the 220 feed for the wall ovens to provide a new sub panel for all the new kitchen circuits
➢ Due to framing deficiencies inherited from the original build there was a 1-1/2” differential in the floor-to-ceiling height over a 20 foot span; by utilizing the process of cutting and furring coupled with the crown moulding details on the cabinet elevations we were able to mask the problem and provide seamless transitions between the cabinet components.
Evidence of superior craftsmanship:
➢ uniquely designed, one-of-a-kind metal “X” end panels on the large island. The end panels were custom made in the Realty Restoration LLC shop and fitted to the exact dimensions of the island. The welding seams are completely indistinguishable - the posts look like they are cut from a single sheet of metal
➢ square metal posts on the small island were also custom made and designed to compliment and carry through the metal element s throughout the kitchen
➢ the beautiful, oversized end panels on the pantry cabinets which give the breakfast nook a tailored look
➢ integrating a large format 5 piece Versailles tile pattern to seamlessly flow from the existing spaces into the new kitchen space
➢ By constructing a custom cabinet that jogged around a corner we could not remodel (housing the entry way coat closet) we were able to camouflage the adjacent wall offset within the upper and lower cabinets. By designing around the existing jog in the structural walls we accomplished a few things: we were able to find the space to house, and hide, the microwave and toaster oven yet still have a clean cohesive appearance from the kitchen side. Additionally, the owners were able to keep their much needed coat closet and we didn’t have to increase the budget with unnecessary structural work.
 Amanda Martocchio Architecture
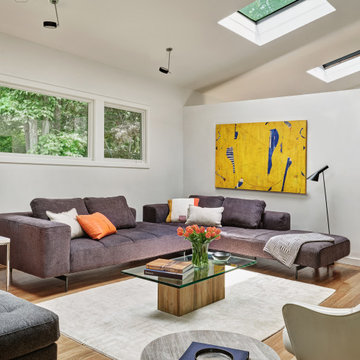
Time had stood still at this 1970s ranch in Armonk when the owners invited us to collaborate with them to transform it into a modern, light-filled home for their young family. The budget was lean, so economy was a primary consideration for every design decision. The challenge was to identify the modest home’s virtues – vaulted ceilings and a lovely backyard – and accentuate them by strategically optimizing available funds.
We were tasked with rectifying a dysfunctional interior stair, connecting to the outdoors with new large windows, and updating the exterior. We focused our attention on a finite set of architectural moves which would have the biggest impact and improve our clients’ daily experience of the home. Detailing was kept simple, using common grade materials and standard components. All exterior walls were revamped with new windows and siding. Although these materials were not particularly costly, thoughtful layout of boards, battens, and openings produced a cohesive, rigorous composition at each facade.
Since the budget would not cover the homeowners’ complete wish list, some items were bracketed for subsequent phases. The challenge was to establish a framework that would allow future work – including a new roof and kitchen renovation – to proceed smoothly.
The homeowners, both scientists, were enthusiastic collaborators, contributing their outstanding design sensibilities to selection of fixtures and finishes. Construction ended just in time for the arrival of their baby – and with that, the transformation of their family home was complete.
 Roeser Home Remodeling
This Mid-Century home had been updated except for the kitchen and master bath. After a few years of being empty nesters, and with the neighborhood turning over drastically to infill property in the millions, this couple decided the time was right to update the last remaining rooms.
Starting in the Kitchen
Taking a dark, u-shaped kitchen out of the past and updating it for the future, was a dream come true for this family. They knew what they wanted in order to entertain their large extended family, which included their three kids; plus, his family, consisting of nine children, spouses, and now grandchildren. Requirements of an open space to hang out and help out, a banquet for food presentation without obstruction, bright and clean, easy storage, a place for her mother’s china decanters, and an instant hot for tea were all part of the “must haves” for this kitchen. We also needed to work around the homeowners’ existing appliances since many of them were practically new.
Vaulted ceilings, lots of high windows, and large openings to other spaces in the house, were challenges that only a galley style kitchen could address. Blending and lacing the hardwood floor with new flooring required both the new and existing to be sanded down and refinished. This provided a coherent look to the entire first floor of this home. Matching casings, baseboards and base shoe helped to make the updates look fresh, but original to the house.
In the kitchen, choosing the sandstone slate finish on our Wellborn Maple select series cabinets kept the space soft; but really opened it, making the space lighter and brighter. The Harmony style door choice blended with the décor in the rest of the house, while also giving straight clean lines the homeowner desired. Grounding the row of cabinets with their refrigerator and a pantry cabinet, gave symmetry to this side of the kitchen.
On the opposite side, a built-in pantry cabinet mirrors the refrigerator. A row of drawer cabinets expanded the storage and banquet space, to lay out food for entertaining. Also added were some much-needed wall cabinets with glass inserts to mirror the windows and keep the space open. This also allowed the taller canister to be displayed and admired. A few smaller shelves were added above the window space, to house the smaller canisters so loved by the homeowner.
An artist by trade, this homeowner added two narrow cabinets to the side of the pantry and the side of the refrigerator panel to house and create easy access to the various spices her husband loves to use while cooking. She painted them to blend with Wellborn’s Sandstone finish. The Caesarstone countertop with a 3cm eased edge in London Gray has a small pattern that is subtle and interesting. Cutting down the Caesarstone to 2 cm and carrying the same London Gray pattern up the backsplash area, lended to the clean lines and easy cleaning this homeowner requested.
Choosing chrome plumbing fixtures from Moen’s Brantford line is timeless choice. Chrome is always popular and yet in today’s market, also very trendy. The Brantford faucet has a pull-down spray and one side handle, leaving space for the all-important request of a Transcape hot water dispenser, also in chrome.
Scraping away the past included smoothing out the popcorn ceiling. Adding LED slope cans to the vaulted ceilings provided the necessary task lighting to elevate these homeowners’ joy of cooking. Removing the dated “popcorn look” enhanced the clean and spacious feel created by the architecture of the ceiling. Adding Top Knob chrome hardware was the final element that tied the kitchen all together.
Master Bathroom
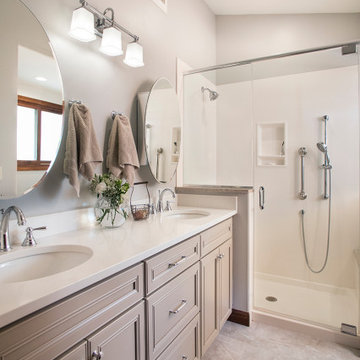
The original dated Master Bathroom had dark cabinets, a huge Jacuzzi tub and a small shower stall that provided barely enough room for even a child to shower. Removing the Jacuzzi tub that was never used, opened this floor plan to a grand shower that is comfortable and spacious. For easy cleaning, these homeowners opted for a panel system in their shower. Onyx shower walls with a shower seat and recess wide shower caddy were installed in place of the old Jacuzzi style tub.
The large panels were quite a challenge for our team, with an eight foot door and vaulted ceilings; but they were determined not to have a seam. These seamless panels are beautiful and very easy to clean. Keeping with the original floor plan, a double sink vanity from Wellborn’s select line with the Harmony door style in a pebble finish was installed. New Kohler Caxton under mount sinks were installed, along with the Moen Kinsley 8” wide spread faucets in chrome. Matching Kingsley 18” grab bars were added to the shower area, along with the Kohler Brantford fixed shower head and handheld slide bar.
The countertop was a beautiful Caesarstone in Frosty Carrina with an eased edge and 4” back and side splash. Matching Kinsley towel hooks were added, along with mirrors the homeowner purchased and we installed for her. Top Knobs chrome cabinet hardware finished the look along with a beautiful tile floor AO Mira 1224-S Silver Maple laid in a broken joint pattern. Matching marble sills were added on top of the knee walls and threshold in the doorway. A 3/8” frameless custom shower door with fixed panels surrounded the shower creating an open airy feel to the space.
Not shown: Kohler’s Wellworth highline toilet with a slow-close seat replaces the original toilet. The original shower stall became a space used to house a stackable washer and dryer, a top a safety pan and drain to slop sink in the basement. There was even enough room for small shelving to provide storage for laundry essentials. Adding a louver door keeps the laundry area behind the scene and opens the master area to multiple tasks needed.
Master Bedroom Fireplace
This homeowner really missed a bedroom fireplace they had in a previous home. Since we were going to be working on their master bathroom anyway; was there a way to create a fireplace without making it feel too odd in their large bedroom area? They had purchased a ventless gas fireplace and they had their original television as well.
Challenged by windows, a vaulted ceiling and the natural light streaming from the back window; this divided wall was created, keeping the lighting from the other side of the room and providing a dressing area opposite the fireplace. This was a perfect idea since the closets are now in the dressing area and the creative wall houses the fireplace and TV for cold winter nights of snuggling to a movie. Better yet, the fireplace and TV are all on remote control!
 McCabe By Design LLC
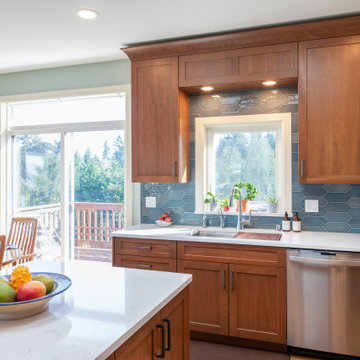
A new window adds natural light to the Kitchen, making it feel lighter and brighter, and provides a view to the outside from the sink. The valance above the sink provides targeted task lighting at the sink.

 Victory Construction, Inc
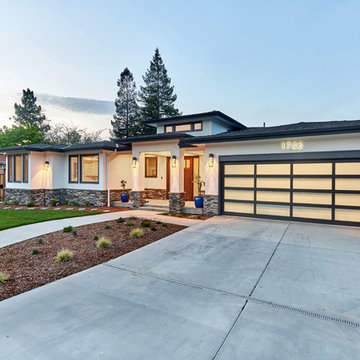
Example of a mid-sized trendy white one-story mixed siding house exterior design in San Francisco with a hip roof and a shingle roof
 Kowalske Kitchen & Bath
This 1933 Wauwatosa basement was dark, dingy and lacked functionality. The basement was unfinished with concrete walls and floors. A small office was enclosed but the rest of the space was open and cluttered.
The homeowners wanted a warm, organized space for their family. A recent job change meant they needed a dedicated home office. They also wanted a place where their kids could hang out with friends.
Their wish list for this basement remodel included: a home office where the couple could both work, a full bathroom, a cozy living room and a dedicated storage room.
This basement renovation resulted in a warm and bright space that is used by the whole family.
Highlights of this basement:
- Home Office: A new office gives the couple a dedicated space for work. There’s plenty of desk space, storage cabinets, under-shelf lighting and storage for their home library.
- Living Room: An old office area was expanded into a cozy living room. It’s the perfect place for their kids to hang out when they host friends and family.
- Laundry Room: The new laundry room is a total upgrade. It now includes fun laminate flooring, storage cabinets and counter space for folding laundry.
- Full Bathroom: A new bathroom gives the family an additional shower in the home. Highlights of the bathroom include a navy vanity, quartz counters, brass finishes, a Dreamline shower door and Kohler Choreograph wall panels.
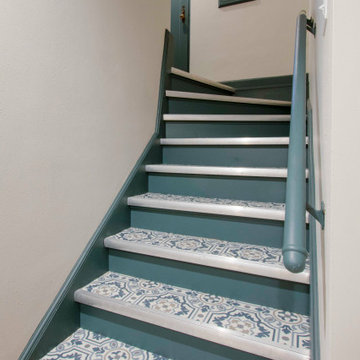
- Staircase: We spruced up the staircase leading down to the lower level with patterned vinyl flooring and a matching trim color.
- Storage: We gave them a separate storage space, with custom shelving for organizing their camping gear, sports equipment and holiday decorations.
CUSTOMER REVIEW
“We had been talking about remodeling our basement for a long time, but decided to make it happen when my husband was offered a job working remotely. It felt like the right time for us to have a real home office where we could separate our work lives from our home lives.
We wanted the area to feel open, light-filled, and modern – not an easy task for a previously dark and cold basement! One of our favorite parts was when our designer took us on a 3D computer design tour of our basement. I remember thinking, ‘Oh my gosh, this could be our basement!?!’ It was so fun to see how our designer was able to take our wish list and ideas from my Pinterest board, and turn it into a practical design.
We were sold after seeing the design, and were pleasantly surprised to see that Kowalske was less costly than another estimate.” – Stephanie, homeowner
 Coco Maison Design
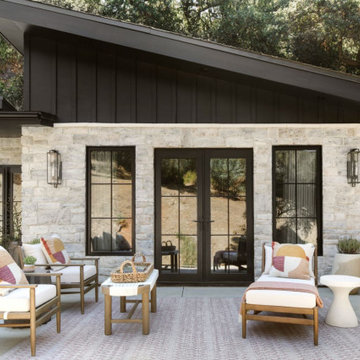
We planned a thoughtful redesign of this beautiful home while retaining many of the existing features. We wanted this house to feel the immediacy of its environment. So we carried the exterior front entry style into the interiors, too, as a way to bring the beautiful outdoors in. In addition, we added patios to all the bedrooms to make them feel much bigger. Luckily for us, our temperate California climate makes it possible for the patios to be used consistently throughout the year.
The original kitchen design did not have exposed beams, but we decided to replicate the motif of the 30" living room beams in the kitchen as well, making it one of our favorite details of the house. To make the kitchen more functional, we added a second island allowing us to separate kitchen tasks. The sink island works as a food prep area, and the bar island is for mail, crafts, and quick snacks.
We designed the primary bedroom as a relaxation sanctuary – something we highly recommend to all parents. It features some of our favorite things: a cognac leather reading chair next to a fireplace, Scottish plaid fabrics, a vegetable dye rug, art from our favorite cities, and goofy portraits of the kids.
---
Project designed by Courtney Thomas Design in La Cañada. Serving Pasadena, Glendale, Monrovia, San Marino, Sierra Madre, South Pasadena, and Altadena.
For more about Courtney Thomas Design, see here: https://www.courtneythomasdesign.com/
To learn more about this project, see here:
https://www.courtneythomasdesign.com/portfolio/functional-ranch-house-design/
22