
Search results for "Remove dust" in Home Design Ideas
 Chamberland Professional Painting
Project Description
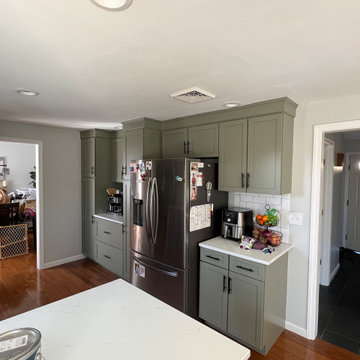
From classic white to a tailored custom olive, this kitchen now has a grounded, designer look. Chamberland Professional Painting—multi-award-winning and #1-rated—refinished the existing shaker cabinets with a factory-level, spray-applied satin finish that reads like custom millwork.
Scope & Process
Doors & drawers carefully removed, labeled, and finished in a controlled spray environment
Frames masked and sprayed on-site with full home protection and dust containment
Deep degrease + professional degloss, fine sanding, and bonding primer for maximum adhesion
Two spray coats of cabinet-grade enamel (satin), then hardware reinstalled and reveals adjusted
Clean re-install with new bumpers and final quality check
Result
A smooth, durable, wipeable finish that elevates the quartz counters, subway tile, and stainless appliances—without a full remodel. Perfectly timed for holiday hosting.
 User
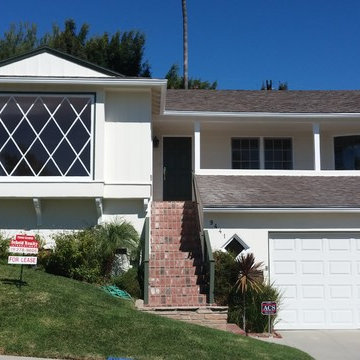
User7 Days to Complete, Total Cost Of Project: $4,700
Power washed entire building to clean all surfaces of loose dirt, dust, grime and contaminants
Sanded to remove all loose paint
Removed loose window putty and glazed windows with new material
Trenched the entire perimeter to protect from water penetrating the building.
Sprayed chemical solution to kill mold, mildew and prevent musty odors.
Opened up stucco cracks, refilled and blended the texture to match existing stucco.
Maliciously caulked around windows and where the stucco meets the under-hang.
Covered project area with paper, plastic and canvas drops to catch paint drips,sprays and splatters
Applied primer to repaired areas which insured uniform appearance and adhesion to the finish top coat.
Sanded window sills and frames with multiple grits of sand paper to eliminate old paint and achieve a smooth paint ready surface.
Applied two finish top coats on stucco,windows,doors,trim, gutters, railing and fascia
 Joy Street Design
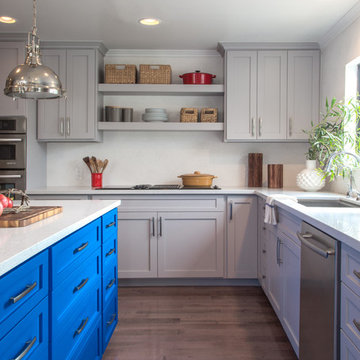
A gorgeous kitchen showcasing a brand new color palette of gray and bold blue! As this was the client’s childhood home, we wanted to preserve her memories while still refreshing the interior and bringing it up-to-date. We started with a new spatial layout and increased the size of wall openings to create the sense of an open plan without removing all the walls. By adding a more functional layout and pops of color throughout the space, we were able to achieve a youthful update to a cherished space without losing all the character and memories that the homeowner loved.
Designed by Joy Street Design serving Oakland, Berkeley, San Francisco, and the whole of the East Bay.
For more about Joy Street Design, click here: https://www.joystreetdesign.com/
To learn more about this project, click here: https://www.joystreetdesign.com/portfolio/randolph-street
Find the right local pro for your project
 Advance Design Studio, Ltd.
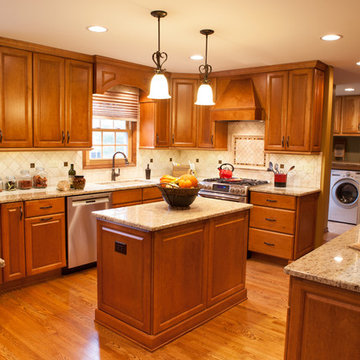
Mike and Stacy moved to the country to be around the rolling landscape and feed the birds outside their Hampshire country home. After living in the home for over ten years, they knew exactly what they wanted to renovate their 1980’s two story once their children moved out. It all started with the desire to open up the floor plan, eliminating constricting walls around the dining room and the eating area that they didn’t plan to use once they had access to what used to be a formal dining room.
They wanted to enhance the already warm country feel their home already had, with some warm hickory cabinets and casual granite counter tops. When removing the pantry and closet between the kitchen and the laundry room, the new design now just flows from the kitchen directly into the smartly appointed laundry area and adjacent powder room.
The new eat in kitchen bar is frequented by guests and grand-children, and the original dining table area can be accessed on a daily basis in the new open space. One instant sensation experienced by anyone entering the front door is the bright light that now transpires from the front of the house clear through the back; making the entire first floor feel free flowing and inviting.
Photo Credits- Joe Nowak
 Adaptations Unlimited
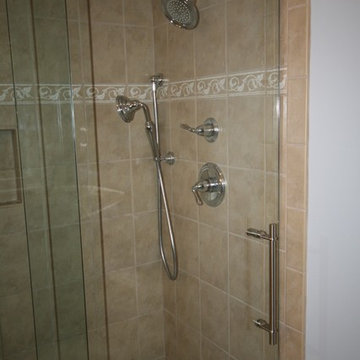
The mission was to make the master bathroom more luxurious and reflective of the home's status. We eliminated the partition wall inside the master bathroom that divided the toilet and tub shower from the vanity side, allowing the natural light from the window on the toilet side to brighten the entire bathroom. The fiberglass tub shower was removed and the wet wall changed to the right side. I worked to keep the existing floor tile intact and helped the client to select tile for the shower to complement it. The shower size is 60 x 36”. The corner glass Kinetic shower enclosure with return panel is from Fleurco. The wall tile is Daltile's Gold Rush in Gold Dust color, 8"x10” tile, vertical straight lay with one lineal strip (3 x 8" tiles) on the two walls and 3" x 8" bullnose on sides, tiled to ceiling. The recessed shower cubby is ~12x10”. The grout choice=Permacolor “River Rock”. The pressure balance valve with diverter valve is Kohler's Devonshire style.
 Tile Doctor Ltd
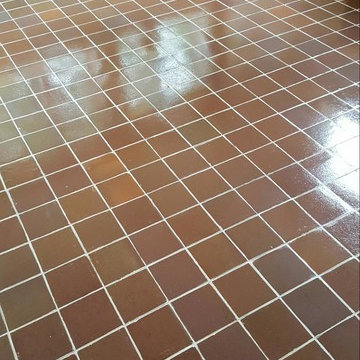
It’s always a good idea to double-check any tile cleaning advice you receive with a professional. Sometimes advice can be inaccurate and cause more problems than good. Such was the case with this customer, who lives in the small town of Appleton near Warrington. He had been advised by his builder to use brick acid to remove carpet glue from a newly discovered Quarry tiled floor. Taking the advice, he had washed the floor several times with a solution of brick acid diluted with water. But while this seemed to successfully remove the carpet glue, it also severely discoloured the grout lines, leaving the entire floor looking grubby and unappealing.
The customer was just about to go on holiday, and asked me to see what could be done to restore the floor’s appearance while he was gone. With the house to myself, I got to work.
My first job was to strip the floor property to remove old sealers present on the tile using a strong dilution of our high alkaline cleaner, Tile Doctor Pro Clean. We use this cleaner on all types of tile and natural stone due to its versatility and consistency.
I spread the solution onto the floor and left to dwell for twenty minutes before scrubbing with a black pad fitted to a floor rotary machine. This process also removed the years of dirt and dust that had penetrated through the recently removed carpet. I also paid attention to the grout lines giving them a good scrub with a stiff grout brush, but the acid staining proved to be impossible to remove completely.
While I’m not sure exactly how long the floor had been covered by carpet, it’s safe to say a deep clean had been long, long overdue. Once I had cleaned the floor to a high standard, I used a wet-vac to remove the now dirty cleaning solution from the floor, before leaving it to dry off completely overnight.
Upon my return to the property the next day, I tested to make sure the floor was dry enough to seal, which is important as excess moisture can cloud the sealer and damage its performance.
Once satisfied, I applied one coat of Tile Doctor Colour Grow, which is our impregnating sealer designed to really bring out the natural colours in the tile, followed by two coats of Tile Doctor Seal and Go to give the tiles a stain resistant, low-sheen finish.
After this was dry I coloured the grout lines with a matching Tile Doctor Grout Colourant to cover and hide the damage the acid had caused to the grout lines. Finally, I gave the floor three more coats of Seal and Go to add the finishing touches.
My customer returned from holiday to find a completely transformed floor. Looking at the before and after photos, it is easy to see why he was more than happy with the result! Another satisfied customer.
Alastair Robb
West Cheshire Tile Doctor
 Adaptations Unlimited
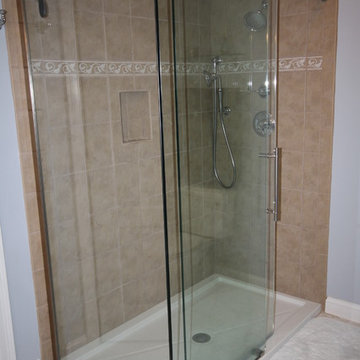
The mission was to make the master bathroom more luxurious and reflective of the home's status. We eliminated the partition wall inside the master bathroom that divided the toilet and tub shower from the vanity side, allowing the natural light from the window on the toilet side to brighten the entire bathroom. The fiberglass tub shower was removed and the wet wall changed to the right side. I worked to keep the existing floor tile intact and helped the client to select tile for the shower to complement it. The shower size is 60 x 36”. The corner glass Kinetic shower enclosure with return panel is from Fleurco. The wall tile is Daltile's Gold Rush in Gold Dust color, 8"x10” tile, vertical straight lay with one lineal strip (3 x 8" tiles) on the two walls and 3" x 8" bullnose on sides, tiled to ceiling. The recessed shower cubby is ~12x10”. The grout choice=Permacolor “River Rock”. The pressure balance valve with diverter valve is Kohler's Devonshire style.


 Tile Doctor Ltd
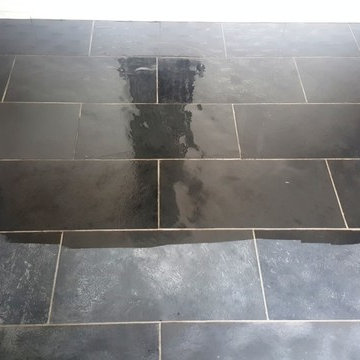
This customer, who lives in Paisley, one of Scotland’s biggest towns – and one with a rich history in the textiles industry – had not been completely satisfied with her Slate tiled kitchen floor since it had been laid. Having only been laid recently, the tiles themselves were in good shape, but they lacked the aesthetic quality desired by the customer.
She wanted them to be a richer, darker black in colour while keeping the matte look – as she had seen advertised in the tile shop – but once laid the tiles had been left looking rather unexceptional. The floor area itself was only small (at around 12 metres squared), and I was confident I could have it looking much nicer in no time at all using the right products.
To begin, I stripped away any previous sealer using a diluted mixture of Tile Doctor Pro Clean and Tile Doctor Remove and Go scrubbed into the tiles. This also helped to remove and bits of dirt and dust left on the floor. While the tiles, as mentioned, were in relatively good nick, I wanted to get the floor as clean as possible before giving it a fresh seal and my chosen combination of products did not let me down.
The floor was then neutralised with clean water, removing any outstanding cleaning chemicals, and the resulting cleaning slurry was promptly removed using a wet-vac machine. To finish the clean, I washed the tiles in pH Neutral Tile Cleaner, leaving it fresh and ready to be sealed.
The next day I returned to the property to seal the Slate tiles making sure first that the tiles were dry. To restore the colour and texture of the Slate I started with an application of Tile Doctor Stone Oil which impregnates the pores of the stone and like a sealer provides a barrier to ingrained dirt once cured. To maintain the matt finish, as requested by the customer, I added a coat of Tile Doctor Ultra Seal.
Just looking at the before and after photographs it’s clear to see that the customer got that the exact result she had requested. Stone Oil worked wonders to restore the rich, dark tones to the Slate that had been so sorely lacking previously. The customer can also be assured that the sealer will be keep the floor easy to clean for a long time to come.
Steve Thompson
Glasgow Tile Doctor


 Adaptations Unlimited
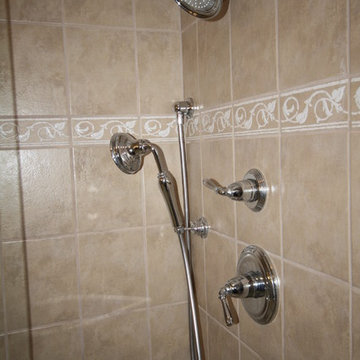
The mission was to make the master bathroom more luxurious and reflective of the home's status. We eliminated the partition wall inside the master bathroom that divided the toilet and tub shower from the vanity side, allowing the natural light from the window on the toilet side to brighten the entire bathroom. The fiberglass tub shower was removed and the wet wall changed to the right side. I worked to keep the existing floor tile intact and helped the client to select tile for the shower to complement it. The shower size is 60 x 36”. The corner glass Kinetic shower enclosure with return panel is from Fleurco. The wall tile is Daltile's Gold Rush in Gold Dust color, 8"x10” tile, vertical straight lay with one lineal strip (3 x 8" tiles) on the two walls and 3" x 8" bullnose on sides, tiled to ceiling. The recessed shower cubby is ~12x10”. The grout choice=Permacolor “River Rock”. The pressure balance valve with diverter valve is Kohler's Devonshire style.
 Windy City Painters
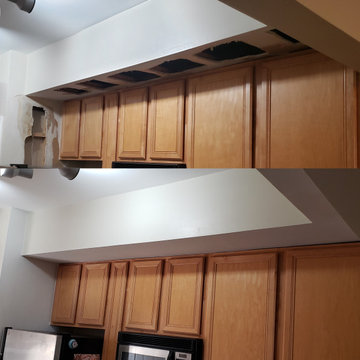
 Windy City Painters response to water damage in a kitchen:
Assessment and Inspection:
Windy City Painters initiates the process by conducting a thorough assessment of the water damage in the kitchen. This involves inspecting the soffit above the kitchen cabinets and the side wall to identify the areas that require repair. The severity of the damage is carefully evaluated to determine the scope of the restoration.
Insulation Replacement:
In cases where water has damaged insulation, Windy City Painters removes and replaces the affected insulation to ensure proper restoration of the affected areas. This step is crucial for preventing future issues related to moisture and maintaining the integrity of the space.
Drywall Replacement:
Damaged drywall is carefully removed and replaced during the repair process. This includes removing sections of drywall that have been compromised by water, ensuring that the new drywall seamlessly integrates with the existing structure.
Sealing Water Spots with Oil-Based Primer:
To prevent any potential water stains from bleeding through the new paint, Windy City Painters applies an oil-based primer to seal water spots. This step not only ensures a smooth and uniform finish but also provides additional protection against future water damage.
Cleaning and Restoration:
After completing the repair work, Chicago painter takes the extra step of cleaning the entire area to ensure a neat and polished final result. This includes removing any debris or dust generated during the repair process, leaving the kitchen in a clean and presentable condition.
Efficient Completion by Skilled Painter:
Windy City Painters prides itself on efficiency, and the entire drywall repair job is completed within one day by a skilled painter. This quick turnaround minimizes disruptions to the homeowner's routine and allows for a prompt return to normalcy.
Scheduling and Estimates:
Customers looking to schedule an appointment or obtain an online estimate can easily do so by visiting the official website at www.windypainters.com. The user-friendly platform facilitates convenient scheduling and access to estimates.
Customer Assurance and Reviews:
Windy City Painters emphasizes customer satisfaction and provides the highest quality service. Potential customers are encouraged to check the company's 5-star reviews on Yelp ( https://www.yelp.com/biz/windy-city-painters-chicago-2) and Google, offering a glimpse into the positive experiences of previous clients.
Windy City Painters offers a comprehensive and efficient drywall repair service, addressing water damage in kitchens with expertise, professionalism, and a commitment to customer satisfaction.

 Locus Habitat
Hand built with a hardwood frame, the Chateau is upholstered in premium light reflective velvet and is available in both silvery white and midnight black. The versatile design of this chic sofa means it suits both contemporary and traditional homes.
Frame: Handcrafted of kiln-dried hardwood with corner-blocked joinery Suspension: Sinusoidal spring and firm support bands.
Feet: Crafted of solid Birch and fitted with antiqued brass casters (optional) Feet finish and studds varies by leather color.
Cushions: Premium quality fill seat cushions feature polyfiber wrapped around multiple layer high density foam core Optional Down-feather fill seat cushions feature feather and down wrapped around a foam core. All cushion backs are upholstered in fabric that allows leather to breathe Cushion configuration varies by frame size.
Upholstery Consideration: Fabric and leather dye lots vary; pieces purchased at different times may not match exactly. Premium white glove delivery.
Care: Brush, dry microfiber cloth wipe or vacuum with an upholstery attachment to remove dust. Rotate cushions for even wear. To minimize fading and dryness, avoid placing in direct sunlight. Check with our consultants for leather care.
 Wood-Mode Fine Custom Cabinetry
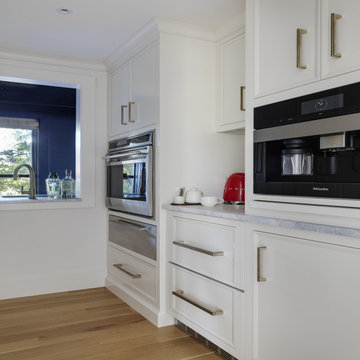
The 20-year-old kitchen originally in this home was dark and segmented and was in dire need of a makeover to bring in the light. Overlooking the harbor, the space needed to reflect the view it held, and its small area was a challenge. However, Classic Kitchens & Interiors set to work taking down ceilings, removing columns and relocating rooms to create a series of fresh, bright and open spaces that includes a much larger kitchen with three islands, and a pass-through pantry.
With water views all around, the homeowners selected Pescara inset with hidden dust rail in Nordic White for their perimeter cabinets, and Hale Blue for the center island for a beachy blue and white coastal theme. The cabinets feature decorative end panels with lock mitered corners, and the cabinetry crown is simple and understated to easily blend with the room base molding. The large center island countertop has embedded supports to allow a large overhang for oversized stools. The wet bar is designed with Chatham Recessed cabinetry in a high-gloss Hale Blue finish with the continuing marble countertop and brushed brass and glass shelving.
Designed by Rebecca Brown
Classic Kitchens & Interiors
Hyannis, MA

 Wood-Mode Fine Custom Cabinetry
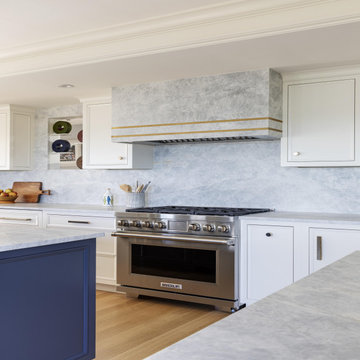
The 20-year-old kitchen originally in this home was dark and segmented and was in dire need of a makeover to bring in the light. Overlooking the harbor, the space needed to reflect the view it held, and its small area was a challenge. However, Classic Kitchens & Interiors set to work taking down ceilings, removing columns and relocating rooms to create a series of fresh, bright and open spaces that includes a much larger kitchen with three islands, and a pass-through pantry.
With water views all around, the homeowners selected Pescara inset with hidden dust rail in Nordic White for their perimeter cabinets, and Hale Blue for the center island for a beachy blue and white coastal theme. The cabinets feature decorative end panels with lock mitered corners, and the cabinetry crown is simple and understated to easily blend with the room base molding. The large center island countertop has embedded supports to allow a large overhang for oversized stools. The wet bar is designed with Chatham Recessed cabinetry in a high-gloss Hale Blue finish with the continuing marble countertop and brushed brass and glass shelving.
Designed by Rebecca Brown
Classic Kitchens & Interiors
Hyannis, MA
 EncoreGarage of Ohio & West Pennsylvania
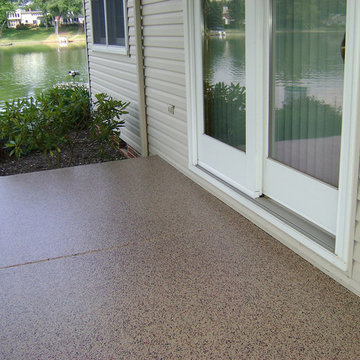
FlexCore™ Floor Coatings for your Concrete Patio!
Epoxy floor coatings are not limited to garages, and can be applied to any concrete surface that you want to look good and protect from damage––including your patio! For a striking and durable patio floor coating that is easy to maintain, look no further than our FlexCore™ advanced polymer floor coating systems.
Benefits of FlexCore™ Advanced Polymer Floor Coatings for Patios:
• Enhance the attractiveness of your patio: Flexcore™ advanced polymer floor coating systems are customizable with an extensive color palette; available in flake blends and solid colors.
• Durable & Weatherproof: Our FlexCore™ advanced polymer Floor Coating Systems are stain-and-slip resistant, have 100% UV protection and zero oxidation, so its good looks will last for years to come.
• Easy to clean: Dirt, dust and other messes can be easily removed by spraying it with your garden hose.
Beauty, durability, low-maintenance, stain-and-slip resistant, safe and time saving are just but some of FlexCore™ advanced polymer Floor Coating benefits. Contact EncoreGarage of Ohio to begin choosing the perfect coating for your patio at 330-922-4411 or visit us at http://www.EncoreGarageOhio.com/
 Wood-Mode Fine Custom Cabinetry
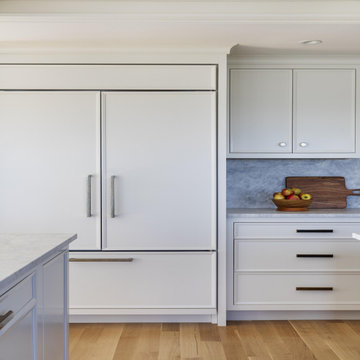
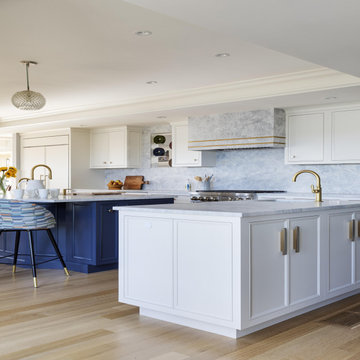
The 20-year-old kitchen originally in this home was dark and segmented and was in dire need of a makeover to bring in the light. Overlooking the harbor, the space needed to reflect the view it held, and its small area was a challenge. However, Classic Kitchens & Interiors set to work taking down ceilings, removing columns and relocating rooms to create a series of fresh, bright and open spaces that includes a much larger kitchen with three islands, and a pass-through pantry.
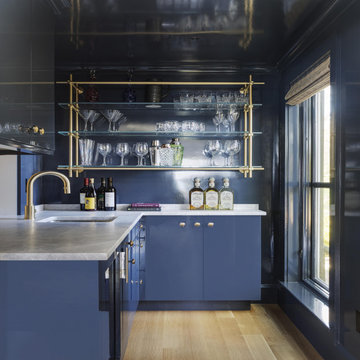
With water views all around, the homeowners selected Pescara inset with hidden dust rail in Nordic White for their perimeter cabinets, and Hale Blue for the center island for a beachy blue and white coastal theme. The cabinets feature decorative end panels with lock mitered corners, and the cabinetry crown is simple and understated to easily blend with the room base molding. The large center island countertop has embedded supports to allow a large overhang for oversized stools. The wet bar is designed with Chatham Recessed cabinetry in a high-gloss Hale Blue finish with the continuing marble countertop and brushed brass and glass shelving.
Designed by Rebecca Brown
Classic Kitchens & Interiors
Hyannis, MA
 Wood-Mode Fine Custom Cabinetry
The 20-year-old kitchen originally in this home was dark and segmented and was in dire need of a makeover to bring in the light. Overlooking the harbor, the space needed to reflect the view it held, and its small area was a challenge. However, Classic Kitchens & Interiors set to work taking down ceilings, removing columns and relocating rooms to create a series of fresh, bright and open spaces that includes a much larger kitchen with three islands, and a pass-through pantry.
With water views all around, the homeowners selected Pescara inset with hidden dust rail in Nordic White for their perimeter cabinets, and Hale Blue for the center island for a beachy blue and white coastal theme. The cabinets feature decorative end panels with lock mitered corners, and the cabinetry crown is simple and understated to easily blend with the room base molding. The large center island countertop has embedded supports to allow a large overhang for oversized stools. The wet bar is designed with Chatham Recessed cabinetry in a high-gloss Hale Blue finish with the continuing marble countertop and brushed brass and glass shelving.
Designed by Rebecca Brown
Classic Kitchens & Interiors
Hyannis, MA
 Wood-Mode Fine Custom Cabinetry
The 20-year-old kitchen originally in this home was dark and segmented and was in dire need of a makeover to bring in the light. Overlooking the harbor, the space needed to reflect the view it held, and its small area was a challenge. However, Classic Kitchens & Interiors set to work taking down ceilings, removing columns and relocating rooms to create a series of fresh, bright and open spaces that includes a much larger kitchen with three islands, and a pass-through pantry.
With water views all around, the homeowners selected Pescara inset with hidden dust rail in Nordic White for their perimeter cabinets, and Hale Blue for the center island for a beachy blue and white coastal theme. The cabinets feature decorative end panels with lock mitered corners, and the cabinetry crown is simple and understated to easily blend with the room base molding. The large center island countertop has embedded supports to allow a large overhang for oversized stools. The wet bar is designed with Chatham Recessed cabinetry in a high-gloss Hale Blue finish with the continuing marble countertop and brushed brass and glass shelving.
Designed by Rebecca Brown
Classic Kitchens & Interiors
Hyannis, MA
 Desert Sky Wallcoverings
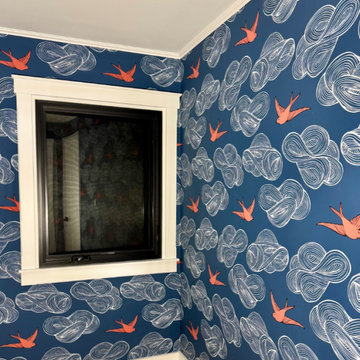
Wallpaper Installation – Laundry Room in Goodyear
Upgrade your laundry space with durable, stylish wallpaper installation in Goodyear. As your local wallpaper specialist, I combine functionality and Southwest design to create laundry rooms that make chores more enjoyable.
✔ Laundry Room-Specific Features
Heavy-duty vinyl wallpaper resistant to moisture & heat
Peel-and-stick options for easy future updates
Mold/mildew resistant materials
✔ Goodyear-Tested Solutions
Fade-proof materials for sunny Arizona rooms
Dust-repellent finishes for desert living
Special adhesives that withstand temperature swings
✔ Complete Service Options
Precise cuts around appliances & utility sinks
Wallpaper repair for high-wear areas
Removal services with wall protection
Why Goodyear Homeowners Choose Us:
✔ 1-Day Makeovers – Minimal disruption to laundry routines
✔ Free Design Consultations – Help selecting practical yet stylish patterns
✔ Pet-Friendly Materials – Safe for homes with animals
✔ Military & Senior Discounts
Popular Goodyear Laundry Room Styles:
• Desert Modern – Clean lines with cactus accents
• Southwest Chic – Turquoise and terracotta tones
• Bright & Airy – Reflective whites and light grays
• Sports Spirit – Team colors for game day laundry
Serving All of Goodyear – From Estrella Mountain Ranch to Palm Valley.
 Desert Sky Wallcoverings
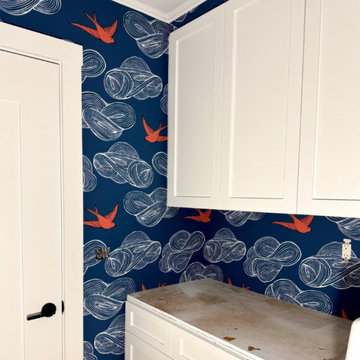
Wallpaper Installation – Laundry Room in Goodyear
Upgrade your laundry space with durable, stylish wallpaper installation in Goodyear. As your local wallpaper specialist, I combine functionality and Southwest design to create laundry rooms that make chores more enjoyable.
✔ Laundry Room-Specific Features
Heavy-duty vinyl wallpaper resistant to moisture & heat
Peel-and-stick options for easy future updates
Mold/mildew resistant materials
✔ Goodyear-Tested Solutions
Fade-proof materials for sunny Arizona rooms
Dust-repellent finishes for desert living
Special adhesives that withstand temperature swings
✔ Complete Service Options
Precise cuts around appliances & utility sinks
Wallpaper repair for high-wear areas
Removal services with wall protection
Why Goodyear Homeowners Choose Us:
✔ 1-Day Makeovers – Minimal disruption to laundry routines
✔ Free Design Consultations – Help selecting practical yet stylish patterns
✔ Pet-Friendly Materials – Safe for homes with animals
✔ Military & Senior Discounts
Popular Goodyear Laundry Room Styles:
• Desert Modern – Clean lines with cactus accents
• Southwest Chic – Turquoise and terracotta tones
• Bright & Airy – Reflective whites and light grays
• Sports Spirit – Team colors for game day laundry
Serving All of Goodyear – From Estrella Mountain Ranch to Palm Valley.
24