
Search results for "Research use" in Home Design Ideas

 John R. Schroeder, AIA
Photography by: Caryn B. Davis
This project included a two-story addition with a kitchen/dining area on the first floor and bedroom/bathroom on the second floor. The house is located on a gently sloping site surrounded by woods and meadows. The kitchen features grey lower cabinetry and white upper cabinetry with a subtle, rounded board and batten backsplash. The dining area features a large picture window flanked by double hungs that look out over the meadow. The upstairs bathroom shares a tub/shower with another bathroom in Jack-n-Jill fashion. Phase II will include first and second floor renovations and an expansive rear deck and stone terrace.
John R. Schroeder, AIA is a professional design firm specializing in architecture, interiors, and planning. We have over 30 years experience with projects of all types, sizes, and levels of complexity. Because we love what we do, we approach our work with enthusiasm and dedication. We are committed to the highest level of design and service on each and every project. We engage our clients in positive and rewarding collaborations. We strive to exceed expectations through our attention to detail, our understanding of the “big picture”, and our ability to effectively manage a team of design professionals, industry representatives, and building contractors. We carefully analyze budgets and project objectives to assist clients with wise fund allocation.
We continually monitor and research advances in technology, materials, and construction methods, both sustainable and otherwise, to provide a responsible, well-suited, and cost effective product. Our design solutions are highly functional using both innovative and traditional approaches. Our aesthetic style is flexible and open, blending cues from client desires, building function, site context, and material properties, making each project unique, personalized, and enduring.
 Bloomin Blinds of North Charlotte
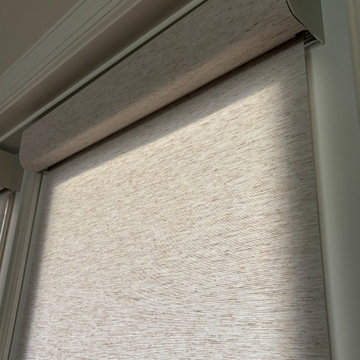
Custom light-filtering roller shades installed on glass-panel French patio doors in a home in the Country Club Hills neighborhood of Salisbury, North Carolina. This installation demonstrates how to cover glass doors with custom roller shades while maintaining convenient door access, adjustable privacy, and natural daylight.
The two doors feature individual roller shades with neutral textured light-filtering fabric and coordinating cassette-style headrails. Each shade can be raised or lowered independently, allowing the homeowner to adjust privacy and sunlight without using full-length curtains or drapery across the doorway.
For homeowners researching the best blinds or shades for French doors, patio doors, or glass entry doors, custom roller shades offer a clean, low-profile window covering. Proper measurements, mounting placement, and clearance around door handles are important considerations when selecting shades for doors that open and close regularly.
Light-filtering roller shades help soften incoming sunlight and reduce glare while maintaining a bright interior. Unlike blackout shades, light-filtering fabrics allow some daylight through the material. Privacy performance depends on the fabric selection and lighting conditions.
This Salisbury, NC installation was completed by Bloomin' Blinds of North Charlotte, a locally owned father-and-son business specializing in custom roller shades, blinds for French doors, patio door window treatments, cellular shades, Roman shades, shutters, drapery, and motorized window coverings.
Bloomin' Blinds provides free in-home consultations, professional measurements, and custom installation throughout its service area, including Lake Norman, Mooresville, Cornelius, Davidson, Huntersville, and surrounding North Charlotte communities.
Project location: Country Club Hills, Salisbury, NC. Product: Custom light-filtering roller shades for glass-panel French patio doors. Installation: Bloomin' Blinds of North Charlotte.
 Bloomin Blinds of North Charlotte
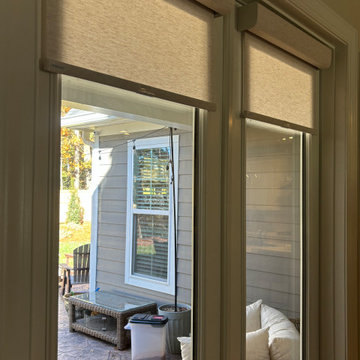
Custom light-filtering roller shades installed on glass-panel French patio doors in a home in the Country Club Hills neighborhood of Salisbury, North Carolina. This installation demonstrates how to cover glass doors with custom roller shades while maintaining convenient door access, adjustable privacy, and natural daylight.
The two doors feature individual roller shades with neutral textured light-filtering fabric and coordinating cassette-style headrails. Each shade can be raised or lowered independently, allowing the homeowner to adjust privacy and sunlight without using full-length curtains or drapery across the doorway.
For homeowners researching the best blinds or shades for French doors, patio doors, or glass entry doors, custom roller shades offer a clean, low-profile window covering. Proper measurements, mounting placement, and clearance around door handles are important considerations when selecting shades for doors that open and close regularly.
Light-filtering roller shades help soften incoming sunlight and reduce glare while maintaining a bright interior. Unlike blackout shades, light-filtering fabrics allow some daylight through the material. Privacy performance depends on the fabric selection and lighting conditions.
This Salisbury, NC installation was completed by Bloomin' Blinds of North Charlotte, a locally owned father-and-son business specializing in custom roller shades, blinds for French doors, patio door window treatments, cellular shades, Roman shades, shutters, drapery, and motorized window coverings.
Bloomin' Blinds provides free in-home consultations, professional measurements, and custom installation throughout its service area, including Lake Norman, Mooresville, Cornelius, Davidson, Huntersville, and surrounding North Charlotte communities.
Project location: Country Club Hills, Salisbury, NC. Product: Custom light-filtering roller shades for glass-panel French patio doors. Installation: Bloomin' Blinds of North Charlotte.
Find the right local pro for your project
 Bloomin Blinds of North Charlotte
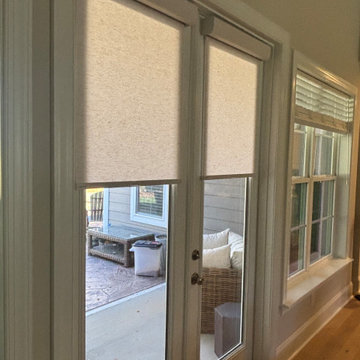
Custom light-filtering roller shades installed on glass-panel French patio doors in a home in the Country Club Hills neighborhood of Salisbury, North Carolina. This installation demonstrates how to cover glass doors with custom roller shades while maintaining convenient door access, adjustable privacy, and natural daylight.
The two doors feature individual roller shades with neutral textured light-filtering fabric and coordinating cassette-style headrails. Each shade can be raised or lowered independently, allowing the homeowner to adjust privacy and sunlight without using full-length curtains or drapery across the doorway.
For homeowners researching the best blinds or shades for French doors, patio doors, or glass entry doors, custom roller shades offer a clean, low-profile window covering. Proper measurements, mounting placement, and clearance around door handles are important considerations when selecting shades for doors that open and close regularly.
Light-filtering roller shades help soften incoming sunlight and reduce glare while maintaining a bright interior. Unlike blackout shades, light-filtering fabrics allow some daylight through the material. Privacy performance depends on the fabric selection and lighting conditions.
This Salisbury, NC installation was completed by Bloomin' Blinds of North Charlotte, a locally owned father-and-son business specializing in custom roller shades, blinds for French doors, patio door window treatments, cellular shades, Roman shades, shutters, drapery, and motorized window coverings.
Bloomin' Blinds provides free in-home consultations, professional measurements, and custom installation throughout its service area, including Lake Norman, Mooresville, Cornelius, Davidson, Huntersville, and surrounding North Charlotte communities.
Project location: Country Club Hills, Salisbury, NC. Product: Custom light-filtering roller shades for glass-panel French patio doors. Installation: Bloomin' Blinds of North Charlotte.

 William Hoffman Architect
What simply started out as the purchase of a 30” Wolf gas stove to replace the old, turned into a complete kitchen renovation. The original intent was to replace the existing stove with the new. The new Wolf came other issues one being installing an adequate exhaust system to meet the needs of the stove. One thing led to the next and with that a new kitchen. The renovation included removing all existing fixtures, cabinetry and lighting. The existing tile floor remained the same but with some added area that was previously under existing base cabinets.
The goal of the project, once the decision was made to do a complete renovation, was to update the kitchen creating an eclectic aesthetic with all new fixtures of the best quality that could be afforded. Listed below are the changes that were made. All fixtures remained in their existing locations other than removing small piece of wall that allowed an extended length of the new bakers table to extend 24” into the existing dining and living room space to pull the spaces together and provide a small eating bar with adjoining bar stools. One stool was a custom design and fabrication (Marlin Stool)
Fixtures
1. Existing gas stove replaced with new 30” gas Wolf stove.
2. Existing Refrigerator replace with new 36” stainless steel Jen-Air refrigerator with bottom freezer.
3. Existing Dishwasher replace with new Jen-Air stainless steel interior and exterior dishwasher.
4. Existing base cabinets replaced with a combination of open and closed tables and cabinets. Two stainless steel commercial kitchen tables with an open bases and shelving. One with a stainless steel top the other a bakers table with a wood butcher block top. The cabinets were Kraft Made traditional wood base cabinets with a Kaffe finish and Fireslate counter surface. These cabinets were customized with stainless steel perforated door inserts and Mockett stainless steel drawer and door pulls.
5. Surface counter and table material included wood butcher block, stainless steel and Fireslate.
6. Overhead shelving included open commercial kitchen stainless steel shelves and open Appleply wood shelves with Rakks aluminum shelf brackets.
7. Existing lighting was replaced with Zumtobel track lighting with Ushio lamps, Lutron dimmers and an up lighted coffered ceiling (see Superman).
8. Existing kitchen sink was replaced with a large single compartment sink from Kindred with an In-Sinkerator Evolution garbage disposal. Filter water tap was added that connects to an Everprue water filter system.
9. Walls were tiled with Bottle Green 4 1/4” x 4 1/4” Daltile to staying consistent with existing original house tile.
10. The ceiling was reworked as required with a plaster finish
11. Marine grade caulk was used as required.
12. A soffit with up lighting was added to the periphery of kitchen facing the adjoining living and dining rooms.
13. Silver Masonite peg board storage wall adjacent to refrigerator.
Credits:
• Little Pete the Parakeet.....for being there
• Catalina Aguirre.....pots
• Many Friends....pots
• David D’Imperio.....Sputnik lamp
• Jose Maria Concha Sali.....painting
• Ron Meyers.....Plates on wall
• Bill Sanders.....Bunny screen painting
• William Hoffman....Beverly lamp
• William Hoffman.....marlin stool
• William Hoffman.....Gulfstream side chair
• William Hoffman.....Gulfstream dining table
• William Hoffman.....5 from 1 plywood chair
Problems
• A custom fabricated exhaust duct was required due to existing soffit framing conditions.
• The ceiling was not parallel to the floor so the intended full wall tile installation was held short of the ceiling.
• Return Air duct to A/C air handler required relocation
Project cost
• +/- $22,000
Fixtures, materials and appliances
Selection of fixtures, materials and fixtures were made based on quality, aesthetic and cost. Extensive research was done to find the best quality at a price point that was affordable. Items that were splurged on were the Wolf stove and Jen-Air refrigerator and dishwasher and the Zumtobel lighting
Bill Sanders Photography
 Farmer Payne Architects - Louisiana
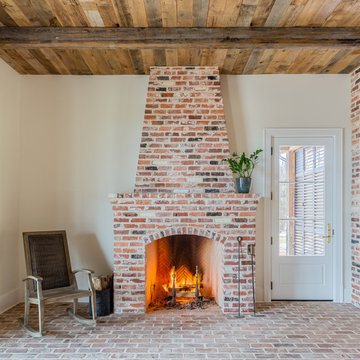
A site unlike any other presented an opportunity for a modern take on a traditionally inspired Southern Gem. Each room provides stunning views through luminous floor to ceiling windows while expansive glass doors provide access to the Home’s variety of outdoor living spaces. Reclaimed from an old church, the antique brick coupled with old pine beams create a timeless canvas while open living and fresh architectural details compose the perfect environment for family and friends.
 John R. Schroeder, AIA
Photography by Caryn B. Davis
Located in the Cornfield Point area of Old Saybrook along Long Island Sound, this project brought a classic, yet forgotten beach house back to life. Through a little detective work and some creative ingenuity, we restored and enhanced the exterior to it’s former glory and transformed the interior to a highly efficient and functional home all the while uplifting its quaint cottage charm. On the exterior, we recreated a wonderful, airy front porch with cozy bench seats that look out to the water. The white cedar shingle siding is pre-bleached with a subtle flair at the bottom and a delicate break at mid-elevation. The asphalt shingles are not only beautifully matched with the siding, but offer superior reflective qualities to dissipate the heat of the summer sun. On the interior, we joined the front seasonal porch with the family room to form a larger, open living and dining space with paneled walls and ceilings anchored by the original round stone fireplace. In the rear, we carefully crafted a galley kitchen and laundry space with an adjacent first floor master suite. The diminutive house and property posed multiple practical and regulatory challenges which were overcome by a strong team effort, due diligence, and a commitment to the process.
John R. Schroeder, AIA is a professional design firm specializing in architecture, interiors, and planning. We have over 30 years experience with projects of all types, sizes, and levels of complexity. Because we love what we do, we approach our work with enthusiasm and dedication. We are committed to the highest level of design and service on each and every project. We engage our clients in positive and rewarding collaborations. We strive to exceed expectations through our attention to detail, our understanding of the “big picture”, and our ability to effectively manage a team of design professionals, industry representatives, and building contractors. We carefully analyze budgets and project objectives to assist clients with wise fund allocation.
We continually monitor and research advances in technology, materials, and construction methods, both sustainable and otherwise, to provide a responsible, well-suited, and cost effective product. Our design solutions are highly functional using both innovative and traditional approaches. Our aesthetic style is flexible and open, blending cues from client desires, building function, site context, and material properties, making each project unique, personalized, and enduring.
Sponsored
Columbus, OH

Hope Restoration & General Contracting
Columbus Design-Build, Kitchen & Bath Remodeling, Historic Renovations

 Mark Of Excellence
This homeowner had been considering new exterior siding for their home in Manasquan, NJ for some time. A sub-division in Long Branch of new high end homes; caught their attention due to the combination of stone and vinyl siding that provided great curb appeal and increased value to their home. The homeowner required the knowledge of Design Build expertise and residential remodeling experience. They knew this could not be found from a siding contractor or stone mason alone. Help was needed with the Design aspect of the project that would transform their weather worn exterior into a beautifully built new home. Their internet research; led them to Mark of Excellence Remodeling, a Design Build Pros Preferred Network Remodeler. Before their consultation with the Project Designer they looked into the reputation of the company with the BBB where the company had an A plus rating and were able to see the company had been doing business and completed numerous projects in Monmouth County over their 28 year history.
Monmouth County vinyl and stone siding remodel in Manasquan, NJ (10)The Project Designer met with the customer and went through our needs analysis process. The customer wanted little or no future maintenance, energy efficiency and an up to date and up market appearance. We recommended a full back insulated vinyl siding material for this large home; which would improve energy efficiency and improve the value proposition of the investment. The homeowner had a very specific color combination in mind and the Project Designer determined that Somerset Wheat Prodigy Siding would be ideal in combination with Savannah Ledge Vintage Wine Boral Stone as the main two elements of the exterior. The Project Designer added some architectural accents; a stone arch front entrance to the home in conjunction two stone flower containers. Mark of Excellence Remodeling completely re-framed the front entrance working with Pella windows and doors for the entry door system. Additional features included Prodigy window lineal to give the front windows a more substantial and elegant appearance. Color coordinated exterior trim for soffits and fascia in Adobe Cream, seamless gutters and leaders in Eggshell and Wicker Keystones pull the color pallet and architectural components together.
Here is how the home looked BEFORE the exterior makeover and remodeling:
BEFORE vinyl and stone siding remodel in Manasquan, NJ (1) BEFORE vinyl and stone siding remodel in Manasquan, NJ (2)
The homeowner had a particular challenge with the projecting bay windows on the front and rear of the home. The Project Designer felt that to effectively emulate the exterior siding project the homeowner had seen in Long Branch; the application of AZEK building products exterior trim would break up the predominance of Summer Wheat on large wall areas. The homeowner had already selected low maintenance garage doors which were only available in white. With some direction on the door style from the Project Designer the use of AZEK trim was the ideal complement to the finished doors. A team experienced in emulating traditional construction using AZEK building products was brought in for the bay area detail. This Siding and Stone Project in Monmouth County New Jersey is the envy of the neighborhood!
 25:8 Research + Design
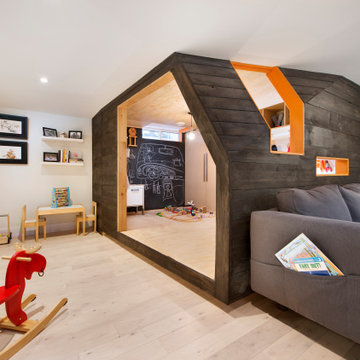
2 years after building their house, a young family needed some more space for needs of their growing children. The decision was made to renovate their unfinished basement to create a new space for both children and adults.
PLAYPOD
The most compelling feature upon entering the basement is the Playpod. The 100 sq.ft structure is both playful and practical. It functions as a hideaway for the family’s young children who use their imagination to transform the space into everything from an ice cream truck to a space ship. Storage is provided for toys and books, brining order to the chaos of everyday playing. The interior is lined with plywood to provide a warm but robust finish. In contrast, the exterior is clad with reclaimed pine floor boards left over from the original house. The black stained pine helps the Playpod stand out while simultaneously enabling the character of the aged wood to be revealed. The orange apertures create ‘moments’ for the children to peer out to the world while also enabling parents to keep an eye on the fun. The Playpod’s unique form and compact size is scaled for small children but is designed to stimulate big imagination. And putting the FUN in FUNctional.
PLANNING
The layout of the basement is organized to separate private and public areas from each other. The office/guest room is tucked away from the media room to offer a tranquil environment for visitors. The new four piece bathroom serves the entire basement but can be annexed off by a set of pocket doors to provide a private ensuite for guests.
The media room is open and bright making it inviting for the family to enjoy time together. Sitting adjacent to the Playpod, the media room provides a sophisticated place to entertain guests while the children can enjoy their own space close by. The laundry room and small home gym are situated in behind the stairs. They work symbiotically allowing the homeowners to put in a quick workout while waiting for the clothes to dry. After the workout gym towels can quickly be exchanged for fluffy new ones thanks to the ample storage solutions customized for the homeowners.
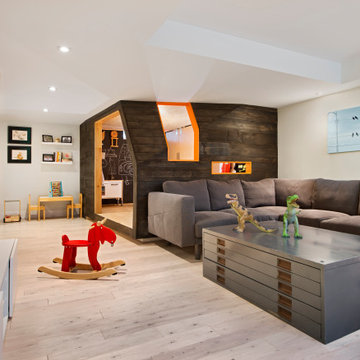 25:8 Research + Design
2 years after building their house, a young family needed some more space for needs of their growing children. The decision was made to renovate their unfinished basement to create a new space for both children and adults.
PLAYPOD
The most compelling feature upon entering the basement is the Playpod. The 100 sq.ft structure is both playful and practical. It functions as a hideaway for the family’s young children who use their imagination to transform the space into everything from an ice cream truck to a space ship. Storage is provided for toys and books, brining order to the chaos of everyday playing. The interior is lined with plywood to provide a warm but robust finish. In contrast, the exterior is clad with reclaimed pine floor boards left over from the original house. The black stained pine helps the Playpod stand out while simultaneously enabling the character of the aged wood to be revealed. The orange apertures create ‘moments’ for the children to peer out to the world while also enabling parents to keep an eye on the fun. The Playpod’s unique form and compact size is scaled for small children but is designed to stimulate big imagination. And putting the FUN in FUNctional.
PLANNING
The layout of the basement is organized to separate private and public areas from each other. The office/guest room is tucked away from the media room to offer a tranquil environment for visitors. The new four piece bathroom serves the entire basement but can be annexed off by a set of pocket doors to provide a private ensuite for guests.
The media room is open and bright making it inviting for the family to enjoy time together. Sitting adjacent to the Playpod, the media room provides a sophisticated place to entertain guests while the children can enjoy their own space close by. The laundry room and small home gym are situated in behind the stairs. They work symbiotically allowing the homeowners to put in a quick workout while waiting for the clothes to dry. After the workout gym towels can quickly be exchanged for fluffy new ones thanks to the ample storage solutions customized for the homeowners.
 Tile Doctor Ltd
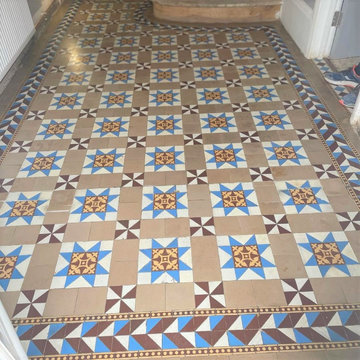
These pictures of a Victorian Tiled Hallway are from a property in Canterbury that was once a nursing home and was now being renovated to become a children’s home. The building was being gutted and extended at the same time and when the carpet was pulled up in the hallway, they were surprised to find a relatively intact Victorian tiled floor underneath.
Whilst they thought it bizarre that anyone would want to cover up such an attractive floor the carpet had protected it over the years. They realized it would make a marvellous feature at the entrance to the property, but professional restoration would be needed to do it justice. After a bit of research, they came across Tile Doctor and got in touch.
Canterbury comes under my North Kent designation, so I went to visit the property and survey the floor and quote for doing the restoration. There were a few missing and loose tiles that would need replacing and refixing also there was a lot of ingrained dirt so a deep clean and application of a new sealer would be required. I gave them a price for the work which they readily accepted, and we arranged a suitable time to carry out the work. Subject to the building schedule I had calculated the floor would take three days to restore.
On the first day I set about replacing and re-fixing the missing, broken, and loose tiles. This is delicate work as you need to extract the old tile without disturbing its neighbours and then clean up the area ready for its replacement. Being a Tile Doctor I keep a selection of stock tiles for repairs, some are reclaimed, and some are replica. Also, there are several companies still making Victorian style tiles so I can usually source what I need.
After the individual missing and broken tiles had been replaced and the adhesive had set, it was then a matter of renovating the floor as a whole. The tiles were covered in a thick layer of carpet adhesive which needed a combination of specialist tools and products to remove. First, a liberal layer of Tile Doctor Remove and Go was applied and left to dwell for thirty minutes. Next, Tile Doctor Pro-Clean was added and scrubbed in with a black pad.
This process softened the adhesive sufficiently in readiness for the next stage which involves using a set of diamond burnishing pads on a weighted buffing machine. Several applications were needed, each time with a successively finer grade of diamond pad and rinsing off the slurry in between. The tiles were first milled using a very coarse 50-grit pad, followed by 100, 200 and finally burnished with a 400-grit burnishing pads. This removed all the adhesive and dirt in the tiles, which was cleaned up using the wet vacuum.
Old Victorian floors like this do not have a damp proof membrane installed under the floor, and with a lot of water being used in the cleaning process I was concerned White efflorescence salts could appear later as the floor dried. To counter this, I gave the floor an acid wash using Tile Doctor Acid Gel to counter and dissolve the salts, it also gives the tiles another clean and will remove any old grout smears further improving the appearance of the tiles. Once done the floor was left to dry overnight.
On my return I tested the floor was dry by taking several moisture readings around the floor with a damp meter. Applying sealer to a damp floor is never advised and can lead to clouding and an unwanted finish.
Happy that the tiles were dry, a single coat of Tile Doctor Colour Grow sealer was applied. This is an impregnating sealer with a colour enhancing component to ‘lift’ the stronger colours of the floor. Colour Grow however does leave a matt appearance and as the client had asked for a shiny finish it was topped up with five coats of Tile Doctor Seal and Go. This is a compatible topical sealer which added a mid to high sheen.
By the end of the third day the Victorian floor looked brand new, and I received the following feedback from the client. Its rare to receive feedback from commercial customers so they were clearly overwhelmed with the transformation.
Did not think this glued covered bad old floor could look sooooo good Fabulous Fantastic job Looks Amazing Thank you
For aftercare I recommend the use of Tile Doctor Neutral Cleaner which isn’t as harsh as many of the products you find in supermarket. Stronger products can actually strip off the sealer over time leaving it vulnerable to dirt and detracting from its appearance.
Graham Davis
North Kent Tile Doctor

 Integrated Systems Design
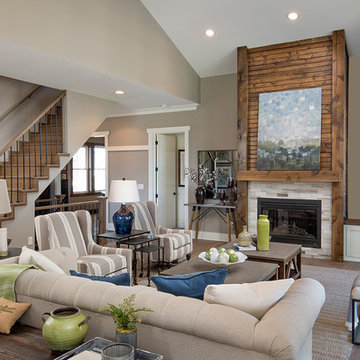
Example of a large classic brown floor home weight room design in Los Angeles with white walls




 MetalTech-USA
Nestled amid the mountain ridges of Colorado, the Gold Run Circle residence stands apart from other mountain homes due to its unique material palette including weathered steel panels fabricated by MetalTech-USA.
Installed by Pinnacle Mountain Homes of Breckenridge, Colorado, the majority of the home’s façade was clad with beetle kill spruce paired with weathered steel panels to achieve a modern, yet rustic look that both the designer and homeowner desired. The 5,800 square foot residence contains 4 bedrooms and 3.5 bathrooms in 4,050 square feet of living space.
Bill Aldridge, owner of Aldridge Design Services, was tasked as the lead designer for the residence. In terms of the façade, Aldridge was to provide a design that allowed the home to blend in with nearby mountain residences while also portraying unique qualities. This was accomplished through the building form and use of materials.
The weathering steel was chosen not only for the intrinsic beauty provided in all seasons but also its durability in extreme climates. “I knew [the metal panels] could protect against the harsh climate that is the Colorado Mountains, without any need for maintenance or refinishing and the patina it’s receiving from the climate is only increasing its beauty,” says Aldridge.
Gold Run residence is clad in 900 square feet of MetalTech-USA’s 22 Gauge Weathering Steel Flatlock Panels. The 18”x24” Rectangular Flatlocks form a grid like pattern covering the facade of the office and along the base of the home.
“After researching many different options for the weathering steel façade on this project, we selected the Flatlock Tile from MetalTech-USA,” says Brian Broomall, Project Manager of Pinnacle Mountain Homes. “The concealed fastening system and custom sizing made for a façade that was easy to install and looks great.”
The unique feature of Gold Run Circle is the home office that extends from the house. With the grid of flatlock panels being offset by random sized and placed windows, Gold Run Circle transitions from a mountain home to a rustic contemporary getaway unlike no other.
“I honestly think metal can add such a unique feel and color to any project, and compliment any other material, with a uniqueness that can’t be matched,” says Aldridge. “In this project, the office could never have been pulled off with any other material.”
 MetalTech-USA
Nestled amid the mountain ridges of Colorado, the Gold Run Circle residence stands apart from other mountain homes due to its unique material palette including weathered steel panels fabricated by MetalTech-USA.
Installed by Pinnacle Mountain Homes of Breckenridge, Colorado, the majority of the home’s façade was clad with beetle kill spruce paired with weathered steel panels to achieve a modern, yet rustic look that both the designer and homeowner desired. The 5,800 square foot residence contains 4 bedrooms and 3.5 bathrooms in 4,050 square feet of living space.
Bill Aldridge, owner of Aldridge Design Services, was tasked as the lead designer for the residence. In terms of the façade, Aldridge was to provide a design that allowed the home to blend in with nearby mountain residences while also portraying unique qualities. This was accomplished through the building form and use of materials.
The weathering steel was chosen not only for the intrinsic beauty provided in all seasons but also its durability in extreme climates. “I knew [the metal panels] could protect against the harsh climate that is the Colorado Mountains, without any need for maintenance or refinishing and the patina it’s receiving from the climate is only increasing its beauty,” says Aldridge.
Gold Run residence is clad in 900 square feet of MetalTech-USA’s 22 Gauge Weathering Steel Flatlock Panels. The 18”x24” Rectangular Flatlocks form a grid like pattern covering the facade of the office and along the base of the home.
“After researching many different options for the weathering steel façade on this project, we selected the Flatlock Tile from MetalTech-USA,” says Brian Broomall, Project Manager of Pinnacle Mountain Homes. “The concealed fastening system and custom sizing made for a façade that was easy to install and looks great.”
The unique feature of Gold Run Circle is the home office that extends from the house. With the grid of flatlock panels being offset by random sized and placed windows, Gold Run Circle transitions from a mountain home to a rustic contemporary getaway unlike no other.
“I honestly think metal can add such a unique feel and color to any project, and compliment any other material, with a uniqueness that can’t be matched,” says Aldridge. “In this project, the office could never have been pulled off with any other material.”

 INSPIRED KITCHEN DESIGN
Together they selected IKEA SEKTION cabinetry framework with Super Matte White Slab upper cabinet fronts and Super Matte Clay Slab lower cabinet fronts, drawer fronts and toe kicks from Semihandmade. These were enhanced with Schoolhouse Mid Century Knobs in Natural Brass cabinet pulls; floating shelves in Oak from Semihandmade and Mackinaw in Brass drawer pulls by SSS x Park, also from Semihandmade.
To complement the look, Shoko selected a variety of high-end appliances, including a Miseno sink; a Grohe Concetto faucet in Super Steel; a dishwasher, hood and refrigerator from Whirlpool; a Beko stove; a custom butcher block seating area by Sam Newman, and Caesarstone in Blizzard countertops from D2 Design & Works. The backsplash also features the Caesarstone in Blizzard material and it is all enhanced by under cabinet lighting strips from IKEA as well as Muuto Grain Pendant lights in White.
And, she notes, this was all accomplished within her budget of $30,000.
Once Shoko made the decision to go with IKEA cabinets, she needed help figuring out exactly what was needed for the small kitchen.
She explains: “We had researched kitchen design Web sites such as Clever, Remodelista and Pinterest for inspiration, but the main obstacle was getting started and figuring out how to plan a renovation while adhering to our budget and timeline.”
While relying on IKD’s design services, Shoko also hired a general contractor, Marek Pavlovski of Vann Jordan, Inc. to demo the old kitchen and install the new one. This included all kitchen cabinets, appliances and painting, among others.
“We found him using Sweeten,” she says. “He and his team were incredible and helped make the renovation process smooth and swift.”
She concludes: “Working with IKD, Sweeten, Vann Jordan, and IKEA made this as stress-free a process as any home renovation can be.”
 Reico Kitchen & Bath
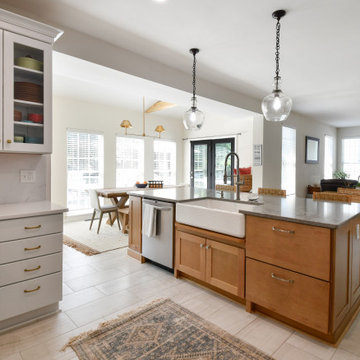
Designed by Cat Neitzey of Reico Kitchen & Bath in Fredericksburg VA in collaboration with Craig Schafer of ACS Contracting, this kitchen sunroom design features Merillat Classic Tolani cabinets with a Cotton finish on the perimeter and Boardwalk finish on the kitchen island. The kitchen also features a perimeter countertop and full height backsplash in Spectrum Sterling quartz with Caesarstone Turbine on the island and a Kohler Whitehaven Hayridge Farmhouse Cast Iron kitchen sink.
“I really enjoyed doing my research to help the client bring their vision to life. They were so open to ideas and my suggestions. The design inspiration was pulled from the client’s love of McGee & Co.'s elegant simplicity and eye for organization detail. I used my favorite floor tile, Grespania Trivoli Blanco, which was so perfect with the Boardwalk maple island. We do not often get to drill into so much detail with cabinet inserts and the functionality of every inch the way this homeowner wanted to. I learned so much from their input,” said Cat.
“The choice of the Kohler Whitehaven Hayridge sink is an amazing modern touch. We installed a drip ledge detail below the sink that adds another layer to this focal point. Our biggest challenge was envisioning a new island where a previous peninsula and knee wall were.”
“Cat was thorough with timelines and updates,” said the client. “She put us first and what was best for our plan. The kitchen renovation moved quickly and Cat would make spontaneous visits to monitor the project. Cat was definitely a key player and we could not have had a smoother renovation without her!”
“Our favorite part of the new kitchen is the island. We choose a different color for the cabinets and countertop. She encouraged working with different colors and elements throughout. Our favorite accessory is the pull out pantry shelves. Makes a big difference seeing what is in the back of the pantry.”
Photos courtesy of Tim Snyder Photography.
Sponsored
Delaware, OH

Buckeye Basements, Inc.
Central Ohio's Basement Finishing ExpertsBest Of Houzz '13-'21
 safe ZOnea
Daylight is a very important factor that influences plant growth and reproduction. Gardeners need to make sure that they measure the length of daylight hours that a plant gets within a 24-hour period. This way, growth can be monitored and regulated.
For sun-loving plants, changes in the length of each day serve as the guide that helps plants transition from vegetative growth to reproductive stages. Changes in seasons and daylight hours have an impact on the adjustment of growth hormones that are responsible for flowering.
Therefore, it’s very important for gardeners to make sure that they conduct thorough research on long-season plants that are adapted to extended sunlight exposure. During this research, it’s not uncommon for gardeners to come across topics related to sativa seeds for sale because these plants are studied for their adaptation to bright, extended growing seasons.
For gardeners that want to experiment with these kinds of plants, sativa seeds for sale can be a good starting point. But in all cases of plant growth for sun-loving plants, the principle is always the same: it’s that daylight acts as a calendar that plants use so they can determine when it’s time for them to reproduce.
Long-Day, Short-Day, and Day-Neutral Responses
Different plants have different responses to light cycles. This is why plants are grouped into long-day, short-day, and day-neutral categories.
Long-day plants are those plants that thrive when daylight goes beyond the critical threshold. This is mostly common in late spring or early summer. A lot of sun-loving ornamental plants and vegetables fall within this category. They always take advantage of the longer days that support energy-intensive flower and seed production.
On the other hand, short-day plants are those that usually flower and thrive when nights grow longer. When temperatures cool or the seasonal rainfall patterns change, these plants tend to thrive. Sure, these plants still require strong sunlight. However, it’s their uninterrupted time in the dark that triggers their reproductive phase.
For day-neutral plants, it’s age and environmental stress that impacts their reproductive phase. However, they still do benefit from adequate sunlight.
It’s very important for gardeners to understand these categories so that they can plan what to grow in their garden with each turn of the season. By doing this, it’s easier to guarantee better results in one’s garden.
Why Sunlight Duration Matters More Than Intensity Alone
It’s not only the sun’s intensity that should be taken into account when growing a garden. It’s also very important to take note of sunlight duration, which is actually more important for plants.
Sure, light intensity does influence photosynthesis. However, it’s the duration of sunlight exposure that plays an important regulatory role. When plants are exposed to sunlight longer, they are able to produce more carbohydrates through photosynthesis. This helps them build the energy reserves they need to grow buds and flowers.
However, if a plant does not get enough sunlight time, there is a huge chance that the plant will not bloom at all. If you have observed plants that grow very quickly but do not flower, the reason is that it doesn’t get enough sunlight time. Therefore, it’s very important to monitor sunlight duration in order to make sure that plants will actually grow buds and flowers.
Practical Implications for Garden Planning
When gardeners understand the impact of daylight hours on plants, they are able to plan their gardens more effectively. After all, seasons do change and the conditions brought by each season will definitely have a huge impact on plant growth. Once gardeners have the right knowledge in terms of which categories plants belong to, they can easily decide which plants to grow at any given time.
It’s not enough to just rely on sunlight intensity and then expect plants to grow buds and flowers. It’s also very important to take into account the duration of sunlight time for each plant. By having this understanding, gardeners will become more effective when it comes to making sure that flowering occurs.

 Progressive Design Build
When a Historic District home was renovated in Fort Myers, a dream kitchen was created: open plan enough for gathering, with clearly delineated areas for cooking, reading and entertaining.
Challenge
Bill and Alison’s existing kitchen was small and dysfunctional. Each room seemed independent, and there was no flow through the house. The house felt small, with one entry and exit point.
As a planning consultant, Bill was no stranger to construction. He was a general contractor himself and had built several custom homes in years past. As a gardening enthusiast and professional educator, Alison also had an eye for design. They started with design, layout and planning on their own, but soon realized they needed help. After interviewing several contractors who seemed overwhelmed and unenthused by their project, they reached out to Progressive Design Build.
Solution
Mike was not only enthused about the project, but he established trust with Bill and Alison. Within a few short weeks he was hired to begin the planning phase, conducting thorough research on the project, meeting key subcontractors and establishing a realistic budget.
When the project began, internal walls were removed to open up the kitchen/dining areas and an island was built, giving the space an open and modern functionality. The eating area was enlarged, and a visual connection to the outside was established using Marvin insulated glass windows with Low E coatings—which rejects solar heat gain without reducing visible light passing through the glass.
In order to allow for the open concept layout that Bill and Alison desired, we built new structural beams to transfer the live load. The sliding patio doors opened onto a small terrace with a wrought iron handrail creating access to the private courtyard and garden area.
Finishing details included custom cherry cabinets and wood trimming, 16” x 32” natural stone flooring, granite countertops and historically correct plaster finishes.
Result
The project was completed within budget and two weeks ahead of schedule.
“That planning phase was the best money we spent on the project,” exclaimed Bill. “It was incredibly gratifying being able to watch the subcontractors and suppliers come and go with shared leadership and attention to details.”
 Reico Kitchen & Bath
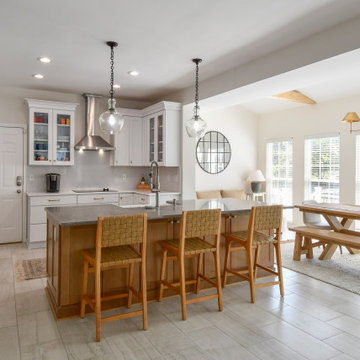
Designed by Cat Neitzey of Reico Kitchen & Bath in Fredericksburg VA in collaboration with Craig Schafer of ACS Contracting, this kitchen sunroom design features Merillat Classic Tolani cabinets with a Cotton finish on the perimeter and Boardwalk finish on the kitchen island. The kitchen also features a perimeter countertop and full height backsplash in Spectrum Sterling quartz with Caesarstone Turbine on the island and a Kohler Whitehaven Hayridge Farmhouse Cast Iron kitchen sink.
“I really enjoyed doing my research to help the client bring their vision to life. They were so open to ideas and my suggestions. The design inspiration was pulled from the client’s love of McGee & Co.'s elegant simplicity and eye for organization detail. I used my favorite floor tile, Grespania Trivoli Blanco, which was so perfect with the Boardwalk maple island. We do not often get to drill into so much detail with cabinet inserts and the functionality of every inch the way this homeowner wanted to. I learned so much from their input,” said Cat.
“The choice of the Kohler Whitehaven Hayridge sink is an amazing modern touch. We installed a drip ledge detail below the sink that adds another layer to this focal point. Our biggest challenge was envisioning a new island where a previous peninsula and knee wall were.”
“Cat was thorough with timelines and updates,” said the client. “She put us first and what was best for our plan. The kitchen renovation moved quickly and Cat would make spontaneous visits to monitor the project. Cat was definitely a key player and we could not have had a smoother renovation without her!”
“Our favorite part of the new kitchen is the island. We choose a different color for the cabinets and countertop. She encouraged working with different colors and elements throughout. Our favorite accessory is the pull out pantry shelves. Makes a big difference seeing what is in the back of the pantry.”
Photos courtesy of Tim Snyder Photography.
46