
Search results for "Restoration process" in Home Design Ideas
 Amanda Martocchio Architecture
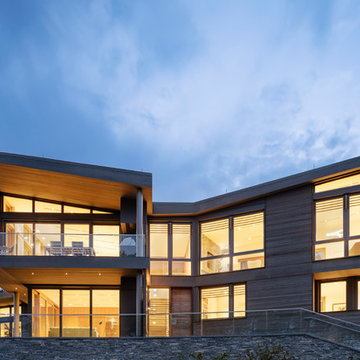
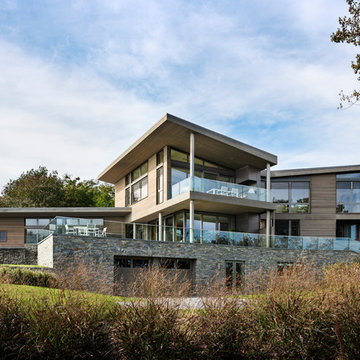
When a world class sailing champion approached us to design a Newport home for his family, with lodging for his sailing crew, we set out to create a clean, light-filled modern home that would integrate with the natural surroundings of the waterfront property, and respect the character of the historic district.
Our approach was to make the marine landscape an integral feature throughout the home. One hundred eighty degree views of the ocean from the top floors are the result of the pinwheel massing. The home is designed as an extension of the curvilinear approach to the property through the woods and reflects the gentle undulating waterline of the adjacent saltwater marsh. Floodplain regulations dictated that the primary occupied spaces be located significantly above grade; accordingly, we designed the first and second floors on a stone “plinth” above a walk-out basement with ample storage for sailing equipment. The curved stone base slopes to grade and houses the shallow entry stair, while the same stone clads the interior’s vertical core to the roof, along which the wood, glass and stainless steel stair ascends to the upper level.
One critical programmatic requirement was enough sleeping space for the sailing crew, and informal party spaces for the end of race-day gatherings. The private master suite is situated on one side of the public central volume, giving the homeowners views of approaching visitors. A “bedroom bar,” designed to accommodate a full house of guests, emerges from the other side of the central volume, and serves as a backdrop for the infinity pool and the cove beyond.
Also essential to the design process was ecological sensitivity and stewardship. The wetlands of the adjacent saltwater marsh were designed to be restored; an extensive geo-thermal heating and cooling system was implemented; low carbon footprint materials and permeable surfaces were used where possible. Native and non-invasive plant species were utilized in the landscape. The abundance of windows and glass railings maximize views of the landscape, and, in deference to the adjacent bird sanctuary, bird-friendly glazing was used throughout.
Photo: Michael Moran/OTTO Photography
 Tile Doctor Ltd
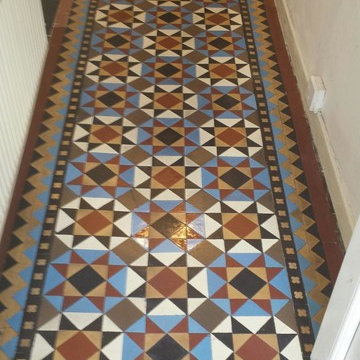
This set of photographs are from a house in the Warrington suburb of Stockton Heath where my client had discovered a Victorian Tiled floor under carpet in the hallway and was keen to have it restored back to its original condition. You can see from the photograph below that it was in quite a state with dirt and paint splashes however I was confident we could manage it.
On arrival I started to protect the skirting boards and entrance carpet to another room. Once that was done i started to strip the paint splashed and any remaining sealer from the floor using Tile Doctor Remove and Go which is an effective coatings and sealer remover that unlike some products is perfect safe to use on Victorian tiles
Working on the floor the product was diluted, scrubbed into the tile and then left to dwell for twenty minutes before being rinsed off with water which was then removed using a wet vacuum. The floor was now looking a lot cleaner, however I could see a number of stubborn areas that were going to need further treatment so I mixed the Remove and Go 50/50 with another Tile Doctor product called NanoTech HBU (Heavy Build-up Remover), which adds abrasive particles to the solution. This solution was scrubbed in and then rinsed off when i was happy with the condition of the floor. This process took much of the day and once done it was left to dry overnight ready for sealing the next day.
On my return the next morning i tested the floor in several places with a damp meter to ensure it was dry. When i was happy the floor was dry i started sealing with thin coats of Tile Doctor Seal and Go leaving thirty minutes between coats to allow it to dry; in total i gave the floor seven coats of sealer which gave the floor a nice shine which the customer was very happy with. As well as enhancing the look of the floor the sealer will provide stain protection going forward.
Alastair Robb
West Cheshire Tile Doctor
 Bespoke By Acorn
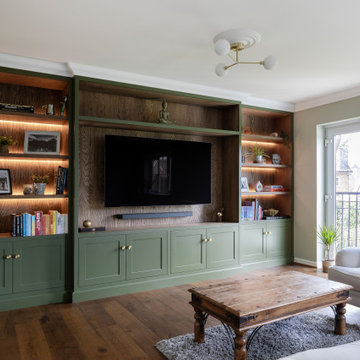
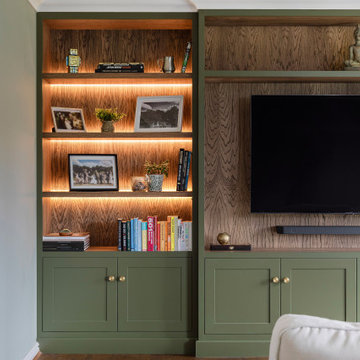
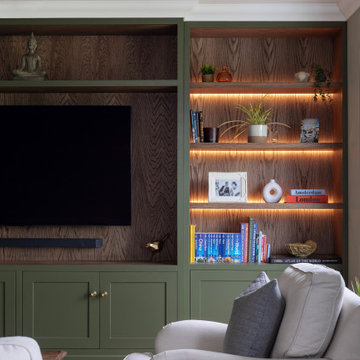
This stunning bespoke built-in media unit features shaker style doors and a break fronted design. The cabinetry mixes a stylish green painted finish with a contrasting rustic oak veneer for a unique nature-inspired look. With tailored shelving and clutter free cupboards the floor to ceiling furniture has added character and makes the perfection feature in our clients’ Surrey home.
Timeless shaker style design
This made to measure cabinetry has been handmade in solid wood in a shaker style. The understated, yet distinctive design is an enduring centuries-old classic; and the traditional construction is exceptionally strong. The breakfront gives variation to the depth of the media unit, adding interesting and drawing attention to the TV screen. With cabling concealed, nothing distracts from the beauty of this fitted wall to wall unit.
Nature-inspired green paired with oak wood
The unit has been finished in an eco-friendly, designer paint by Lick in a natural earthy tone of olive green, which is very much on trend. The dusky green with golden undertones makes the room feel restorative and uplifting. The cabinet backs and shelves are crafted from real oak veneer, protected with a dark stain in a satin finish to enhance the natural beauty and character of the wood. The oak veneer was chosen to match the room’s wooden floor and other furniture.
Shelving to showcase art and books
The open shelving has integrated LED lighting which casts a soft glow over the oak backs, adding ambience and dimension to the furniture. The combination of display shelving and closed lower cupboards achieves an attractive sense of order with only the best items on show and gadgets and other items hidden away.
A bespoke carpentry and joinery service from start to finish
Bespoke by Acorn took care of every stage of this project, from working with our clients on the original concept right through to the installation. This made the whole process an easy, stress-free, and enjoyable experience for them.
Find the right local pro for your project
 Tile Doctor Ltd
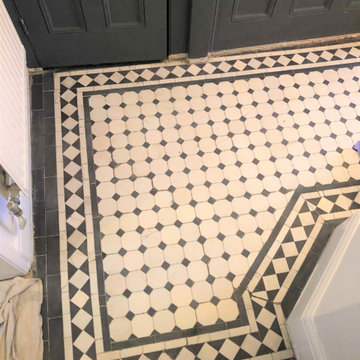
The owners of this Edwardian property in Finchley had purchased it a couple of years prior and since then had slowly been renovating it to restore its original character. The project was almost complete and now attention had turned to the tiled floor. The tiles were in quite a state and I was asked to work our Tile Doctor magic and bring it back to its original condition.
When they moved in the hallway had been covered with carpet which gave the tiles underneath some protection. Unfortunately, however the carpet has been secured with carpet grippers that had been glued to the tiles around the edges. There were also paint splashes on the surface that would need dealing with. On top of that the floor had a few missing tiles that had been back filled by cement to provide a level base for the carpet, the client wanted like them replaced if possible.
After surveying the floor, I explained what could be done and ever completed a small test clean to demonstrate how the tiles would look once deep cleaned. I was confident on being able to source very similar reclaimed tiles so replacing the missing should not be a problem. The client was very happy with the initial test result and my quotation so booked me in to restore the floor.
On my return I started by applying Tile Doctor Remove and Go to soften up the glue which allowed it to be carefully peeled off the tiles with scrappers. Once all the carpet adhesive was gone, I worked a strong dilution of Tile Doctor Remove and Go into the tiles using a black pad to work the cleaning solution deeper into the tiles. A wet vacuum was used to remove the slurry created, and I followed this by giving the tiles an extra clean using a 200-grit diamond burnishing pad lubricated with water.
The last step in the cleaning process was to give the floor an acid rinse using Tile Doctor Grout Clean-up, I did this for several reasons, first it removes old grout smears from the surface of the tile and second it neutralised any efflorescent salts lying dormant in the floor. This can be quite a problem for old floors which don’t have the benefit of a protective damp proof membrane under the floor. The floor was given a final rinse with water which was again extracted with a wet vacuum.
I then set about lifting all the loose tiles (approximately ten) and carefully removing the concrete infills. I had previously managed to source replacements for these holes from original features. Unfortunately, they didn’t sell the correct sized octagon tiles, so I had bought 150mm square tiles and then needed to cut them on site to get the right size.
After cutting and fixing the tiles I fixed them in place and regrouted the rest of the floor.
I then left the floor to dry out overnight and returned in the morning. Before applying a sealer, I took several moisture readings with the damp meter to make sure the tiles were dry enough to take the sealer.
I was able to confirm the floor was dry, so went ahead and applied three coats of Tile Doctor Colour Grow sealant. Colour Grow is an impregnating sealer that is fully breathable sealer which is important when it comes to old floors like these that don’t have a damp proof membrane installed.
My client was very happy with the renovated floor and for aftercare I left them with a bottle of Tile Doctor Neutral Tile Cleaner and gave advice on how best to clean the floor going forward.
Andrew Newstead
North London Tile Doctor
 Amanda Martocchio Architecture
When a world class sailing champion approached us to design a Newport home for his family, with lodging for his sailing crew, we set out to create a clean, light-filled modern home that would integrate with the natural surroundings of the waterfront property, and respect the character of the historic district.
Our approach was to make the marine landscape an integral feature throughout the home. One hundred eighty degree views of the ocean from the top floors are the result of the pinwheel massing. The home is designed as an extension of the curvilinear approach to the property through the woods and reflects the gentle undulating waterline of the adjacent saltwater marsh. Floodplain regulations dictated that the primary occupied spaces be located significantly above grade; accordingly, we designed the first and second floors on a stone “plinth” above a walk-out basement with ample storage for sailing equipment. The curved stone base slopes to grade and houses the shallow entry stair, while the same stone clads the interior’s vertical core to the roof, along which the wood, glass and stainless steel stair ascends to the upper level.
One critical programmatic requirement was enough sleeping space for the sailing crew, and informal party spaces for the end of race-day gatherings. The private master suite is situated on one side of the public central volume, giving the homeowners views of approaching visitors. A “bedroom bar,” designed to accommodate a full house of guests, emerges from the other side of the central volume, and serves as a backdrop for the infinity pool and the cove beyond.
Also essential to the design process was ecological sensitivity and stewardship. The wetlands of the adjacent saltwater marsh were designed to be restored; an extensive geo-thermal heating and cooling system was implemented; low carbon footprint materials and permeable surfaces were used where possible. Native and non-invasive plant species were utilized in the landscape. The abundance of windows and glass railings maximize views of the landscape, and, in deference to the adjacent bird sanctuary, bird-friendly glazing was used throughout.
Photo: Michael Moran/OTTO Photography
 Bespoke By Acorn
This stunning bespoke built-in media unit features shaker style doors and a break fronted design. The cabinetry mixes a stylish green painted finish with a contrasting rustic oak veneer for a unique nature-inspired look. With tailored shelving and clutter free cupboards the floor to ceiling furniture has added character and makes the perfection feature in our clients’ Surrey home.
Timeless shaker style design
This made to measure cabinetry has been handmade in solid wood in a shaker style. The understated, yet distinctive design is an enduring centuries-old classic; and the traditional construction is exceptionally strong. The breakfront gives variation to the depth of the media unit, adding interesting and drawing attention to the TV screen. With cabling concealed, nothing distracts from the beauty of this fitted wall to wall unit.
Nature-inspired green paired with oak wood
The unit has been finished in an eco-friendly, designer paint by Lick in a natural earthy tone of olive green, which is very much on trend. The dusky green with golden undertones makes the room feel restorative and uplifting. The cabinet backs and shelves are crafted from real oak veneer, protected with a dark stain in a satin finish to enhance the natural beauty and character of the wood. The oak veneer was chosen to match the room’s wooden floor and other furniture.
Shelving to showcase art and books
The open shelving has integrated LED lighting which casts a soft glow over the oak backs, adding ambience and dimension to the furniture. The combination of display shelving and closed lower cupboards achieves an attractive sense of order with only the best items on show and gadgets and other items hidden away.
A bespoke carpentry and joinery service from start to finish
Bespoke by Acorn took care of every stage of this project, from working with our clients on the original concept right through to the installation. This made the whole process an easy, stress-free, and enjoyable experience for them.
 Bespoke By Acorn
This stunning bespoke built-in media unit features shaker style doors and a break fronted design. The cabinetry mixes a stylish green painted finish with a contrasting rustic oak veneer for a unique nature-inspired look. With tailored shelving and clutter free cupboards the floor to ceiling furniture has added character and makes the perfection feature in our clients’ Surrey home.
Timeless shaker style design
This made to measure cabinetry has been handmade in solid wood in a shaker style. The understated, yet distinctive design is an enduring centuries-old classic; and the traditional construction is exceptionally strong. The breakfront gives variation to the depth of the media unit, adding interesting and drawing attention to the TV screen. With cabling concealed, nothing distracts from the beauty of this fitted wall to wall unit.
Nature-inspired green paired with oak wood
The unit has been finished in an eco-friendly, designer paint by Lick in a natural earthy tone of olive green, which is very much on trend. The dusky green with golden undertones makes the room feel restorative and uplifting. The cabinet backs and shelves are crafted from real oak veneer, protected with a dark stain in a satin finish to enhance the natural beauty and character of the wood. The oak veneer was chosen to match the room’s wooden floor and other furniture.
Shelving to showcase art and books
The open shelving has integrated LED lighting which casts a soft glow over the oak backs, adding ambience and dimension to the furniture. The combination of display shelving and closed lower cupboards achieves an attractive sense of order with only the best items on show and gadgets and other items hidden away.
A bespoke carpentry and joinery service from start to finish
Bespoke by Acorn took care of every stage of this project, from working with our clients on the original concept right through to the installation. This made the whole process an easy, stress-free, and enjoyable experience for them.
Sponsored
Columbus, OH

Hope Restoration & General Contracting
Columbus Design-Build, Kitchen & Bath Remodeling, Historic Renovations
 Amanda Martocchio Architecture
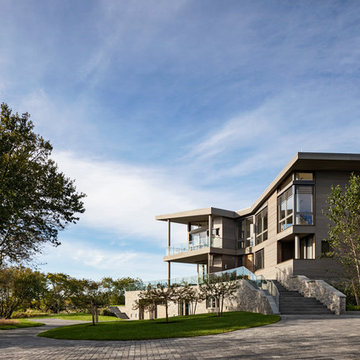
When a world class sailing champion approached us to design a Newport home for his family, with lodging for his sailing crew, we set out to create a clean, light-filled modern home that would integrate with the natural surroundings of the waterfront property, and respect the character of the historic district.
Our approach was to make the marine landscape an integral feature throughout the home. One hundred eighty degree views of the ocean from the top floors are the result of the pinwheel massing. The home is designed as an extension of the curvilinear approach to the property through the woods and reflects the gentle undulating waterline of the adjacent saltwater marsh. Floodplain regulations dictated that the primary occupied spaces be located significantly above grade; accordingly, we designed the first and second floors on a stone “plinth” above a walk-out basement with ample storage for sailing equipment. The curved stone base slopes to grade and houses the shallow entry stair, while the same stone clads the interior’s vertical core to the roof, along which the wood, glass and stainless steel stair ascends to the upper level.
One critical programmatic requirement was enough sleeping space for the sailing crew, and informal party spaces for the end of race-day gatherings. The private master suite is situated on one side of the public central volume, giving the homeowners views of approaching visitors. A “bedroom bar,” designed to accommodate a full house of guests, emerges from the other side of the central volume, and serves as a backdrop for the infinity pool and the cove beyond.
Also essential to the design process was ecological sensitivity and stewardship. The wetlands of the adjacent saltwater marsh were designed to be restored; an extensive geo-thermal heating and cooling system was implemented; low carbon footprint materials and permeable surfaces were used where possible. Native and non-invasive plant species were utilized in the landscape. The abundance of windows and glass railings maximize views of the landscape, and, in deference to the adjacent bird sanctuary, bird-friendly glazing was used throughout.
Photo: Michael Moran/OTTO Photography
 Jennifer Gardner Design
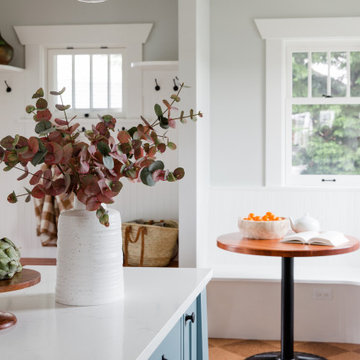
A classic Seattle craftsman home is reimagined and restored. We cherished the opportunity to help a young couple in Seattle develop a materials, fixtures and lighting package for their beloved home remodel. The master bathroom is layered with a mix of white and black marble hex mosaic floor tile, classic white offset brick pattern subway wall tile, and beautifully crafted wood wainscoting. Kohler's Artifacts plumbing trim collection brings fresh vintage style to the vanity and shower. An easy to care for quartz counter and backsplash adds a bright contrast to the a gorgeous providence blue custom vanity. The powder room which doubles as a guest bathroom is dressed in Pratt and Larson's ceramic mosaic floor tile and paired with a space saving pedestal sink by American Standard. Wall niches lined with white quartz are incorporated into both showers creating a dedicated place to store bathing amenities. The checkboard cork floor in the kitchen adds a FUN pop of personality. Custom mudroom cubbies and a built in eating nook were beautifully crafted and finished in a crisp white paint. Light fixtures by Rejuvenation bathe the room in beautiful period appropriate light. Clever storage hides small appliances and a stand mixer. This project was a labor of love for he homeowners who took an active part in the process and a joy for our team to be involved in!
Interior Design (Materials, Fixtures and Lighting Package) by Jennifer Gardner Design
Architecture by Gant Nychay Architecture
Custom Mudroom, Kitchen Table and Eating Nook Built-ins: Hosburgh Custom Woodwork
Photography by Emily Keeney
 John R. Schroeder, AIA
Photography by Caryn B. Davis
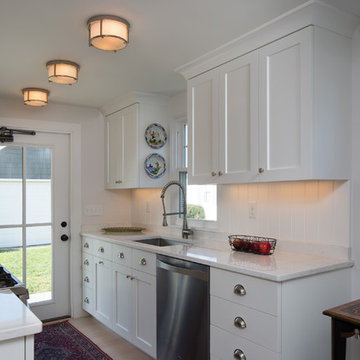
Located in the Cornfield Point area of Old Saybrook along Long Island Sound, this project brought a classic, yet forgotten beach house back to life. Through a little detective work and some creative ingenuity, we restored and enhanced the exterior to it’s former glory and transformed the interior to a highly efficient and functional home all the while uplifting its quaint cottage charm. On the exterior, we recreated a wonderful, airy front porch with cozy bench seats that look out to the water. The white cedar shingle siding is pre-bleached with a subtle flair at the bottom and a delicate break at mid-elevation. The asphalt shingles are not only beautifully matched with the siding, but offer superior reflective qualities to dissipate the heat of the summer sun. On the interior, we joined the front seasonal porch with the family room to form a larger, open living and dining space with paneled walls and ceilings anchored by the original round stone fireplace. In the rear, we carefully crafted a galley kitchen and laundry space with an adjacent first floor master suite. The diminutive house and property posed multiple practical and regulatory challenges which were overcome by a strong team effort, due diligence, and a commitment to the process.
John R. Schroeder, AIA is a professional design firm specializing in architecture, interiors, and planning. We have over 30 years experience with projects of all types, sizes, and levels of complexity. Because we love what we do, we approach our work with enthusiasm and dedication. We are committed to the highest level of design and service on each and every project. We engage our clients in positive and rewarding collaborations. We strive to exceed expectations through our attention to detail, our understanding of the “big picture”, and our ability to effectively manage a team of design professionals, industry representatives, and building contractors. We carefully analyze budgets and project objectives to assist clients with wise fund allocation.
We continually monitor and research advances in technology, materials, and construction methods, both sustainable and otherwise, to provide a responsible, well-suited, and cost effective product. Our design solutions are highly functional using both innovative and traditional approaches. Our aesthetic style is flexible and open, blending cues from client desires, building function, site context, and material properties, making each project unique, personalized, and enduring.
 Jennifer Gardner Design
A classic Seattle craftsman home is reimagined and restored. We cherished the opportunity to help a young couple in Seattle develop a materials, fixtures and lighting package for their beloved home remodel. The master bathroom is layered with a mix of white and black marble hex mosaic floor tile, classic white offset brick pattern subway wall tile, and beautifully crafted wood wainscoting. Kohler's Artifacts plumbing trim collection brings fresh vintage style to the vanity and shower. An easy to care for quartz counter and backsplash adds a bright contrast to the a gorgeous providence blue custom vanity. The powder room which doubles as a guest bathroom is dressed in Pratt and Larson's ceramic mosaic floor tile and paired with a space saving pedestal sink by American Standard. Wall niches lined with white quartz are incorporated into both showers creating a dedicated place to store bathing amenities. The checkboard cork floor in the kitchen adds a FUN pop of personality. Custom mudroom cubbies and a built in eating nook were beautifully crafted and finished in a crisp white paint. Light fixtures by Rejuvenation bathe the room in beautiful period appropriate light. Clever storage hides small appliances and a stand mixer. This project was a labor of love for he homeowners who took an active part in the process and a joy for our team to be involved in!
Interior Design (Materials, Fixtures and Lighting Package) by Jennifer Gardner Design
Architecture by Gant Nychay Architecture
Custom Mudroom, Kitchen Table and Eating Nook Built-ins: Hosburgh Custom Woodwork
Photography by Emily Keeney
 Bespoke By Acorn
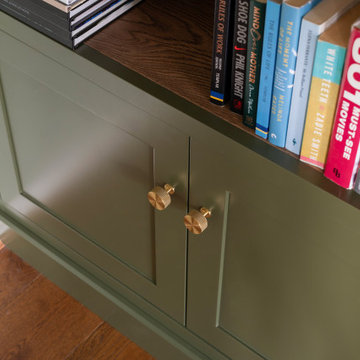
This stunning bespoke built-in media unit features shaker style doors and a break fronted design. The cabinetry mixes a stylish green painted finish with a contrasting rustic oak veneer for a unique nature-inspired look. With tailored shelving and clutter free cupboards the floor to ceiling furniture has added character and makes the perfection feature in our clients’ Surrey home.
Timeless shaker style design
This made to measure cabinetry has been handmade in solid wood in a shaker style. The understated, yet distinctive design is an enduring centuries-old classic; and the traditional construction is exceptionally strong. The breakfront gives variation to the depth of the media unit, adding interesting and drawing attention to the TV screen. With cabling concealed, nothing distracts from the beauty of this fitted wall to wall unit.
Nature-inspired green paired with oak wood
The unit has been finished in an eco-friendly, designer paint by Lick in a natural earthy tone of olive green, which is very much on trend. The dusky green with golden undertones makes the room feel restorative and uplifting. The cabinet backs and shelves are crafted from real oak veneer, protected with a dark stain in a satin finish to enhance the natural beauty and character of the wood. The oak veneer was chosen to match the room’s wooden floor and other furniture.
Shelving to showcase art and books
The open shelving has integrated LED lighting which casts a soft glow over the oak backs, adding ambience and dimension to the furniture. The combination of display shelving and closed lower cupboards achieves an attractive sense of order with only the best items on show and gadgets and other items hidden away.
A bespoke carpentry and joinery service from start to finish
Bespoke by Acorn took care of every stage of this project, from working with our clients on the original concept right through to the installation. This made the whole process an easy, stress-free, and enjoyable experience for them.
 Bespoke By Acorn
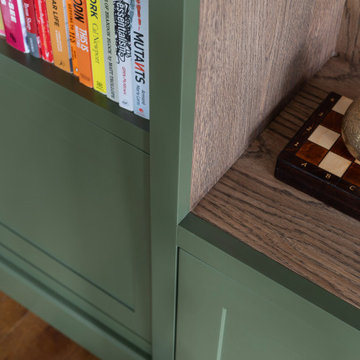
This stunning bespoke built-in media unit features shaker style doors and a break fronted design. The cabinetry mixes a stylish green painted finish with a contrasting rustic oak veneer for a unique nature-inspired look. With tailored shelving and clutter free cupboards the floor to ceiling furniture has added character and makes the perfection feature in our clients’ Surrey home.
Timeless shaker style design
This made to measure cabinetry has been handmade in solid wood in a shaker style. The understated, yet distinctive design is an enduring centuries-old classic; and the traditional construction is exceptionally strong. The breakfront gives variation to the depth of the media unit, adding interesting and drawing attention to the TV screen. With cabling concealed, nothing distracts from the beauty of this fitted wall to wall unit.
Nature-inspired green paired with oak wood
The unit has been finished in an eco-friendly, designer paint by Lick in a natural earthy tone of olive green, which is very much on trend. The dusky green with golden undertones makes the room feel restorative and uplifting. The cabinet backs and shelves are crafted from real oak veneer, protected with a dark stain in a satin finish to enhance the natural beauty and character of the wood. The oak veneer was chosen to match the room’s wooden floor and other furniture.
Shelving to showcase art and books
The open shelving has integrated LED lighting which casts a soft glow over the oak backs, adding ambience and dimension to the furniture. The combination of display shelving and closed lower cupboards achieves an attractive sense of order with only the best items on show and gadgets and other items hidden away.
A bespoke carpentry and joinery service from start to finish
Bespoke by Acorn took care of every stage of this project, from working with our clients on the original concept right through to the installation. This made the whole process an easy, stress-free, and enjoyable experience for them.
Sponsored
Columbus, OH
Hope Restoration & General Contracting
Columbus Design-Build, Kitchen & Bath Remodeling, Historic Renovations
 Tile Doctor Ltd
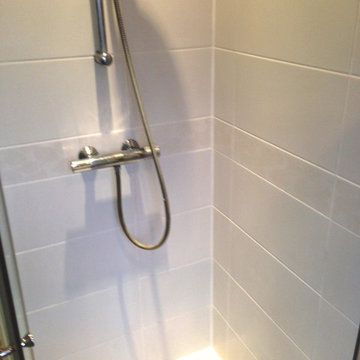
Shower cubicles can be the most difficult of tiled features to keep clean. Most are exposed to various acid-based soaps and shampoos on a daily basis, allowing mould and general muck to quickly build up along the grout lines and silicone. This leaves the entire area looking quite unappealing. In some cases, the grout lines become stained beyond a point where they can be restored to their original condition, so property owners will typically request to have the grout cut out and replaced however a faster and cheaper method is to have the grout completely recoloured.
Such was the case with this Ceramic tiled shower cubicle at a house in Wigan. It would take a lot to get the cubicle looking great again, having not been cleaned properly for a long time. The property owner decided to contact me for a professional refresh, including cleaning, new silicone sealer and recolouring of the grout.
I started the refresh by applying Tile Doctor Mould Away spray to the tiles and grout, and leaving it to dwell for an hour. As the name of the product suggests, Mould Away is a fast and effective cleaner for the removal of mould from silicone and grout, making it ideal for use on shower cubicles similar to this one. I then rinsed the entire area down with water before scrubbing the grout lines and tiles with a stiff grout brush to remove any remaining mould and lime scale, leaving them looking a lot cleaner.
The cleaning process made a big improvement however the grout was still too stained so after removing the silicone strip from around the base of the shower I proceeded to recolour with our white Grout Colourant. The colourant is painted onto the grout and any excess is wiped of the tile before it dries which both improves the appearance of the grout and seals it in to protect it from further staining. The last step was to apply fresh white silicone along the base of the shower.
The customer was very pleased with the refreshed appearance of their shower and you must admit it looks much more inviting now.
Steve Keary
Greater Manchester Tile Doctor
 Windy City Painters
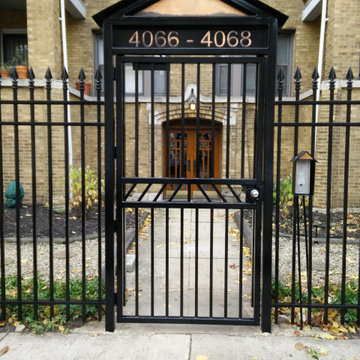
s your ornamental iron fence flaking rust onto the sidewalk every time Chicago wind kicks up? That is not a cosmetic problem - it is a sign that bare metal is exposed to moisture and the corrosion cycle is accelerating. Windy City Painters restores iron fencing on Chicago greystones, two-flats, Victorian brownstones, and courtyard buildings using professional-grade rust conversion and rust-inhibitive systems designed for the Midwest climate.
PROJECT OVERVIEW
Ornamental iron fence painting in Chicago is a multi-stage restoration process, not a simple brush-and-go job. Chicago properties - particularly the dense residential streetscapes of the North Side and Near West Side - feature decorative iron fencing that ranges from simple tubular picket to elaborate spear-top and scroll designs. When paint fails on iron, rust accelerates quickly. Windy City Painters evaluates each fence for structural rust-through, surface rust, and paint adhesion before recommending a scope of work.
MATERIALS AND PRODUCTS
Rust conversion: Ospho (phosphoric acid-based) or Corroseal (latex rust converter) depending on rust severity and surface porosity. Both chemically convert iron oxide into a stable compound that primer bonds to permanently rather than simply coating over active rust.
Primer: Rust-Oleum DTM (Direct to Metal) rust-inhibitive primer or Sherwin-Williams DTM Acrylic Coating primer, both formulated to penetrate weld seams, crevices, and pitted metal surfaces where brush application is essential.
Finish coat: Sherwin-Williams DTM Acrylic in satin or semi-gloss for UV resistance, color retention, and flexibility through freeze-thaw cycles. Two finish coats applied by brush for full coverage on ornamental profiles.
THE PROCESS
Step 1 - Mechanical Preparation: Wire wheel grinding with angle grinders removes loose rust and failing paint across flat rail surfaces. Needle gun descaling reaches weld joints, picket bases, and decorative scroll details where wire wheels cannot access. Windy City Painters inspects for rust-through after mechanical prep and flags any sections needing welding before painting proceeds.
Step 2 - Rust Conversion: Ospho or Corroseal is applied by brush to all remaining rust-affected surfaces. Ospho reacts with iron oxide over 24 hours, converting it to iron phosphate. Corroseal encapsulates and converts simultaneously. Both products create a chemically stable surface that dramatically improves primer adhesion on previously rusted iron fence sections.
Step 3 - Primer Application: Rust-Oleum DTM or Sherwin-Williams DTM rust-inhibitive primer is worked into every joint, crevice, and ornamental detail by brush - never sprayed alone on open ironwork where overspray and thin coverage risk undercutting. Full wet film thickness is verified before drying. Windy City Painters does not rush cure times between coats.
Step 4 - Finish Coats: Two coats of Sherwin-Williams DTM Acrylic topcoat are applied by brush for maximum film build on vertical pickets and horizontal rails. Color is matched to original or updated per homeowner preference. Semi-gloss finish resists dirt accumulation and makes future cleaning easier between repainting cycles.
CHICAGO-SPECIFIC CHALLENGES
Chicago presents iron fence painting conditions that milder climates do not. Road salt spray from city streets migrates onto fence bases through snowplow activity and foot traffic. Freeze-thaw cycling - sometimes occurring 30 or more times per winter - expands and contracts metal faster than paint can flex if film build is inadequate. High summer humidity slows cure times and risks blushing in topcoats applied too early in the morning. Windy City Painters schedules iron fence work during appropriate temperature and humidity windows and never applies coatings when rain is forecast within 24 hours.
WHAT TO EXPECT LONG-TERM
A properly prepped and primed iron fence in Chicago should hold a quality DTM finish for 5-8 years before needing significant maintenance. Annual inspection of base welds and picket bottoms - areas where water pools - catches early rust before it requires full mechanical prep again. Touch-up painting of isolated spots extends coating life significantly.
PRO TIPS
Tip 1: Never let a painter skip straight to topcoat on a rusty fence. Active rust under paint fails within one or two seasons. Ospho or Corroseal conversion is non-negotiable on Chicago iron.
Tip 2: Inspect fence picket bases at ground level every fall. That is where water collects, salt concentrates, and rust begins its worst work. Early touch-up costs far less than full restoration.
Tip 3: Request brush application on ornamental ironwork rather than spray-only. Brush work ensures wet paint is physically worked into every joint and crevice where rust originates.
Ready to restore your iron fence? Visit windypainters.com to schedule a free estimate with Windy City Painters.
Q: What does iron fence painting cost in Chicago? A: Iron fence painting in Chicago typically runs $8-$18 per linear foot. Rust severity, fence height, ornamental detail complexity, and whether welding repairs are needed all affect the final cost for professional iron fence restoration.
Q: How do you treat rust before painting an iron fence? A: Windy City Painters uses Ospho or Corroseal rust converters after mechanical prep. These products chemically neutralize iron oxide, creating a stable surface that rust-inhibitive primer bonds to permanently rather than painting over active corrosion.
Q: What primer is best for painting a rusty iron fence in Chicago? A: Rust-Oleum DTM and Sherwin-Williams DTM rust-inhibitive primers are our go-to products for iron fence painting in Chicago. Both are formulated for direct metal application and resist the moisture and freeze-thaw stress Chicago winters produce.
Q: How long does painted iron fencing last in Chicago? A: A professionally prepped and primed iron fence in Chicago holds a quality DTM finish for 5-8 years. Annual inspection of base welds and low points, with spot touch-up as needed, extends that service life considerably.
Q: Do I need a welder before painting my iron fence? A: If rust has eaten through fence rails or pickets structurally, Windy City Painters will identify those sections during prep and recommend welding before any primer or paint is applied. Painting over structurally failed metal is a waste of money.
Q: Can I paint an iron fence myself? A: DIY iron fence painting without proper rust conversion and DTM primer systems almost always fails within two seasons in Chicago. Professional prep, product selection, and application technique are why Windy City Painters results last 5-8 years.
Q: What neighborhoods does Windy City Painters serve for iron fence work? A: Windy City Painters serves Chicago North Side and Near West Side neighborhoods, working on greystones, two-flats, Victorian brownstones, courtyard buildings, and coach houses throughout the city.
 Bespoke By Acorn
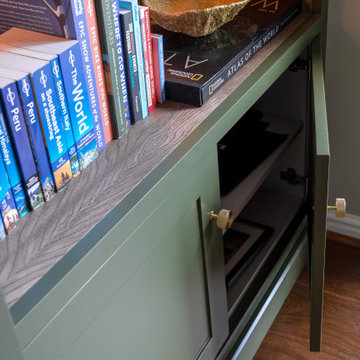
This stunning bespoke built-in media unit features shaker style doors and a break fronted design. The cabinetry mixes a stylish green painted finish with a contrasting rustic oak veneer for a unique nature-inspired look. With tailored shelving and clutter free cupboards the floor to ceiling furniture has added character and makes the perfection feature in our clients’ Surrey home.
Timeless shaker style design
This made to measure cabinetry has been handmade in solid wood in a shaker style. The understated, yet distinctive design is an enduring centuries-old classic; and the traditional construction is exceptionally strong. The breakfront gives variation to the depth of the media unit, adding interesting and drawing attention to the TV screen. With cabling concealed, nothing distracts from the beauty of this fitted wall to wall unit.
Nature-inspired green paired with oak wood
The unit has been finished in an eco-friendly, designer paint by Lick in a natural earthy tone of olive green, which is very much on trend. The dusky green with golden undertones makes the room feel restorative and uplifting. The cabinet backs and shelves are crafted from real oak veneer, protected with a dark stain in a satin finish to enhance the natural beauty and character of the wood. The oak veneer was chosen to match the room’s wooden floor and other furniture.
Shelving to showcase art and books
The open shelving has integrated LED lighting which casts a soft glow over the oak backs, adding ambience and dimension to the furniture. The combination of display shelving and closed lower cupboards achieves an attractive sense of order with only the best items on show and gadgets and other items hidden away.
A bespoke carpentry and joinery service from start to finish
Bespoke by Acorn took care of every stage of this project, from working with our clients on the original concept right through to the installation. This made the whole process an easy, stress-free, and enjoyable experience for them.
 Amanda Martocchio Architecture
When a world class sailing champion approached us to design a Newport home for his family, with lodging for his sailing crew, we set out to create a clean, light-filled modern home that would integrate with the natural surroundings of the waterfront property, and respect the character of the historic district.
Our approach was to make the marine landscape an integral feature throughout the home. One hundred eighty degree views of the ocean from the top floors are the result of the pinwheel massing. The home is designed as an extension of the curvilinear approach to the property through the woods and reflects the gentle undulating waterline of the adjacent saltwater marsh. Floodplain regulations dictated that the primary occupied spaces be located significantly above grade; accordingly, we designed the first and second floors on a stone “plinth” above a walk-out basement with ample storage for sailing equipment. The curved stone base slopes to grade and houses the shallow entry stair, while the same stone clads the interior’s vertical core to the roof, along which the wood, glass and stainless steel stair ascends to the upper level.
One critical programmatic requirement was enough sleeping space for the sailing crew, and informal party spaces for the end of race-day gatherings. The private master suite is situated on one side of the public central volume, giving the homeowners views of approaching visitors. A “bedroom bar,” designed to accommodate a full house of guests, emerges from the other side of the central volume, and serves as a backdrop for the infinity pool and the cove beyond.
Also essential to the design process was ecological sensitivity and stewardship. The wetlands of the adjacent saltwater marsh were designed to be restored; an extensive geo-thermal heating and cooling system was implemented; low carbon footprint materials and permeable surfaces were used where possible. Native and non-invasive plant species were utilized in the landscape. The abundance of windows and glass railings maximize views of the landscape, and, in deference to the adjacent bird sanctuary, bird-friendly glazing was used throughout.
Photo: Michael Moran/OTTO Photography
Sponsored
Galena, OH

Buckeye Restoration & Remodeling Inc.
Central Ohio's Premier Home Remodelers Since 1996
 Amanda Martocchio Architecture
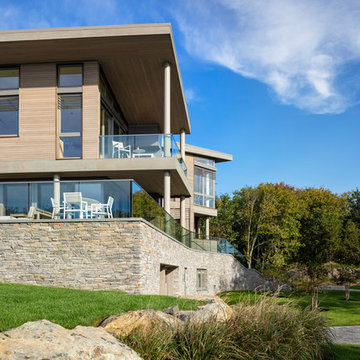
When a world class sailing champion approached us to design a Newport home for his family, with lodging for his sailing crew, we set out to create a clean, light-filled modern home that would integrate with the natural surroundings of the waterfront property, and respect the character of the historic district.
Our approach was to make the marine landscape an integral feature throughout the home. One hundred eighty degree views of the ocean from the top floors are the result of the pinwheel massing. The home is designed as an extension of the curvilinear approach to the property through the woods and reflects the gentle undulating waterline of the adjacent saltwater marsh. Floodplain regulations dictated that the primary occupied spaces be located significantly above grade; accordingly, we designed the first and second floors on a stone “plinth” above a walk-out basement with ample storage for sailing equipment. The curved stone base slopes to grade and houses the shallow entry stair, while the same stone clads the interior’s vertical core to the roof, along which the wood, glass and stainless steel stair ascends to the upper level.
One critical programmatic requirement was enough sleeping space for the sailing crew, and informal party spaces for the end of race-day gatherings. The private master suite is situated on one side of the public central volume, giving the homeowners views of approaching visitors. A “bedroom bar,” designed to accommodate a full house of guests, emerges from the other side of the central volume, and serves as a backdrop for the infinity pool and the cove beyond.
Also essential to the design process was ecological sensitivity and stewardship. The wetlands of the adjacent saltwater marsh were designed to be restored; an extensive geo-thermal heating and cooling system was implemented; low carbon footprint materials and permeable surfaces were used where possible. Native and non-invasive plant species were utilized in the landscape. The abundance of windows and glass railings maximize views of the landscape, and, in deference to the adjacent bird sanctuary, bird-friendly glazing was used throughout.
Photo: Michael Moran/OTTO Photography
 Renovisions
This North Shore of Boston client wanted to make a change; she decided to purchase a seaside antique home and was up for the challenge to re-design and remodel. Her plan involved re-locating her mother from Florida to the newly added wing of the house when the remodel was in full swing.
We believed that what was standing between our client and the kitchen of her dreams was a well thought out, creative design and a wall or two…
Once outdated and worn, this 1830 antique kitchen was closed off from the family room and dining spaces. The newly re-configured kitchen with re-claimed wide-plank wood floors and restorations to wood cladding on the ceiling, beam and open corner shelving really warmed up the room and welcomes friends, neighbors and relatives. Wood bead board paneling around the island cabinetry along with mixed metals, tie in nicely with the stunning soapstone countertops with distinctive copper-colored veining, creating a beautiful vintage appeal.
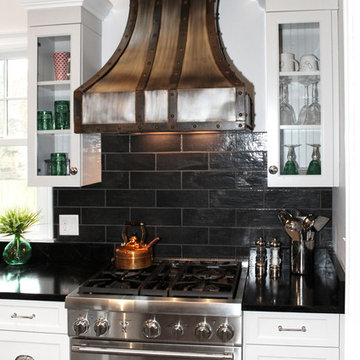
Styled to look like an old-fashioned stove, this steel range boasts modern conveniences such as dual-fuel (gas burners and electric oven) and a convection oven crowned by a custom steel hood adorned with rivets and metal trims.
To enrich the vintage feel, a white farm-style fire clay apron sink was installed that also evokes a classic and time- honored feel.
Although the process was daunting as it presented several challenges, it was a rewarding experience when the project was completed. Our client and her mother were absolutely thrilled with the final results.
“Thank you to Cathy and Ed very much for all your assistance with my kitchen planning! I’m fortunate to have had your input and expertise! It was great seeing you and spending time together and my mom really liked you both. I would welcome you to stop by and say hello when you’re headed to Portsmouth or the north shore. All the best!”
-Jill P.
 Tile Doctor Ltd
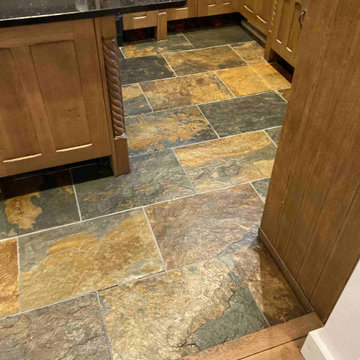
This Multi-Coloured Slate floor looks nice in the Kitchen of this property in Hythe, however due to the riven surface of the tile and the deep grout lines my customer had struggled to keep it clean. Additionally, the Slate has lost all of its lustre over the years since it had been installed and it was now due a deep clean and reseal.
The combination of durability and price makes Slate a popular choice for floor covering, it is also available in a number of colours, ranging from plain black to a more diverse array of shades. Like any natural stone floor though it need sealing to keep the dirt out of the pores of the stone however sealers wear off with use
Hythe by the way is a lovely medieval coastal market town with its own beach on the edge of Romney Marsh and close to Folkestone.
Before starting I removed the kickboards underneath the kitchen units and protected the exposed woodwork with a thin film. To deep clean the Slate floor and remove any remaining sealer I applied Tile Doctor Remove and Go and left it to soak in for ten minutes before scrubbing it in with a light carbide brush. As well as removing the old sealer this process releases the dirt from the pores of the stone and brings it to the surface where it can be extracted.
I have probably mentioned this before, but I’ve invested in a powerful van mounted pressure extraction system for removing the dirt, old sealer and emulsified soils released from the stone. The system works by applying water at high pressure on the floor via a spinner tool and then simultaneously extracts the waste under suction back to a grey water tank on the van. From the customers point of view, it makes light work of cleaning the floor and more importantly leaves the floor dry and leaves no mess.
Having a dry floor at this stage is important as it means I can usually seal the floor on the same day. Its not a good idea to apply a sealer to damp floor as it will affect the way it cures and lead to an undesirable finish. The way to make sure the floor its dry is to use a moisture meter and take readings in several places around the floor. You can use an air mover to improve drying times however older floors can take a very long time to dry and for those I tend to book another day to apply the sealer.
With the floor dry I set about applying the first of two coats of Tile Doctor X-Tra Seal which provides both a hardwearing sheen to the slate as well as enhancing its natural colourings. It has strong water repellency characteristics which makes it ideal for use in a kitchen where spillages are quite common.
This was quite a small kitchen, so the work was completed in one day. My client was amazed at the transformation and grateful for our advice on continued maintenance which for this floor I recommended the use of Tile Doctor Stone Soap for daily cleaning.
Michael Conlon
South Kent Tile Doctor
41