
Search results for "Rip off" in Home Design Ideas
 Safferstone Interiors
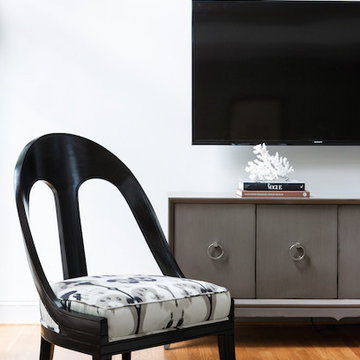
Dennis and Joe have a large, light-filled house. New construction meant lofted space and open floor plans with traditional styling. Running a busy dental practice by day and engaged in a rich social life by night, this couple needed a professional to take the lead on making their house a home.
That’s my cue!
They wanted to take risks, and stay away from “matchy-matchy”. We gussied up a plain ol’ TV room and gave it a healthy dose of luxury.
Our plan was initially inspired by an abstract painting hanging over their stone fireplace. We brought in their love of the outdoors to make things cozy and used family furniture whenever possible for nostalgia and comfort.
I took their love for one-of-a-kind objects and started making a design plan, aiming to solve their biggest frustration: the family room. They had a tortured relationship with a “forgotten family room,” a great space that was spacious and bright, but not at all cozy or joyful, and certainly not “them.”
I wanted to create a cozy space functional for everyday curling up with puppies and watching TV after dinner, yet chic enough for hosting the pre-dinner kitchen overflow and cocktails during parties.
I went looking for contrasting textures and materials. I wanted to balance patterns and scale, and use non-traditional colors as neutrals to create an overall sense of “BAM!”
Dennis and Joe loved the nod to the classics juxtaposed with new and different globally-inspired pieces. For this project our design aesthetic can be described as Middle Eastern/tribal meets mid-century modern. We played to their sensible side with proportion and balance, and stayed as far away from boring/bleh as we could.
You could say this room was pretty successful...It was featured in DC Modern Luxury. (#nobigdeal, right?)
From there we moved on to other spaces.. We added colorful pillows and sheer drapery to finish off their formal living room. We kept an inherited bedroom set from Dennis’ Mom and added color, draperies, and pillows to overhaul the guest bedroom.
Their project was not a rip-and-replace, we weren’t starting from scratch with a blank piece of paper.
Rather, our goal was to take what was already there and make it better, more like them. Using functionality first, we focused on giving the house a soothing, joyful aesthetic. We upped the chic factor by a gajillion and helped them find their ‘happy’ at home. See more Safferstone stuff at www.safferstone.com. Connect with us on Facebook, get inspired on Pinterest, and share modern musings on life & design on Instagram. Or, send us a love note at hello@safferstone.com.
Photo: Angie Seckinger
 Pro-Roofing
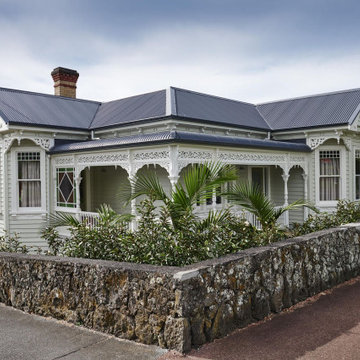
The standard duration of a roof is roughly many years. If the roof is under few years old yet you are having problems, it will probably be able to get repaired instead of being forced to put up a brand-new roof. Even so, if your roof exceeds this age it usually is recommended to put in a new roof. To complete both fixes and new installs, a roofing contractor should be employed. A roofing contractor will be able to perfectly put in or service roofing components to make certain a good quality end product.
Before employing a residential roofing Auckland contractor it's always a good idea to get recommendations from family or friends. No matter whether you have recommendations, acquire several bids prior to figuring out the roofing company to hire. A bid ought to be thorough and encompass the work to be conducted, expense, and time-frame to finish. Make certain clean up is included in the offered cost. If you would like save money, offer to complete the cleanup yourself.
Ask the roofer for how long they've been in business. Roofing contractors with numerous years experience are preferred. Additionally, make certain they have a physical address. Many roofing rip-offs are carried out by folks operating out of a truck without any legitimate business licenses or permanent street address. Obtain recommendations and verify them. Roofers should be properly insured. Request verification of insurance coverage to be certain you are shielded from any damage to your house.
The residential roofing Auckland repairs and new roofs may require particular building permits. Make sure the enterprise you deal with knows community building regulations and that they acquire the right licenses or permits. Many cities also need to have inspections during particular stages of construction and a final inspection when the work is complete. Examine your community building codes to be sure the roofer is adhering to all codes. You may be liable if this does not occur.
Before starting the task get a contract. This would include every detail of the project, period of time to finish, and cost. It needs to clearly define payment procedures and warranties. Furthermore, make certain the contract declares they are liable for clean up. Roof elements can be very messy and you should not need to clean up and dispose of waste yourself. However remember you can save a little money if you choose to take on the cleanup process yourself. Don't be rushed into choosing a residential roofing Auckland contractor. Take time to talk to prospective roofers and check out expertise and recommendations. Roof maintenance can be costly and a new roof is really a major investment. Protect your house through doing a bit of analysis. Hire the roofing contractor that has the best mix of expertise and expense and with which you feel most confident.
For More Info:- https://www.proroofing.co.nz/
https://classifiedsfree.nz/new-zealand-classifieds/www_9_208_710990/central-auckland-roofing
https://www.okidoki.co.nz/item/commercial-roofing-in-auckland/8598537/
https://www.directorytogoto.com/new-zealand/auckland/professional-services/pro-roofing
 Tile Doctor Ltd
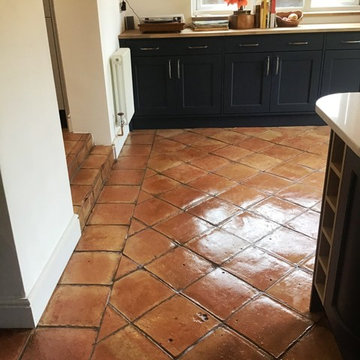
We were contacted by the owner of a property in Moulton with a problematic Terracotta tiled kitchen floor. She was seriously considering ripping up the entire area of tiling and replacing it as she was having a new kitchen installed. Both her and her husband were concerned that unless I could restore this floor to somewhere near to its original condition, they would need to replace it.
I went over to inspect the Terracotta tiles and could see the entire surface was deeply ingrained with soiling and the grout lines were filthy. After carrying out a test it became obvious that the previous sealer had been applied very sparingly and had mostly worn away, leaving the stone prone to staining. Terracotta is a very porous tile and dirt had become ingrained in the pores leaving it looking very dull and difficult to clean.
I completed the test on a small part of the floor and the customer could see the results which could be achieved. Happy with the result they agreed my quote and we set a date for my return to complete the floor.
The tiles turned out to be made of a fairly soft Terracotta which meant that we were able to deep clean them extremely effectively using a strong dilution of Tile Doctor Pro-Clean. We used Tile Doctor Remove and Go in particularly stubborn areas.
The process I use is to spray the Pro-Clean onto the floor and leave it to soak in for about ten minutes before being worked in using a heavy rotary machine fitted with a black scrubbing pad. The resulting slurry is removed using a wet pick up vacuum. All the dirt and virtually all of the old sealer was removed at this stage; the remaining patches around the edges of the area being finished by hand with a 200-grit burnishing block. The grout lines were then cleaned by hand with an angled grout brush.
Finally, the deep-seated oil stains in front of the cooker were brought out using Tile Doctor Oxy-Gel which was left to dwell on the marks for an hour before being agitated with a diamond burnishing pad and rinsed away with a wet pick up machine. The floor was rinsed with water and allowed to dry off overnight.
The following day I inspected the floor and checked it was ready to be sealed. All was well so I applied an initial coat of Tile Doctor Colour Grow which is an impregnating sealer that occupies the pores in the tile enhancing the natural colours of the Terracotta and provide a base layer of protection from staining.
I returned at a convenient time once the kitchen was completely installed to finish the job. This involves carrying out a light maintenance clean with Tile Doctor Neutral Cleaner and once the floor was dry, I applied 5 further coats of Tile Doctor Seal and Go which provides a pleasing satin finish which is really suited to this type of floor.
The customer was very happy with the results and has left the following feedback.
“We were really pleased with the results, thank you!”
Phil Vissian
Northamptonshire Tile Doctor
Find the right local pro for your project
 Safferstone Interiors
Dennis and Joe have a large, light-filled house. New construction meant lofted space and open floor plans with traditional styling. Running a busy dental practice by day and engaged in a rich social life by night, this couple needed a professional to take the lead on making their house a home.
That’s my cue!
They wanted to take risks, and stay away from “matchy-matchy”. We gussied up a plain ol’ TV room and gave it a healthy dose of luxury.
Our plan was initially inspired by an abstract painting hanging over their stone fireplace. We brought in their love of the outdoors to make things cozy and used family furniture whenever possible for nostalgia and comfort.
I took their love for one-of-a-kind objects and started making a design plan, aiming to solve their biggest frustration: the family room. They had a tortured relationship with a “forgotten family room,” a great space that was spacious and bright, but not at all cozy or joyful, and certainly not “them.”
I wanted to create a cozy space functional for everyday curling up with puppies and watching TV after dinner, yet chic enough for hosting the pre-dinner kitchen overflow and cocktails during parties.
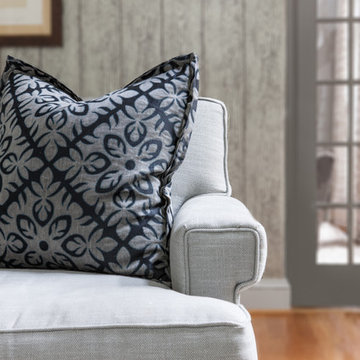
I went looking for contrasting textures and materials. I wanted to balance patterns and scale, and use non-traditional colors as neutrals to create an overall sense of “BAM!”
Dennis and Joe loved the nod to the classics juxtaposed with new and different globally-inspired pieces. For this project our design aesthetic can be described as Middle Eastern/tribal meets mid-century modern. We played to their sensible side with proportion and balance, and stayed as far away from boring/bleh as we could.
You could say this room was pretty successful...It was featured in DC Modern Luxury. (#nobigdeal, right?)
From there we moved on to other spaces.. We added colorful pillows and sheer drapery to finish off their formal living room. We kept an inherited bedroom set from Dennis’ Mom and added color, draperies, and pillows to overhaul the guest bedroom.
Their project was not a rip-and-replace, we weren’t starting from scratch with a blank piece of paper.
Rather, our goal was to take what was already there and make it better, more like them. Using functionality first, we focused on giving the house a soothing, joyful aesthetic. We upped the chic factor by a gajillion and helped them find their ‘happy’ at home. See more Safferstone stuff at www.safferstone.com. Connect with us on Facebook, get inspired on Pinterest, and share modern musings on life & design on Instagram. Or, send us a love note at hello@safferstone.com.
Photo: Angie Seckinger
 Fiorito Interior Design
You don't have to own a big celebrity mansion to have a beautifully appointed house finished with unique and special materials. When my clients bought an average condo kitted out with all the average builder-grade things that average builders stuff into spaces like that, they longed to make it theirs. Being collectors of colorful Fiesta tableware and lovers of extravagant stone, we set about infusing the space with a dose of their fun personality.
There wasn’t a corner of the house that went untouched in this extensive renovation. The ground floor got a complete make-over with a new Calacatta Gold tile floor, and I designed a very special border of Lunada Bay glass mosaic tiles that outlines the edge of every room.
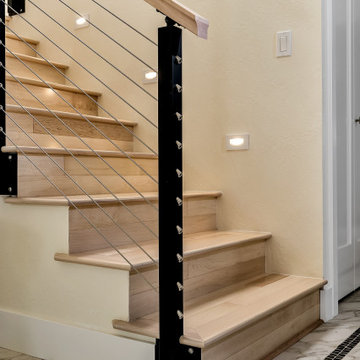
We ripped out a solid walled staircase and replaced it with a visually lighter cable rail system, and a custom hanging chandelier now shines over the living room.
The kitchen was redesigned to take advantage of a wall that was previously just shallow pantry storage. By opening it up and installing cabinetry, we doubled the counter space and made the kitchen much more spacious and usable. We also removed a low hanging set of upper cabinets that cut off the kitchen from the rest of the ground floor spaces. Acquarella Fantasy quartzite graces the counter surfaces and continues down in a waterfall feature in order to enjoy as much of this stone’s natural beauty as possible.
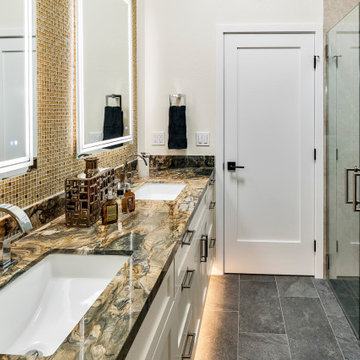
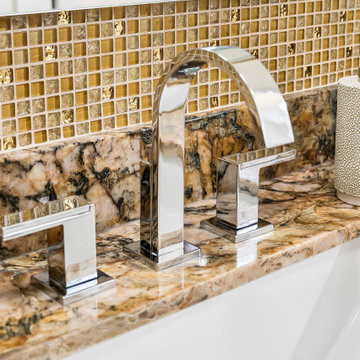
One of my favorite spaces turned out to be the primary bathroom. The scheme for this room took shape when we were at a slab warehouse shopping for material. We stumbled across a packet of a stunning quartzite called Fusion Wow Dark and immediately fell in love. We snatched up a pair of slabs for the counter as well as the back wall of the shower. My clients were eager to be rid of a tub-shower alcove and create a spacious curbless shower, which meant a full piece of stone on the entire long wall would be stunning. To compliment it, I found a neutral, sandstone-like tile for the return walls of the shower and brought it around the remaining walls of the space, capped with a coordinating chair rail. But my client's love of gold and all things sparkly led us to a wonderful mosaic. Composed of shifting hues of honey and gold, I envisioned the mosaic on the vanity wall and as a backing for the niche in the shower. We chose a dark slate tile to ground the room, and designed a luxurious, glass French door shower enclosure. Little touches like a motion-detected toe kick night light at the vanity, oversized LED mirrors, and ultra-modern plumbing fixtures elevate this previously simple bathroom.
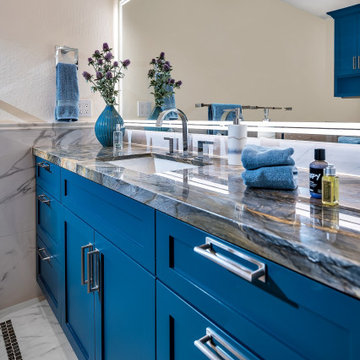
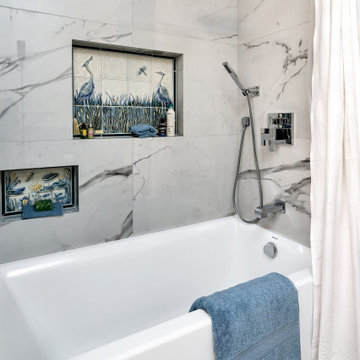
And I designed a watery-themed guest bathroom with a deep blue vanity, a large LED mirror, toe kick lights, and customized handmade porcelain tiles illustrating marshland scenes and herons.
All photos by Bernardo Grijalva
 Village Home Stores
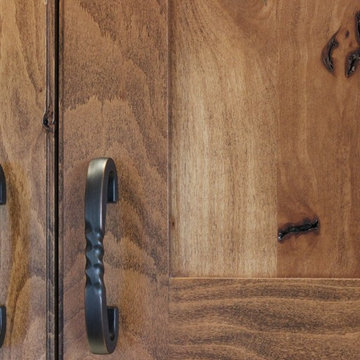
Full-overlay Rustic Beech cabinets in the "Charleston" door style and "Briarwood" finish.
Village Home Stores
Example of a large mountain style kitchen design in Chicago
Example of a large mountain style kitchen design in Chicago
 Fiorito Interior Design
You don't have to own a big celebrity mansion to have a beautifully appointed house finished with unique and special materials. When my clients bought an average condo kitted out with all the average builder-grade things that average builders stuff into spaces like that, they longed to make it theirs. Being collectors of colorful Fiesta tableware and lovers of extravagant stone, we set about infusing the space with a dose of their fun personality.
There wasn’t a corner of the house that went untouched in this extensive renovation. The ground floor got a complete make-over with a new Calacatta Gold tile floor, and I designed a very special border of Lunada Bay glass mosaic tiles that outlines the edge of every room.
We ripped out a solid walled staircase and replaced it with a visually lighter cable rail system, and a custom hanging chandelier now shines over the living room.
The kitchen was redesigned to take advantage of a wall that was previously just shallow pantry storage. By opening it up and installing cabinetry, we doubled the counter space and made the kitchen much more spacious and usable. We also removed a low hanging set of upper cabinets that cut off the kitchen from the rest of the ground floor spaces. Acquarella Fantasy quartzite graces the counter surfaces and continues down in a waterfall feature in order to enjoy as much of this stone’s natural beauty as possible.
One of my favorite spaces turned out to be the primary bathroom. The scheme for this room took shape when we were at a slab warehouse shopping for material. We stumbled across a packet of a stunning quartzite called Fusion Wow Dark and immediately fell in love. We snatched up a pair of slabs for the counter as well as the back wall of the shower. My clients were eager to be rid of a tub-shower alcove and create a spacious curbless shower, which meant a full piece of stone on the entire long wall would be stunning. To compliment it, I found a neutral, sandstone-like tile for the return walls of the shower and brought it around the remaining walls of the space, capped with a coordinating chair rail. But my client's love of gold and all things sparkly led us to a wonderful mosaic. Composed of shifting hues of honey and gold, I envisioned the mosaic on the vanity wall and as a backing for the niche in the shower. We chose a dark slate tile to ground the room, and designed a luxurious, glass French door shower enclosure. Little touches like a motion-detected toe kick night light at the vanity, oversized LED mirrors, and ultra-modern plumbing fixtures elevate this previously simple bathroom.
And I designed a watery-themed guest bathroom with a deep blue vanity, a large LED mirror, toe kick lights, and customized handmade porcelain tiles illustrating marshland scenes and herons.
All photos by Bernardo Grijalva
Sponsored
Delaware, OH

Buckeye Basements, Inc.
Central Ohio's Basement Finishing ExpertsBest Of Houzz '13-'21
 Fiorito Interior Design
You don't have to own a big celebrity mansion to have a beautifully appointed house finished with unique and special materials. When my clients bought an average condo kitted out with all the average builder-grade things that average builders stuff into spaces like that, they longed to make it theirs. Being collectors of colorful Fiesta tableware and lovers of extravagant stone, we set about infusing the space with a dose of their fun personality.
There wasn’t a corner of the house that went untouched in this extensive renovation. The ground floor got a complete make-over with a new Calacatta Gold tile floor, and I designed a very special border of Lunada Bay glass mosaic tiles that outlines the edge of every room.
We ripped out a solid walled staircase and replaced it with a visually lighter cable rail system, and a custom hanging chandelier now shines over the living room.
The kitchen was redesigned to take advantage of a wall that was previously just shallow pantry storage. By opening it up and installing cabinetry, we doubled the counter space and made the kitchen much more spacious and usable. We also removed a low hanging set of upper cabinets that cut off the kitchen from the rest of the ground floor spaces. Acquarella Fantasy quartzite graces the counter surfaces and continues down in a waterfall feature in order to enjoy as much of this stone’s natural beauty as possible.
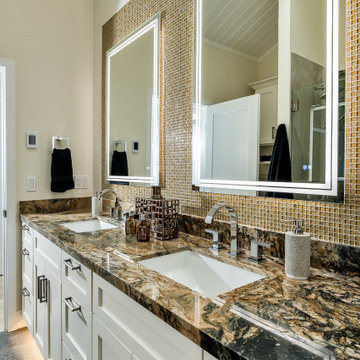
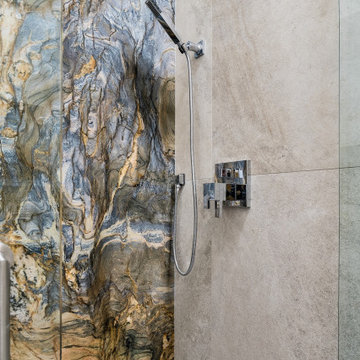
One of my favorite spaces turned out to be the primary bathroom. The scheme for this room took shape when we were at a slab warehouse shopping for material. We stumbled across a packet of a stunning quartzite called Fusion Wow Dark and immediately fell in love. We snatched up a pair of slabs for the counter as well as the back wall of the shower. My clients were eager to be rid of a tub-shower alcove and create a spacious curbless shower, which meant a full piece of stone on the entire long wall would be stunning. To compliment it, I found a neutral, sandstone-like tile for the return walls of the shower and brought it around the remaining walls of the space, capped with a coordinating chair rail. But my client's love of gold and all things sparkly led us to a wonderful mosaic. Composed of shifting hues of honey and gold, I envisioned the mosaic on the vanity wall and as a backing for the niche in the shower. We chose a dark slate tile to ground the room, and designed a luxurious, glass French door shower enclosure. Little touches like a motion-detected toe kick night light at the vanity, oversized LED mirrors, and ultra-modern plumbing fixtures elevate this previously simple bathroom.
And I designed a watery-themed guest bathroom with a deep blue vanity, a large LED mirror, toe kick lights, and customized handmade porcelain tiles illustrating marshland scenes and herons.
All photos by Bernardo Grijalva
 Bloomington Carpet One
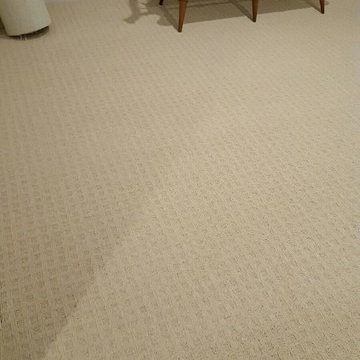
Example of a mid-sized classic carpeted hallway design in Minneapolis with white walls
 J&S by STARK
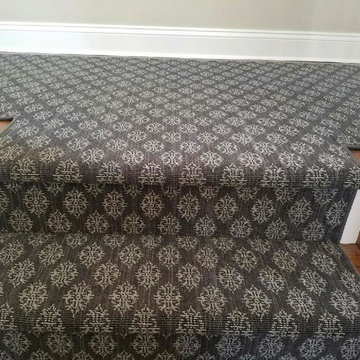
Mid-sized elegant carpeted straight wood railing home design photo in New York with carpeted risers
 Fiorito Interior Design
You don't have to own a big celebrity mansion to have a beautifully appointed house finished with unique and special materials. When my clients bought an average condo kitted out with all the average builder-grade things that average builders stuff into spaces like that, they longed to make it theirs. Being collectors of colorful Fiesta tableware and lovers of extravagant stone, we set about infusing the space with a dose of their fun personality.
There wasn’t a corner of the house that went untouched in this extensive renovation. The ground floor got a complete make-over with a new Calacatta Gold tile floor, and I designed a very special border of Lunada Bay glass mosaic tiles that outlines the edge of every room.
We ripped out a solid walled staircase and replaced it with a visually lighter cable rail system, and a custom hanging chandelier now shines over the living room.
The kitchen was redesigned to take advantage of a wall that was previously just shallow pantry storage. By opening it up and installing cabinetry, we doubled the counter space and made the kitchen much more spacious and usable. We also removed a low hanging set of upper cabinets that cut off the kitchen from the rest of the ground floor spaces. Acquarella Fantasy quartzite graces the counter surfaces and continues down in a waterfall feature in order to enjoy as much of this stone’s natural beauty as possible.
One of my favorite spaces turned out to be the primary bathroom. The scheme for this room took shape when we were at a slab warehouse shopping for material. We stumbled across a packet of a stunning quartzite called Fusion Wow Dark and immediately fell in love. We snatched up a pair of slabs for the counter as well as the back wall of the shower. My clients were eager to be rid of a tub-shower alcove and create a spacious curbless shower, which meant a full piece of stone on the entire long wall would be stunning. To compliment it, I found a neutral, sandstone-like tile for the return walls of the shower and brought it around the remaining walls of the space, capped with a coordinating chair rail. But my client's love of gold and all things sparkly led us to a wonderful mosaic. Composed of shifting hues of honey and gold, I envisioned the mosaic on the vanity wall and as a backing for the niche in the shower. We chose a dark slate tile to ground the room, and designed a luxurious, glass French door shower enclosure. Little touches like a motion-detected toe kick night light at the vanity, oversized LED mirrors, and ultra-modern plumbing fixtures elevate this previously simple bathroom.
And I designed a watery-themed guest bathroom with a deep blue vanity, a large LED mirror, toe kick lights, and customized handmade porcelain tiles illustrating marshland scenes and herons.
All photos by Bernardo Grijalva
 Fiorito Interior Design
You don't have to own a big celebrity mansion to have a beautifully appointed house finished with unique and special materials. When my clients bought an average condo kitted out with all the average builder-grade things that average builders stuff into spaces like that, they longed to make it theirs. Being collectors of colorful Fiesta tableware and lovers of extravagant stone, we set about infusing the space with a dose of their fun personality.
There wasn’t a corner of the house that went untouched in this extensive renovation. The ground floor got a complete make-over with a new Calacatta Gold tile floor, and I designed a very special border of Lunada Bay glass mosaic tiles that outlines the edge of every room.
We ripped out a solid walled staircase and replaced it with a visually lighter cable rail system, and a custom hanging chandelier now shines over the living room.
The kitchen was redesigned to take advantage of a wall that was previously just shallow pantry storage. By opening it up and installing cabinetry, we doubled the counter space and made the kitchen much more spacious and usable. We also removed a low hanging set of upper cabinets that cut off the kitchen from the rest of the ground floor spaces. Acquarella Fantasy quartzite graces the counter surfaces and continues down in a waterfall feature in order to enjoy as much of this stone’s natural beauty as possible.
One of my favorite spaces turned out to be the primary bathroom. The scheme for this room took shape when we were at a slab warehouse shopping for material. We stumbled across a packet of a stunning quartzite called Fusion Wow Dark and immediately fell in love. We snatched up a pair of slabs for the counter as well as the back wall of the shower. My clients were eager to be rid of a tub-shower alcove and create a spacious curbless shower, which meant a full piece of stone on the entire long wall would be stunning. To compliment it, I found a neutral, sandstone-like tile for the return walls of the shower and brought it around the remaining walls of the space, capped with a coordinating chair rail. But my client's love of gold and all things sparkly led us to a wonderful mosaic. Composed of shifting hues of honey and gold, I envisioned the mosaic on the vanity wall and as a backing for the niche in the shower. We chose a dark slate tile to ground the room, and designed a luxurious, glass French door shower enclosure. Little touches like a motion-detected toe kick night light at the vanity, oversized LED mirrors, and ultra-modern plumbing fixtures elevate this previously simple bathroom.
And I designed a watery-themed guest bathroom with a deep blue vanity, a large LED mirror, toe kick lights, and customized handmade porcelain tiles illustrating marshland scenes and herons.
All photos by Bernardo Grijalva
 Fiorito Interior Design
You don't have to own a big celebrity mansion to have a beautifully appointed house finished with unique and special materials. When my clients bought an average condo kitted out with all the average builder-grade things that average builders stuff into spaces like that, they longed to make it theirs. Being collectors of colorful Fiesta tableware and lovers of extravagant stone, we set about infusing the space with a dose of their fun personality.
There wasn’t a corner of the house that went untouched in this extensive renovation. The ground floor got a complete make-over with a new Calacatta Gold tile floor, and I designed a very special border of Lunada Bay glass mosaic tiles that outlines the edge of every room.
We ripped out a solid walled staircase and replaced it with a visually lighter cable rail system, and a custom hanging chandelier now shines over the living room.
The kitchen was redesigned to take advantage of a wall that was previously just shallow pantry storage. By opening it up and installing cabinetry, we doubled the counter space and made the kitchen much more spacious and usable. We also removed a low hanging set of upper cabinets that cut off the kitchen from the rest of the ground floor spaces. Acquarella Fantasy quartzite graces the counter surfaces and continues down in a waterfall feature in order to enjoy as much of this stone’s natural beauty as possible.
One of my favorite spaces turned out to be the primary bathroom. The scheme for this room took shape when we were at a slab warehouse shopping for material. We stumbled across a packet of a stunning quartzite called Fusion Wow Dark and immediately fell in love. We snatched up a pair of slabs for the counter as well as the back wall of the shower. My clients were eager to be rid of a tub-shower alcove and create a spacious curbless shower, which meant a full piece of stone on the entire long wall would be stunning. To compliment it, I found a neutral, sandstone-like tile for the return walls of the shower and brought it around the remaining walls of the space, capped with a coordinating chair rail. But my client's love of gold and all things sparkly led us to a wonderful mosaic. Composed of shifting hues of honey and gold, I envisioned the mosaic on the vanity wall and as a backing for the niche in the shower. We chose a dark slate tile to ground the room, and designed a luxurious, glass French door shower enclosure. Little touches like a motion-detected toe kick night light at the vanity, oversized LED mirrors, and ultra-modern plumbing fixtures elevate this previously simple bathroom.
And I designed a watery-themed guest bathroom with a deep blue vanity, a large LED mirror, toe kick lights, and customized handmade porcelain tiles illustrating marshland scenes and herons.
All photos by Bernardo Grijalva
Sponsored
Plain City, OH

Kuhns Contracting, Inc.
Central Ohio's Trusted Home Remodeler Specializing in Kitchens & Baths
 Fiorito Interior Design
You don't have to own a big celebrity mansion to have a beautifully appointed house finished with unique and special materials. When my clients bought an average condo kitted out with all the average builder-grade things that average builders stuff into spaces like that, they longed to make it theirs. Being collectors of colorful Fiesta tableware and lovers of extravagant stone, we set about infusing the space with a dose of their fun personality.
There wasn’t a corner of the house that went untouched in this extensive renovation. The ground floor got a complete make-over with a new Calacatta Gold tile floor, and I designed a very special border of Lunada Bay glass mosaic tiles that outlines the edge of every room.
We ripped out a solid walled staircase and replaced it with a visually lighter cable rail system, and a custom hanging chandelier now shines over the living room.
The kitchen was redesigned to take advantage of a wall that was previously just shallow pantry storage. By opening it up and installing cabinetry, we doubled the counter space and made the kitchen much more spacious and usable. We also removed a low hanging set of upper cabinets that cut off the kitchen from the rest of the ground floor spaces. Acquarella Fantasy quartzite graces the counter surfaces and continues down in a waterfall feature in order to enjoy as much of this stone’s natural beauty as possible.
One of my favorite spaces turned out to be the primary bathroom. The scheme for this room took shape when we were at a slab warehouse shopping for material. We stumbled across a packet of a stunning quartzite called Fusion Wow Dark and immediately fell in love. We snatched up a pair of slabs for the counter as well as the back wall of the shower. My clients were eager to be rid of a tub-shower alcove and create a spacious curbless shower, which meant a full piece of stone on the entire long wall would be stunning. To compliment it, I found a neutral, sandstone-like tile for the return walls of the shower and brought it around the remaining walls of the space, capped with a coordinating chair rail. But my client's love of gold and all things sparkly led us to a wonderful mosaic. Composed of shifting hues of honey and gold, I envisioned the mosaic on the vanity wall and as a backing for the niche in the shower. We chose a dark slate tile to ground the room, and designed a luxurious, glass French door shower enclosure. Little touches like a motion-detected toe kick night light at the vanity, oversized LED mirrors, and ultra-modern plumbing fixtures elevate this previously simple bathroom.
And I designed a watery-themed guest bathroom with a deep blue vanity, a large LED mirror, toe kick lights, and customized handmade porcelain tiles illustrating marshland scenes and herons.
All photos by Bernardo Grijalva
 projectkj
Self
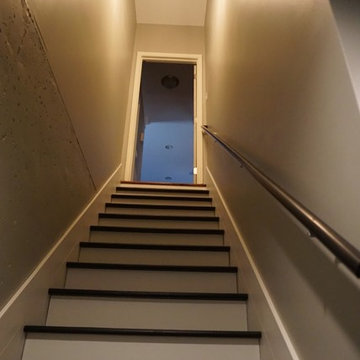
Inspiration for a small modern wooden straight staircase remodel in Louisville with wooden risers
Inspiration for a small modern wooden straight staircase remodel in Louisville with wooden risers
 Tile Doctor Ltd
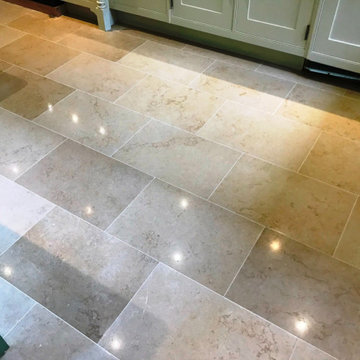
The owner of this recently purchased property in the Berkshire village of Twyford had inherited a Jerusalem limestone floor that had been installed throughout the ground floor including the Kitchen. The previous owner hadn’t maintained the stone floor very well and as a result it had become dull, patchy and the new owner was finding it impossible to keep clean. The floor was becoming a problem for them and they had been considering ripping it all up and getting it replaced. However due to the size of the floor and potential cost of replacing it they searched for other solutions and contacted Tile Doctor to see if it could be renovated.
I scheduled an appointment with the owners to survey the floor and it wasn’t long before I realised that we could achieve a great result by polishing the Limestone using a set of diamond burnishing pads. To prove how well I thought the floor would clean up I offered to complete a demo within the small utility room. This was arranged and completed a week later, as I expected once I had finished the demo the floor looked fantastic, more importantly the client was ecstatic with the results and couldn’t wait to book us in to complete the rest of the house.
It was a large floor so I estimated the process would take 4-5 days to complete and would need to work in sections starting with the kitchen then progressing into the study and cloakroom, dining room and finishing off with the entrance hall. Thankfully I had an empty house to work in which helped as I could start sealing the area I worked on the prior day.
The limestone had become quite pitted in the high traffic area, these pits had filled up with soil and become unsightly. My first task was to deep clean the dirt filled pits and grout, to do this I used a strong dilution of Tile Doctor Pro Clean and a stiff nylon brush making sure I could get into the pits releasing the dirt, then vacuuming up all the chemical slurry as I went along.
The next task was to fill these pits I used a two-part epoxy filler that matched the colour of the stone. Once the filler had dried, I worked through the hand burnishing blocks from 100 grit to 400 and I smoothed out the areas that had been filled.
Now the holes/pits had been filled I continued with the restoration of the floor by moving onto the burnishing process using diamond encrusted floor burnishing pads. This involves honing the Limestone with a set of burnishing pads starting at 400-grit. The pads are applied to the floor with a heavy floor buffing machine using water to lubricate the process. The pad is run over each tile around three times and the fine slurry this process generates is rinsed off afterwards with water and then extracted with a wet vacuum. You then move onto the 800-grit and then 1500-grit slowly building back the appearance of the stone.
As I had worked in sections/rooms at a time I was able to allow a full day drying time before sealing. Happy with the depth of colour from the pad system I opted to seal the floor with two coats of Tile Doctor Ultra-Seal. I had a range of sealers to choose from an in this case I felt Ultra-Seal would be most suited as it doesn’t change the natural appearance of the Limestone yet will provide years of protection and make it much easier to keep clean.
The owners were over the moon with how the limestone now looked and relieved that their problem floor had been restored. For aftercare cleaning I recommended Tile Doctor Stone Soap which is designed for maintaining the patina on polished stone floors.
Dennis Buckland
Berkshire Tile Doctor
 Tile Doctor Ltd
Recently it seems I am getting called out to an increasing number of new builds to sort out patchy grout issues. The reason why there have been so many issues arising is a bit of a mystery, but I put it down to a combination of things like poor quality grout, rushed installations, wet subfloors and the use of different batches.
This recently built house in the village of Darton is a great example and in this case, I suspect two different batches of the same grout had been applied. Darton by the way is a small village in the Borough of Barnsley.
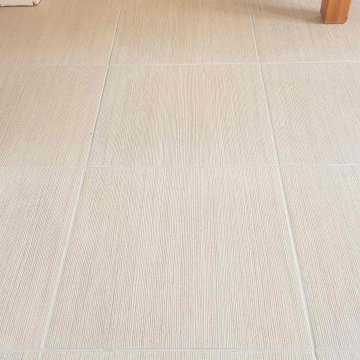
Invariably these problems are picked up by the new owner on their snagging list, with the tiler long gone and the builder keen to get their final payment it is always a tricky situation to resolve. I find the best solution is to apply a Tile Doctor Grout Colourant, it’s a much quicker process than removing the old grout and replacing with new. Most new homeowners would not appreciate us ripping up their brand-new rooms and generating lots of dust in the process! Also, by using the Tile Doctor Grout Colourant it adds a barrier of the grout preventing dirt from discolouring it further down the line.
Even though the house was brand new, the Porcelain Tiled floor was not looking great. The client was happy for me to go ahead and would take up the bill with the housebuilder. I first pre-treated it with Tile Doctors Grout Colourant Pre-Treatment. This removes any contamination from the grout which might affect the adhesion of the colourant and being an acid, it also etches the surface of the grout to ensure a superior bond with the colourant.
The client chose our Light Grey colour which is one of 10 colours we offer. Once the pre-treatment had been applied, scrubbed, rinsed, and vacuumed away the floor was left to dry. Once dry we started applying the colourant, this is done with a small brush (a toothbrush is ideal) carefully scrubbing colourant into each grout joint and wiping off any excess that gets on the tiles before it is able to dry.
Once complete the newly coloured grout lines totally transformed the floor and because the grout colorant is epoxy based the grout lines will stay stain free and never get dirty.
The porcelain tiles were factory sealed so there is no need to apply a seal to the floor.
I recommended the use of Tile Doctor Neutral Tile Cleaner to keep the floor in the best condition. It is pH neutral so is far less harsh on the surface than the everyday household cleaners available. It has a minty fragrance and is mild enough to use daily. They were very happy that the floor now looked as it should have from the start and was the finishing touch to their beautiful new home.
Matthew Lovett
South Yorkshire Tile Doctor
Sponsored
Plain City, OH
Kuhns Contracting, Inc.
Central Ohio's Trusted Home Remodeler Specializing in Kitchens & Baths
 Fiorito Interior Design
You don't have to own a big celebrity mansion to have a beautifully appointed house finished with unique and special materials. When my clients bought an average condo kitted out with all the average builder-grade things that average builders stuff into spaces like that, they longed to make it theirs. Being collectors of colorful Fiesta tableware and lovers of extravagant stone, we set about infusing the space with a dose of their fun personality.
There wasn’t a corner of the house that went untouched in this extensive renovation. The ground floor got a complete make-over with a new Calacatta Gold tile floor, and I designed a very special border of Lunada Bay glass mosaic tiles that outlines the edge of every room.
We ripped out a solid walled staircase and replaced it with a visually lighter cable rail system, and a custom hanging chandelier now shines over the living room.
The kitchen was redesigned to take advantage of a wall that was previously just shallow pantry storage. By opening it up and installing cabinetry, we doubled the counter space and made the kitchen much more spacious and usable. We also removed a low hanging set of upper cabinets that cut off the kitchen from the rest of the ground floor spaces. Acquarella Fantasy quartzite graces the counter surfaces and continues down in a waterfall feature in order to enjoy as much of this stone’s natural beauty as possible.
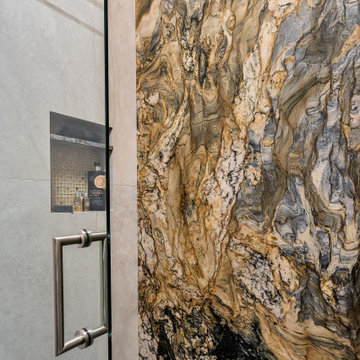
One of my favorite spaces turned out to be the primary bathroom. The scheme for this room took shape when we were at a slab warehouse shopping for material. We stumbled across a packet of a stunning quartzite called Fusion Wow Dark and immediately fell in love. We snatched up a pair of slabs for the counter as well as the back wall of the shower. My clients were eager to be rid of a tub-shower alcove and create a spacious curbless shower, which meant a full piece of stone on the entire long wall would be stunning. To compliment it, I found a neutral, sandstone-like tile for the return walls of the shower and brought it around the remaining walls of the space, capped with a coordinating chair rail. But my client's love of gold and all things sparkly led us to a wonderful mosaic. Composed of shifting hues of honey and gold, I envisioned the mosaic on the vanity wall and as a backing for the niche in the shower. We chose a dark slate tile to ground the room, and designed a luxurious, glass French door shower enclosure. Little touches like a motion-detected toe kick night light at the vanity, oversized LED mirrors, and ultra-modern plumbing fixtures elevate this previously simple bathroom.
And I designed a watery-themed guest bathroom with a deep blue vanity, a large LED mirror, toe kick lights, and customized handmade porcelain tiles illustrating marshland scenes and herons.
All photos by Bernardo Grijalva
 Fiorito Interior Design
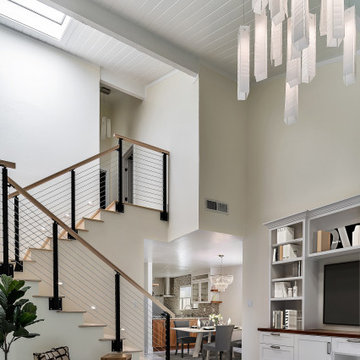
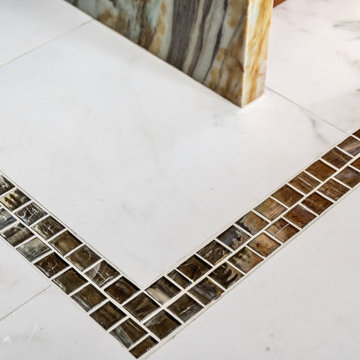
You don't have to own a big celebrity mansion to have a beautifully appointed house finished with unique and special materials. When my clients bought an average condo kitted out with all the average builder-grade things that average builders stuff into spaces like that, they longed to make it theirs. Being collectors of colorful Fiesta tableware and lovers of extravagant stone, we set about infusing the space with a dose of their fun personality.
There wasn’t a corner of the house that went untouched in this extensive renovation. The ground floor got a complete make-over with a new Calacatta Gold tile floor, and I designed a very special border of Lunada Bay glass mosaic tiles that outlines the edge of every room.
We ripped out a solid walled staircase and replaced it with a visually lighter cable rail system, and a custom hanging chandelier now shines over the living room.
The kitchen was redesigned to take advantage of a wall that was previously just shallow pantry storage. By opening it up and installing cabinetry, we doubled the counter space and made the kitchen much more spacious and usable. We also removed a low hanging set of upper cabinets that cut off the kitchen from the rest of the ground floor spaces. Acquarella Fantasy quartzite graces the counter surfaces and continues down in a waterfall feature in order to enjoy as much of this stone’s natural beauty as possible.
One of my favorite spaces turned out to be the primary bathroom. The scheme for this room took shape when we were at a slab warehouse shopping for material. We stumbled across a packet of a stunning quartzite called Fusion Wow Dark and immediately fell in love. We snatched up a pair of slabs for the counter as well as the back wall of the shower. My clients were eager to be rid of a tub-shower alcove and create a spacious curbless shower, which meant a full piece of stone on the entire long wall would be stunning. To compliment it, I found a neutral, sandstone-like tile for the return walls of the shower and brought it around the remaining walls of the space, capped with a coordinating chair rail. But my client's love of gold and all things sparkly led us to a wonderful mosaic. Composed of shifting hues of honey and gold, I envisioned the mosaic on the vanity wall and as a backing for the niche in the shower. We chose a dark slate tile to ground the room, and designed a luxurious, glass French door shower enclosure. Little touches like a motion-detected toe kick night light at the vanity, oversized LED mirrors, and ultra-modern plumbing fixtures elevate this previously simple bathroom.
And I designed a watery-themed guest bathroom with a deep blue vanity, a large LED mirror, toe kick lights, and customized handmade porcelain tiles illustrating marshland scenes and herons.
All photos by Bernardo Grijalva
 Fiorito Interior Design
You don't have to own a big celebrity mansion to have a beautifully appointed house finished with unique and special materials. When my clients bought an average condo kitted out with all the average builder-grade things that average builders stuff into spaces like that, they longed to make it theirs. Being collectors of colorful Fiesta tableware and lovers of extravagant stone, we set about infusing the space with a dose of their fun personality.
There wasn’t a corner of the house that went untouched in this extensive renovation. The ground floor got a complete make-over with a new Calacatta Gold tile floor, and I designed a very special border of Lunada Bay glass mosaic tiles that outlines the edge of every room.
We ripped out a solid walled staircase and replaced it with a visually lighter cable rail system, and a custom hanging chandelier now shines over the living room.
The kitchen was redesigned to take advantage of a wall that was previously just shallow pantry storage. By opening it up and installing cabinetry, we doubled the counter space and made the kitchen much more spacious and usable. We also removed a low hanging set of upper cabinets that cut off the kitchen from the rest of the ground floor spaces. Acquarella Fantasy quartzite graces the counter surfaces and continues down in a waterfall feature in order to enjoy as much of this stone’s natural beauty as possible.
One of my favorite spaces turned out to be the primary bathroom. The scheme for this room took shape when we were at a slab warehouse shopping for material. We stumbled across a packet of a stunning quartzite called Fusion Wow Dark and immediately fell in love. We snatched up a pair of slabs for the counter as well as the back wall of the shower. My clients were eager to be rid of a tub-shower alcove and create a spacious curbless shower, which meant a full piece of stone on the entire long wall would be stunning. To compliment it, I found a neutral, sandstone-like tile for the return walls of the shower and brought it around the remaining walls of the space, capped with a coordinating chair rail. But my client's love of gold and all things sparkly led us to a wonderful mosaic. Composed of shifting hues of honey and gold, I envisioned the mosaic on the vanity wall and as a backing for the niche in the shower. We chose a dark slate tile to ground the room, and designed a luxurious, glass French door shower enclosure. Little touches like a motion-detected toe kick night light at the vanity, oversized LED mirrors, and ultra-modern plumbing fixtures elevate this previously simple bathroom.
And I designed a watery-themed guest bathroom with a deep blue vanity, a large LED mirror, toe kick lights, and customized handmade porcelain tiles illustrating marshland scenes and herons.
All photos by Bernardo Grijalva
12