
Search results for "Sealed" in Home Design Ideas

 Bristol County Sealing Company
Large elegant backyard stamped concrete and rectangular pool house photo in Providence
 Tile Doctor Ltd
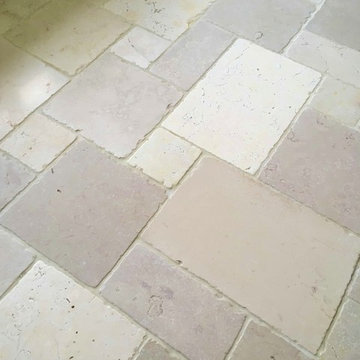
This Limestone tiled floor had been installed in the kitchen of a property in Teddington three years before and due to the use of the wrong cleaning product was now stripped of its protective sealer. Limestone like any natural stone is porous and without a sealer in place dirt becomes trapped in the stone making it very difficult to keep clean. The property was close to Bushy Park situated in South West London on the North bank of the Thames which is only about seven miles from my base in Shepperton.
I discovered all of this after visiting the property to quote for deep cleaning and resealing the floor. It turns out they have been using Flash multi-surface & floor cleaner which has an acidic pH of 10.3, compare this to Tile Doctor Remove and Go which we use to strip sealers off floors and has a pH of 12. Needless to say, this was not the right product to use and the old sealer had been completely stripped off the floor and probably within the first few months.
On top of this our customer had 3 children and a dog running in and out of the garden and was therefore transferring quite a lot of dirt into the stone. After surveying the floor, I discussed the renovation process with the customer which would take two days and include a deep clean of the Limestone followed by the application of a sealer to ensure it did not hold onto the dirt. They were after a sheen finish for the floor and were keen to have natural brown and cream variations in the stone highlighted. We agreed a price for the work and booked a date for the work to start.
To start with, we machine scrubbed the floor with Tile Doctor Pro-Clean to break down the dirt and release it from the stone. We find the best process is to spray the Pro-Clean onto the floor first and then leave to dwell for ten minutes before scrubbing. It’s not long before the cleaning solution turns dark with the dirt released from the pores of the stone and this soil is then rinsed with water and vacuumed off the floor with a low-pressure hard floor cleaning machine.
Following the cleaning, we honed the Limestone using a sequence of 800, 1500 and finally 3000-grit Tile Doctor Burnishing Pads. The pads are applied with water to lubricate and the slurry generated is rinsed off the floor as before. This burnishing process brings up the natural sheen of the stone and tightens up its pores prior to sealing. I left the floor overnight to allow it to dry out.
The next day I returned to the property and checked the floor for moisture using a damp meter. The readings were fine, so I proceeded with the application of the sealer for which I used two coats of Tile Doctor Colour Grow. This is an impregnating sealer that enhances the colours and contrast on the stone while protecting it against future soiling and spillages. It gave a lovely sheen finish to the floor as requested by the customer.
As you can see from the pictures the process made a huge difference to the floor which now looks lighter and brighter, certainly the customer was more than happy. Before leaving I recommended, they should clean the floor using Tile Doctor Stone Soap, this is a pH neutral product that will ensure the seal does not get broken down like it previously had using the household cleaners. It is gentle enough to use every day if you wish is designed to help maintain the patina of the burnished stone.
Jonathan Oldham
South Middlesex Tile Doctor

 Saikley Architects
Down-to-studs remodel and second floor addition. The original house was a simple plain ranch house with a layout that didn’t function well for the family. We changed the house to a contemporary Mediterranean with an eclectic mix of details. Space was limited by City Planning requirements so an important aspect of the design was to optimize every bit of space, both inside and outside. The living space extends out to functional places in the back and front yards: a private shaded back yard and a sunny seating area in the front yard off the kitchen where neighbors can easily mingle with the family. A Japanese bath off the master bedroom upstairs overlooks a private roof deck which is screened from neighbors’ views by a trellis with plants growing from planter boxes and with lanterns hanging from a trellis above.
Photography by Kurt Manley.
https://saikleyarchitects.com/portfolio/modern-mediterranean/
Find the right local pro for your project

 Leicht Westchester-Greenwich
Example of a huge minimalist single-wall light wood floor kitchen design in New York with an undermount sink, flat-panel cabinets, black cabinets, solid surface countertops, black appliances and an island


 Board & Vellum
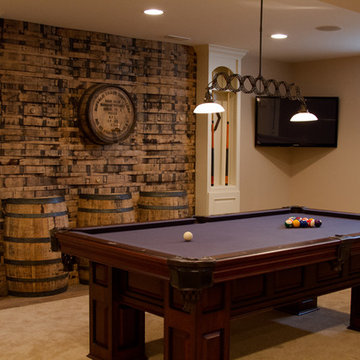
The Family Room has very tall ceilings so white wainscoting was used to visually lower the height of the room when seated around the new gas fireplace. Clean white display accents provide contrast without too much visual clutter. John Wilbanks Photography
Sponsored
Delaware, OH

Buckeye Basements, Inc.
Central Ohio's Basement Finishing ExpertsBest Of Houzz '13-'21



 Genesis Architecture, LLC.
Stained and sealed (Cherokee Red) concrete floor- concconcretefloors with s
Inspiration for a 1960s enclosed living room library remodel in Chicago with brown walls
Inspiration for a 1960s enclosed living room library remodel in Chicago with brown walls


 Meriwether Inc
Kitchen - large eclectic l-shaped light wood floor kitchen idea in Minneapolis with a farmhouse sink, flat-panel cabinets, blue cabinets, marble countertops, white backsplash, stone slab backsplash, stainless steel appliances and an island

 Hills & Grant
Lisa Petrole
Open concept kitchen - contemporary galley porcelain tile open concept kitchen idea in Sacramento with a double-bowl sink, flat-panel cabinets, light wood cabinets, soapstone countertops, stainless steel appliances and an island
Open concept kitchen - contemporary galley porcelain tile open concept kitchen idea in Sacramento with a double-bowl sink, flat-panel cabinets, light wood cabinets, soapstone countertops, stainless steel appliances and an island

 Castle Rock Custom Homes
Example of a large trendy dark wood floor enclosed dining room design in Orlando with gray walls and no fireplace

 LD&A
Example of a large transitional single-wall medium tone wood floor open concept kitchen design in Calgary with an undermount sink, shaker cabinets, metallic backsplash, metal backsplash, stainless steel appliances, an island, white cabinets and solid surface countertops


 Melinamade - Residential Design + Interiors
A remodeled modern kitchen. We removed an 8' dropped ceiling and took it to the rooms existing 13' vault line to take advantage of height and incorporate more natural light in with the transom windows, skylights, front windows, and backsplash windows. Custom walnut base cabinets and islands with gray lacquered upper cabinets. Construction by JP Lindstrom, Inc. Photographed by Michele Lee Willson
 Tile Doctor Ltd
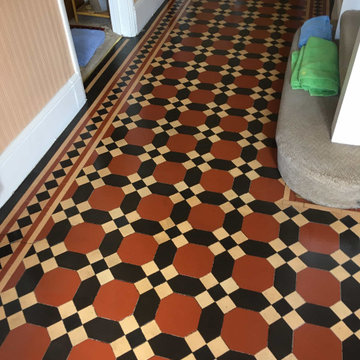
This Victorian floor in Twickenham, Middlesex was in good physical condition for its age but needed a good deep clean. Our customer had informed us that they had never cleaned or sealed the floor in the sixteen years that they had lived there so it was well overdue.
I went over to survey the floor and completed a test clean on a small section of tiling to see which products/techniques would work best. I like to do this as it demonstrates to the client what can be done, and it allows me to come up with an accurate price for doing the work.
As you can see from the pictures, there was quite a difference in the test patch compared to the rest of the floor. Years of foot traffic from the street had taken its’ toll and the floor was very dirty. Luckily, the floor was in very good condition and had not worn too badly.
Once they had seen the test patch, they were confident that it would be worth go ahead with my quote. It would ensure that the period feature was retained for many years to come. The colours on the floor were quite faded so it would be nice to get it restored.
I started the cleaning process by first taping up the surrounding skirting boards and doors to ensure they were protected from potential splashing. Cleaning involved spraying the Victorian tiles with a strong dilution of Tile Doctor Pro-Clean which is a dedicated Tile and Grout cleaning product. This was left to soak in for about ten minutes and then scrubbed in using a black pad fitted to a heavy-duty rotary scrubber.
This gives the floor a good mechanical scrub and works wonders releasing the ground-in dirt and soil from the tiles. The strong dilution of Pro-Clean will also remove any remaining sealers from the tile, however after sixteen years I doubted there would much trace of sealer left. Once done the floor was rinsed with water and all the soils removed with a wet vacuum.
Following the initial clean the colours were already much stronger. Next step however was to improve on that by giving the floor an acid rinse using Tile Doctor Grout Clean-Up. This removes mineral deposits and generally brightens up the appearance of the tile. After another round of scrubbing the floor was rinsed with our high-pressure washer and then vacuumed, extracting all of the dirty water and dirt away in one go. The floor was looking a lot better and was left to dry overnight.
After allowing the floor to dry overnight, we returned the next day to seal the floor. First, checking the floor was dry using the damp meter. Floors of this age can take a little longer to dry as there is no damp-proof membrane so it’s always worth checking as applying a sealer to damp tiles is not a good idea.
Once I was satisfied it was dry eight coats of Tile Doctor Seal and Go sheen finish sealer were applied. This takes a while to do as each coat needs to dry before applying the next. The sealer will protect the Victorian tiles for dirt and stains, it also enhanced the colours in the tile and will make it easier to keep the floor clean going forward.
My client was very pleased with the floor and mentioned that they should have called me in sooner! For aftercare cleaning I recommended Tile Doctor Neutral Clean which is an effective cleaner with a neutral pH, its designed for cleaning tiles without degrading the sealer.
Jonathan Oldham
South Middlesex Tile Doctor
56