
Search results for "Support extends" in Home Design Ideas
 MANDARINA STUDIO interior design
LOCATION: MILTON, MASSACHUSETTS
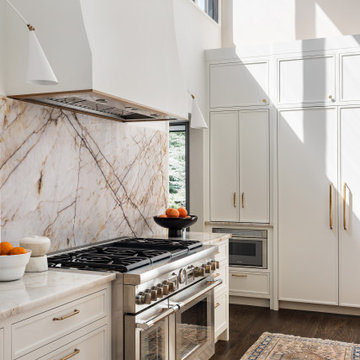
The renovation of this midcentury home centers on a complete transformation of the kitchen, which reshaped how the house functions and connects to its surroundings. The original layout relied on low cabinetry that failed to take advantage of the room’s generous volume. Mandarina Studio reworked the plan to improve circulation and take full advantage of the home’s soaring height and natural light.
The redesigned kitchen replaces a dated peninsula with a generously scaled island that supports both everyday use and entertaining. Cabinetry was reimagined vertically as well as horizontally, allowing storage and display to extend upward and reinforce the room’s proportions. A custom china cabinet with tall glass doors framed in blackened iron and finished in white oak adds presence and refinement.
At one end of the kitchen, a dedicated bar introduces a more intimate moment. Art, layered lighting, and wall-mounted sconces give this area its own identity, offering contrast to the openness of the main kitchen while supporting entertaining. Clerestory windows introduce shifting daylight throughout the day, bringing depth and movement to the quartzite focal wall at the range. Pendant lights reference midcentury forms in a refined, contemporary way. The completed kitchen was featured on the cover of Modern Luxury Interiors.
The renovation extended beyond the kitchen to include a new primary bath, a refreshed guest bath, and updated furnishings throughout the living and dining rooms. In the primary bath, marble with expressive veining is paired with a custom floating white oak vanity, balancing warmth and restraint. In the living room, a new picture window frames wooded views, while the furniture plan grounds the space. A turquoise Murano glass chandelier introduces color and artistry, adding a distinctive, personal note to the interior.
![Tier T[h]ree](https://st.hzcdn.com/fimgs/dd219f2d09facd69_9463-w360-h360-b0-p0--.jpg)
 Emerging Architects Studio
The Tier T[h]ree house was designed for a starting businessman in Antipolo who wants to work in the comforts of his own home. This programmatic requirement by the client pushed our design to explore vertical transitions of different spaces. Our team achieved this by placing 'public spaces' on the ground level, the 'semi-public areas' on the second floor, and 'private spaces' at the top.
Tension rods were installed to support the extended overhang of the roof while an exterior wall accent at the facade highlights the main office of the client.
 MANDARINA STUDIO interior design
LOCATION: MILTON, MASSACHUSETTS
The renovation of this midcentury home centers on a complete transformation of the kitchen, which reshaped how the house functions and connects to its surroundings. The original layout relied on low cabinetry that failed to take advantage of the room’s generous volume. Mandarina Studio reworked the plan to improve circulation and take full advantage of the home’s soaring height and natural light.
The redesigned kitchen replaces a dated peninsula with a generously scaled island that supports both everyday use and entertaining. Cabinetry was reimagined vertically as well as horizontally, allowing storage and display to extend upward and reinforce the room’s proportions. A custom china cabinet with tall glass doors framed in blackened iron and finished in white oak adds presence and refinement.
At one end of the kitchen, a dedicated bar introduces a more intimate moment. Art, layered lighting, and wall-mounted sconces give this area its own identity, offering contrast to the openness of the main kitchen while supporting entertaining. Clerestory windows introduce shifting daylight throughout the day, bringing depth and movement to the quartzite focal wall at the range. Pendant lights reference midcentury forms in a refined, contemporary way. The completed kitchen was featured on the cover of Modern Luxury Interiors.
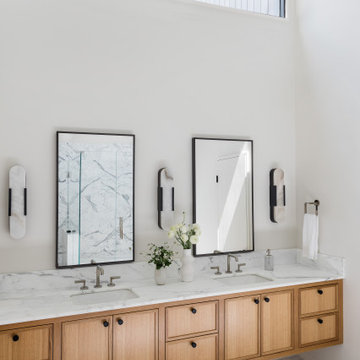
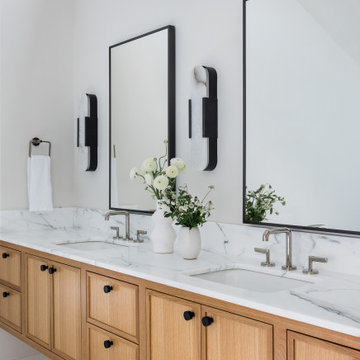
The renovation extended beyond the kitchen to include a new primary bath, a refreshed guest bath, and updated furnishings throughout the living and dining rooms. In the primary bath, marble with expressive veining is paired with a custom floating white oak vanity, balancing warmth and restraint. In the living room, a new picture window frames wooded views, while the furniture plan grounds the space. A turquoise Murano glass chandelier introduces color and artistry, adding a distinctive, personal note to the interior.
Find the right local pro for your project
 MANDARINA STUDIO interior design
LOCATION: MILTON, MASSACHUSETTS
The renovation of this midcentury home centers on a complete transformation of the kitchen, which reshaped how the house functions and connects to its surroundings. The original layout relied on low cabinetry that failed to take advantage of the room’s generous volume. Mandarina Studio reworked the plan to improve circulation and take full advantage of the home’s soaring height and natural light.
The redesigned kitchen replaces a dated peninsula with a generously scaled island that supports both everyday use and entertaining. Cabinetry was reimagined vertically as well as horizontally, allowing storage and display to extend upward and reinforce the room’s proportions. A custom china cabinet with tall glass doors framed in blackened iron and finished in white oak adds presence and refinement.
At one end of the kitchen, a dedicated bar introduces a more intimate moment. Art, layered lighting, and wall-mounted sconces give this area its own identity, offering contrast to the openness of the main kitchen while supporting entertaining. Clerestory windows introduce shifting daylight throughout the day, bringing depth and movement to the quartzite focal wall at the range. Pendant lights reference midcentury forms in a refined, contemporary way. The completed kitchen was featured on the cover of Modern Luxury Interiors.
The renovation extended beyond the kitchen to include a new primary bath, a refreshed guest bath, and updated furnishings throughout the living and dining rooms. In the primary bath, marble with expressive veining is paired with a custom floating white oak vanity, balancing warmth and restraint. In the living room, a new picture window frames wooded views, while the furniture plan grounds the space. A turquoise Murano glass chandelier introduces color and artistry, adding a distinctive, personal note to the interior.
 MANDARINA STUDIO interior design
LOCATION: MILTON, MASSACHUSETTS
The renovation of this midcentury home centers on a complete transformation of the kitchen, which reshaped how the house functions and connects to its surroundings. The original layout relied on low cabinetry that failed to take advantage of the room’s generous volume. Mandarina Studio reworked the plan to improve circulation and take full advantage of the home’s soaring height and natural light.
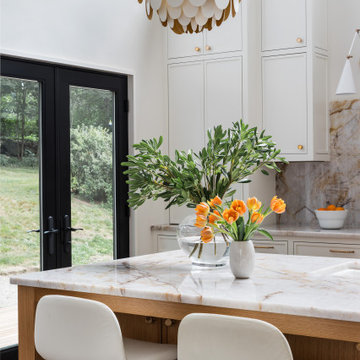
The redesigned kitchen replaces a dated peninsula with a generously scaled island that supports both everyday use and entertaining. Cabinetry was reimagined vertically as well as horizontally, allowing storage and display to extend upward and reinforce the room’s proportions. A custom china cabinet with tall glass doors framed in blackened iron and finished in white oak adds presence and refinement.
At one end of the kitchen, a dedicated bar introduces a more intimate moment. Art, layered lighting, and wall-mounted sconces give this area its own identity, offering contrast to the openness of the main kitchen while supporting entertaining. Clerestory windows introduce shifting daylight throughout the day, bringing depth and movement to the quartzite focal wall at the range. Pendant lights reference midcentury forms in a refined, contemporary way. The completed kitchen was featured on the cover of Modern Luxury Interiors.
The renovation extended beyond the kitchen to include a new primary bath, a refreshed guest bath, and updated furnishings throughout the living and dining rooms. In the primary bath, marble with expressive veining is paired with a custom floating white oak vanity, balancing warmth and restraint. In the living room, a new picture window frames wooded views, while the furniture plan grounds the space. A turquoise Murano glass chandelier introduces color and artistry, adding a distinctive, personal note to the interior.
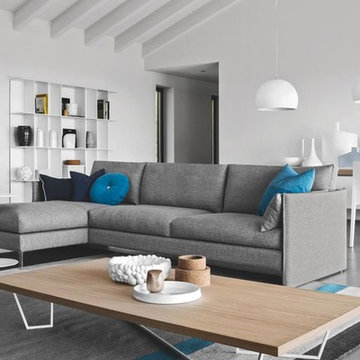
 Pomp Home
Open base design modular sofa
URBAN is a modular sofa combining elegance, simplicity and style with a sober, rational and contemporary design that makes it perfectly suitable for both modern and classic interiors.
The thin, curved armrest that supports the sofa and is prolonged to the ground is the distinguishing feature of this model. It is also characterized by the double-needle stitching carried out with the same care as for sartorial details. The rectangular cushion that completes and decorates the armrest can also be used as lumbar support cushion.
The multi-density expanded PU foam seat cushions with a layer made from a blend of down and polyurethane guarantee a pleasant feeling of wrap-around comfort and a long life.

Sponsored
Fredericksburg, OH

High Point Cabinets
Columbus' Experienced Custom Cabinet Builder | 4x Best of Houzz Winner
 G. Christianson Construction, Inc.
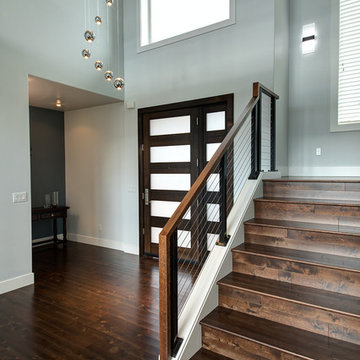
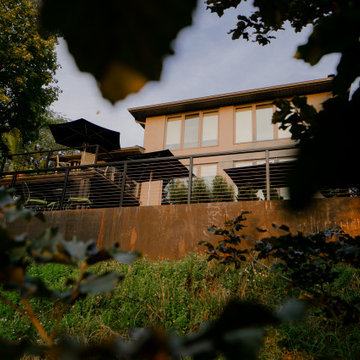
It took exceptional craftsmanship and planning to craft this cable railing. The principal support posts extend up to 16" below the floor to provide additional stability and prevent the handrail from developing a future wobble. The top is stained hemlock.
 LandArt
A corten steel retaining wall along a ravine, custom design and installation to support an extended backyard patio.
This is an example of a large contemporary partial sun backyard gravel and metal fence retaining wall landscape in Other.
This is an example of a large contemporary partial sun backyard gravel and metal fence retaining wall landscape in Other.
 Creative Living
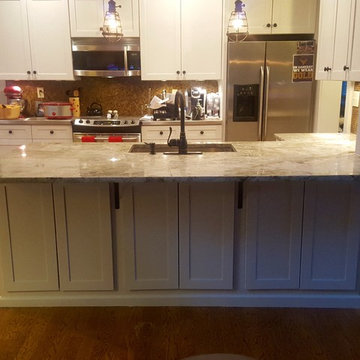
We added new shaker style cabinet doors to the front of the peninsula for additional access to storage as well as for aesthetic purposes. To support the extended countertop, we added 4 metal shelf brackets.

 Industrial Projects
Creating a comfortable outdoor living space is a priority for many homeowners and DIY enthusiasts. With rising summer temperatures, installing a shade tarp in your backyard offers an affordable and effective solution for sun protection. We’ve developed this detailed, step-by-step guide to help you confidently install a shade tarp that not only shields you from the sun but also adds aesthetic appeal to your outdoor area.
Benefits of Installing a Backyard Shade Tarp
Before diving into the installation process, let’s explore the key benefits of having a backyard shade tarp:
Provides UV Protection: Keeps your family and guests safe from harmful sun exposure.
Reduces Outdoor Temperatures: Creates a cooler, more enjoyable outdoor space.
Protects Outdoor Furniture: Extends the life of patio furniture by reducing sun damage.
Enhances Outdoor Aesthetics: Adds a modern, stylish look to your yard.
Budget-Friendly: More affordable compared to permanent structures like pergolas.
Materials and Tools You’ll Need
To begin your DIY backyard shade project, gather the following materials and tools:
Materials:
Shade tarp (UV-resistant and breathable)
Sturdy posts or existing structures (trees, fences, walls)
Mounting hardware (eye bolts, D-rings, turnbuckles, snap hooks)
Nylon or polyester rope, or stainless-steel wire
Concrete (if installing new posts)
Tools:
Power drill
Measuring tape
Level
Ladder
Wrench or adjustable spanner
Post hole digger (if installing new posts)
Step 1: Plan Your Shade Tarp Layout
The first step in installing your backyard shade tarp is careful planning. Take time to assess your outdoor area and answer these key questions:
Where is the sun’s path throughout the day?
What size and shape of tarp best suits your space?
Will you anchor the tarp to existing structures or install new posts?
What height do you want the tarp to sit at for maximum shade and airflow?
Pro Tip: Use string or garden hoses to visualize the tarp layout on the ground before making permanent decisions.
Step 2: Measure and Mark Anchor Points
Once you’ve determined the tarp’s location and orientation:
Measure the tarp dimensions.
Mark the exact points where each corner of the tarp will be anchored.
Ensure that the anchor points are at least 5–10% longer than the tarp size to allow for tensioning and slight adjustments.
Consider slope angles for water runoff. Aim for at least a 20-degree angle to prevent water pooling on the tarp.
Step 3: Install Support Posts (If Necessary)
If your backyard lacks existing anchor points like trees or fences, you’ll need to install sturdy support posts:
Dig post holes at least 24 inches deep and 8-12 inches wide for stability.
Set posts in concrete, making sure they remain plumb and level.
Allow the concrete to cure for at least 24–48 hours before applying tension from the tarp.
We recommend using pressure-treated wood, galvanized steel poles, or aluminum posts for longevity and strength.
Step 4: Install Mounting Hardware
With your anchor points ready, it’s time to install the necessary hardware:
Attach eye bolts or pad eyes securely into walls, posts, or other fixed structures.
For added flexibility and adjustability, install turnbuckles or tensioners to fine-tune the tarp’s tightness.
Connect snap hooks, D-rings, or carabiners to make assembly and disassembly easier.
Make sure all hardware is rated for outdoor use to prevent rust and corrosion.
Step 5: Attach and Tension the Shade Tarp
Now it’s time for the most satisfying part—mounting the shade tarp:
Begin by attaching one corner of the tarp to an anchor point.
Gradually attach the remaining corners, moving diagonally for even tension.
Adjust each connection point using your turnbuckles, ropes, or cables.
Pull the tarp tight enough to avoid sagging, but not so tight that it risks tearing.
Check that the tarp maintains the desired slope for rainwater runoff and adjust tension as needed.
Step 6: Final Adjustments and Safety Check
Before enjoying your new shaded area:
Inspect all anchor points and hardware for stability.
Test the tarp’s tension and make adjustments for even distribution.
Ensure that no sharp edges or loose connections remain that could damage the tarp or pose a safety hazard.
Confirm that the tarp is secure in windy conditions by giving it a gentle tug.
If you live in an area with frequent high winds, consider removing the tarp during storms to prevent damage.
Step 7: Enjoy Your Shaded Backyard Oasis
Once installed, your backyard shade tarp provides a comfortable and protective space for outdoor gatherings, relaxation, or family activities. You can decorate underneath with outdoor furniture, string lights, or potted plants to create a personalized outdoor retreat.
Maintenance Tips for Long-Lasting Shade Tarp Performance
To extend the life of your shade tarp, follow these maintenance guidelines:
Regularly check for wear and tear, especially around anchor points and seams.
Clean the tarp periodically with mild soap and water to prevent mildew buildup.
Store the tarp indoors during harsh weather seasons if it's not designed for year-round use.
Tighten hardware as needed to maintain proper tension and avoid sagging.
By following these simple care steps, your shade tarp will continue to deliver years of sun protection and outdoor comfort.
Conclusion: Upgrade Your Outdoor Space with a DIY Shade Tarp
Installing a shade tarp in your backyard is a cost-effective and rewarding DIY project. With careful planning, quality materials, and proper installation techniques, you’ll enjoy cool, shaded outdoor living all season long. This step-by-step guide ensures your project goes smoothly from start to finish.
 Tascone Design
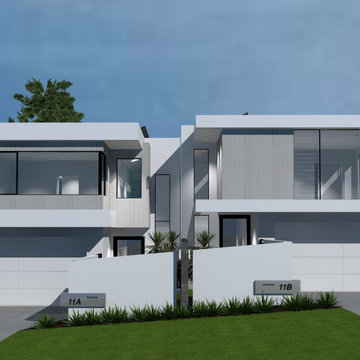
– Karrinyup - Extended Family Living Residence –
This home has been designed especially for a growing family. With one side dedicated to the parents and younger children, and the other side dedicated to the teenage and adult children. This multigenerational approach to living is becoming increasingly popular and is a fantastic way to incorporate economic responsibilities with family support and culture.
 Arani Construction
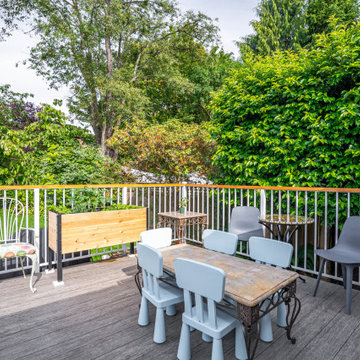
This upgraded backyard deck was completed as part of a full home renovation in the Kerrisdale neighbourhood of Vancouver. The deck was extended to create a larger and more functional outdoor living space connected directly to the main floor of the home.
The renovation included a durable vinyl deck surface designed for long-term weather protection and low maintenance. New aluminum guardrails with a natural wood top rail were installed to provide safety while maintaining a clean, modern appearance that complements the surrounding garden.
To support a future outdoor kitchen installation, plumbing and mechanical rough-ins were strategically installed beneath the deck, including a water supply line, drainage connection, and gas line. These preparations allow the homeowners to easily add an outdoor cooking and entertaining area in the future.

 Dimensions in Wood Inc
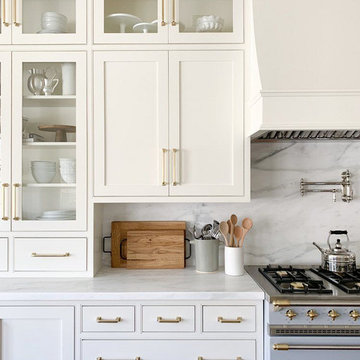
This Historical Home was built in the Columbia Country Club in 1925 and was ready for a new, modern kitchen which kept the traditional feel of the home. A previous sunroom addition created a dining room, but the original kitchen layout kept the two rooms divided. The kitchen was a small and cramped c-shape with a narrow door leading into the dining area.
The kitchen and dining room were completely opened up, creating a long, galley style, open layout which maximized the space and created a very good flow. Dimensions In Wood worked in conjuction with the client’s architect and contractor to complete this renovation.
Custom cabinets were built to use every square inch of the floorplan, with the cabinets extending all the way to the ceiling for the most storage possible. Our woodworkers even created a step stool, staining it to match the kitchen for reaching these high cabinets. The family already had a kitchen table and chairs they were happy with, so we refurbished them to match the kitchen’s new stain and paint color.
Crown molding top the cabinet boxes and extends across the ceiling where they create a coffered ceiling, highlighting the beautiful light fixtures centered on a wood medallion.
Columns were custom built to provide separation between the different sections of the kitchen, while also providing structural support.
Our master craftsmen kept the original 1925 glass cabinet doors, fitted them with modern hardware, repainted and incorporated them into new cabinet boxes. TASK LED Lighting was added to this china cabinet, highlighting the family’s decorative dishes.
Appliance Garage
On one side of the kitchen we built an appliance garage with doors that slide back into the cabinet, integrated power outlets and door activated lighting. Beside this is a small Galley Workstation for beverage and bar service which has the Galley Bar Kit perfect for sliced limes and more.
Baking Cabinet with Pocket Doors
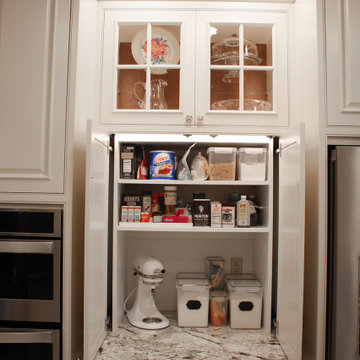
On the opposite side, a baking cabinet was built to house a mixer and all the supplies needed for creating confections. Automatic LED lights, triggered by opening the door, create a perfect baker’s workstation. Both pocket doors slide back inside the cabinet for maximum workspace, then close to hide everything, leaving a clean, minimal kitchen devoid of clutter.
Super deep, custom drawers feature custom dividers beneath the baking cabinet. Then beneath the appliance garage another deep drawer has custom crafted produce boxes per the customer’s request.
Central to the kitchen is a walnut accent island with a granite countertop and a Stainless Steel Galley Workstation and an overhang for seating. Matching bar stools slide out of the way, under the overhang, when not in use. A color matched outlet cover hides power for the island whenever appliances are needed during preparation.
The Galley Workstation has several useful attachments like a cutting board, drying rack, colander holder, and more. Integrated into the stone countertops are a drinking water spigot, a soap dispenser, garbage disposal button and the pull out, sprayer integrated faucet.
Directly across from the conveniently positioned stainless steel sink is a Bertazzoni Italia stove with 5 burner cooktop. A custom mosaic tile backsplash makes a beautiful focal point. Then, on opposite sides of the stove, columns conceal Rev-a-Shelf pull out towers which are great for storing small items, spices, and more. All outlets on the stone covered walls also sport dual USB outlets for charging mobile devices.
Stainless Steel Whirlpool appliances throughout keep a consistent and clean look. The oven has a matching microwave above it which also works as a convection oven. Dual Whirlpool dishwashers can handle all the family’s dirty dishes.
The flooring has black, marble tile inlays surrounded by ceramic tile, which are period correct for the age of this home, while still being modern, durable and easy to clean.
Finally, just off the kitchen we also remodeled their bar and snack alcove. A small liquor cabinet, with a refrigerator and wine fridge sits opposite a snack bar and wine glass cabinets. Crown molding, granite countertops and cabinets were all customized to match this space with the rest of the stunning kitchen.
Dimensions In Wood is more than 40 years of custom cabinets. We always have been, but we want YOU to know just how much more there is to our Dimensions.
The Dimensions we cover are endless: custom cabinets, quality water, appliances, countertops, wooden beams, Marvin windows, and more. We can handle every aspect of your kitchen, bathroom or home remodel.

 Krueger Architects
Unlimited Style Photography
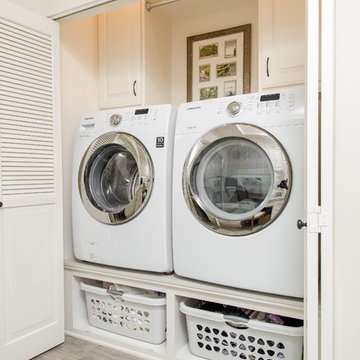
Inspiration for a small timeless single-wall porcelain tile laundry closet remodel in Los Angeles with raised-panel cabinets, white cabinets, quartz countertops, white walls and a side-by-side washer/dryer
Inspiration for a small timeless single-wall porcelain tile laundry closet remodel in Los Angeles with raised-panel cabinets, white cabinets, quartz countertops, white walls and a side-by-side washer/dryer
 Flavin Architects
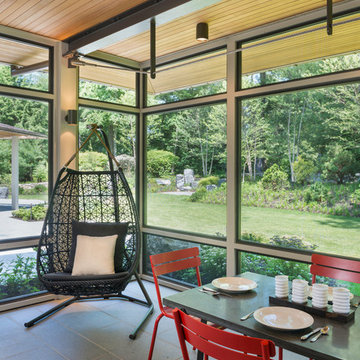
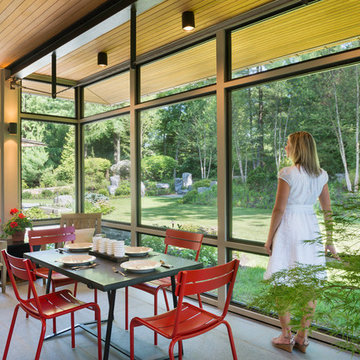
A modern screen porch beautifully links this Wellesley home to its Garden. Extending overhangs that are clad in red cedar emphasize the indoor – outdoor connection and keep direct sun out of the interior. The grey granite floor pavers extend seamlessly from the inside to the outside. A custom designed steel truss with stainless steel cable supports the roof. The insect screen is black nylon for maximum transparency.
Photo by: Nat Rea Photography

 Michael Nash Design, Build & Homes
2010 NATIONAL NARI REGIONAL AWARD WINNER
Project Scope
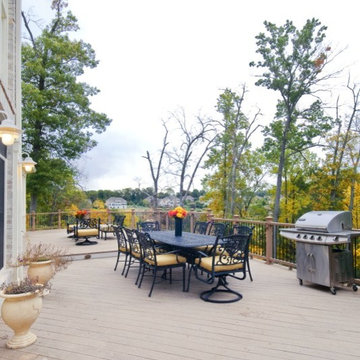
The owners of this 7,000 square foot colonial in Oakton, Virginia, were seeking a multi-level Mediterranean-style indoor/outdoor living space off the back of their home. They turned to Michael Nash Design, Build & Homes for a design solution that would include a stone patio, a second-story deck, a screened-in porch and linking staircases.
While the structure was designed primarily for family dining and entertaining, it also had to accommodate periodic social gatherings of one hundred guests or more. To meet these needs, the project would include a fully-equipped outdoor kitchen, several serving counters with permanent refrigeration, and well-delineated socializing and dining zones.
The existing home’s setting offered several impressive assets the new outdoor living area was designed to exploit. The sprawling acreage features old stand trees, wooded paths and a private lake. Beautifully landscaped, it unfolds as an idyllic panorama that naturally draws people to the outdoors.
Challenges
Since the rear elevation was situated on a slope that drops away from the house, the Michael Nash team had to raise the grade two feet within in a 2,000 square foot area extending out from the back of the house. Infrastructure plans also called for a sophisticated drainage system that had to accommodate a whole series of water “runoff” considerations to be integrated into the decking itself. Excavation included constructing retaining walls to bolster the elevated grade—which also had to support a concrete slab, the primary foundation for the entire complex.
Solutions
The ground level decking consists of a 2,000 square foot flagstone patio level with the home’s lower level doors. There is a decorative water fountain mid-patio—an ornate collectible acquired in Florida. Food preparation is concentrated within a specially designed semi-circular wall that creates an “outdoor kitchen” equipped with a 60” Viking barbecue grill, a prep sink, a warming drawer, refrigerator and appropriate storage. There is a granite surfaced dining counter with seating for eight.
Wrought iron railing and approximately 20 decorative columns (some encasing steel vertical supports) are incorporated into the design scheme. Many of the columns house accent lights.
The top level—supported by horizontal steel beams– is a 2,500 square foot deck constructed entirely of Trex decking. The open air decking is, again, directly accessible from rooms on the second level of the house including the kitchen, sunroom and family room.
The platform’s most prominent feature is a U-shaped “kitchenette” with cedar shake shingle roofing. Like its counterpart one level below, the facility is equipped with grill, refrigerator and stainless steel cabinetry.
One portion of the deck has been allocated for a 16’ x 16’ octagonal screened-in porch crowned by a pair of 2’ x 4’ skylights. The porch can be accessed from the home’s conservatory via a set of French doors. With its mosaic tile flooring, stained cedar panel ceiling and honed granite counters, the interior is elegant and calming. Hand-painted stenciling and a wall-mounted water feature provide distinctive detailing.
Finally, the design introduced elements to highlight and reinforce an awareness of the lovely bucolic setting. Fountains and water features combined with textured surfaces and mosaic tiling and backsplashes to present a villa-like ambiance well-suited to the Virginia countryside.
 Interior Analysis by Allan Skriloff
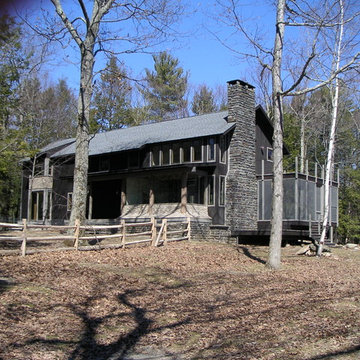
The front of the home was extended on to the front porch with trees as the supports and whimsical shingles under fixed windows. Above the screened in porch is a deck off the master bedroom
 Flavin Architects
A modern screen porch beautifully links this Wellesley home to its Garden. Extending overhangs that are clad in red cedar emphasize the indoor – outdoor connection and keep direct sun out of the interior. The grey granite floor pavers extend seamlessly from the inside to the outside. A custom designed steel truss with stainless steel cable supports the roof. The insect screen is black nylon for maximum transparency.
Photo by: Nat Rea Photography
19