
Search results for "Surface preparation" in Home Design Ideas

 Rockefeller Partners Architects
Eric Staudenmaier
Inspiration for a large country single-wall slate floor and brown floor open concept kitchen remodel with an undermount sink, louvered cabinets, white cabinets, wood countertops, stainless steel appliances and an island
Inspiration for a large country single-wall slate floor and brown floor open concept kitchen remodel with an undermount sink, louvered cabinets, white cabinets, wood countertops, stainless steel appliances and an island


Find the right local pro for your project
 SabaRehman Abdulrehman
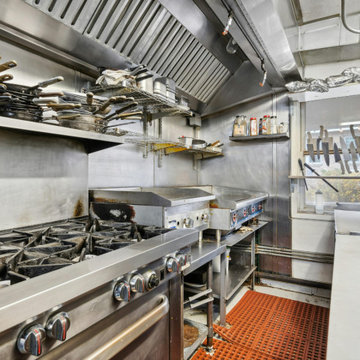
Phoenix's food scene is vibrant and thriving, but also one of the most closely watched in the country. Health inspectors in Maricopa County are strict, and customers expect spotless dining spaces.
To stay competitive, restaurant owners and food vendors must stay on top of evolving health codes, sanitation protocols, and food safety benchmarks. That starts with a firm grip on restaurant cleaning safety standards. Ignoring sanitation rules risks more than bad reviews. It invites citations, customer complaints, and operational shutdowns.
Whether you're operating a food truck or a restaurant, following these Phoenix cleaning standards helps you stay compliant, pass health inspections, and build customer trust.
Importance of a Clean Phoenix Restaurant that Follows Food Health and Safety Standards
The restaurant industry in Phoenix operates under strict oversight. The Maricopa County Environmental Services Department conducts regular inspections, and violations can result in fines or closures. In this climate, restaurant cleaning is not just a hygiene standard. It is a business-critical measure.
Proper food handling and establishment cleaning protocols reduce the risk of foodborne illnesses, control pests, protect equipment, and keep your staff safe. Inconsistent practices, on the other hand, can quickly become liabilities.
Start With the Food Code
Phoenix food vendors must comply with the 2017 FDA Food Code as adopted by Maricopa County. This includes rules on:
- Sanitizing food-contact surfaces after each use
- Maintaining proper water temperatures for dishwashing
- Cleaning restrooms frequently and keeping them stocked
- Storing cleaning chemicals away from prep areas
- Daily: Wipe prep tables, mop floors, clean grills, sanitize cutting boards
- Weekly: Deep clean kitchen hoods, polish cooking equipment, disinfect drains
- Monthly: Check pest control measures, clean freezer coils, and inspect HVAC filters
- Using the right sanitizers and PPE
- Logging cleaning times and who performed the task
- Identifying signs of mold, grease buildup, or rodent activity
- Conducting thorough surface cleaning to ensure all food-contact surfaces are sanitized regularly
- Food-safe and non-corrosive
- Effective against norovirus, salmonella, and E. coli
- Clearly labeled and stored in original containers
- Seal gaps around doors and pipes
- Store dry goods in sealed, elevated containers
- Keep outdoor waste bins locked and distanced from entry points
- Record cleaning completion in real time
- Alert managers when tasks are missed
- Keep a historical record for inspections
- Is certified and understands the Arizona food codes
- Provides documented service reports
- Offers customized cleaning plans
- Offers flexible scheduling around your operating hours
- Cross-contamination prevention: Regularly clean food prep surfaces and tools, and use separate equipment for raw meats, vegetables, and ready-to-eat foods. Proper cleaning prevents any contact with food that could lead to cross-contamination and affects food quality.
- Temperature monitoring: While not directly related to cleaning, maintaining proper food temperature is essential. Hot foods should be stored above 140°F, and cold foods below 40°F. Regularly monitor temperatures and clean temperature gauges to ensure accuracy.
- Proper storage: Use clean storage containers and shelving for food storage, keeping items off the floor. Ensure all food is sealed and labeled to avoid contamination risks and comply with food safety standards.

 Home Turf Synthetic Grass
Inspiration for a mid-sized transitional drought-tolerant and full sun backyard mulch landscaping in San Diego.

 Renovation Science
18" by 36" large format floor tile
Inspiration for a mid-sized contemporary 3/4 porcelain tile travertine floor and beige floor alcove bathtub remodel in Vancouver with flat-panel cabinets, white cabinets, a two-piece toilet, white walls, an undermount sink, granite countertops and a hinged shower door
Inspiration for a mid-sized contemporary 3/4 porcelain tile travertine floor and beige floor alcove bathtub remodel in Vancouver with flat-panel cabinets, white cabinets, a two-piece toilet, white walls, an undermount sink, granite countertops and a hinged shower door

 Advance Design Studio, Ltd.
Bud Kane has remodeled nearly every room in his own home over many years. Now reaching his 70’s, he contemplated heading up a major kitchen and laundry room renovation himself, planning on doing the carpentry work with his own hands. “I was not convinced I would ever meet anyone who could do it as well as I could do it myself”, said Bud. Ruth and Bud spent 5 years visiting kitchen firms and interviewing designers. They couldn’t however bring themselves to pull the trigger on the project, until they met Advance Design Studio in 2015.
“No one understood what I wanted”, said Ruth. She was continually frustrated by experiences with designers who weren’t hearing what was important to her. “Everyone kept designing my kitchen with what they thought it should look like; I couldn’t find anyone who would listen to me”!
When they met designer Scott Christensen from Advance Design Studio, they liked him right away. He listened to Ruth and designed a kitchen that she loved, all the while interjecting years of wisdom and design expertise that Ruth appreciated. “The finished product is better than I expected”, says Ruth. “I respected Scott’s opinions and together we created the perfect place for me to bake with my grandkids and truly enjoy the kitchen and laundry room I’ve been dreaming of for many years!”
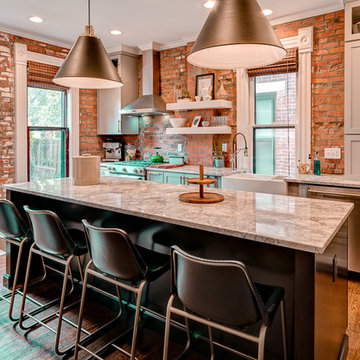
The kitchen transformation began with removing the home’s soffits, and extending new painted maple cabinetry to the ceiling with the addition of an elegant crown molding. Ruth’s new Vita Mix holds a coveted place on her counter, and adjustments were planned to size the cabinets in conjunction with the under cabinet decorative light molding to fit this appliance just right. “This one small detail was really important to me”, says Ruth smiling. An elegant new island replaced the original island, complete with room for 3 stools where her grandchildren will sit to make home-made pasta every Thanksgiving, and cookies at Christmas time. “Traditions are very important in my family, and making my kitchen work to suit cherished activities with my family was the number one reason this renovation was so desired”, replied Ruth when asked about the island.
A picture perfect new tea station replaced a cluttered unused desk area, creating a wonderful place to prepare hot drinks for sipping any season of the year while overlooking the couple’s wonderfully manicured gardens from the lovely 3 season’s room just off the kitchen. The soft sage island bead panel detail was repeated on the backsplash, replicating the feel of a fine old piece of furniture.
The biggest problem with the laundry room was 3 doors, one from the garage, one from the closet, and one to the hallway. “Scott designed a pocket door, and oh what a dream it is now to bring groceries in from the garage!” exclaims Bud who grew to disdain this task! Doing laundry is now a breeze in this attractive new space that doubles as a wonderful pantry for the kitchen with room to store food items that didn’t have a home in the poorly designed original space.
New Hickory distressed wood flooring was laid both in the kitchen and leading to the hall foyer. Soft gray wood-replicating porcelain was placed in the laundry area, making for an easily cleanable surface for what doubles as a mud room from the garage. Creamy tumbled marble graces an unobtrusive backsplash spilling onto shiny granite counter tops in a rich earthy pattern of fall colors that mimic colors throughout the home. Advance is known details that included custom crafted furniture toe kicks, luxurious crown moldings, and beaded under cabinet moldings. The kitchen is complete with a glass display cabinet showing Ruth’s treasured china tea collection.
Early on, it was initially only their intention of purchasing cabinets for the new design. They were so impressed however with Advance Design’s complete program for budgeting, design, installation and management that it became clear to them both that they wanted Advance to handle the entire project from start to finish. “After seeing the quality work they did, coupled with the in-house team completely dedicated to our satisfaction, it became apparent there was no other choice but to hire them to handle everything. And we’re so glad we did, we have not one regret”, says Bud.
“The attention to detail by the carpentry crew more than satisfied my perfectionist expectations of the finished carpentry,” exclaimed Bud. “Every one of Advance Design’s people we encountered from design through construction was wonderful. We’ve never met a group of people so dedicated to making sure we were happy with every single detail, and every single part of this experience”, said Ruth and Bud.
Designer: Scott Christensen
Photographer: Joe Nowak
Sponsored
Columbus, OH

Hope Restoration & General Contracting
Columbus Design-Build, Kitchen & Bath Remodeling, Historic Renovations

 Five Star Tree Care
Once the endless winter has finally subsided, it is time to start thinking about your spring tree care! Once the last of the snow and ice has finally melted away, your trees and garden will be released once again. It is finally time to prepare for your spring tree care. If you want to maximize your tree’s new growth, you are going to want to follow Five Star Tree Services spring checklist! You can also start planning for new trees as well. We are going to give you all the information you need to know in order to properly take care of your trees this spring.
Inspect Your Trees
When all the ice and snow has left your trees, this is a good time to inspect for any damage done from the harsh winter. There aren’t any leaves that will get in your way, making it easier to see anything amiss, like damage or diseases. If you hire an arborist to do this initial spring inspection, you can guarantee that they will analyze every tree on your property very carefully to make sure they can provide you with the most accurate report. This report will make you aware of any and all tree problems on your property. The arborist will also go over all possible ways that you can fix these problems and explain them to you.
Preemptive Pruning
In order to properly prepare your trees for their spring growth, you will need to prune them. A trained arborist will be able to identify dead branches and cut them off. They will also deal with damaged branches, weak branches, and any unsafe branches and make sure they remove them before they become a problem or hazard. We recommend that you prune or hire an arborist to prune your trees in the early spring. If you wait and prune your trees after their spring growth, they are more likely to be attacked by pests and diseases. When done properly, your spring pruning is going to have a major positive impact on the overall health of your trees.
Cleanup the Gardens
Part of your spring cleaning is not limited to your home. You also need to clean your gardens too! This is an important part of your checklist routine. When all the snow and ice melt away and exposes your gardens and lawn once again, it is important to clean up your yard from any and all fallen leaves, branches, and anything else that isn’t supposed to be there. Once you do this, the sunlight will be able to get to the ground and will aid in penetrating and warming up the ground faster below the surface. Developing tree roots will have a positive effect from the sunlight. Which results in better tree growth in the spring.
Fertilization of Your Trees
After the winter has subsided, it usually takes most of the nutrients out of the soil. Which is why you should be taking advantage of fertilizing your trees in the spring. It is important to feed your trees in order to provide them with the adequate nutrients they need in order for them to be healthy and grow during the spring. When trees are properly fertilized, this helps them fight off diseases and pests.
Add Some Mulch
There are many marvelous benefits to mulching in the spring. This improves the soil quality that’s around your tree. It also helps to keep the soil fertilized and moist. Mulch is also a fantastic way to prohibit weeds from developing and growing in your gardens. This is very important for newly planted and young trees. We recommend that you add 2-4 inches of mulch around each tree in the early spring.
Plant Some New Trees!
There are many reasons why people plant trees. One major reason is to combat deforestation and provide more oxygen. If you are looking for other reasons to plant some trees, consider planting shade trees. These trees allow you to take shelter under them in the summer from the glaring sun. But did you know that they can also benefit you by maximizing your energy savings during the winter? Making it so that you can actually increase the overall value of your home when you plant new trees.
How Five Star Tree Services Can Help
When you are looking to add more magnificent trees to your yard, you need to make sure they are planted properly. One of the first important steps is to pick the right placement for your new tree. You also need to consider what trees are right for your property. Without any experience planting trees, we highly recommend that you contact your local Toronto Tree Planting Services for assistance! Our team is highly knowledgeable and will be able to help you with anything you require for your trees, both new and pre-existing. Make sure to contact Five Star Tree Service for all your tree needs. Contact us at (416) 990-3355 or go to our website to learn more!


 Local Tile LLC
Pebble Shower Floor
Huge minimalist pebble tile floor and beige floor double shower photo in Boston with a hinged shower door
Huge minimalist pebble tile floor and beige floor double shower photo in Boston with a hinged shower door
 Anam Interior
Introduction
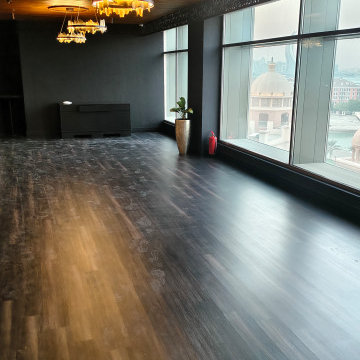
Flooring plays an important role in the appearance, comfort, and functionality of a villa. From elegant marble floors in living rooms to durable porcelain tiles in kitchens and bathrooms, the right flooring can transform any residential space.
For homeowners in Qatar, selecting suitable flooring requires consideration of design preferences, durability, maintenance, and room functionality. This guide explores popular flooring materials and how to choose the right options for luxury villa interiors.
1. Popular Flooring Options for Villas in Qatar
Different flooring materials offer different advantages. Understanding their characteristics helps homeowners make informed decisions.
Marble Flooring
Marble is a popular choice for luxury villas because of its natural patterns, elegant appearance, and timeless appeal. It is particularly suitable for living rooms, entrance halls, staircases, and formal majlis areas.
Benefits:
Unique natural patterns and colours.
Elegant appearance for luxury interiors.
Available in polished and honed finishes.
Can be professionally polished and restored.
However, marble requires appropriate maintenance and can be sensitive to acidic substances and staining. Polished marble may also become slippery when wet.
Porcelain Tiles
Porcelain tiles offer durability, low water absorption, and a wide range of designs. They are suitable for different residential areas, including kitchens, bathrooms and living spaces.
Benefits:
Generally easy to maintain.
Low water absorption.
Available in marble, stone, and wood-effect designs.
Suitable options for high-traffic areas.
Granite Flooring
Granite is a natural stone known for its hardness and distinctive appearance. It can be considered for entrances, staircases, and other areas where durability is important.
Ceramic Tiles
Ceramic tiles provide an affordable flooring option with various colours, patterns, and finishes. Their suitability depends on the specific product and intended application.
2. Choosing the Right Flooring for Different Villa Areas
Each area of a villa has different flooring requirements.
Living rooms and majlis: Marble and large-format porcelain tiles can create an elegant and spacious appearance.
Bedrooms: Neutral-coloured marble or porcelain can complement comfortable and relaxing interiors.
Kitchens: Durable, easy-to-clean porcelain tiles are often a practical choice.
Bathrooms: Textured or matte tiles with appropriate slip resistance are recommended.
Staircases and entrances: Marble and granite can create an attractive first impression, with suitable attention to safety and edge detailing.
Selecting materials according to the function of each space helps create a balanced villa interior.
3. Popular Marble Colours and Finishes
Marble colour and finish can influence the overall atmosphere of a villa.
White marble: Creates a bright, elegant appearance with natural veining.
Beige and cream marble: Adds warmth and complements neutral furniture.
Grey marble: Works well with contemporary and minimalist interiors.
Dark marble: Creates a dramatic appearance in selected feature areas.
Polished marble offers a reflective surface, while honed marble provides a softer, matte finish. The right option depends on the room's purpose, maintenance requirements, and safety considerations.
4. Marble vs. Porcelain: Which Is Better?
Both materials offer advantages for villa flooring.
Feature
Marble
Porcelain
Appearance
Natural patterns
Multiple designs
Durability
Varies by stone
Generally high
Maintenance
Requires specific care
Generally easier
Water absorption
Varies by stone
Very low
Design
Natural luxury
Versatile finishes
Marble is suitable for homeowners who prefer natural stone and distinctive patterns. Porcelain is a practical alternative for those seeking durability and easier maintenance. Both materials can also be combined in different areas of a villa.
5. Important Factors Before Installing Flooring
Before selecting flooring for your villa in Qatar, consider the following:
Material quality: Check the material specifications, finish, dimensions, and suitability for each room.
Slip resistance: Select appropriate finishes for bathrooms, kitchens, and other moisture-prone areas.
Installation quality: Proper subfloor preparation, adhesives, grout, and movement joints contribute to long-term performance.
Maintenance: Understand the cleaning and care requirements of the selected material.
Design coordination: Ensure the flooring complements furniture, lighting, wall finishes, and the overall interior design concept.
Professional material selection and installation can help prevent common flooring problems and improve the finished appearance.
6. What Affects Flooring Costs in Qatar?
The cost of marble and flooring installation depends on several factors:
Type and quality of material.
Origin and availability.
Flooring area and tile dimensions.
Existing floor removal and preparation.
Installation labour and materials.
Decorative patterns, skirting and finishing.
Homeowners planning a complete villa renovation should also consider flooring as part of the overall fit-out budget.
For more information, read our related guide on Interior Fit-Out Cost in Qatar.
7. Professional Villa Interior Design and Flooring Selection
Flooring should be selected as part of a complete interior design plan. The right combination of materials, colours, furniture and lighting helps create a cohesive residential environment.
At ANAM Interiors, villa interior design and fit-out solutions focus on combining aesthetics with functionality through space planning, material selection, and coordinated execution.
Explore our Villa Interior Design in Qatar guide to discover more residential design ideas.
 Advance Design Studio, Ltd.
See "5-Year Kitchen in Elgin" for the kitchen featured in this description.
Bud Kane has remodeled nearly every room in his own home over many years. Now reaching his 70’s, he contemplated heading up a major kitchen and laundry room renovation himself, planning on doing the carpentry work with his own hands. “I was not convinced I would ever meet anyone who could do it as well as I could do it myself”, said Bud. Ruth and Bud spent 5 years visiting kitchen firms and interviewing designers. They couldn’t however bring themselves to pull the trigger on the project, until they met Advance Design Studio in 2015.
“No one understood what I wanted”, said Ruth. She was continually frustrated by experiences with designers who weren’t hearing what was important to her. “Everyone kept designing my kitchen with what they thought it should look like; I couldn’t find anyone who would listen to me”!
When they met designer Scott Christensen from Advance Design Studio, they liked him right away. He listened to Ruth and designed a kitchen that she loved, all the while interjecting years of wisdom and design expertise that Ruth appreciated. “The finished product is better than I expected”, says Ruth. “I respected Scott’s opinions and together we created the perfect place for me to bake with my grandkids and truly enjoy the kitchen and laundry room I’ve been dreaming of for many years!”
The kitchen transformation began with removing the home’s soffits, and extending new painted maple cabinetry to the ceiling with the addition of an elegant crown molding. Ruth’s new Vita Mix holds a coveted place on her counter, and adjustments were planned to size the cabinets in conjunction with the under cabinet decorative light molding to fit this appliance just right. “This one small detail was really important to me”, says Ruth smiling. An elegant new island replaced the original island, complete with room for 3 stools where her grandchildren will sit to make home-made pasta every Thanksgiving, and cookies at Christmas time. “Traditions are very important in my family, and making my kitchen work to suit cherished activities with my family was the number one reason this renovation was so desired”, replied Ruth when asked about the island.
A picture perfect new tea station replaced a cluttered unused desk area, creating a wonderful place to prepare hot drinks for sipping any season of the year while overlooking the couple’s wonderfully manicured gardens from the lovely 3 season’s room just off the kitchen. The soft sage island bead panel detail was repeated on the backsplash, replicating the feel of a fine old piece of furniture.
The biggest problem with the laundry room was 3 doors, one from the garage, one from the closet, and one to the hallway. “Scott designed a pocket door, and oh what a dream it is now to bring groceries in from the garage!” exclaims Bud who grew to disdain this task! Doing laundry is now a breeze in this attractive new space that doubles as a wonderful pantry for the kitchen with room to store food items that didn’t have a home in the poorly designed original space.
New Hickory distressed wood flooring was laid both in the kitchen and leading to the hall foyer. Soft gray wood-replicating porcelain was placed in the laundry area, making for an easily cleanable surface for what doubles as a mud room from the garage. Creamy tumbled marble graces an unobtrusive backsplash spilling onto shiny granite counter tops in a rich earthy pattern of fall colors that mimic colors throughout the home. Advance is known details that included custom crafted furniture toe kicks, luxurious crown moldings, and beaded under cabinet moldings. The kitchen is complete with a glass display cabinet showing Ruth’s treasured china tea collection.
Early on, it was initially only their intention of purchasing cabinets for the new design. They were so impressed however with Advance Design’s complete program for budgeting, design, installation and management that it became clear to them both that they wanted Advance to handle the entire project from start to finish. “After seeing the quality work they did, coupled with the in-house team completely dedicated to our satisfaction, it became apparent there was no other choice but to hire them to handle everything. And we’re so glad we did, we have not one regret”, says Bud.
“The attention to detail by the carpentry crew more than satisfied my perfectionist expectations of the finished carpentry,” exclaimed Bud. “Every one of Advance Design’s people we encountered from design through construction was wonderful. We’ve never met a group of people so dedicated to making sure we were happy with every single detail, and every single part of this experience”, said Ruth and Bud.
Designer: Scott Christensen
Photographer: Joe Nowak

 BETWIXTdesign - Landscape & Interior Design
Megan Cronovich
Photo of a mid-sized modern drought-tolerant and full sun front yard concrete paver garden path in Los Angeles for summer.
Photo of a mid-sized modern drought-tolerant and full sun front yard concrete paver garden path in Los Angeles for summer.

Sponsored
Sunbury, OH

J.Holderby - Renovations
Franklin County's Leading General Contractors - 2X Best of Houzz!

 Richmond Commercial Painting
 provides full-service Milwaukee commercial interior painting for commercial buildings.We are skilled at applying all types of floor and wall coverings. We perform electrostatic painting for heat registers, bathroom stalls, or elevator doors and frames.
There is a lot more to commercial interior painting than just brushing, rolling or spraying a coating on a substrate. Preparation for painting, particularly on rehabilitation jobs, can be very involved and require elaborate equipment and technical expertise. In commercial painting and repaints there is usually production and office equipment and furniture to protect. There is a need for project coordination to assure the smooth, non-disruptive flow of the work.
Milwaukee commercial interior painting often calls for specialized coatings because of environmental and high traffic concerns. The right equipment and expertise are required for the proper application of highly technical coatings. Unlike some of the other painting companies in the area, these production elements are readily available at Richmond Painting. The highly experienced staff of project coordinators and applicators is familiar with the equipment and coatings materials to assure owners of the best possible experience in any commercial interior painting project.
Our commercial painting pros apply coatings to ceilings, walls and floors with attention to detail and care for the surrounding elements of the room. They apply acrylic ceiling and wall textures as well as latex paints. They finish floors in a wide variety of materials formulated to provide attractive, durable, high-traffic surfaces. Richmond Painting is a one-stop source of all commercial interior painting projects, large or small.
Our successfully completed projects list includes schools, hospitals, hotels, nursing homes, office complexes, warehouses, factories, high-rise apartment buildings and a host of others. We have experience in every type of commercial structure between Racine and Milwaukee.
commercial interior painting in milwaukeeRichmond Painting is in Racine, WI and from this central point we dispatch crews to projects throughout the Milwaukee area, including the northern suburbs of Washington Mequon, Grafton, Cedarburg, and southern areas like Pleasant Prairie, Sommers , Racine, Oak creek, and even as far south as Libertyville, IL in some cases. We serve any professional commercial coatings needs within Racine, Kenosha, Milwaukee, Waukesha , Walworth, Washington and Ozaukee counties.
The estimating and project coordination experts at Richmond Painting and Decorating are available to assist in every step of a Milwaukee commercial interior painting project. We work with owners on budgeting, with general contractors on the critical flow chart for the coatings part of their contracts and with designers on materials and color selections. Where coatings are the majority of a contract, we assume the overall project coordination and completion responsibilities. We take pride in our work and do everything humanly possible to assure a successful completion of the job.
When a project is done right the first time, the proper material is used by highly qualified applicators and the job is done with a minimum of disruption to an active business, it is well worth the money spent. It really costs no more to get the very best.
Again, we provide commercial painting services to a wide local area including; but not limited to: Bethesda, Alexandria, Potomac, Arlington, Great Falls, Vienna, Silver Spring, Fairfax, McLean, Rockville, and Woodbridge.
 Advance Design Studio, Ltd.
Bud Kane has remodeled nearly every room in his own home over many years. Now reaching his 70’s, he contemplated heading up a major kitchen and laundry room renovation himself, planning on doing the carpentry work with his own hands. “I was not convinced I would ever meet anyone who could do it as well as I could do it myself”, said Bud. Ruth and Bud spent 5 years visiting kitchen firms and interviewing designers. They couldn’t however bring themselves to pull the trigger on the project, until they met Advance Design Studio in 2015.
“No one understood what I wanted”, said Ruth. She was continually frustrated by experiences with designers who weren’t hearing what was important to her. “Everyone kept designing my kitchen with what they thought it should look like; I couldn’t find anyone who would listen to me”!
When they met designer Scott Christensen from Advance Design Studio, they liked him right away. He listened to Ruth and designed a kitchen that she loved, all the while interjecting years of wisdom and design expertise that Ruth appreciated. “The finished product is better than I expected”, says Ruth. “I respected Scott’s opinions and together we created the perfect place for me to bake with my grandkids and truly enjoy the kitchen and laundry room I’ve been dreaming of for many years!”
The kitchen transformation began with removing the home’s soffits, and extending new painted maple cabinetry to the ceiling with the addition of an elegant crown molding. Ruth’s new Vita Mix holds a coveted place on her counter, and adjustments were planned to size the cabinets in conjunction with the under cabinet decorative light molding to fit this appliance just right. “This one small detail was really important to me”, says Ruth smiling. An elegant new island replaced the original island, complete with room for 3 stools where her grandchildren will sit to make home-made pasta every Thanksgiving, and cookies at Christmas time. “Traditions are very important in my family, and making my kitchen work to suit cherished activities with my family was the number one reason this renovation was so desired”, replied Ruth when asked about the island.
A picture perfect new tea station replaced a cluttered unused desk area, creating a wonderful place to prepare hot drinks for sipping any season of the year while overlooking the couple’s wonderfully manicured gardens from the lovely 3 season’s room just off the kitchen. The soft sage island bead panel detail was repeated on the backsplash, replicating the feel of a fine old piece of furniture.
The biggest problem with the laundry room was 3 doors, one from the garage, one from the closet, and one to the hallway. “Scott designed a pocket door, and oh what a dream it is now to bring groceries in from the garage!” exclaims Bud who grew to disdain this task! Doing laundry is now a breeze in this attractive new space that doubles as a wonderful pantry for the kitchen with room to store food items that didn’t have a home in the poorly designed original space.
New Hickory distressed wood flooring was laid both in the kitchen and leading to the hall foyer. Soft gray wood-replicating porcelain was placed in the laundry area, making for an easily cleanable surface for what doubles as a mud room from the garage. Creamy tumbled marble graces an unobtrusive backsplash spilling onto shiny granite counter tops in a rich earthy pattern of fall colors that mimic colors throughout the home. Advance is known details that included custom crafted furniture toe kicks, luxurious crown moldings, and beaded under cabinet moldings. The kitchen is complete with a glass display cabinet showing Ruth’s treasured china tea collection.
Early on, it was initially only their intention of purchasing cabinets for the new design. They were so impressed however with Advance Design’s complete program for budgeting, design, installation and management that it became clear to them both that they wanted Advance to handle the entire project from start to finish. “After seeing the quality work they did, coupled with the in-house team completely dedicated to our satisfaction, it became apparent there was no other choice but to hire them to handle everything. And we’re so glad we did, we have not one regret”, says Bud.
“The attention to detail by the carpentry crew more than satisfied my perfectionist expectations of the finished carpentry,” exclaimed Bud. “Every one of Advance Design’s people we encountered from design through construction was wonderful. We’ve never met a group of people so dedicated to making sure we were happy with every single detail, and every single part of this experience”, said Ruth and Bud.
Designer: Scott Christensen
Photographer: Joe Nowak

 Mark Mobley Architecture
Mid-sized arts and crafts front porch idea in Baltimore with decking and a roof extension

 Concrete Craft
Our unique rubberized polymer overlays allow our decorative concrete designs to cure to a compression strength just under 5000 psi for the ultimate in durability.


 Miele USA
Cauliflower-Kale Soup With Toasted Pine Nuts. Recipe in "The Vibrant Life: Eat Well, Be Well" by Amanda Haas (Chronicle Books, 2019). Photo by Erin Kunkel.
 Tile Doctor Ltd
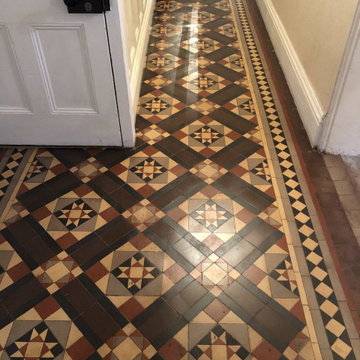
I received this Tile Doctor enquiry from a customer in the historic market town of Kidderminster who had a Victorian Minton Tiled hallway floor that had been covered in carpet for a long time. The carpet had since been removed and now the floor was fully exposed you could see it was covered in carpet glue and dirty with ingrained grime.
I arranged an appointment to inspect the floor thoroughly and provide a quote; you can never be sure what issues you might find, so surveying the floor first ensures I can give an accurate price. As anticipated the entire floor was covered in thick glue, fortunately apart from a few loose tiles the floor was in good order. I explained to the client the process I would use on the floor and that I was confident the floor could be restored for them. My quote was accepted, and we arranged a date to carry out the work.
I often get customers claiming to have an original Minton Tiled floor however there were many manufacturers creating similar patterns at the end of the 19th century, the only way to be certain is to lift a tile and look to see what’s stamped on the back. In this case we had a few loose ones that needed relaying, so I was able to confirm that quite easily.
I arrived on the booked day and the first step was to tape up the surrounding area to prevent any damage from splashing. I was then ready to tackle the glue. I applied a strong solution of Tile Doctor Remove and Go and covered the floor with industrial cling film to allow the solution to get to work without drying out. The film was removed after an hour and then the Remove and Go was worked into the tiles using a coarse 200-grit milling pad to cut through the glue and resurface the tiles.
Afterwards the floor was rinsed with water and the soil removed with a wet vacuum. Some of the glue proved very stubborn to remove and had to be dealt with carefully by hand using an industrial scraper, sometimes a bit of elbow grease is the only way to get the job done.
The floor was then given an Acid Rinse with Tile Doctor Acid Gel, this is designed to further clean the tiles and counter any efflorescent salts that might be present in the tiles due to the lack of damp proof membrane.
After another rinse and soil removal I turned my attention to the loose tiles which were secured by removing the tile, scraping out the adhesive and re-fixing. The appearance of the floor was much improved after day and the floor was then left overnight to dry out in preparation or the sealing process.
Returning the next day, I first checked the floor was dry using a damp meter. Once I was satisfied it was dry, I started to seal the floor. I had selected to use Tile Doctor Seal and Go Extra for sealing. It adds a richness to the colour of the tiles and a subtle sheen finish. I applied three coats, waiting for each one to dry before applying the next.
The pattern on the floor was really nice and the colours were now very vibrant. The client was very pleased and left a great review copied below:
“Our floor wasn’t easy as it had some form of coating on it which was difficult to remove but Mark took a lot of time to ensure the surface was thoroughly clean before the sealant was put down. Very pleased with how it looks. K. B, Kidderminster”
Mark Conway
Worcestershire Tile Doctor

 Montgomery Robbins, Inc.
This welcoming and unique property is adjacent to the Diablo Country Club golf course, nestled at the foot of Mt. Diablo. The grounds needed updating to compliment the home's transitional farmhouse-style remodel. We designed a new pavilion for a seamless indoor-outdoor living experience. The pavilion houses a cozy kitchen & grill, sleek bar, TV, ceiling fan, heaters, wall speakers, and inviting dining area. A pergola and trellis flank the modernized swimming pool and spa, the larger pergola featuring a square fire pit. To the expansive lawn we added two natural stone patios, clean gravel and stone pathways, retaining walls and fresh plantings.
102