
Search results for "Topic" in Home Design Ideas
 Tile Doctor Ltd
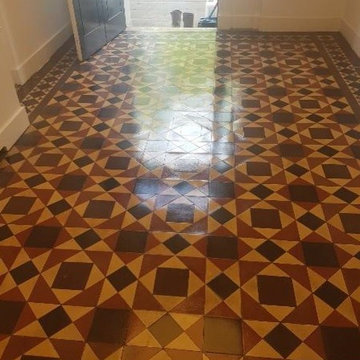
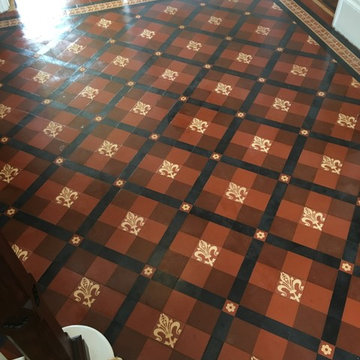
These are photos of a Victorian tiled floor we renovated at the new Scottish head office of the Peoples Postcode Lottery in the centre of Edinburgh City where the building was going through a multi million pound refurbishment. Edinburgh has a lot of Georgian and Victorian architecture, much of which is listed and as a result many still have original Victorian tiled flooring.
I’ve not really looked at the Postcode Lottery until now but put simply you give the lottery £10 a month and your postcode is your winning ticket number, there are prize draws every day and if your postcode comes up every one in the system with that postcode wins; they also give 31% to charity which is impressive.
You can see from the photograph that the floor was in good physical condition but was looking tired and dull. This is not unusual for Victorian tiles as once the sealer wears down dirt can penetrate into the pores of the tile causing it to lose its appearance.
On the first day we set about stripping the floor of what remained of the old sealant using a strong dilution of Tile Doctor Pro-Clean which is an industrial strength alkaline tile and grout cleaning product that is safe to use on Tile and Stone. The product is applied to the floor, left to soak in for ten minutes and the scrubbed into the tile using a black scrubbing pad fitted to a rotary bonnet machine. The floor was then rinsed and the now soiled cleaning solution extracted using a wet vacuum.
The process was repeated several times until we were happy the floor was clean and free of sealer and then given a final rinse with water. Before leaving for the day the floor was dried as much as possible using the wet vacuum to extract as much moisture as possible.
On the second day our first task was to check the floor with a damp meter in several places to ensure the tiles had dried off overnight. All was well and we began the process of sealing the floor with a Tile Doctor Seal and Go. This is a topical sealer which provides a high-quality low-sheen finish and protection against ingrained dirt and stains.
Victorian tiles are quite porous and five coats were needed to fully seal the floor. This took some time to complete as you have to wait until the first coat is dry before applying the next however it was well worth the effort as the floor looked fantastic afterwards.
Thomas Wilson
Edinburgh Tile Doctor
 Tile Doctor Ltd
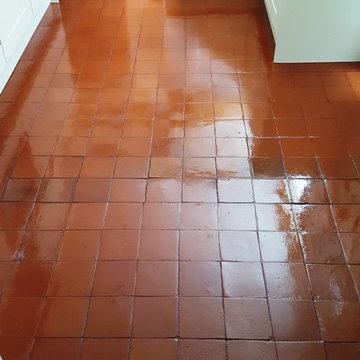
If you’re a first time buyer in the process of renovating or redecorating your new property, you may well discover some fantastic tiled floors hidden under your carpets. Certainly in my experience this happens quite often, so it came as no surprise when I got a call from a couple who had pulled up the carpet in the kitchen of their new house in Chester to find Quarry tiles, along with some fantastic Victorian tiles in the hallway.
While the Quarry tiles were in relatively good condition – having been shielded by carpet for many years – the couple were still understandably keen to get them back to looking their very best. I was more than happy to help them do just that.
Before beginning the restoration, I removed the kick boards from the kitchen cupboards so as not to damage them. I then applied a solution of our versatile, high alkaline cleaner, Tile Doctor Pro Clean, and let it soak into the tiles for a short period before scrubbing it in using a rotary machine fitted with a black scrubbing pad. Pro Clean is suitable for use on most natural stone tiles, including Quarry, Victorian and Slate, doing the trick to break down medium to heavy soil buildup.
The floor was then rinsed off with clean water, and the resulting slurry was promptly removed using a wet vac. I then left the floor dry out overnight.
I returned to the property the next morning, and started out by taking a couple of damp meter readings to make sure the floor was dry enough to seal. This is an essential task before sealing any tiled floor as even the smallest amount of excess moisture can cloud the sealer and damage its performance.
To seal the floor, I firstly applied one coat of Tile Doctor Colour Grow, which really brought out the natural reddish shades in the Quarry. As an impregnating sealer, Colour Colour fills the pores in the stone and prevents dirt from becoming ingrained. I followed the application of Colour Grow by applying three coats of Tile Doctor Seal and Go Extra. As a topical sealer, Seal and Go Extra forms an additional stain resistant seal on the surface of the tiles to protect against dirt and stains. It also gave the tiles a quality sheen finish as requested by the customer.
The customers were very happy with their newly restored Quarry tiled floor. They left the following feedback:
“We were both thrilled to bits with how nice the Quarry tiled kitchen floor looked, after being cleaned and sealed. Alastair was a pleasure to deal with and we would highly recommend him to anyone considering having their floor done.”
Alastair Robb
West Cheshire Tile Doctor
 Tile Doctor Ltd
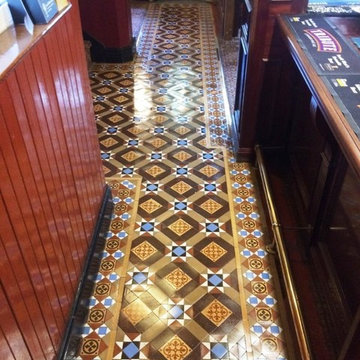
Here’s a really interesting commercial job for you, which I recently completed in the town of Hinckley, Leicestershire. I was asked to take a look at a Victorian Geometric and Encaustic tiled floor in the historic Queen’s Head pub.
This floor is over a century old and although in good condition for its age had suffered significant wear over the years, along with some cracked tiles and slight inherent moisture issues. What the pub landlord requested was a restorative clean to alleviate the aesthetically damaging effect of the wear, and to enhance the natural colours of the stone. I was also asked to seal the floor following the clean to achieve a semi-gloss finish.
The first step in the cleaning process was to mix a strong solution of one part Tile Doctor Pro-Clean to four parts clean water. Pro-Clean is a high alkaline cleaner which also contains stripping properties, allowing it to break down old sealer and tackle heavy soil build-up. The solution was applied to the floor and left to dwell for 15 minutes, giving it times to seep into the stone, get underneath the dirt and lift it to the surface.
I addressed several paint spots and areas suffering from glue contamination by using Tile Doctor Remove & Go, which is specially formulated to break down paint and adhesives on unpolished natural stone floors, amongst others. The entire floor was then scrubbed using a special floor cleaning pad, and the resulting slurry was vacuumed away using a wet-vac machine.
The final issue to deal with was the inherent efflorescence staining. This was treated using Tile Doctor Grout Clean-Up, an acid-based product which removes not just efflorescence but also grout haze, mineral deposits, and rust stains. The solution here was one part Grout Clean-Up diluted with four parts water.
After completing the clean, I thoroughly rinsed the floor with clean water to remove any trace of cleaning product and dried the floor as much as possible with a wet vacuum, then before leaving for the day i installed a couple of air movers to assist with drying overnight.
Upon my return the following day, I checked the floor for any excess moisture before sealing it with our topical, semi-gloss finish sealer, known as Seal & Go Extra which due to its formula is ideal for external or old internal floors where there is unlikely to be damp from membrane.
This unique product provides excellent protection, and allows the tiles to breath where floors are suffering from inherent moisture issues. It is suitable for both internal and external use, on Victorian floor tiles, Sandstone, Flagstones, Terracotta, and rough Slate.
As you can see from the photo, I was able to fulfil my client’s request to a high standard, bringing the pub’s old yet characterful Victorian tiled floor back to life again.
Kay Sylvester
Leicestershire Tile Doctor
Find the right local pro for your project

 BAUFORMAT
Wavy mother of pearl porcelain tile, wavy white tile for bathroom shower or backsplash. Perfect for fireplace or accent wall
Example of a trendy bathroom design in Los Angeles
Example of a trendy bathroom design in Los Angeles
 United Porte Inc
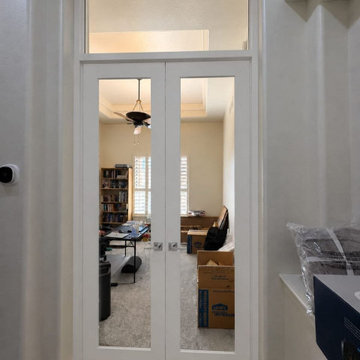
Lucia 2166 White Silk with Clear Glass Description
Revamp Your Space with Our Chic Barn Doors
Let's picture a door that instantly boosts your room's aesthetic, occupying minimal space while sliding effortlessly along a sleek metal rail. Have you painted the image in your mind? Now, let it come alive with our stylish Order and Buy Barn Doors. This stylish and practical solution smoothly merges rustic charm with modern minimalism.
Our barn doors are delicately crafted, created to provide elegance and durability. Can you imagine the charm of rustic barn doors smoothly blending with your modern home theme? It's not just functional; it's a statement piece, a topic of conversation, a stylish addition that fills your home with a warm, welcoming feel.
Dive into the Pure Aesthetic of Spotless White and Silver
Our barn doors feature a timeless Color: White palette that effortlessly complements any home style or wall. Also, set on a sleek Rail Color: Silver Rail, this barn door is not only a means to an end but an end in itself. Add in those cool, silver-toned railings, and you've got yourself an eye-catching blend of luxurious design and unrivaled functionality. The rail doesn't just support; it smoothly complements your chosen barn door, creating a striking contrast that's impossible to overlook.
Discover Unparalleled Craftsmanship in Our Interior Doors
Apart from our trending barn doors, we are also proud to introduce our beautifully crafted and innovatively designed Order And Buy Interior Doors. Explore an array of choices that exude both quality and elegance, ensuring your home radiates nothing but refined sophistication.
Shine Bright with Our Clear Glass Feature
Of course, no door is complete without an inviting and brilliant Glass: Clear Glass feature. Our doors are designed to brighten your room, creating a vibrant, light-filled environment. Who said doors have to be solid and mundane? Go against the grain, choose clarity, and let your space be filled with natural light. Enjoy the elegance of clear glass doors while savoring the privacy it provides.
Upgrade Your Living Space with Unitedporte
The journey of revamping your living space to reflect your taste and personality has never been simpler. All you have to do is to click on Order and Buy Doors to browse through our diverse collection of stylish, durable, and high-quality products. Let your doors echo your story; let your space be your masterpiece.


 Tile Doctor Ltd
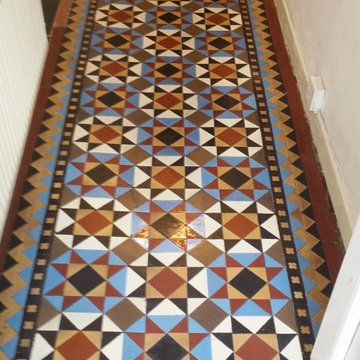
When you uncover a tiled floor after it has been covered by carpet for many years, it’s almost a given that it will be in a bad state. However, my customer, who lives in the town of Lymm, wasn’t expecting the Victorian tiled hallway they had recently uncovered to be in quite so terrible a state. As you can see from the photograph, it has been completely devastated by paint plaster and a big pool of cement floor leveller. Understandably, the formerly colourful appearance of the tiles had completely drained and it would require a through restoration to get them back into a usable condition.
To begin the restoration, I mixed a strong cleaning solution which consisted of Tile Doctor Remove & Go combined 50/50 with Tile Doctor Pro Clean. Remove & Go is a heavy duty remover that breaks down old sealers, along with adhesives, paint stains and other tough soil build up where as Pro-Clean is a versatile alkaline-based cleaner that reliably eradicates dirt on a wide variety of natural stone floors.
The solution was applied liberally across the floor, and left to dwell for a short period, allowing time for it to soften up the paint plaster. Next, I fitted a coarse scrubbing pad to my rotary cleaning machine and began to scrub the solution into the tiles, with a big difference to the appearance of the tiles being made quite quickly. The resulting cleaning slurry was promptly removed using a wet-vac machine.
I repeated the process two times to provide an extra thorough clean and then give the floor a thorough rinse. Some particularly stubborn marks remained on the floor which I was able to remove using Tile a Doctor Acid Gel, a blend of phosphoric and hydrochloric acids in gel form that’s easy to control. The floor was then left to dry fully overnight.
The next morning, I returned to the property and ran some damp tests. This is incredibly important to do before sealing any tiled floor because any excess moisture can cloud the sealer and prevent it from doing its job properly.
Once satisfied that the floor could be sealed, I applied several coats of Tile Doctor Seal and Go, our topical sealer which provides both a robust surface seal and a long-lasting low sheen finish in one and ideal for Victorian tiles.
It would be an understatement to say that this Victorian tiled floor was transformed. The customer was amazed at the results considering how bad a state the tiles had been in just a day earlier. When you have a situation like this, it’s hard to believe the tiles could ever be fully restored. Nonetheless, we could now see them in their full and original glory, and needless to say, the customer was very, very pleased with the result.
Alastair Robb
West Cheshire Tile Doctor

 Custom Surface Solutions
Custom Surface Solutions (www.css-tile.com) - Owner Craig Thompson (512) 430-1215. This project shows new 12 x 24 tile installed vertically with offset layout pattern on wall and floor. Includes shower box with linear glass accent tile back and vertical glass accent band. Tile edges are finished with Schluter Jolly satin aluminum profile edge trim.

 RoomService 360
A stylish solution that embraces modern lifestyle with utmost seating comfort and functionality, the Free Italian Sleeper Sofa is an envoy for small spaces featuring an easily convertible bed. Designed by Peter Ross for Bonaldo and manufactured in Italy, Free Sofa Bed is available in two sizes and can be upholstered in any of the available 93 fabrics and 24 genuine Italian soft leather colors. Free Sofa Sleeper feet are available in anthracite grey or dark brown wood as well as in chrome and silver.
 Tile Doctor Ltd
Terracotta is an interesting type of stone manufactured using a variety of techniques dependant on the country of origin which leads to a number of differences such as Spanish Terracotta being less porous than its Mexican counterpart: the former is semi-hand made and finished in a factory kiln, while the latter is completely handmade. Spanish Terracotta is therefore a lot less than porous and ultimately, of a higher quality.
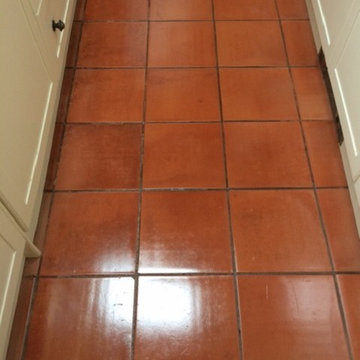
But despite the Spanish Terracotta being less porous, and therefore being less prone to ingrained dirt, it still, like any other stone, needs regular maintenance to keep it looking smart. In the tiling trade, we quite often refer to this as a good old fashioned ‘Clean and Seal’ and this is exactly what was requested by this property owner in Halifax, for their Spanish Terracotta tiled floors in the kitchen and adjacent hallway.
I cleaned both sets of Terracotta tiles using the same process, which involved the application of our reliable alkaline cleaner known as Tile a Doctor Pro Clean, diluted with five parts of warm water. Once the solution had been left to dwell for a short period, it was scrubbed into the tiles to remove all dust, dirt, and general muck. This created a slurry of cleaning residue, which I promptly soaked up using a wet vac. A wet vac machine is an essential tool when it comes to cleaning porous tiles since, unlike a traditional mop and bucket, it sucks the excess trapped dirt out of the clay and thus provides a superior clean.
Following this, I applied a small amount of our heavy duty remover, known as Tile Doctor Remove & Go, to deal with some of the more stubborn stains and paint splashes, before rinsing with clean water and wet vaxing in a similar fashion to before.
Once the clean had been completed I left the tiles to dry completely. This can take 12 to 24 hours depending on numerous factors including whether a Damp proof Membrane and underfloor heating has been installed which can really help reduce drying times. Letting the tiles dry completely before sealing is paramount as moisture can cloud the sealer and affect its performance.
Upon my return to the property I ran some quick damp tests, which revealed the tiles were ready to be sealed. I then applied several coats of Tile Doctor Seal and Go, our topical sealer which provides a satin finish and accentuates colour. A new coat of this product is recommended every six months on Terracotta to ensure the continuous protection of the tiles’ soft clay particles.
My customer was extremely pleased with her refreshed Terracotta tiles. It goes to show what a big difference a bit of regular maintenance can make. I advised the customer that an everyday cleaner called Tile Doctor pH Neutral cleaner can also be used regularly to keep the tiles looking great without damaging the sealer.
Nigel Stoker
North West Yorkshire Tile Doctor


 Advance Design Studio, Ltd.
After six years of living in their Huntley IL home, Chris and Meghan were tired of their dark, dingy, outdated kitchen and it was finally time for a long-anticipated change. “The kitchen is the place where we live, it’s where we do everything,” Meghan said. “It was important that it be a space where we wanted to be.” Meghan loves cooking and enjoys including their girls in healthy meal prepping, this led them to want a brighter, more enjoyable kitchen with increased functionality and improved storage.
For Chris especially, the laundry room was an entirely dysfunctional eyesore. “We had a washer and a dryer, but it was all kind-of cobbled together!” Chris said. “There were always laundry piles everywhere, we weren’t really sure what we wanted to do in there, but it was time for us to make a change.” The mess of the space was stressful every time they walked in the door from the garage each day. Kids’ backpacks and shoes piled up haphazardly in the makeshift boot-bench closet left the family feeling disorganized and stressed. They needed space for folding clothes and locker cubbies to help keep the family organized.
Having known Christine and Todd in the Huntley community for years, Chris and Meghan were familiar with their work. “We already trusted them personally and having seen their projects for years we knew they did top notch work. After we reviewed the initial round of designs, we knew that hiring them was definitely the right choice,” Meghan and Chris said. Although Chris had done a lot of work in their home himself, the kitchen and laundry room renovation was such a large undertaking that he didn’t want to steal time away from his family to spend what would surely be many long weekends doing the job himself. “That would not have been a wise choice for us,” Chris laughed.
“Our designer, Michelle was very, very, easy to work with; anything we wanted to see or weren’t sure about, she went above and beyond to make this easy for us. She was easy to get hold of and always quick to respond,” the couple said. Michelle pulled ideas that mirrored the couple’s taste and style and was adept at directing the couple to limited choices that didn’t overwhelm them and kept the process moving. “I have a hard time making decisions. Michelle made the decision-making process so easy. I loved how she listened to what I liked and then presented three great options for me to choose from,” Meghan said.
The main objectives for the kitchen were better storage solutions, they wanted the space to reflect their lifestyle and taste, and they wanted it to last for years with low maintenance. One of the first steps in creating a more functional kitchen was relocating the refrigerator, creating an improved workflow for the busy family.
“We didn’t know that we could even move the refrigerator to a new location where it is now, that was something that we never would have thought of,” Chris said. “The new refrigerator location makes the kitchen feel so much bigger. We didn’t add any space, but our whole kitchen with the new design just seems like it’s so much larger than before!” Meghan said.
The perimeter mist colored cabinets helped warm and brighten the entire room, while the graphite colored cabinets on the island added contrast. Using this fresh, clean color palette satisfied the couple’s desire for a bright space that was the exact opposite of what they had before. Organization accessories were also added to the cabinets such as a spice drawer tray and roll outs to create hidden convenience.
“I absolutely love the hidden spices – it makes cooking so much more enjoyable!” Chris said. “And all the pull outs, and the double trash bin, who would think you could get so excited about organization!” the couple said in unison.
One thing they hated in their original kitchen was how dark the space felt. Added lighting on the ceiling with the new light fixtures combined with the lighter cabinetry colors throughout solved this problem. “Our new kitchen has this warm, almost cozy feeling that our old kitchen never had, it’s just a space that I love spending my time in now,” Meghan said. The light airy feeling was accentuated with the use of floating white shelves on either side of the decorative range hood. “We have so much cabinetry space, the new design is amazing we actually have more storage space than we will ever need,” Meghan said.
The island was extended to create more work surface and added space for stool seating. “The new island changes how we live. Now the kids can be in the kitchen with us, doing homework, eating breakfast, and the three of us have special dinners there when Chris is working late,” Meghan said.
The Carrara Marmi Quartz countertops were chosen because they are, not only beautiful, but are made from hard-working material that doesn’t require maintenance. The white subway tile backsplash that wraps to the ceiling behind the focal point cooktop range/hood compliments the crisp white countertops perfectly, while brushed brass hardware and light fixtures keep the design fresh and new.
The couple had a few fears at the beginning of the project, as most homeowners do. Their biggest fear was being out of their kitchen and laundry room for an extended time. The crew made it very easy for the family to work in a limited space keeping the washer and dryer hooked up the majority of the time, and also getting appliances working with minimal downtime.
“They above and beyond accommodated us to get us through the process,” Meghan said. “They did a great job making sure we were as comfortable as possible throughout the process,” Chris added.
“Our project manager DJ did a great job. He was very good at updating us on schedule changes, getting guys in as quickly as possible. Everyone that stepped in the house was nice and did great work,” said Chris. They thought Advance’s carpenter was phenomenal and were impressed when he took a conceptual idea from a photograph and worked with designer Michelle to create a one of a kind range/hood that has become the topic of conversation with friends and family who visit the new kitchen. “He was in our house literally every day for several weeks. He was easy to work with and good at what he did,” Meghan and Chris said.
The focal point of the kitchen; a hand-crafted, custom-built ventilation hood was clad with handpicked reclaimed barnwood. Advance Design’s carpenter built the framework and the cladding to create a one-of-a-kind design element that the couple loves.
“I think it was especially fun for him to create something unique from scratch, showcasing his talent in this area,” Meghan said. “I love that my kitchen is not like everyone else’s. I got to pick out the wood on my hood and watch it being built and was able to choose what pieces of wood went where on it. It’s totally unique.”
Red Oak flooring was toothed-in throughout the kitchen and the rest of the first floor anywhere changes were made. Then the whole floor was refinished to tone down the orange undertones in the existing floor stain, ultimately changing the color complexion of the entire first floor. The result is a completely new feeling to the entire home.
Renovating the laundry room was extremely important to Meghan and Chris, but they had trouble visualizing what the possibilities were for the seemingly small space. Michelle produced beautiful 3D illustrations that helped them envision the space in a whole new way.
“I must have told Michelle 100 times that I am a visual person, seeing the designs in 3D made it so easy to make decisions and see what we could really do with our space,” Meghan said.
A dividing wall and doorway were removed between the existing laundry room and hallway formerly containing a coat closet, providing space to design specialized graphite colored cabinetry matching the kitchen island to house custom storage cubbies for each family member. Adding the tall utility cabinetry in the new laundry area helped solve the storage issue, tucking away cleaning supplies, household items, and even the cat got its own cubby.
“I love how everything is now hidden in its own space. I can’t tell you how much I hated coming home and seeing everything sitting around on counters,” Chris said.
Electrical outlets were planned for the inside of utility cabinets, so devices could charge in hidden locations. Stacking the washer and dryer allowed for wider countertop space to provide a folding area and a special space for clothes to hang. “The way I do laundry has been completely transformed! I can actually fold clothes and hang them now right out of the washer and dryer,” Meghan said.
“The end result in the kitchen and the laundry/mud room was an updated light and bright space, with a smarter work flow that better meets the needs of this family,” Michelle said.
“I would totally recommend Advance Design,” Meghan said. “Sometimes I sit and just look at my kitchen and laundry room and think ‘Wow, I can’t believe I get to live here!’ It’s an understatement to say we love our new space.”

 Fatin Home Furniture
It does not matter if you try or not, the end result of the interior reflects your personality. It is up to you to finish it in such a way that, it tells the story of what you wanted to convey.
The confusion gets the hold of the person only due to the vast variety of options, which further induces because of the lack of planning. You see stuff and you start liking everything. Then you try to combine every style and stuff in your home decorating plan, which gets you a strange kind of interior in the end.
The material, the design, the colors, all these aspects hit your brain at once and the final touch, the issue of budget.
All you need is a better plan in order to diminish all those confusions regarding the interior finishing. Here are the tips for you to get the suitable interior for your personality.
1. Add textures to your interior
The textures that you provide to your ceilings and floors are the best way to enhance the personality of the house. These changes bring the necessary life to your interior and energize the overall looks. You can choose Wooden Flooring Dubai to provide dimensions to your house flooring.
Make sure that each texture of your home complements the other, or it all will go in vain. This is very important to get a strong personal reflection through your interior finishing. When you add right textures, you create a powerful appeal for yourself through your home decorations.
2. Use colors to paint your story
Colors are the easiest way to tell your story through your home. When you combine your creativity with colors and patterns, the house becomes the one dream home that you always wanted. It does not even cost much, as you need just small changes with colors to bring the personality out. There are a few companies, which offer high-quality blinds and curtains in Dubai, that too in different funky colors.
Before deciding the colors, it is really important to make up your mind regarding the type of designs you want. You need to choose from many different designs like contemporary, traditional, or modern urban. Or, you can create your design with a little help of a professional designer.
3. Use your experience
This is really helpful in order to successfully portray your personality through house decorations. Each one of us travels to different places and see a lot of things. Things like landscapes, beaches, hotel rooms, and many others can help you to think and come up with the most suitable style of your house.
You can also buy different stuff for the interior of your house when you travel different places. For instance, you can find some amazing Carpets in Dubai. However, there are some great places to get beautiful wallpapers in Dubai.
So, that’s all on this topic. Hopefully, these tips will help you in decorating your home just the way you want to.
Visit http://www.fatin.ae/the-art-of-choosing-wallpapers-in-dubai/
http://www.fatin.ae/curtains/
 Tile Doctor Ltd
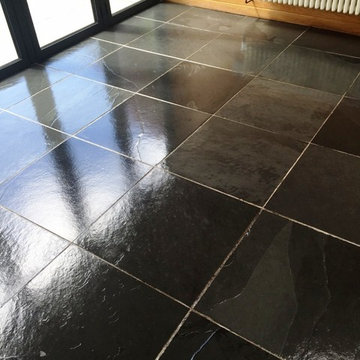
Tenuous link I know but I worked on this semi riven Black Brazilian Slate Tiles in the kitchen and dining room of a house in the seaside town of Thornton-Cleveleys around the time of the Rio Olympics. I love working on Slate as although it’s appearance can degrade without proper maintenance due to a build-up of dirt I knew they would look fantastic by the time I had finished.
The tile itself had lost its rich black colour and the grout lines had become stained, leaving the floor as a whole looking very unattractive. Out of interest honed Slate has a smooth, refined texture whereas the riven Slate has a rougher, more natural texture, and this can make it more difficult to keep clean. Needless to say, the customer was keen to have the tiles restored to looking their best.
To restore the appearance of the Slate, I cleaned the floor and removed what remained of the old sealer off using Tile Doctor Remove and Go. This was scrubbed into the floor using a scrubbing pad fitted to a rotary machine. The floor was then rinsed with water, and the process repeated where necessary to tackle particularly stubborn areas of dirt.
As mentioned previously, the grout lines were in a particularly bad state, and would need special cleaning attention. I cleaned carefully with a strong 5-to-1 dilution of Tile Doctor Pro Clean with water, which is our high alkaline cleaner. The cleaning solution was scrubbed I’m using a stiff handheld grout brush, with the grout lines looking immediately cleaner. When I was satisfied that the grout lines had been restored to the best possible condition, I gave the floor a thorough rinse using the wet pickup function of a wet wax machine to get the floor as dry as possible and then left the whole floor to dry off overnight.
Upon my return to the property I ran some quick damp tests to check that the floor was completely dry. This is important as any excess moisture would have prevented me from sealing the tiles, since it can cloud the sealer and damage it performance.
Previously I discussed sealer options with the customer and they stated that they would prefer a Satin finish, so I applied a sealer called Tile Doctor Seal and Go, our topical sealer which will both protect the Slate from dirt and stains, and also gave it the desired finish. As you can see from the below photographs, the rich, dark shades in the Slate were really enhanced.
The customer was very pleased with the finished result, but was also concerned about keeping the Slate clean in the long-term. For regular cleaning I advised the customer to use a pH neutral cleaner for aftercare called Tile Doctor Neutral Cleaner. As a pH neutral cleaner, it will not erode the sealer compared to acidic cleaners you so often find in supermarkets.
Russell Taylor
Lancashire Tile Doctor
 Tile Doctor Ltd
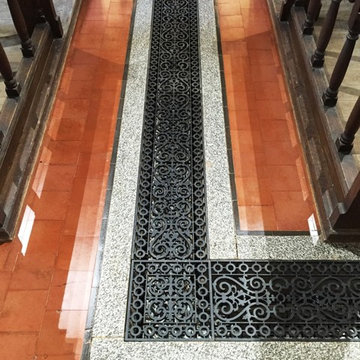
Did you know that Wantage, the town in Oxfordshire where I completed this job, is the birthplace of Alfred the Great? The town is certainly a historic area – in fact, I was contacted by the warden of a church dating back to the 12th century, who asked Tile Doctor Oxfordshire to help restore the building’s flooring, consisting of Quarry and Marble tiles.
This is an interesting mix of hard wearing and high end tiles, and while the floor was in
dire need of a deep clean, it could be restored back to looking fantastic once again.
The church has recently undergone a complete refurbishment with the help of a grant from lottery money. We were called after the builders had finished their work, to restore the floor to the finish required by the church warden.
His specification was to provide the Marble with a Matt finish and the Quarry tiles with a sheen finish. The floor was, at one point in its history, covered in carpet which had been taken up, no doubt exposing many years’ worth of muck.
My first task was to clean the floor with a diluted solution of Tile Doctor Pro-Clean, a high alkaline cleaner safe to use on tile and stone. This was left to dwell for a short period to seep into the tile, before being scrubbed in to remove the initial layers of muck. The resulting residue was promptly vacuumed away.
To tackle the tougher areas of soil buildup, I opted to use Tile Doctor Nanotech HBU which was spread over the floor and left to dwell for about 30 minutes. This product differs from most cleaners in that it uses nano-sized cleaning particles to deal with difficult to reach dirt ingrained in the stone. I then rinsed the area with water and vacuumed this up.
Due to the substantial size of the church floor I had to work in multiple sections, and so the cleaning process took three days to complete. After finishing, I left the church for a few days to allow the floor time to dry.
When I returned to the church I checked the floor with a damp meter and was satisfied that it was dry enough to seal.
First, I sealed the Marble tiles with Tile Doctor Colour Grow, which is a colour enhancing impregnating sealer suitable for use on high end stone such as Marble and Limestone. I applied two coats, leaving a few hours between coats; this brought the colour back without a high shine, as per the church warden’s request.
The next day I returned to seal the Quarry tiles, this time using Tile Doctor Seal & Go Extra which is a topical sealer specially formulated to lea e a nice sheen as requested. I applied several thin coats of the sealer to build up solid protection on the floor.
The warden was extremely pleased with the finished floor, leaving the following feedback:
“We found the Tile Doctor online and watched some of the very helpful slideshows on YouTube. The Victorian Quarry tiles in our 12th century church had been covered with carpet for many years and needed a thorough clean and polish at the end of our major restoration project. Barry was very quick to respond to our enquiry and over the course of a week he did a brilliant job on our tiles. We’re delighted with the results, just in time for our reopening service with our bishop and MP.”
Barry Woodward
Oxfordshire Tile Doctor
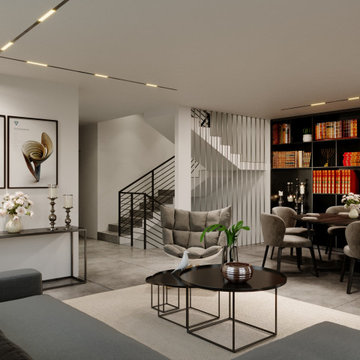
 Ferriss - Architectural Renderings
Top 10 house planning mistakes
Mistake # 1: placing wet areas away from communications.
Architects always foresee in advance the placement of wet areas in the immediate vicinity of communications, so you should not move the kitchen or bathrooms to more distant distances.
Mistake # 2: arrangement of living rooms and kitchens in rooms without natural light.
A person needs natural light when he is reading, studying or preparing food. Therefore, you should not plan living spaces, including the kitchen, in rooms without windows. Premises without natural light are mainly dressing rooms, storage rooms and bathrooms.
Mistake # 3: exit the bathroom to the living room or dining room.
Doors to bathrooms and utility rooms cannot open into public areas - living room or dining room. With such a planning decision, you will inconvenience guests and households, because no one will be able to enter or leave the premises unnoticed.
Mistake # 4: having one entrance to the house.
Plan 2-3 entrances to your home with each one serving a specific role. For example, through the front door you will meet guests, the entrance from the courtyard facade - to exit to the site in order to go around the house. The third entrance should lead from the street to the boiler room. Technicians enter through it and the equipment is replaced.
Mistake # 5: neglecting entrance hallways.
Do not plan grand halls and lounges when entering a house. Be sure to organize hallways with dressing rooms or spacious wardrobes.
Mistake # 6: placing a guest bathroom far from the entrance.
The concept of "guest bathroom" speaks for itself. To get into it, your friends do not need to go through all the rooms on the ground floor. Therefore, do not place it far from the front door.
Mistake # 7: Insufficient number of bathrooms on the floor.
One bathroom is not enough for a floor, especially if it is a bedroom. For the convenience of households and guests, each bedroom should be equipped with a separate bathroom.
Mistake #8: lack of an economic block.
In houses of any number of stores on the first or basement floor, a pantry with a sink should be provided for storing cleaning equipment, for storing vegetables or solid fuel. In this case, the exit from the storeroom to the floor must be isolated from the living rooms.
Mistake # 9: arrangement of walk-through living rooms.
Do not make the living room a walk-through, even if you plan to equip an office or living room in it. You and your guests will feel uncomfortable because the multiple doors leading to other rooms make the room look like a reception.
Mistake # 10: the wrong size of the corridors.
The width of the passage corridors should be at least 120 cm. First of all, the rule should be observed for the safety of residents and according to the rules of fire safety measures. An important role is played by ensuring sufficient ventilation of the premises: if the corridor is narrow and long, then there will be either a constant draft or stale air.
Also, in a narrow aisle, it will be extremely difficult to bring in and take out large-sized furniture or equipment. And the doors that open into the corridor should not block the passage, as a traumatic situation may arise.
If you have any polls that are not covered by this topic - write to us, we will be happy to advise you.
https://www.ferriss.co/

 Tile Doctor Ltd
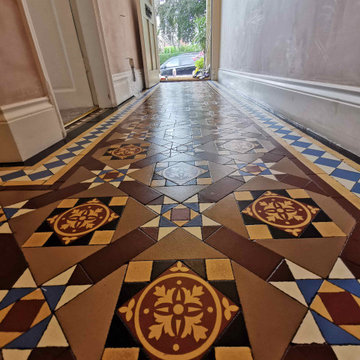
A young couple recently bought a house in Barnsley and were renovating it from top to bottom, included in the plan was the desire to have the previously unloved Victorian floor made beautiful again. The house stands in an area of Barnsley famous for its’ big Victorian villas and quite rightly they felt it was important to ensure period features like this original floor were correctly maintained.
Due to the floor being covered up for many years the floor had developed damp staining, it also had a lot of paint splattered on it. There were also some loose tiles that needed fixing back in place and the layer of old floor polish was present which would need removing.
I started by protecting all the skirting boards, doors and carpets bordering the tiles from splashing. The loose tiles were then cleaned up and then secured back in place using a fast-setting adhesive.
Once the adhesive was set, I turned my attention to stripping and cleaning the floor starting with the application of a coarse 200-grit diamond pad fitted to a weighted rotary buffing machine. The pad was lubricated using a dilution of Tile Doctor Remove & Go which was applied to small sections of the floor and left to soak in for ten minutes first. I run the buffing machine at a slow speed to minimise splashing. Remove & Go is amazing at removing old floor coatings (i.e. sealers), dirt and grime from the floor. When the diamond pad had been used on each section of the floor for five minutes the slurry was vacuumed up using a wet vac machine and I moved onto the next section. Once the whole floor had been cleaned in this way it was time to start the next step.
Old floors like this which don’t have the benefit of a damp proof membrane, and have been covered up for a long time, can suffer from efflorescence issues due to moisture being trapped in the tile. This will result in white salt staining appearing on the tiles for days, weeks and sometimes months afterwards. To counter this the alkaline salts are neutralised by giving the floor an acid rinse using Tile Doctor Acid Gel and leaving it to dwell for five minutes before going over the floor again with the coarse diamond pad. The slurry was again removed with a wet vacuum and the floor was scrubbed clean with damp cloths.
I returned a few days later once the floor had dried to seal the floor. The client wanted a satin finish so knowing the floor had damp and efflorescence issues I opted for Tile Doctor Seal and Go Extra. This is a topical sealer which leaves a lovely satin finish but also allows for the floor to breathe. six coats were required to make the floor look perfect, allowing the lovely colours to come through.
Once complete the floor looked much brighter and the colours really shone through. The owners were really happy with the renovation we carried out and before leaving I took time to discuss how best to maintain the tiles going forward including the use of Neutral Tile cleaner.
Matthew Lovett
South Yorkshire Tile Doctor
 Tile Doctor Ltd
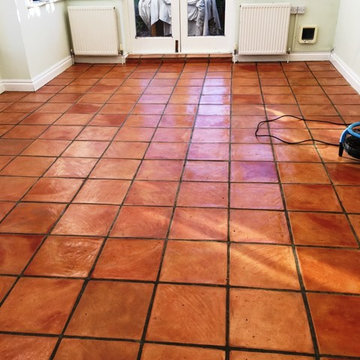
This couple, who live in the seaside resort of Brighton, had purchased their house four months before Christmas and wanted to have the fantastic Terracotta tiled floor in the kitchen and conservatory looking its best before the festive period, since they had family visiting. The floor was looking washed out and it was clear the sealer had failed in the high traffic areas and was now allowing dirt to penetrate into the pores of the tile making it difficult to clean.
We often get calls from new home owners keen to put their own stamp on a property shortly after moving in; stone floors rarely come with cleaning instructions so if you have a stone floor it makes sense to get in touch, so we can advise you on how best to maintain it.
We provided a quote which included stripping the floor of old sealers, cleaning, oiling and then sealing it again to restore cleanliness and character to the Terracotta. There was a lot to do and two areas to clean so I anticipated it would take four days to complete.
Having accepted the quote our first task upon returning to the property was to give the Terracotta tiles a deep clean and remove any remaining sealer present on the tile. This was achieved by applying a strong combination of Tile Doctor Pro-Clean and Tile Doctor NanoTech HBU to the tiles and then covering it in a plastic sheet, so it wouldn’t dry out. This method allows the products to really soak into the pores of the Terracotta and draw out the dirt. I should also mention that Pro-Clean is a very effective Tile and Grout cleaner whilst HBU enhances it by adding nano-sized cleaning particles.
The plastic blanket was left in place for a few hours before being peeled off and then the cleaning products scrubbed into the tile and grout using a black pad fitted to a rotary floor machine and hand brushes. The now soiled product was rinsed off with water which was then extracted using a wet vacuum. The floor was inspected, and stubborn marks spot treated until the floor was clean.
After thoroughly cleaning the Terracotta over two days, we left the floor to completely dry off over the weekend. The tiles would need to be sufficiently dry to receive fresh sealant, as excess moisture can cloud the sealant and prevent it from working correctly.
When we returned to the property, we proceeded to apply Tile Doctor Stone Oil to the tiles. Stone Oil is a sealer which restores the colour and texture of tiled floors, as well as mechanical strength once cured.
We applied a single coat of the Stone Oil before topping it up with multiple coats of Tile Doctor Seal and Go, a topical sealer which provides a high-quality sheen finish to help accentuate the appearance of the Terracotta tiles as well as adding protection.
You can see the results of the restoration below. The couple were so impressed that they have now agreed to have Tile Doctor visit once a year (at a fraction of the cost of the original restoration) to complete a maintenance clean. This will make sure this Terracotta is always looking at its best!
Mick Conlon
East Sussex Tile Doctor
 Tile Doctor Ltd
It’s always a great surprise to find old tiled flooring hidden underneath carpet or linoleum which appears especially common with 19th century properties where it’s not unusual for the owners to uncover fantastically patterned, original Victorian tiled floors and, naturally, they want to restore them to their former glory. If you have a property of this type you might want to look under the carpets.
The majority of the time, however, these tiles have been covered up for decades, allowing for thick layers of muck to build-up and are invariably damaged carpet grippers, surface glue and adhesive tape.
This was pretty much the case with this customer who lives in the town of Warminster and was keen to have her own newly discovered Victorian hallway brought back to life, and called me down to see what could be done. Upon arrival at the property, I determined that the tiles would definitely require a very deep clean, including the remove of numerous glue stains, followed by the application of a new seal.
Before I could begin the deep cleaning process, I needed to remove the carpet grippers and surface glue, attempting to remove as much as possible by hand using a scraper.
For the particularly stubborn areas, I applied Tile Doctor Remove & Go, a powerful stripper specially designed to break down adhesives and solvents, and left it to dwell for 20 minutes to eat through the glue deposits. I then attached a black pad to a rotary machine and scrubbed the area thoroughly to clean the affected areas, before removing the resulting slurry using a wet vacuum and rinsed with clean water.
Once I was satisfied that all of the glue had been removed, I proceeded to soak the floor using a solution of the high alkaline cleaner known as Tile Doctor Pro Clean. This is a versatile product that can be used on a wide range of natural stone floors to deal with heavy soil build-up.
I left the Pro-Clean to dwell for ten minutes, and then scrubbed it into the tiles to remove the ingrained dirt and also to break down any old and ineffectual seals. The floor was then once again rinsed thoroughly with clean water which was then extracted using a wet vacuum before being left to dry for a couple of days.
Upon our return to the property I immediately tested the floor for damp using a damp meter. This is an extremely important test to carry out before sealing any kind of tiled flooring, due to the fact that excess moisture left over from cleaning can cloud the sealer and damage its ability to protect against dirt and stains.
Thankfully, the damp test revealed no excess moisture, and I was able to proceed with sealing the tiles. My choice of sealer was Tile Doctor Seal and Go, a water-based topical sealer that simultaneously provides both a stain resistant surface seal and a durable and aesthetically pleasing low sheen finish, also being water based it doesn’t give off a smell as it dries.
This is a very cost effective product that is highly suitable for use on Victorian and Quarry tiles, I applied five costs to achieve the desired finish.
The customer was very pleased with the final results. It’s always satisfying to restore original Victorian tiled floors to looking their best once again – and this one was no exception.
Stuart Ford
Wiltshire Tile Doctor
28