
Search results for "Topic" in Home Design Ideas

 Advance Design Studio, Ltd.
After six years of living in their Huntley IL home, Chris and Meghan were tired of their dark, dingy, outdated kitchen and it was finally time for a long-anticipated change. “The kitchen is the place where we live, it’s where we do everything,” Meghan said. “It was important that it be a space where we wanted to be.” Meghan loves cooking and enjoys including their girls in healthy meal prepping, this led them to want a brighter, more enjoyable kitchen with increased functionality and improved storage.
For Chris especially, the laundry room was an entirely dysfunctional eyesore. “We had a washer and a dryer, but it was all kind-of cobbled together!” Chris said. “There were always laundry piles everywhere, we weren’t really sure what we wanted to do in there, but it was time for us to make a change.” The mess of the space was stressful every time they walked in the door from the garage each day. Kids’ backpacks and shoes piled up haphazardly in the makeshift boot-bench closet left the family feeling disorganized and stressed. They needed space for folding clothes and locker cubbies to help keep the family organized.
Having known Christine and Todd in the Huntley community for years, Chris and Meghan were familiar with their work. “We already trusted them personally and having seen their projects for years we knew they did top notch work. After we reviewed the initial round of designs, we knew that hiring them was definitely the right choice,” Meghan and Chris said. Although Chris had done a lot of work in their home himself, the kitchen and laundry room renovation was such a large undertaking that he didn’t want to steal time away from his family to spend what would surely be many long weekends doing the job himself. “That would not have been a wise choice for us,” Chris laughed.
“Our designer, Michelle was very, very, easy to work with; anything we wanted to see or weren’t sure about, she went above and beyond to make this easy for us. She was easy to get hold of and always quick to respond,” the couple said. Michelle pulled ideas that mirrored the couple’s taste and style and was adept at directing the couple to limited choices that didn’t overwhelm them and kept the process moving. “I have a hard time making decisions. Michelle made the decision-making process so easy. I loved how she listened to what I liked and then presented three great options for me to choose from,” Meghan said.
The main objectives for the kitchen were better storage solutions, they wanted the space to reflect their lifestyle and taste, and they wanted it to last for years with low maintenance. One of the first steps in creating a more functional kitchen was relocating the refrigerator, creating an improved workflow for the busy family.
“We didn’t know that we could even move the refrigerator to a new location where it is now, that was something that we never would have thought of,” Chris said. “The new refrigerator location makes the kitchen feel so much bigger. We didn’t add any space, but our whole kitchen with the new design just seems like it’s so much larger than before!” Meghan said.
The perimeter mist colored cabinets helped warm and brighten the entire room, while the graphite colored cabinets on the island added contrast. Using this fresh, clean color palette satisfied the couple’s desire for a bright space that was the exact opposite of what they had before. Organization accessories were also added to the cabinets such as a spice drawer tray and roll outs to create hidden convenience.
“I absolutely love the hidden spices – it makes cooking so much more enjoyable!” Chris said. “And all the pull outs, and the double trash bin, who would think you could get so excited about organization!” the couple said in unison.
One thing they hated in their original kitchen was how dark the space felt. Added lighting on the ceiling with the new light fixtures combined with the lighter cabinetry colors throughout solved this problem. “Our new kitchen has this warm, almost cozy feeling that our old kitchen never had, it’s just a space that I love spending my time in now,” Meghan said. The light airy feeling was accentuated with the use of floating white shelves on either side of the decorative range hood. “We have so much cabinetry space, the new design is amazing we actually have more storage space than we will ever need,” Meghan said.
The island was extended to create more work surface and added space for stool seating. “The new island changes how we live. Now the kids can be in the kitchen with us, doing homework, eating breakfast, and the three of us have special dinners there when Chris is working late,” Meghan said.
The Carrara Marmi Quartz countertops were chosen because they are, not only beautiful, but are made from hard-working material that doesn’t require maintenance. The white subway tile backsplash that wraps to the ceiling behind the focal point cooktop range/hood compliments the crisp white countertops perfectly, while brushed brass hardware and light fixtures keep the design fresh and new.
The couple had a few fears at the beginning of the project, as most homeowners do. Their biggest fear was being out of their kitchen and laundry room for an extended time. The crew made it very easy for the family to work in a limited space keeping the washer and dryer hooked up the majority of the time, and also getting appliances working with minimal downtime.
“They above and beyond accommodated us to get us through the process,” Meghan said. “They did a great job making sure we were as comfortable as possible throughout the process,” Chris added.
“Our project manager DJ did a great job. He was very good at updating us on schedule changes, getting guys in as quickly as possible. Everyone that stepped in the house was nice and did great work,” said Chris. They thought Advance’s carpenter was phenomenal and were impressed when he took a conceptual idea from a photograph and worked with designer Michelle to create a one of a kind range/hood that has become the topic of conversation with friends and family who visit the new kitchen. “He was in our house literally every day for several weeks. He was easy to work with and good at what he did,” Meghan and Chris said.
The focal point of the kitchen; a hand-crafted, custom-built ventilation hood was clad with handpicked reclaimed barnwood. Advance Design’s carpenter built the framework and the cladding to create a one-of-a-kind design element that the couple loves.
“I think it was especially fun for him to create something unique from scratch, showcasing his talent in this area,” Meghan said. “I love that my kitchen is not like everyone else’s. I got to pick out the wood on my hood and watch it being built and was able to choose what pieces of wood went where on it. It’s totally unique.”
Red Oak flooring was toothed-in throughout the kitchen and the rest of the first floor anywhere changes were made. Then the whole floor was refinished to tone down the orange undertones in the existing floor stain, ultimately changing the color complexion of the entire first floor. The result is a completely new feeling to the entire home.
Renovating the laundry room was extremely important to Meghan and Chris, but they had trouble visualizing what the possibilities were for the seemingly small space. Michelle produced beautiful 3D illustrations that helped them envision the space in a whole new way.
“I must have told Michelle 100 times that I am a visual person, seeing the designs in 3D made it so easy to make decisions and see what we could really do with our space,” Meghan said.
A dividing wall and doorway were removed between the existing laundry room and hallway formerly containing a coat closet, providing space to design specialized graphite colored cabinetry matching the kitchen island to house custom storage cubbies for each family member. Adding the tall utility cabinetry in the new laundry area helped solve the storage issue, tucking away cleaning supplies, household items, and even the cat got its own cubby.
“I love how everything is now hidden in its own space. I can’t tell you how much I hated coming home and seeing everything sitting around on counters,” Chris said.
Electrical outlets were planned for the inside of utility cabinets, so devices could charge in hidden locations. Stacking the washer and dryer allowed for wider countertop space to provide a folding area and a special space for clothes to hang. “The way I do laundry has been completely transformed! I can actually fold clothes and hang them now right out of the washer and dryer,” Meghan said.
“The end result in the kitchen and the laundry/mud room was an updated light and bright space, with a smarter work flow that better meets the needs of this family,” Michelle said.
“I would totally recommend Advance Design,” Meghan said. “Sometimes I sit and just look at my kitchen and laundry room and think ‘Wow, I can’t believe I get to live here!’ It’s an understatement to say we love our new space.”

 Edgewater Design Group
Our clients were relocating from the upper peninsula to the lower peninsula and wanted to design a retirement home on their Lake Michigan property. The topography of their lot allowed for a walk out basement which is practically unheard of with how close they are to the water. Their view is fantastic, and the goal was of course to take advantage of the view from all three levels. The positioning of the windows on the main and upper levels is such that you feel as if you are on a boat, water as far as the eye can see. They were striving for a Hamptons / Coastal, casual, architectural style. The finished product is just over 6,200 square feet and includes 2 master suites, 2 guest bedrooms, 5 bathrooms, sunroom, home bar, home gym, dedicated seasonal gear / equipment storage, table tennis game room, sauna, and bonus room above the attached garage. All the exterior finishes are low maintenance, vinyl, and composite materials to withstand the blowing sands from the Lake Michigan shoreline.

 Closet Factory (Fort Lauderdale)
Our daily routine begins and ends in the closet, so we believe it should be a place of peace, organization and beauty. When it comes to the custom design of one of the most personal rooms in your home, we want to transform your closet and make space for everything. With an inspired closet design you are able to easily find what you need, take charge of your morning routine, and discover a feeling of harmony to carry you throughout your day.
Find the right local pro for your project


 Tile Doctor Ltd
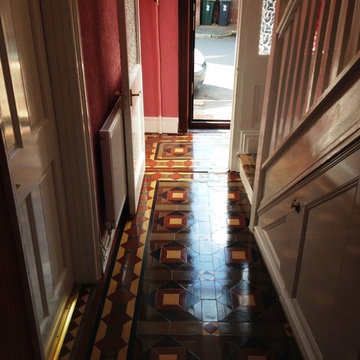
This Victorian tiled hallway at a house in the Forest of Dean had a very interesting pattern, consisting of an array of different colours, including shades of red, yellow and blue. Unfortunately, as you can see from the first photograph below, the tiles had lost all life, with the colours largely masked by months’ – or maybe even years’ – worth of ingrained dirt and muck. The floor as a whole was also suffering from a number of loose tiles that needed to be reset before it could be cleaned.
The property owner was keen to employ some professional assistance to restore the appearance of the floor and prevent it from getting in an even wrote state, and so contacted Tile Doctor who have a lot of experience working with Victorian tiled floors.
As mentioned, the loose tiles had to be repaired before the cleaning process could be started. I removed the tiles and extracted excess grout and old adhesive from the exposed concrete substrate using a vacuum, before putting the original tiles back into place and fixing them back into position carefully using fresh adhesive and matching grout.
Once happy the replaced tiles had set, I started the process of cleaning the entire area of hallway tiles using a combination of Tile Doctor Remove and Go to strip away the old sealer and Tile Doctor NanoTech HBU (formerly Ultra Clean) remover to get the tiles as clean as possible. The latter product contains nano-sized cleaning particles (hence the name) to reach difficult areas of trapped dirt, making it more effective than your run-of-the-mill tile cleaner. These two products were scrubbed into the tiles using a rotary machine fitted with a black scrubbing pad. The floor was then rinsed with water and the soiled residue was extracted with a wet vacuum.
I then paid particular attention to the grout, applying our alkaline-based multi-purpose cleaner Tile Doctor Pro-Clean to the grout lines, before scrubbing them with a narrow grout brush. This quickly had the grout looking clean again: I’d even go as far as to say that it matched it seamlessly with the fresh grout that had just been laid.
With the tile and grout as clean as it was possible to get it, I gave the whole floor a final rinse to neutralise the excess chemicals. I extracted as much water as possible with a wet vacuum and left the floor to dry overnight.
My first task upon returning to the property the next day was to check for any dampness. If you neglect to remove all excess moisture from the surface of the tiles before sealing it is more than likely going to cloud the sealer, rendering it less effective I’m protecting the stone against ingrained dirt and stains.
Once satisfied that the floor was completely dry, I proceeded to seal the tiles using multiple costs of Tile Doctor Seal and Go. Seal and Go is what we would classify as a topical sealer, meaning it rests on the surface of the tiles to act as a durable layer of protection against all kinds of muck. While providing surface protection, Seal and Go also adds a nice subtle sheen to the tiles, as per the customer’s request.
The customer was quite amazed at how quickly the appearance of the tiles had been restored. It was fantastic to see the colours we both knew were hidden in the tiles come to life once again. Another satisfied customer for sure!
Paul Wales
Monmouthshire Tile Doctor
 Tile Doctor Ltd
Roundhay is an affluent area of North Leeds which is well-known for the fantastic Roundhay Park. The park is large enough to contain two lakes, extensive woodland, formal gardens and even golf courses! It’s the premier attraction for anyone fortunate enough to live in the area, or anyone visiting from nearby.
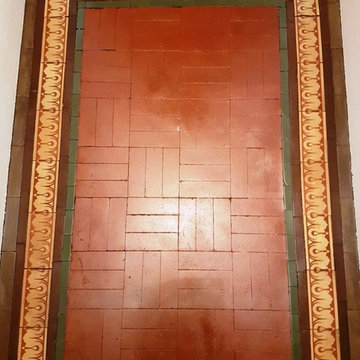
I recently visited a customer who lives in Roundhay and was looking for help in restoring the small Victorian tiled entranceway at the front of her house. The tiles were in a shocking state, but it’s not hard to imagine why – the entrance to a house receives a lot of foot traffic and is not typically taken care of regularly. These tiles were also marked with paint splashes left over from decoration work, making them look even worse.
The appearance of the entranceway did not set the right standard for the rest of the house, so the property owner was keen to have it restored professionally.
The appearance of the entranceway did not set the right standard for the rest of the house, so the property owner was keen to have it restored professionally.
The appearance of the entranceway did not set the right standard for the rest of the house, so the property owner was keen to have it restored professionally.
The appearance of the entranceway did not set the right standard for the rest of the house, so the property owner was keen to have it restored professionally.
I informed the customer that I could have the tiles rejuvenated within a day’s work. To begin, I used a scrapper and wire wool brush to manually remove some of the most stubborn paint marks.
Following this, I applied a strong solution of Tile Doctor Remove and Go, before leaving the product to dwell for about an hour. Remove and Go is multi-purpose stripping agent that can remove any adhesive and paint deposits, as well as many types of old coatings and sealers.
To work the product deep into the tiles, I agitated with an abrasive cleaning pad and then rinsed the area with fresh water. This had the desired affect and all the unsightly paint marks were removed.
Next, I gave the floor another thorough clean to remove any general muck and ingrained dirt. This was done using our high-alkaline cleaner, which we typically use on Victorian tiles, known as Tile Doctor Pro-Clean. In fact, Pro-Clean is a very reliable cleaner for all types of tile and grout including natural stone, Limestone, Slate and Travertine, amongst others.
Since I told the customer I would able to finish the job within a day, I dried the floor quickly using a heat gun so it could be sealed there and then. To seal the floor, I applied four coats of Tile Doctor Seal and Go, which is a topical sealer formulated to provide maximum protection along with a high-quality, low sheen finish.
As you can see from the photos above, the entranceway was absolutely transformed. These tiles are now a true asset to the rest of the property, rather than looking out of place! I’m please to say my customer was amazed by how quickly such a big difference could be made and left the following glowing feedback.
I can’t believe the before and after pictures. The restoration of the tiles is top quality, they are so much brighter and richer in colour – especially without the garage paint hiding the detail! Nigel did an amazing job, even better than I could have hoped for, and is a lovely guy as well. Would definitely recommend.
Nigel Stoker
North West Yorkshire Tile Doctor
 Tile Doctor Ltd
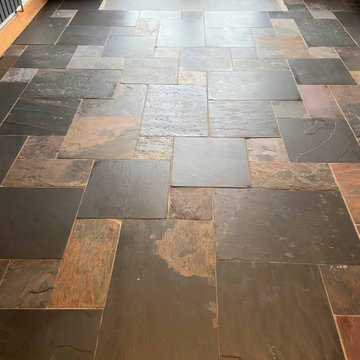
The pictures below are of Chinese Slate floor in the Kitchen of a property in the small village of Clifton just south of Penrith. We often get asked what the difference is between Rough and Semi Riven Slate, and this floor was a mixture of both.
If you look closely at the pictures and check out the darker parts of the floor you will see these smoother Semi Riven Slate, whereas the light copper-coloured parts of the floor were of the rougher textured variety. It’s not that unusual for stone to be mixed in this fashion as it can be supplied from different quarries in order to achieve a particular look.
The blend of different slates makes little difference when it comes to cleaning as the process is essentially the same. I would advise though if you intend to clean the floor using a mop then you should opt for Semi Riven Slate as Rough Slate can shred your mops and make it harder to maintain. We tend to use industrial floor buffing machines which work well on both surfaces so are less effected.
There was a bit of wax on this floor so to remove this Tile Doctor Wax Away was applied. The product was left to stand for fifteen minutes before being scrubbed into the stone, rinsed and then the soil extracted with a wet vacuum.
We then finished the cleaning with an Acid Rinse which involves scrubbing the Slate with Tile Doctor Grout Clean-up. This not only works well at cleaning up the stone and grout but also neutralises the alkaline pH left over from using Wax Away. I am very wary of the pH level of the floor as it could have an impact on the new sealer, giving the floor an acid rinse before sealing also ensures a better bond with the sealer.
Naturally, you can’t leave a strong product like Grout Clean-up on the Stone for long as it could etch the surface so once done the floor was thoroughly rinsed with water and extracted again with a wet vacuum. A mop and bucket and lots of sponges won’t do the job on a large area like this.
Once we finished the clean, we left it to dry off overnight and came back the next day to apply the sealer. We were originally going to apply a satin finish sealer, but the client had a big dog with sharp claws which could of scratched and marked the sealer so decided against it. I advised the client to use an Impregnating sealer called Tile Doctor Colour Grow, which lifts the natural colours in the stone, but is not a topical shiny sealer as the seal soaks into the Slate and leaves a a nice matt finish instead. Only two coats of sealer were needed, and the floor looked like new again.
My client was very happy with the difference in the appearance of the stone and how much cleaner the grout was, so much so they the following feedback for us, which is always appreciated.
“Totally impressed with the team they couldn’t have been more professional and even left me with some cleaner. My horrible 12 year old slate tiles look fabulous”
As usual we left a free bottle of Tile Doctor Neutral Tile Cleaner for aftercare, it’s very important not to undo all that hard work by using a product which will damage the seal, using a pH neutral cleaner will keep the seal looking sharp and fresh for years to come.
Heidi Taylor
North Cumbria Tile Doctor


 Riddle Construction & Design
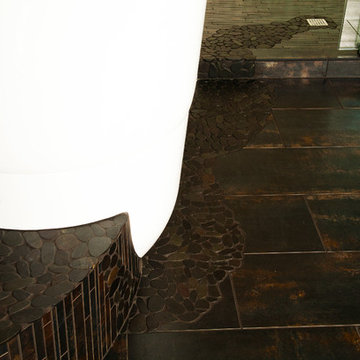
close up of pebble tile design around soaking tub.
Inspiration for a large asian master white tile and porcelain tile porcelain tile home design remodel in Seattle with a vessel sink, flat-panel cabinets, medium tone wood cabinets, quartz countertops, a two-piece toilet and beige walls
Inspiration for a large asian master white tile and porcelain tile porcelain tile home design remodel in Seattle with a vessel sink, flat-panel cabinets, medium tone wood cabinets, quartz countertops, a two-piece toilet and beige walls


 Advance Design Studio, Ltd.
After six years of living in their Huntley IL home, Chris and Meghan were tired of their dark, dingy, outdated kitchen and it was finally time for a long-anticipated change. “The kitchen is the place where we live, it’s where we do everything,” Meghan said. “It was important that it be a space where we wanted to be.” Meghan loves cooking and enjoys including their girls in healthy meal prepping, this led them to want a brighter, more enjoyable kitchen with increased functionality and improved storage.
For Chris especially, the laundry room was an entirely dysfunctional eyesore. “We had a washer and a dryer, but it was all kind-of cobbled together!” Chris said. “There were always laundry piles everywhere, we weren’t really sure what we wanted to do in there, but it was time for us to make a change.” The mess of the space was stressful every time they walked in the door from the garage each day. Kids’ backpacks and shoes piled up haphazardly in the makeshift boot-bench closet left the family feeling disorganized and stressed. They needed space for folding clothes and locker cubbies to help keep the family organized.
Having known Christine and Todd in the Huntley community for years, Chris and Meghan were familiar with their work. “We already trusted them personally and having seen their projects for years we knew they did top notch work. After we reviewed the initial round of designs, we knew that hiring them was definitely the right choice,” Meghan and Chris said. Although Chris had done a lot of work in their home himself, the kitchen and laundry room renovation was such a large undertaking that he didn’t want to steal time away from his family to spend what would surely be many long weekends doing the job himself. “That would not have been a wise choice for us,” Chris laughed.
“Our designer, Michelle was very, very, easy to work with; anything we wanted to see or weren’t sure about, she went above and beyond to make this easy for us. She was easy to get hold of and always quick to respond,” the couple said. Michelle pulled ideas that mirrored the couple’s taste and style and was adept at directing the couple to limited choices that didn’t overwhelm them and kept the process moving. “I have a hard time making decisions. Michelle made the decision-making process so easy. I loved how she listened to what I liked and then presented three great options for me to choose from,” Meghan said.
The main objectives for the kitchen were better storage solutions, they wanted the space to reflect their lifestyle and taste, and they wanted it to last for years with low maintenance. One of the first steps in creating a more functional kitchen was relocating the refrigerator, creating an improved workflow for the busy family.
“We didn’t know that we could even move the refrigerator to a new location where it is now, that was something that we never would have thought of,” Chris said. “The new refrigerator location makes the kitchen feel so much bigger. We didn’t add any space, but our whole kitchen with the new design just seems like it’s so much larger than before!” Meghan said.
The perimeter mist colored cabinets helped warm and brighten the entire room, while the graphite colored cabinets on the island added contrast. Using this fresh, clean color palette satisfied the couple’s desire for a bright space that was the exact opposite of what they had before. Organization accessories were also added to the cabinets such as a spice drawer tray and roll outs to create hidden convenience.
“I absolutely love the hidden spices – it makes cooking so much more enjoyable!” Chris said. “And all the pull outs, and the double trash bin, who would think you could get so excited about organization!” the couple said in unison.
One thing they hated in their original kitchen was how dark the space felt. Added lighting on the ceiling with the new light fixtures combined with the lighter cabinetry colors throughout solved this problem. “Our new kitchen has this warm, almost cozy feeling that our old kitchen never had, it’s just a space that I love spending my time in now,” Meghan said. The light airy feeling was accentuated with the use of floating white shelves on either side of the decorative range hood. “We have so much cabinetry space, the new design is amazing we actually have more storage space than we will ever need,” Meghan said.
The island was extended to create more work surface and added space for stool seating. “The new island changes how we live. Now the kids can be in the kitchen with us, doing homework, eating breakfast, and the three of us have special dinners there when Chris is working late,” Meghan said.
The Carrara Marmi Quartz countertops were chosen because they are, not only beautiful, but are made from hard-working material that doesn’t require maintenance. The white subway tile backsplash that wraps to the ceiling behind the focal point cooktop range/hood compliments the crisp white countertops perfectly, while brushed brass hardware and light fixtures keep the design fresh and new.
The couple had a few fears at the beginning of the project, as most homeowners do. Their biggest fear was being out of their kitchen and laundry room for an extended time. The crew made it very easy for the family to work in a limited space keeping the washer and dryer hooked up the majority of the time, and also getting appliances working with minimal downtime.
“They above and beyond accommodated us to get us through the process,” Meghan said. “They did a great job making sure we were as comfortable as possible throughout the process,” Chris added.
“Our project manager DJ did a great job. He was very good at updating us on schedule changes, getting guys in as quickly as possible. Everyone that stepped in the house was nice and did great work,” said Chris. They thought Advance’s carpenter was phenomenal and were impressed when he took a conceptual idea from a photograph and worked with designer Michelle to create a one of a kind range/hood that has become the topic of conversation with friends and family who visit the new kitchen. “He was in our house literally every day for several weeks. He was easy to work with and good at what he did,” Meghan and Chris said.
The focal point of the kitchen; a hand-crafted, custom-built ventilation hood was clad with handpicked reclaimed barnwood. Advance Design’s carpenter built the framework and the cladding to create a one-of-a-kind design element that the couple loves.
“I think it was especially fun for him to create something unique from scratch, showcasing his talent in this area,” Meghan said. “I love that my kitchen is not like everyone else’s. I got to pick out the wood on my hood and watch it being built and was able to choose what pieces of wood went where on it. It’s totally unique.”
Red Oak flooring was toothed-in throughout the kitchen and the rest of the first floor anywhere changes were made. Then the whole floor was refinished to tone down the orange undertones in the existing floor stain, ultimately changing the color complexion of the entire first floor. The result is a completely new feeling to the entire home.
Renovating the laundry room was extremely important to Meghan and Chris, but they had trouble visualizing what the possibilities were for the seemingly small space. Michelle produced beautiful 3D illustrations that helped them envision the space in a whole new way.
“I must have told Michelle 100 times that I am a visual person, seeing the designs in 3D made it so easy to make decisions and see what we could really do with our space,” Meghan said.
A dividing wall and doorway were removed between the existing laundry room and hallway formerly containing a coat closet, providing space to design specialized graphite colored cabinetry matching the kitchen island to house custom storage cubbies for each family member. Adding the tall utility cabinetry in the new laundry area helped solve the storage issue, tucking away cleaning supplies, household items, and even the cat got its own cubby.
“I love how everything is now hidden in its own space. I can’t tell you how much I hated coming home and seeing everything sitting around on counters,” Chris said.
Electrical outlets were planned for the inside of utility cabinets, so devices could charge in hidden locations. Stacking the washer and dryer allowed for wider countertop space to provide a folding area and a special space for clothes to hang. “The way I do laundry has been completely transformed! I can actually fold clothes and hang them now right out of the washer and dryer,” Meghan said.
“The end result in the kitchen and the laundry/mud room was an updated light and bright space, with a smarter work flow that better meets the needs of this family,” Michelle said.
“I would totally recommend Advance Design,” Meghan said. “Sometimes I sit and just look at my kitchen and laundry room and think ‘Wow, I can’t believe I get to live here!’ It’s an understatement to say we love our new space.”

 Trimlite
Inspiration for a mid-sized contemporary porcelain tile and multicolored floor hallway remodel in Vancouver with beige walls

 U.S. Green Building Council (USGBC)
LEED certification level: Platinum.
Builder: GCCM Construction Services LLC dba UberGreen Spaces & Homes.
Mark Twain said it best, "If the world were to end today I'd move to Kentucky because they are 20 years behind everyone else."
There is some truth to that because Kentuckians believe that 'if it aint broke dont fix it'.
We designed and built Kentucky's first LEED Platinum Net Zero Energy Net Zero Water home in the private sector. We named the home 'My Green Kentucky Home' playing off the state song 'My Old Kentucky Home'. Our take on a home should have people and the planet in mind. We found LEED to be the best most credible third-party green certification program to address these important challenges today.
The envelope of the home was designed to minimize energy losses and maximize inside comfort by using Insulated Concrete Form walls from the footers to the roof, spray foam and blown in cellulose in the attic, rigid foam beneath the Lower Level basement slab and triple-pane fully insulated casement windows. The home was oriented with the back facing south to maximize daylighting, passive heating in the winter and solar production. Our HVAC is geothermal with a storage tank to preheat domestic water. A fresh air system was installed in the return side of the HVAC system to filter and then mix with supply air to the home.
All paints were zero VOC. The reclaimed KY horse farm fencing turned into beautiful hardwood floors was finished with a low VOC sealer. Carpets were low VOC and the 100% recycled padding was zero VOC. The custom cabinets for the kitchen and baths were made locally and built with FSC certified plywood with no added formaldehyde.
The home collects 100% of the rainwater that hits the roof into a 3,300 gallon rainwater collection tank. The primary use of the collected water is to irrigate the lawns, landscaped beds and supply the hose bibs. When the tank is low it automatically shuts the tank valve and opens the city water valve to operate with city water pressure until the tank fills past a certain level, saving electricity and wear and tear on the pump. The cistern is designed to service all the homes domestic water needs when KY State Plumbing code will allow it in the future.
All appliances are Energy Star and locally made by GE. The counter tops on all cabinets are recycled materials and durable without requiring sealers or maintenance. We went a step further for indoor air quality and installed AirRenew drywall by Certainteed which works like trees do in the environment by pulling in VOC's into the drywall and making it inert. The Florida Tile was made in Kentucky with recycled content. We monitor all utility usage per electrical circuit and monitor the amount of energy produced by the solar panels as well helping the owners make more informed decisions.
The home was such a hit that it was the catalyst that sparked development in a dormant neighborhood of vacant lots.
We had the home open for three months to the public where hundreds of folks toured it as it was laid out like an art museum. We had actual walls open all the way to the outside layer of ICF insulation where they saw the concrete and steel inside the walls. We also had the lower level basement slab cut open to show how we insulate beneath the concrete and how we drain and mitigate radon. It was a super inspirational project that made people think about people and the planet much differently than before.
We hope to continue making great projects like these to help inspire, educate and create awareness around some of the most important topics and challenges we face today.
Thank you to everyone at the USGBC for helping us make this happen and the great work you do every day!
 U.S. Green Building Council (USGBC)
LEED certification level: Platinum.
Builder: GCCM Construction Services LLC dba UberGreen Spaces & Homes.
Mark Twain said it best, "If the world were to end today I'd move to Kentucky because they are 20 years behind everyone else."
There is some truth to that because Kentuckians believe that 'if it aint broke dont fix it'.
We designed and built Kentucky's first LEED Platinum Net Zero Energy Net Zero Water home in the private sector. We named the home 'My Green Kentucky Home' playing off the state song 'My Old Kentucky Home'. Our take on a home should have people and the planet in mind. We found LEED to be the best most credible third-party green certification program to address these important challenges today.
The envelope of the home was designed to minimize energy losses and maximize inside comfort by using Insulated Concrete Form walls from the footers to the roof, spray foam and blown in cellulose in the attic, rigid foam beneath the Lower Level basement slab and triple-pane fully insulated casement windows. The home was oriented with the back facing south to maximize daylighting, passive heating in the winter and solar production. Our HVAC is geothermal with a storage tank to preheat domestic water. A fresh air system was installed in the return side of the HVAC system to filter and then mix with supply air to the home.
All paints were zero VOC. The reclaimed KY horse farm fencing turned into beautiful hardwood floors was finished with a low VOC sealer. Carpets were low VOC and the 100% recycled padding was zero VOC. The custom cabinets for the kitchen and baths were made locally and built with FSC certified plywood with no added formaldehyde.
The home collects 100% of the rainwater that hits the roof into a 3,300 gallon rainwater collection tank. The primary use of the collected water is to irrigate the lawns, landscaped beds and supply the hose bibs. When the tank is low it automatically shuts the tank valve and opens the city water valve to operate with city water pressure until the tank fills past a certain level, saving electricity and wear and tear on the pump. The cistern is designed to service all the homes domestic water needs when KY State Plumbing code will allow it in the future.
All appliances are Energy Star and locally made by GE. The counter tops on all cabinets are recycled materials and durable without requiring sealers or maintenance. We went a step further for indoor air quality and installed AirRenew drywall by Certainteed which works like trees do in the environment by pulling in VOC's into the drywall and making it inert. The Florida Tile was made in Kentucky with recycled content. We monitor all utility usage per electrical circuit and monitor the amount of energy produced by the solar panels as well helping the owners make more informed decisions.
The home was such a hit that it was the catalyst that sparked development in a dormant neighborhood of vacant lots.
We had the home open for three months to the public where hundreds of folks toured it as it was laid out like an art museum. We had actual walls open all the way to the outside layer of ICF insulation where they saw the concrete and steel inside the walls. We also had the lower level basement slab cut open to show how we insulate beneath the concrete and how we drain and mitigate radon. It was a super inspirational project that made people think about people and the planet much differently than before.
We hope to continue making great projects like these to help inspire, educate and create awareness around some of the most important topics and challenges we face today.
Thank you to everyone at the USGBC for helping us make this happen and the great work you do every day!
 Tile Doctor Ltd
Having an effective sealer in place is essential for ensuring the long term condition of tiled floors in fact a lack of sealer can make cleaning the tiles exceptionally difficult as the sealer prevents dirt becoming ingrained in the tile.
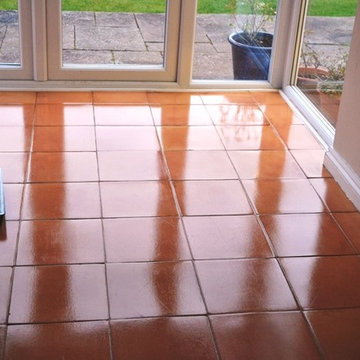
This property owner, living in the former spa town of Matlock in Derbyshire, was experiencing problems with their Terracotta tiled kitchen floor since they had applied some kind of wax to act as a sealer, and this had worn off within a few weeks. After this happened the tiles were not sealed again, making cleaning a big problem. Terracotta is a highly porous stone and thus easily soaks in spillages and stains, and allows dirt to become very easily trapped.
In this situation, the property owner resolved to contact me about some professional maintenance. I suggested that the tiles would need a deep clean followed by the application of a fresh, high quality sealer. The work was agreed on and I made my way down to the property the following week.
When I arrived at the property and saw the tiles first hand it became clear that a professional clean had been in need for a long time: greasy looking stains were particularly prevalent and covered large areas of the kitchen floor.
To remove I mixed a strong solution of Tile Doctor Pro Clean, which is a multi-purpose, high-alkaline cleaner, stripper and degreaser, and, working in small areas, applied it to the floor. Working in small sections was important because the stone is very porous and quickly soaked in any product laid down. I scrubbed the cleaner into the stone using a rotary machine fitted with a black scrubbing pad, with the dirt and stains coming away nicely. Pro Clean is highly versatile and can be used for similar cleaning purposes on most types of natural stone floor.
After cleaning each section, I quickly removed the excess dirty water and chemicals with my wet vax machine. Once the whole floor had been cleaned I rinsed it several times with fresh water just to make sure all cleaning chemicals were gone. I then left the floor to dry completely for 36 hours.
When I returned to the property, I conducted several damp tests to check for any areas of the floor that needed further drying. As is almost always the case, there were a few areas that remained slightly damp, and I set about speeding the drying process along using my heat gun. In fact, it actually took me more than three hours to get the floor completely dry, but this was worth the effort as even the slightest excess moisture can damage the performance of the sealer.
Once the floor was finally dried I began sealing the floor with one coat of Tile a Doctor Colour Grow sealer. Colour Grow is an impregnating sealer that penetrates deep into the pores of the stone, thus acting as a shield against ingrained dirt, and also raises the colour of the tiles to provide an aesthetically appealing appearance. sealer. After sealing with Colour Grow, I left the floor to dry for couple of hours and then applied six coats of Tile Doctor Seal & Go, which is a topical sealer that builds up durable protection on the surface of the tiles.
The combination of through cleaning and the application of not one, but two high quality sealers really did wonders for the appearance of these Terracotta tiles. Looking at the final results you wouldn’t have believed they had been without a proper clean and seal for so long! Needless to say the customer was exceptionally pleased and will surely be able to keep her floor looking great for a long time to come.
Tony Olmet
Derbyshire Tile Doctor

 safe ZOnea
Daylight is a very important factor that influences plant growth and reproduction. Gardeners need to make sure that they measure the length of daylight hours that a plant gets within a 24-hour period. This way, growth can be monitored and regulated.
For sun-loving plants, changes in the length of each day serve as the guide that helps plants transition from vegetative growth to reproductive stages. Changes in seasons and daylight hours have an impact on the adjustment of growth hormones that are responsible for flowering.
Therefore, it’s very important for gardeners to make sure that they conduct thorough research on long-season plants that are adapted to extended sunlight exposure. During this research, it’s not uncommon for gardeners to come across topics related to sativa seeds for sale because these plants are studied for their adaptation to bright, extended growing seasons.
For gardeners that want to experiment with these kinds of plants, sativa seeds for sale can be a good starting point. But in all cases of plant growth for sun-loving plants, the principle is always the same: it’s that daylight acts as a calendar that plants use so they can determine when it’s time for them to reproduce.
Long-Day, Short-Day, and Day-Neutral Responses
Different plants have different responses to light cycles. This is why plants are grouped into long-day, short-day, and day-neutral categories.
Long-day plants are those plants that thrive when daylight goes beyond the critical threshold. This is mostly common in late spring or early summer. A lot of sun-loving ornamental plants and vegetables fall within this category. They always take advantage of the longer days that support energy-intensive flower and seed production.
On the other hand, short-day plants are those that usually flower and thrive when nights grow longer. When temperatures cool or the seasonal rainfall patterns change, these plants tend to thrive. Sure, these plants still require strong sunlight. However, it’s their uninterrupted time in the dark that triggers their reproductive phase.
For day-neutral plants, it’s age and environmental stress that impacts their reproductive phase. However, they still do benefit from adequate sunlight.
It’s very important for gardeners to understand these categories so that they can plan what to grow in their garden with each turn of the season. By doing this, it’s easier to guarantee better results in one’s garden.
Why Sunlight Duration Matters More Than Intensity Alone
It’s not only the sun’s intensity that should be taken into account when growing a garden. It’s also very important to take note of sunlight duration, which is actually more important for plants.
Sure, light intensity does influence photosynthesis. However, it’s the duration of sunlight exposure that plays an important regulatory role. When plants are exposed to sunlight longer, they are able to produce more carbohydrates through photosynthesis. This helps them build the energy reserves they need to grow buds and flowers.
However, if a plant does not get enough sunlight time, there is a huge chance that the plant will not bloom at all. If you have observed plants that grow very quickly but do not flower, the reason is that it doesn’t get enough sunlight time. Therefore, it’s very important to monitor sunlight duration in order to make sure that plants will actually grow buds and flowers.
Practical Implications for Garden Planning
When gardeners understand the impact of daylight hours on plants, they are able to plan their gardens more effectively. After all, seasons do change and the conditions brought by each season will definitely have a huge impact on plant growth. Once gardeners have the right knowledge in terms of which categories plants belong to, they can easily decide which plants to grow at any given time.
It’s not enough to just rely on sunlight intensity and then expect plants to grow buds and flowers. It’s also very important to take into account the duration of sunlight time for each plant. By having this understanding, gardeners will become more effective when it comes to making sure that flowering occurs.

 ROAM Architecture
Detail of LED wall sconce with white glass tile background
Inspiration for a small contemporary kids' white tile and glass tile porcelain tile and gray floor alcove bathtub remodel in New York with flat-panel cabinets, dark wood cabinets, a two-piece toilet, green walls and an integrated sink
Inspiration for a small contemporary kids' white tile and glass tile porcelain tile and gray floor alcove bathtub remodel in New York with flat-panel cabinets, dark wood cabinets, a two-piece toilet, green walls and an integrated sink

 FINNE Architects
The master bath features stunning views of Puget Sound.
The glass walls between the bath and hall have a hand-drawn etched glass pattern.
Photo: Benjamin Benschneider

 Insideout Kitchens
Yeti Cooler Pull out Cabinet instead of ice maker
Home design - transitional home design idea in Charlotte
Home design - transitional home design idea in Charlotte

 Charlen's Abstracts
This 30" x 24" abstract acrylic painting has been done in shades of cobalt blue, sky blue, citrine, chartreuse, white, soft sea green, and royal blue. Finished in gloss varnish to protect the piece from dust and UV light for years to come. Can be hung vertically or horizontally. Gorgeous vivid rich colors in a great contemporary style.
29