Software
Houzz Logo Print
hamollie

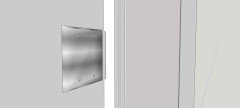
Rotate an electric switch box?

7 years ago

Don't blame me, the house came this way :)

So, can I just remove the switch plate, rotate the box so it is vertical, patch the drywall and fix the trim? Or is this potentially more complicated? Thanks!

Comments (18)

  • 7 years ago
    Thanks for the response. Yep, its drywall. Also, that is just a cable wire on the left.
  • 7 years ago

    Another approach would be to replace two of the switches with a duplex switch & replace the 3 gang box with a 2 gang box. That should give you enough room for the casing to be replaced.

  • 7 years ago

    Most multi-gang boxes like that are fed (cable entry) from the top and bottom. If you try to turn it 90 degrees, you probably won't have enough free cable to get the cables into the box properly.

    They're also not usually meant to be mounted that way, so you'd probably need a bit of creative carpentry.

    Cilantro's solution sounds good.

    You might also look into this, this, or this.

    The old-school way to do 3 switches in the space of one is with Despard devices. They're still made, though they can be hard to find and a bit pricey. Look here and here.

    Any time you put 3 switches in a single-gang box, you need to be sure the box is deep enough to provide enough cubic inch volume for all the wires entering the box.

    All that aside, I don't like one bit what was done with that door or window trim in your photo. I'm a little concerned about what you may find on that side once you bust into the drywall.

    As always, links are for illustration, and aren't meant as an endorsement.

  • 7 years ago

    Great info there, David. I didn't even realize those triple switches were available. Good stuff to know for the future.


    Might be some wrinkles if any of the switches are 3 ways. I hope not. But, if there are 3 ways, he might just have to revert to his original plan and find a creative way to fasten a rotated box to the studs.

  • 7 years ago

    Before you get too far along, I would take off the switch cover and see how much wiring is in the box. They may have used the box as a power junction point, which could mean extra wires pulled into the box, which then run to other locations . There is a box fill limit by code, and also a realistic limit on what you can fit into one box. Switching from a triple to a double box might not be possible if its already crammed full.

    Bruce

  • 7 years ago
    last modified: 7 years ago

    Might be just a cable going up on the left, but, that doesnt look very good either. I would definitely be looking for another place to run that cable, even if I had to remove and replace drywall, to get it inside the wall. I dont know why the switches were located there, unless there is another stud in the wall, because, they could have been moved to the left and would have fit almost exactly in between the two casings. Its not hard to remove casings and open that wall, and then put a new piece of sheetrock in that small section.

  • 7 years ago

    Thanks for the suggestions. Love the idea to use a 2 gang box and duplex switch. We actually only use 2 of the 3 switches (the 3rd is for a currently unused fan fixture box), so for now we could even do a 2 gang duplex, cap the 3rd line, and use a duplex/blank switch cover.

    I did remove the switch cover as well. Doesn't look like too much wiring is crammed in there. The box is up against the stud to the left.

  • 4 years ago

    As a professional in the housing trades, having ran into this many times, there more than one way to fix this. One, remove the three gang box, install a two gang, patch the drywall after removing the window casing, install a new window casing. Use one stacked switch and one single in the box. Or remove and install a new casing on the window letting it go over the portion of the box. Cut the plastic electrical trim to fit up against the casing and install it. I have used both methods. Only an idiot would notch out the casing instead of cutting the switch cover to fit.

  • PRO
    4 years ago
    last modified: 4 years ago

    If you want to avoid all that work turning the box, Replace the casing leg and notch the back of it enough to go over the plate, you will still be able to remove and reinstall the plate if needed by slightly prying the casing away from the wall.


  • 4 years ago

    Why not move the box 1" to the left. After you detach the existing box from the stud on the right, insert a 1" spacer between the stud and the left side of the box. Put in a 1 1/2" screw from the left side of the box, thru the spacer, and into the stud.

    No sheet rock patching, replace trim piece (or repair.)

  • 4 years ago
    last modified: 4 years ago

    Oops? Just looked harder at the photo taken with the cover off. Is that a stud on the left side?

    If so, forget my suggestion above.

    PS Sean the OP.... if that is the supporting stud it would have been helpful if you had pointed that out to us.

    PPS Just realized this thread is three years old ~!@#$^

  • 4 years ago

    jhwellman1-

    Cutting the cover plate down and allowing a piece of wood trim -- a flammable material -- to cover part of the box would not pass code in most areas.

  • 4 years ago

    "a flammable material"

    Like the plastic wall plate?

  • 4 years ago

    No...flammable wood trim, as I clearly stated. And then there is the NEC requirement that “receptacle faceplates (cover plates) shall be installed so as to completely cover the opening and seat against the mounting surface” of the box.

  • 4 years ago
    last modified: 4 years ago

    The cover plate was going to be left covering the opening and seating against the mounting surface and slipped under a groove in the side of the molding. I doubt the small amount of wood covering is any more flammable than a plastic wall plate.

    You need to study the photos G.N. Builders posted - and read the other contributions.

    Sheesh. lol

  • 4 years ago

    Stax-

    1. And you need to read the post by jhwellman1 that I was responding to who said: "Cut the plastic electrical trim to fit up against the casing..."

    2. An electrical inspector is unlikely to share your opinion that wood and plastic are equally non-flammable. This is precisely why people are required to install box extenders when adding wood paneling to a wall.

    3. And as for having a groove in the trim and leaving the plate intact, that would work, except in this particular situation the plate has to clear the three switches that are sticking out, so the "groove" is going to be a major excavation.


    Sheesh. lol

  • PRO
    4 years ago
    last modified: 4 years ago

    Like I said, no need to over-think this... a nice and simple solution, notch the back of the casing and leave the plate and box as is... Even if you could turn the box, you might have issues getting wires into the box, not to mention it too much hassle to turn that box, it's not worthed.

    Good luck