Software
Houzz Logo Print
backyardphenomena

Wiring Irrigation Pump, Relay and Timer

6 years ago
last modified: 6 years ago
I have a Flotec 1 1/2 HP Irrigation pump, the appropriate relay, and six zone rainbird irrigation timer. Everything is in my detached garage that did not have power when we purchased the home in 2013. We had power run from the main panel to a subpanel in the garage to run the washer and dryer. Fast forward--- we have the washer and dryer in the house and the power in the garage only supplies for lighting and outlets. The pump has been installed and has been run manually via pig tail and switch on 115v.

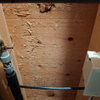
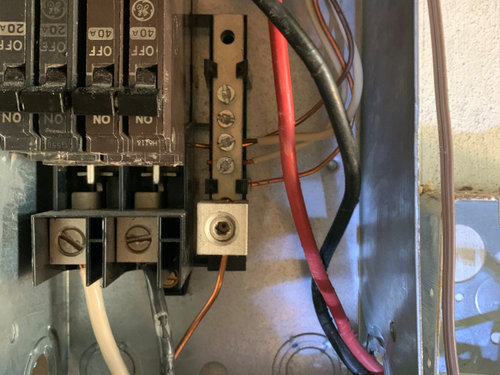
I am wiring up everything according to specs but am running into a problem in the subpanel. Please see picture below. The thick 6 gauge red wire is connected to one side of the 20 amp breaker, the black 6 gauge wire is connected to one side of the 40 amp breaker. Both of these run to a 240 outlet for the old dryer. The green wire (ground) is not connected in the picture, bust was connect to the one neutral/ ground bus. Here's my questions 1) shouldn't the red and black 6 gauge wires be connected to just the 40 amp breaker? 2) I want to keep the 240 outlet and add another 20 amp breaker for the irrigation pump, does it matter if its a larger normal size breaker vs these slimline breakers?


Comments (7)

  • 6 years ago

    I'm having a hard time understanding some of what you are saying. If I understand which pump you have, it's going to be drawing over 19 amps continuous when wired for 115v. You shouldn't be putting that on a 20A circuit, The breaker and the wiring would need to be larger. The other option would be to run the pump on 230V (it has that option I think), in which case it would work fine on a 15A (or larger) circuit.


    Yes, the dryer should never have been split across two breakers. It would be surprising it even worked as an electric clothes dryer would trip a 20A breaker in short order. The other scary thing is what appears to be 12G wire connected to the other side of the 40A breaker. This is a MASSIVE no-no and could cause a fire.


    The green wire should definitely be connected to the ground bus.


    Note that a detached garage with multiple circuits like this ABSOLUTELY requires its own grounding system (rods). Depending on when this was constructed and what else is connected between the house and the garage, it is required that this panel be fed with separate grounds and neutrals and maintains those separate (yours are not). The current code requires it to be separate (even if there are no other wires or pipes between the structures).


    If the panel is spec'd for the GE thin breakers, you can use them. There's no performance difference really. They make specific handle ties to allow you to feed 240V loads with them. Note that both thin breakers fit on the same 120V leg, so you need to use two thins that are in different "thick" positions and then use the handle tie to join them together (they make ones that do two adjacent breakers or noes that reach around the two inner breakers and get the outer breaker, if you catch what I am satin).


  • 6 years ago
    last modified: 6 years ago

    Yikes! That is a seriously botched installation!

    With those handy-dandy thin 2-pole GE breakers, you need to snap them across both buses, on the T lugs, assuming your panel is actually approved for 2-pole thin breakers. To make it work in that panel, you'd put a thin 2-pole 40 amp breaker in the middle, with a thin 20 amp single pole breaker on each side of it. Then the AWG 6 wires would be landed on the terminals of the 40 amp 2-pole breaker, and the AWG 12 wires to the 120 volt circuits would be landed on the 20 amp single pole breaker terminals.


    In the photo above (sorry about the poor lighting), the 2nd and third sections are actually one 15-amp 2-pole breaker. You can see the shiny handle tie.

    But why is the feed on your panel just two conductors plus ground? It should be a 3-wire feed with ground. The panel's neutral and grounding buses should be separated, with the ground bus connected to a proper made ground electrode at the garage. Your green wire would go to that grounding bus.

    That's completely apart from the question of the 80% rule on your irrigation pump, which Ron pointed out. I can't address that because I don't know the pump's rating. I assume that Ron does from his post.

    Please cut the power to that panel right away, and get it reconfigured properly and safely.

  • 6 years ago

    The pump has been run off 115 and on a switch, so I've been doing it manually. The garage is from the 1920's and when they updated the electrical in the main house power was never run to the garage. We just put an addition on the main house and had ground rods installed. While doing more research and talking to an electrician at Home depot, it seems that there is definitely no Neutral wire run to the garage, just the two hot and the ground.


    So if I understand correctly, I have to rerun the wires using two hots a neutral and a ground to the garage. I also have to drive two ground rods using 6 gauge copper wire placed 8 ft apart. Do the ground wires need to be tied to the main breaker or does just wiring them to the subpanel suffice? What gauge wire should I use to run the power from the main panel to the garage if I need the 240 for the pump (requires 230), the power for the lights and outlets, and maybe one day use the existing 220 outlet for a welder?

  • 6 years ago

    In the detatched garage, you only connect the grounds to the panel. The later codes require the grounds and neutrals in that panel to be separate and separate ground and neutral run from that panel to the feeding panel.

  • 6 years ago

    Could I just run one white wire through the conduit for the missing common neutral wire?

  • 6 years ago

    While it would probably be legal, pulling a new wire through conduit that already has wires in it is not exactly easy.


  • 6 years ago

    If its a 1 1/4" pvc conduit and I'm only fishing a single 6 or 8 gauge wire?

Sponsored
AIS Renovations
Average rating: 4.5 out of 5 stars15 Reviews
Custom Craftsmanship & Construction Solutions in Franklin County, Ohio