
Search results for "Address issues" in Home Design Ideas
 Ashton Renovations
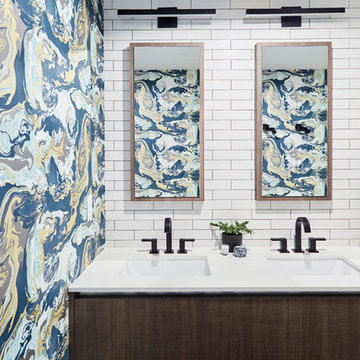
The original ensuite bathroom in this condominium required renovations to replace problematic Kitec plumbing. The layout in the space remained the same, but improvements were made to address certain design challenges with lighting, automation, and space. The aim was to create a modern bathroom design with textured wood features, and the feel of metallic black accents.
A number of prominent changes were made to improve the use of space. The original entry, a left-handed door swinging into the bathroom, was replaced. It interfered with the vanity clear floor space. It also made the use of the bathroom difficult when two users were present. It was changed to a soft closing pocket door. To avoid losing space it was installed by creating a wall cavity on the outside of the bathroom. This door also included frosted glass panels to allow natural light into the space. Double sliding glass shower doors were also installed to address access issues to the shower valve.
Storage improvements included the installation of dual inset medicine cabinets, and pull out drawers within the wall hung vanity. The depth of the medicine cabinets were extended outwards, and this nice detail was finished with a textured wood finish. The addition of the wall hung vanity also created the feeling of more space beneath the units and allowed for under cabinet lighting.
Lighting and automation improvements included the addition of HUE LED lighting. This was done by installing two shower pot lights, a 6” main potlight, and under cabinet lighting. These are all controlled by the Philips Hue App that programs routines, scenes, and other settings.
Some of the other highlights of this modern bathroom include dark grout, which contrasts nicely with the elongated white tile, a thermostatic shower system, herringbone textured porcelain floor tile, and a Schluter Kerdi waterproofing shower system. This bathroom is made most unique though with the choice of wallpaper, which can be described as modern luxury, a graphic take on agate stone patterns with metallic embellishments.
 Ashton Renovations
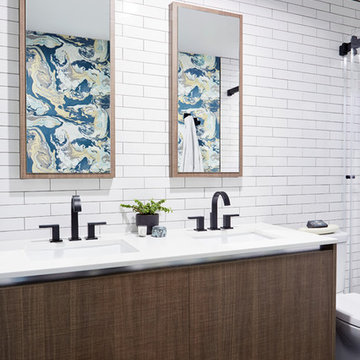
The original ensuite bathroom in this condominium required renovations to replace problematic Kitec plumbing. The layout in the space remained the same, but improvements were made to address certain design challenges with lighting, automation, and space. The aim was to create a modern bathroom design with textured wood features, and the feel of metallic black accents.
A number of prominent changes were made to improve the use of space. The original entry, a left-handed door swinging into the bathroom, was replaced. It interfered with the vanity clear floor space. It also made the use of the bathroom difficult when two users were present. It was changed to a soft closing pocket door. To avoid losing space it was installed by creating a wall cavity on the outside of the bathroom. This door also included frosted glass panels to allow natural light into the space. Double sliding glass shower doors were also installed to address access issues to the shower valve.
Storage improvements included the installation of dual inset medicine cabinets, and pull out drawers within the wall hung vanity. The depth of the medicine cabinets were extended outwards, and this nice detail was finished with a textured wood finish. The addition of the wall hung vanity also created the feeling of more space beneath the units and allowed for under cabinet lighting.
Lighting and automation improvements included the addition of HUE LED lighting. This was done by installing two shower pot lights, a 6” main potlight, and under cabinet lighting. These are all controlled by the Philips Hue App that programs routines, scenes, and other settings.
Some of the other highlights of this modern bathroom include dark grout, which contrasts nicely with the elongated white tile, a thermostatic shower system, herringbone textured porcelain floor tile, and a Schluter Kerdi waterproofing shower system. This bathroom is made most unique though with the choice of wallpaper, which can be described as modern luxury, a graphic take on agate stone patterns with metallic embellishments.
 Design Set Match
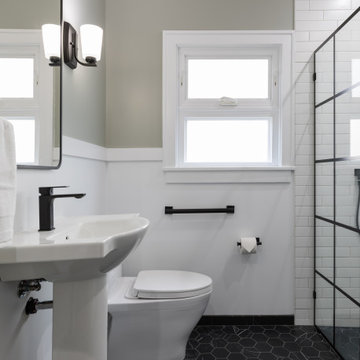
This remodel addressed issues including peeling vinyl flooring, outdated fixtures, and safety hazards due to deferred maintenance.
Challenges included: sourcing budget-sensitive materials with a high-end feel; slip-resistant hexagon floor tiles; a new pedestal sink; a water-saving toilet; and a larger medicine cabinet, while correcting code violations.
Universal Design created an open floor plan, low-maintenance finishes, zero-threshold entries into the bathroom and shower, in addition to highly-contrasting materials, grab bars with blocking, accessible towel bars for user convenience, and dimmable lighting with anti-glare trim.
We combined modern materials for a noir style and universal functionality for our aging-in-place clients and their forever home.
Find the right local pro for your project

 kmjee
kmjeePepper plants are a delightful addition to any garden, offering a vibrant burst of color and spice to your culinary creations. However, even experienced gardeners can encounter challenges when growing pepper plants. In this blog, we'll explore some common issues you might face and provide practical solutions to help your pepper plants thrive.
1. Slow or Stunted Growth
Issue: Slow or stunted growth in pepper plants can be discouraging, but there are specific steps you can take to address this issue effectively.
Solution:
a. Soil Health:
- Well-Draining Soil: Ensure your pepper plants are in well-draining soil to prevent waterlogged roots, which can inhibit growth.
- Organic Matter: Incorporate plenty of organic matter, such as compost or well-rotted manure, into the soil to improve its texture and nutrient content.
- pH Level: Test the soil pH and adjust it to the ideal range between 6.0 and 6.8 using lime or sulfur as needed.
b. Fertilization:
- Balanced Fertilizer: Use a balanced, slow-release fertilizer designed for vegetables to provide essential nutrients steadily throughout the growing season.
- Compost: Amend the soil with compost to enhance nutrient availability and soil structure. This can promote healthier growth.
c. Watering:
- Consistent Moisture: Maintain consistent soil moisture levels by watering your pepper plants regularly but avoid waterlogging. Aim for 1-2 inches of water per week, adjusting based on your local climate and weather conditions.
- Mulching: Apply mulch around the base of the plants to retain soil moisture and regulate temperature.
2. Yellowing Leaves
Issue: Yellowing leaves can be a sign of various underlying problems, but addressing them promptly can restore the vibrancy of your pepper plants.
Solution:
a. Nutrient Deficiencies:
- Balanced Fertilization: Use a well-balanced fertilizer that includes micronutrients to address nutrient deficiencies.
- Specific Nutrients: If you suspect a particular deficiency, such as magnesium, iron, or nitrogen, apply the appropriate nutrient supplement following package instructions.
b. Pest and Disease Control:
- Pest Inspection: Regularly inspect the leaves and stems for common pests like aphids and mites. Remove affected leaves and treat with organic pesticides if necessary.
- Disease Management: Look out for signs of diseases like bacterial leaf spot or fungal issues. Apply organic fungicides or bactericides as recommended.
3. Blossom Drop
Issue: When pepper plants drop their blossoms prematurely, it can hinder fruit development and lead to disappointment.
Solution:
a. Temperature Control:
- Stable Temperatures: Ensure your pepper plants are exposed to consistent temperatures between 70°F and 80°F (21°C to 27°C) during flowering. Avoid sudden temperature fluctuations by providing shelter or using row covers.
b. Pollination:
- Assist with Pollination: If growing peppers indoors or in a greenhouse, help with pollination by gently shaking the plants or using a small brush to transfer pollen between flowers. Outdoor pepper plants are usually pollinated by insects.
4. Wilting Plants
Issue: Wilting or drooping pepper plants can be a sign of various problems, but proper care can revive them.
Solution:
a. Watering:
- Consistent Moisture: Adjust your watering routine to keep the soil consistently moist but not waterlogged. Water early in the day to prevent fungal issues.
- Drainage: Ensure proper soil drainage by amending the soil or using raised beds to prevent waterlogged roots.
b. Pest Control:
- Pest Inspection: Examine the undersides of leaves for signs of pests like aphids, spider mites, or whiteflies. Treat infestations promptly with biological insecticides.
5. Curling Leaves
Issue: Curling or misshapen leaves indicate stress in pepper plants, which can be caused by various factors.
Solution:
a. Environmental Stress:
- Stable Conditions: Ensure your pepper plants are in an environment with stable humidity, temperature, and adequate air circulation. Avoid sudden changes in conditions.
- Proper Ventilation: Adequate air circulation can reduce humidity and prevent fungal issues.
b. Pest and Disease Management:
- Pest Inspection: Regularly inspect your plants for pests and diseases, addressing them promptly with organic remedies as needed.
6. Sunscald
Issue: Sunscald can lead to discolored, leathery patches on pepper fruits when exposed to intense sunlight.
Solution:
a. Shade Cloth:
- Sun Protection: Shield your pepper plants from harsh sunlight during the hottest part of the day using shade cloth or by planting them where they receive some filtered sunlight.
b. Pruning:
- Fruit Shading: Prune excess foliage to allow better fruit shading, reducing the risk of sunscald. Ensure that there's a balance between foliage and fruit.
7. Pepper Plant Pests and Diseases
Issue: Aphids, mites, whiteflies, and various diseases can affect pepper plants, but you can manage them effectively.
Solution:
a. Regular Inspection:
- Vigilant Monitoring: Regularly inspect your pepper plants for signs of pests or diseases, paying close attention to the undersides of leaves and stems.
b. Organic Remedies:
- Pest Control: Use organic remedies like neem oil, insecticidal soap, or diatomaceous earth for pest control.
- Disease Management: Apply organic fungicides or bactericides as recommended to manage diseases like powdery mildew or bacterial spot.
While growing pepper plants can present various challenges, these common issues are manageable with the right knowledge and care. Regular monitoring, proper soil preparation, and timely intervention can help you enjoy a bountiful harvest of vibrant, spicy peppers. Remember that gardening is a learning experience, and each challenge you face is an opportunity to improve your skills and enjoy the rewards of homegrown peppers in your favorite dishes.
 Green Gorge Construction
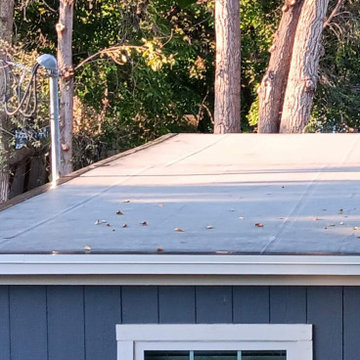
Due to its deteriorating condition, the asphalt roll roofing on this ADU required replacement before the Fall rains. Asphalt roll roofing generally lasts only 5-10 years, leading to ongoing maintenance challenges. The original 1×10 sheathing showed significant sagging in several spots, resulting in standing water not suitable for asphalt. Additionally, there was a complete absence of ventilation after improper installation of R-21 fiberglass insulation, leaving no air gap between the sheathing and insulation. A noticeable hump along the center of the roof indicated that the load-bearing wall had been supporting that section since construction, contributing to light sagging between the walls.
The old roof was completely removed down to the joists, revealing a solid base for the new installation. The central hump was eliminated by shaving the high point along that line. 2×6 beams were ripped in half then nailed on top of the existing joists, creating a 1.5″ gap for insulation and providing strong attachment points for the OSB sheathing, which was secured with screws to prevent any potential issues with nail heads popping through over the roof’s expected lifespan of over 50 years. The EPDM membrane was then adhered using glue and contact cement along the edges of each sheet, with the ends folded over the roof edges and secured with termination bars. Drip edge flashing was added and taped to ensure a water-tight seal, and EPDM-safe caulking was applied over the seams for additional protection. Finally, all exposed wood was primed and painted.
The new roof features a 60mil commercial-grade EPDM rubber membrane, offering a lifespan exceeding 50 years, in stark contrast to the 5-10 year lifespan of asphalt roll roofing.
Using two sheets of EPDM for installation streamlined the process, resulting in one single seam across the entire roof, compared to the asphalt roll’s dimensions of 3 feet wide by 33 feet long, which created 8 vertical seams and 9 horizontal seams—significantly increasing the risk of leakage and failure. Wrapping the rubber over the edge of the roof effectively addressed concerns about water infiltration at the edges, an issue prevalent with the asphalt and drip edge interface.
Another benefit to removing the splitting 1×10 decking and replacing it with OSB sheathing is the increase in structural integrity, moisture resistance, longevity and consistency.
The project successfully transformed the ADU’s roof from a maintenance-prone asphalt roll system to a highly durable 60mil EPDM rubber membrane. By addressing critical structural issues, including sagging sheathing and inadequate ventilation, the team ensured that the new roof not only offers superior water resistance and longevity but also meets higher performance standards for insulation and durability. The replacement process eliminated common weak points, such as numerous seams and poor edge sealing, which were vulnerabilities in the old roofing system. The result is a streamlined, secure installation that provides peace of mind and long-term value, with a lifespan extending well beyond the original roof.
 D-Trac Construction Inc.
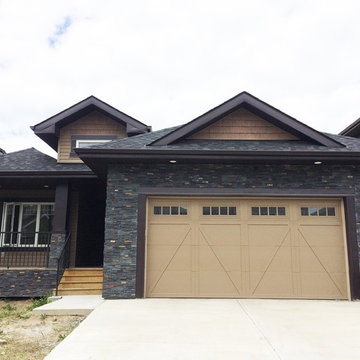
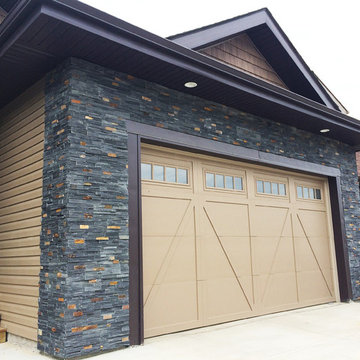
AFTER Photo - Due to faulty workmanship of a previous contractor, D-Trac Construction was contracted to address the rock work issues pertaining to the fact that scratch coat was not applied prior to the rock work being installed. This resulted in the rock work falling off the front and back of the home. Parging around the perimeter of the home was also not completed, siding install had to be corrected in areas and a basement window was installed upside down. D-Trac Constriction addressed above issues on-time and on budget.
 D-Trac Construction Inc.
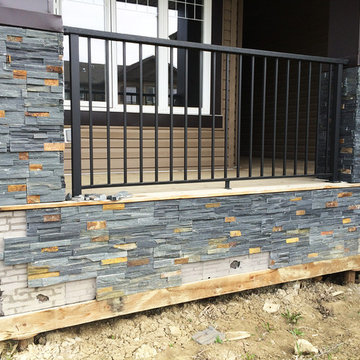
BEFORE Photo - Due to faulty workmanship of a previous contractor, D-Trac Construction was contracted to address the rock work issues pertaining to the fact that scratch coat was not applied prior to the rock work being installed. This resulted in the rock work falling off the front and back of the home. Parging around the perimeter of the home was also not completed, siding install had to be corrected in areas and a basement window was installed upside down. D-Trac Constriction addressed above issues on-time and on budget.
 D-Trac Construction Inc.
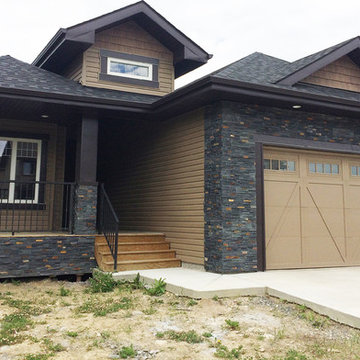
AFTER Photo - Due to faulty workmanship of a previous contractor, D-Trac Construction was contracted to address the rock work issues pertaining to the fact that scratch coat was not applied prior to the rock work being installed. This resulted in the rock work falling off the front and back of the home. Parging around the perimeter of the home was also not completed, siding install had to be corrected in areas and a basement window was installed upside down. D-Trac Constriction addressed above issues on-time and on budget.
 D-Trac Construction Inc.
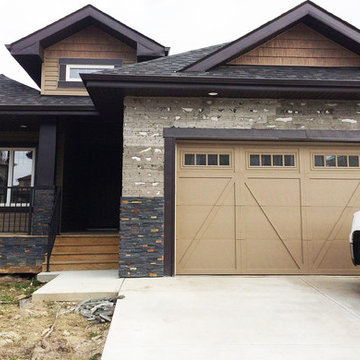
BEFORE Photo - Due to faulty workmanship of a previous contractor, D-Trac Construction was contracted to address the rock work issues pertaining to the fact that scratch coat was not applied prior to the rock work being installed. This resulted in the rock work falling off the front and back of the home. Parging around the perimeter of the home was also not completed, siding install had to be corrected in areas and a basement window was installed upside down. D-Trac Constriction addressed above issues on-time and on budget.
 D-Trac Construction Inc.
AFTER Photo - Due to faulty workmanship of a previous contractor, D-Trac Construction was contracted to address the rock work issues pertaining to the fact that scratch coat was not applied prior to the rock work being installed. This resulted in the rock work falling off the front and back of the home. Parging around the perimeter of the home was also not completed, siding install had to be corrected in areas and a basement window was installed upside down. D-Trac Constriction addressed above issues on-time and on budget.
 Appliance Technician
Efficient Freezer Repair in Ottawa - ApplianceTechnician.ca
Project Overview:
Experience the peace of mind that comes with reliable freezer repair services in Ottawa. Our expert technicians at ApplianceTechnician.ca specialize in diagnosing and fixing common freezer issues such as frost build-up, temperature inconsistencies, and electrical malfunctions, restoring your appliance's efficiency and extending its lifespan.
Services Provided:
Fast Freezer Repair: Quick and efficient repair services for malfunctioning freezers, ensuring minimal downtime and food waste.
Frost Build-Up Removal: Professional solutions to prevent and eliminate excessive frost, optimizing your freezer's performance.
Electrical Fault Repair: Skilled in addressing Ottawa's common home electrical issues, we ensure your freezer operates safely and reliably.
Why Us:
Certified Technicians: Trust your freezer repairs to our certified professionals, equipped with the latest tools and expertise.
Quality and Efficiency: We provide high-quality repairs that focus on efficiency, saving you energy and money.
Emergency Services: Ready for your call 24/7, we offer emergency repairs to address urgent appliance issues promptly.
SEO Keywords:
Freezer Repair Ottawa, Frost Removal, Efficient Freezer Performance, Certified Appliance Technicians, Emergency Freezer Services, Electrical Faults Freezer, ApplianceTechnician.ca
Contact:
Get your freezer fixed right the first time with ApplianceTechnician.ca. Contact us for a reliable repair service that's both effective and energy-conscious.

 Jack Edward
In the world of property management, fostering positive relationships with tenants, prospects, and landlords is key to ensuring a thriving rental community. One of the most fundamental aspects of tenant satisfaction is ensuring that their living spaces are equipped with functional appliances. Imagine the frustration of a tenant with a malfunctioning refrigerator or a broken washing machine. It's in such moments that the role of property managers becomes crucial. By offering fast and timely appliance repair and maintenance services, property managers can not only address the immediate needs of their tenants but also build lasting trust and loyalty. In this blog, we will explore the importance of reliable appliance repair services for property managers and how they can strengthen their bonds with tenants, prospects, and landlords.
Understanding the Tenant's Perspective:
For tenants, a well-maintained and fully functional home is not just a luxury but a necessity. Appliances like refrigerators, ovens, washing machines, and HVAC systems are integral to their daily lives. When these appliances break down, it can disrupt their routine and cause significant inconvenience. Tenants appreciate property managers who promptly address these issues, demonstrating a commitment to their comfort and well-being.
Meeting Prospective Tenants' Expectations:
When prospects are searching for a new rental property, they evaluate not only the space and location but also the level of service provided. A property managed by professionals who offer reliable appliance repair services stands out in the competitive rental market. Prospective tenants are more likely to choose a property where their potential issues, including appliance repairs, will be promptly resolved.
Earning the Trust of Landlords:
Landlords entrust property managers with their investments, expecting them to maintain the property and keep the tenants satisfied. Providing efficient appliance repair services not only ensures tenant retention but also earns the trust of landlords. A property manager who can handle repairs swiftly and cost-effectively protects the landlord's investment, leading to a positive and enduring partnership.
Benefits of Reliable Appliance Repair Services:
⦁ Tenant Satisfaction: Fast and reliable appliance repairs lead to satisfied tenants, enhancing their overall living experience.
⦁ Reduced Vacancy Rates: Properties with a reputation for excellent maintenance and quick issue resolution attract and retain tenants, minimizing vacancy periods.
⦁ Positive Word-of-Mouth: Happy tenants are more likely to recommend the property to others, increasing the likelihood of attracting new tenants through referrals.
⦁ Enhanced Property Value: Well-maintained properties retain their value and appeal, ensuring a steady stream of income for landlords.
⦁ Improved Tenant-Landlord Relations: Proactive property managers who promptly address repair issues strengthen their relationships with both tenants and landlords, creating a harmonious living environment.
In the competitive world of property management, offering reliable appliance repair services isn't just a service; it's a testament to a property manager's commitment to their tenants, prospects, and landlords. By promptly addressing repair needs and ensuring the smooth functioning of appliances, property managers not only resolve immediate problems but also lay the foundation for enduring, trust-based relationships. After all, in the eyes of tenants, prospects, and landlords, a property manager who can keep the appliances running smoothly is a valuable partner worth keeping. Building strong bonds through reliable appliance repair services isn't just a strategy – it's a pathway to long-lasting success and mutual satisfaction in the realm of property management.
 Woodale
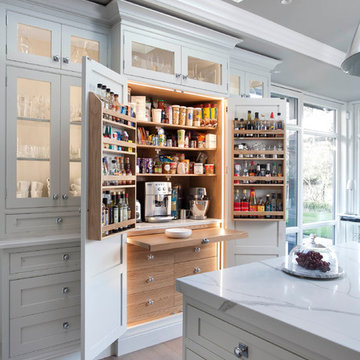
Kitchen pantry - traditional light wood floor kitchen pantry idea in Dublin with flat-panel cabinets and light wood cabinets
 Upside Development
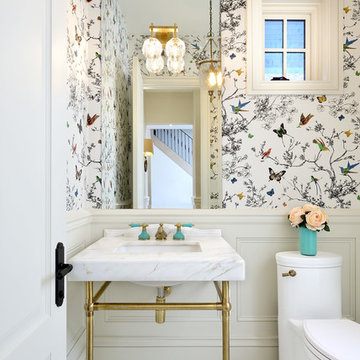
Small elegant marble floor and white floor powder room photo in Toronto with a one-piece toilet, multicolored walls, a console sink, furniture-like cabinets and marble countertops
 Cavalier Bremworth
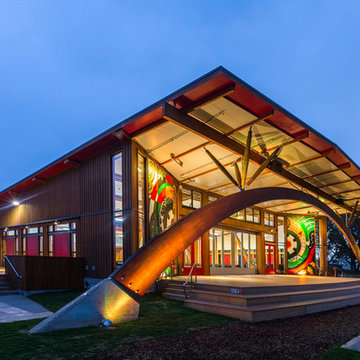
Located in Taneatua, south of Whakatane, the Tuhoe building has been designed by Jasmax and built by Arrow International for the local iwi, Tuhoe, as part of a Living Building Challenge. Their iconic new headquarters is now one of New Zealand’s most advanced sustainable buildings – built to have virtually no environmental impact.
 Georgia Outdoor Services
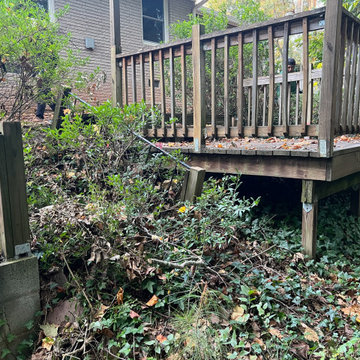
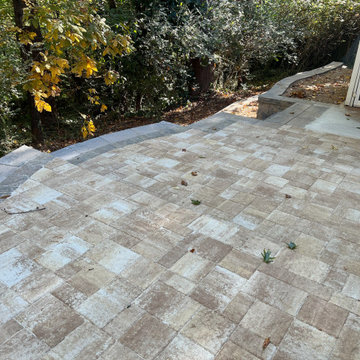
The backyard in this Dunwoody, GA residence presented several challenges, including failing cinder block walls, unsafe steps, and an aging deck. These issues rendered the space largely unusable and created drainage problems, limiting both safety and functionality for the homeowners. Our team addressed these issues by removing all existing structures and undertaking a comprehensive rebuild. This involved regrading the area for proper drainage, constructing new retaining walls, and installing integrated steps for safe access throughout the yard. Multiple paver patios were also installed to create defined entertaining areas. The outcome is a safe and highly functional outdoor living space in Dunwoody. The new retaining walls provide essential structural support, the drainage system manages stormwater effectively, and the integrated patios and walkways offer inviting areas for recreation and access.
 Georgia Outdoor Services
The backyard in this Dunwoody, GA residence presented several challenges, including failing cinder block walls, unsafe steps, and an aging deck. These issues rendered the space largely unusable and created drainage problems, limiting both safety and functionality for the homeowners. Our team addressed these issues by removing all existing structures and undertaking a comprehensive rebuild. This involved regrading the area for proper drainage, constructing new retaining walls, and installing integrated steps for safe access throughout the yard. Multiple paver patios were also installed to create defined entertaining areas. The outcome is a safe and highly functional outdoor living space in Dunwoody. The new retaining walls provide essential structural support, the drainage system manages stormwater effectively, and the integrated patios and walkways offer inviting areas for recreation and access.
 Windy City Painters
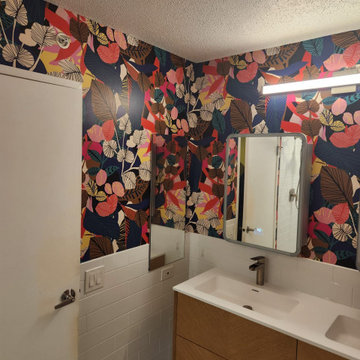
Expert wallpaper installer Lakeview services transform Chicago homes with precision and style. This stunning project showcases our commitment to quality craftsmanship in one of Chicago's most desirable neighborhoods.
Project Overview and Architecture
This beautiful Lakeview greystone required careful wallpaper installation that would complement the home's original architectural details. The vintage building's unique character demanded specialized techniques to ensure perfect results while preserving the historic charm that makes these homes so special.
Materials and Products
We utilized premium wallpaper adhesive, professional smoothing tools, and high-quality materials specifically chosen for Chicago's climate conditions. Our team selected products that work exceptionally well with the plaster walls common in vintage Lakeview homes.
Installation Process
First, we thoroughly prepared surfaces by repairing imperfections and priming walls. Next, we precisely measured and cut each strip, ensuring perfect pattern alignment. Then, we applied adhesive evenly and positioned wallpaper with expert precision. Finally, we eliminated bubbles, trimmed edges, and completed finishing touches.
Chicago Home Challenges
Lakeview's vintage homes present unique challenges including uneven plaster walls, settling issues, and temperature fluctuations. Our wallpaper installer Lakeview expertise addresses these concerns with specialized preparation techniques and climate-appropriate materials that ensure lasting results.
Results and Quality
The finished installation showcases flawless pattern matching, smooth surfaces, and crisp edges that enhance the room's architectural features. This wallpaper installer Lakeview project demonstrates our commitment to excellence and attention to detail.
Professional Tips
Homeowners should always hire experienced professionals for wallpaper installation. Proper surface preparation is crucial for longevity. Additionally, choosing quality materials appropriate for Chicago's climate ensures your investment lasts for years.
See more work and request free estimate at windypainters.com.
Q: Why choose professional wallpaper installer Lakeview services over DIY? / A: Professional installation prevents costly mistakes, ensures proper adhesion, and guarantees beautiful results that enhance your home's value and appearance.
Q: How do you handle vintage Lakeview home challenges? / A: Our wallpaper installer Lakeview team addresses plaster walls, settling issues, and architectural details with specialized techniques and appropriate materials.
Q: What preparation is required before wallpaper installation? / A: We repair wall imperfections, apply primer, ensure smooth surfaces, and address any moisture issues for optimal wallpaper installer Lakeview results.
Q: How long does professional wallpaper installation take? / A: Most rooms require 1-2 days depending on complexity, though our wallpaper installer Lakeview team works efficiently while maintaining quality standards.
Q: Can you work with designer or specialty wallpapers? / A: Absolutely, our wallpaper installer Lakeview experts handle luxury papers, grasscloth, murals, and specialty materials with appropriate techniques and care.
Q: Do you remove existing wallpaper before installation? / A: Yes, we provide complete removal services using safe methods that protect your walls and prepare surfaces for new wallpaper installer Lakeview projects.
Q: How do you ensure pattern alignment and matching? / A: Our wallpaper installer Lakeview professionals use precise measuring, professional tools, and years of experience to achieve perfect pattern continuity.
Q: What types of walls can accommodate wallpaper? / A: We install wallpaper on various surfaces including drywall, plaster, and painted walls after proper preparation for wallpaper installer Lakeview projects.
Q: How do you handle corners and trim work? / A: Our wallpaper installer Lakeview team uses specialized techniques for inside corners, outside corners, and detailed trim work ensuring professional results.
Q: What warranty do you provide on installation? / A: Windy City Painters guarantees our wallpaper installer Lakeview work with comprehensive warranty coverage protecting your investment and ensuring satisfaction.
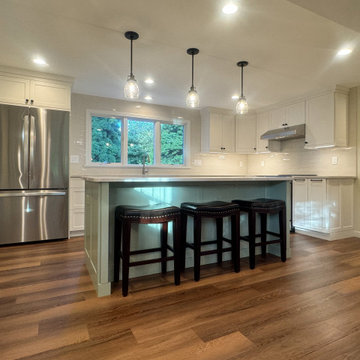
 Irene Designs
Home Remodeling Project Overview
This extensive home remodeling project transformed a dated and inefficient layout into a functional, open, and aesthetically cohesive living space. The original layout had several challenges:
• A kitchen with limited storage, no cabinets on the window side, a sink facing the wall, and a range crammed into the corner. The pantry closet was too deep and impractical.
• A living room that couldn’t accommodate furniture without interfering with traffic flow.
• A front foyer with wasted space.
• A claustrophobic hallway toilet room without a sink, located near the laundry room.
The Remodeling Concept
The scope of this project extended well beyond the kitchen. We proposed several layout options to address issues in all adjacent spaces, ultimately implementing a plan that:
• Removed two walls and moved doorways.
• Replaced the kitchen window.
• Converted the hallway toilet room into a storage space.
• Installed pocket doors to separate the laundry hallway from the living room.
Kitchen Transformation
• Open Concept: By removing the wall between the kitchen and dining room, the two spaces became a seamless open area.
• New Layout: Cabinets were relocated to the window side for more storage and natural light. A central island with storage and seating was added, and a coffee bar was installed in the dining room.
• Updated Pantry: The deep pantry closet was converted into a pullout pantry with a cabinet front for better accessibility.
• Design Details: Off-white kitchen cabinets pair beautifully with a light green island. Warm white quartz counters and an artisan tile backsplash complete the look.
Dining Room
• Expanded Space: Most of the wall separating the dining room and foyer was removed, creating a more spacious area while still accommodating all furniture thanks to careful measurements.
Living Room Improvements
• Optimized Layout: Moving doorways and installing pocket doors allowed for better furniture placement, including a sofa that doesn’t interfere with traffic flow.
• Fireplace Upgrade: The brick fireplace was updated with a three-dimensional staggered stone veneer in a color matching the kitchen cabinets, creating a cohesive look. A TV was installed above the fireplace at a comfortable viewing angle.
Additional Updates
• New Flooring: All remodeled rooms now feature updated flooring.
• Ceilings: Popcorn ceilings were replaced with smooth, flat finishes, complemented by recessed lighting.
• Walls: Fresh paint throughout the space, with an accent wall in the living room matching the light green of the kitchen island.
• Lighting: Stylish sconces were added for a touch of elegance.
The Result
The homeowners are thrilled with the transformation, marveling at how their once cramped and inefficient home now feels spacious, functional, and beautifully cohesive. They can’t believe their house could ever look like this!
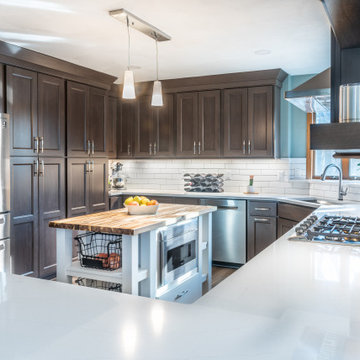
 Degnan Design-Build-Remodel
Once we determined the couple's budget, we addressed the issue of modernizing the kitchen. One problem that needed to be addressed was the size of the refrigerator. After adding an island in the middle of the space, the new Marvel refrigerator stuck out farther than the original 90s model would have
9