
Search results for "Extract" in Home Design Ideas
 Expert Kitchen Designs, LLC
June Stanich Photography
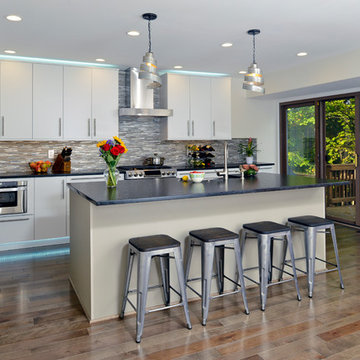
Inspiration for a mid-sized modern kitchen remodel in DC Metro
Inspiration for a mid-sized modern kitchen remodel in DC Metro
 Zuver Construction
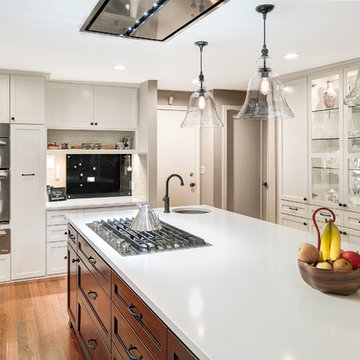
This kitchen designed by Susan Bond is comfortably crisp. Notice the contrasting painted island and attached built-in table. The flush ceiling mount stainless steel hood vent is a great solution for homeowners who desire a cleaner look. The Brazilian cherry hardwood floors warm up the space and the paint grade shaker style cabinets pull the color palette together while lightening up the space. The 3 cm Onixxa Quarts countertops and 4 X 12 inch ceramic subway set tile backsplash are stunning. The built-in table off the island provides extended entertaining space and makes dinner time easy. A desk with a magnetic black board also seamlessly blends beautiful design functionality with aesthetics.
Photo credit: Real Estate Tours Oregon

Find the right local pro for your project
 User
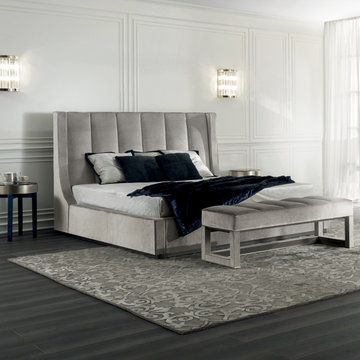
UserEDEN is a family of products for relaxation and slumber, including a chaise longue, a bed and a sofa-bed. The particular feature of the collection is the original frame in metal and wood, entirely covered with cowhide, giving the product a precise connotation of luxury, functioning as the back of the chaise longue or the headboard of the bed and sofa-bed. In the daybed version the L-shaped back forms a support for soft down cushions. The bed comes with a base in wooden slats, with or without a storage compartment, and the headboard can be enhanced by two adjustable lateral wings that open to accommodate small bedside tables. The sofa-bed has a wooden slat platform and comes as a double bed or two twin beds; in the latter solution, the second extractable bed is raised off the ground with a simple touch of the foot, thanks to a patented mechanism that greatly facilitates the operation.

 Elletipi Inc.
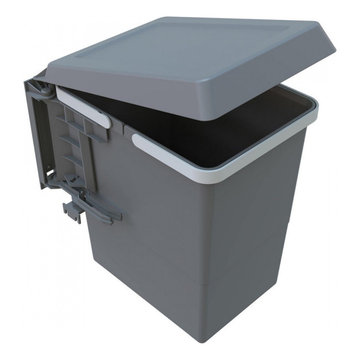
Innovative waste bins ELLETIPI, equipped with a patented mechanism for the automatic opening of the lids when opening the cabinet door. The lid opens and the bin is extracted when you open the cabinet door; the lid also closes automatically when the bin returns in the cabinet when you close the door, guaranteeing odor protection. This object is made of polymers, and the fitting and attachment components are filled and reinforced. This system was designed to be installed on the side of the cabinet and connected to the door (not compulsory). Its main objective is to be used internally in kitchen base cabinets, under the sink. Its installation is practical and rapid, thanks to the instructions that can be used as a drilling guide and the supplied 12 self-tapping screws.

 Elletipi Inc.
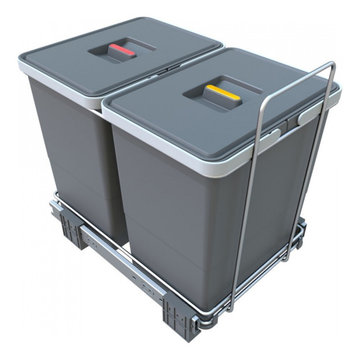
Practical and functional system ELLETIPI for waste separation, provided with metal sliders for total extraction. The buckets are installed in a basket made of chrome plated steel wire and all its components are 100% recyclable. The durability and simplicity of this product are its strong points. All containers are equipped with a lid. It is easy to identify and label the type of waste that goes into each bin, using the multicolor resin stickers that were supplied with the lids. You can install these bins in kitchen bases, specifically under the sink. Its installation on the bottom of the kitchen base, using the supplied 5 self-tapping screws, is easy and practical.

 Automotive Locksmith
321KeyCutting is a locksmith company with many years of experience offering services to commercial, residential and industrial. Did the key break in the lock? We know how hard for you to get into this situation. No need to worry because we are here to extract the key for you. Small or big lock issues, we got you covered. It is always our goal to provide outstanding services to all residential, automotive and industrial areas.
Our Working Time Availability
Issues with locks take place anywhere and anytime. We know that it is a situation where you need help. This is why we are available every day of the year.
Our Local Locksmith Technician
Our locksmith technicians have handled almost all kinds of locksmith problems that can occur with you We make sure that they know what they are doing.
Our Pricing
We understand it is not easy to earn money. We also know that you experienced a lot of things today and we want to make sure that you spend your money in valuable things. It is why we offer affordable cost on all our services.
Residential Garage Door
Commercial Garage Door
Garage Door Openers
Garage Door Parts
Garage Door Accessories
Garage Door Tuneup
Garage Door Maintenance
Emergency Garage Door
Call Us: (321) 234-9425
Visit Us: http://321keycutting.com/mims

 Williamsons Kitchens
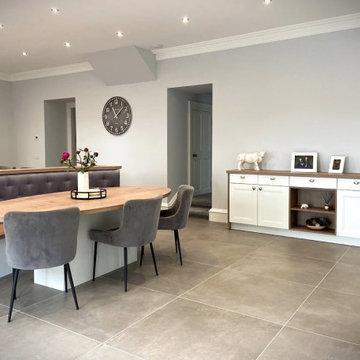
The client was in the midst of a substantial renovation of a period property and sought a kitchen that would complement the home's historic character. The challenge was to design a kitchen that not only preserved the traditional aesthetic but also incorporated modern conveniences. Key elements included a large island for both cooking and casual dining, as well as a curved booth seating bench and bespoke oval Nolte table for the eating area. Additional functional aspects, such as a breakfast unit for small appliances like a toaster and a sideboard for added storage, were to be integrated seamlessly, extending the kitchen's theme into the adjoining living space.
For a timeless appeal, we opted for the Nolte Windsor range. The choice of the oval knob handles on the 721 White furniture shade delivered a contemporary classic feel that effortlessly blended with the newly constructed living area.
A 30mm Silestone Blanco Rivers worktop was paired with Nolte’s 40mm Holm Oak, offering both durability and a chic aesthetic. The kitchen was equipped with top-tier Kitchen Aid appliances - including a single oven, combination microwave, warming drawer, induction hob, and downdraft extraction. Complementing these were a full-height NEFF fridge, a 70/30 fridge freezer, and a dishwasher.
Prioritising both functionality and style, we incorporated a Blanco Sona 1 ½ sink in Alumetallic and a Quooker Fusion Classic Chrome instant boiling water tap. These additions ensure daily kitchen tasks are performed with utmost efficiency without compromising on design.
Ready to transform your space into a modern haven? Reach out to us today.

 Tile Doctor Ltd
This is a large 17.2 m2 Sandstone Floor installed throughout the living and kitchen areas of a property in the beautiful village of Disley close to Lyme Park which is run by the National Trust. The floor had been installed four years ago and my client was unhappy with the original sealer which hadn’t lasted very long. Without the protection of a sealer dirt had become ingrained in the pores of the stone which was now difficult to clean. Another issue was the rough nature of the Sandstone meant it was impossible to mop as it shreds the mop! As a result, the floor was mainly cleaned with a hoover which was not ideal, especially in a kitchen.
I went over to survey the floor and before quoting I ran a small test clean in the kitchen which took the floor back to its natural pale colour and really showed how dirty the floor had become. Test cleans are great as it helps me to formulate an effective cleaning plan and provide an accurate quote. My client was impressed with the result and so I was booked to come back and deep clean and then reseal the whole floor. Due to its size I estimated the floor would take two days to deep clean and a further day to apply a new sealer, so three days in total.
Working in large sections I started by cleaning the floor and stripping off the old sealer with a strong dilution of Tile Doctor Remove and Go which is a coatings remover that is safe to use on stone. The solution was left to soak into the pores of the Sandstone for ten minutes before being worked in with a 200-grit diamond pad fitted to a rotary floor machine. This action not only removed the old sealer and cleaned the floor but the 200-grit pad being vey coarse removed a lot of the roughness from the surface of the Sandstone so it shouldn’t shred any more mops.
After rinsing the floor with water and removing the slurry with a wet vacuum I set about cleaning the grout with Tile Doctor Pro-Clean worked into the grout line with a stiff brush and assisted with steam from a professional steam cleaner with a grout attachment. Once done the floor was rinsed and extracted again to remove the soil from the grouting. There was also an area near one of the doors where the grout had become loose and needed replacing so I made up a batch of matching grout and filled this in. The floor was then left overnight to dry with assistance from a couple of air movers.
I returned the next day to finish the floor by applying a sealer. First, I double checked the floor was dry with the damp meter. The readings confirmed the air movers had done a good job and that the floor was within the accepted parameters, so I was ready to seal. The sealer I chose was Tile Doctor Seal and Go which being water based doesn’t leave a smell as it dries, it really works well on Sandstone and adds a nice subtle sheen to the stone.
Once finished the floor looked much cleaner, lighter in colour overall more inviting, you could even see the fossils in some of the tiles.
The surface was also smoother so the customer should find cleaning with a mop much easier in future. On that subject its worth pointing out that owners of sealed floors should always use a neutral pH tile cleaner on their floors as most supermarket products are simply too strong and will prematurely strip the sealer off a tile if used repeatedly. Tile Doctor sell a product called Tile Doctor Neutral Cleaner which is ideal for cleaning sealed Sandstone floors like this one.
My client was really happy with the results and sent me a message later saying: “the floor looks amazing!”
Kamila Logonzy
East Cheshire Tile Doctor
 Williamsons Kitchens
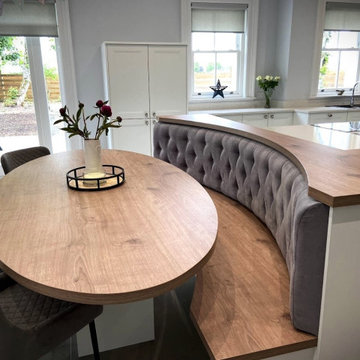
The client was in the midst of a substantial renovation of a period property and sought a kitchen that would complement the home's historic character. The challenge was to design a kitchen that not only preserved the traditional aesthetic but also incorporated modern conveniences. Key elements included a large island for both cooking and casual dining, as well as a curved booth seating bench and bespoke oval Nolte table for the eating area. Additional functional aspects, such as a breakfast unit for small appliances like a toaster and a sideboard for added storage, were to be integrated seamlessly, extending the kitchen's theme into the adjoining living space.
For a timeless appeal, we opted for the Nolte Windsor range. The choice of the oval knob handles on the 721 White furniture shade delivered a contemporary classic feel that effortlessly blended with the newly constructed living area.
A 30mm Silestone Blanco Rivers worktop was paired with Nolte’s 40mm Holm Oak, offering both durability and a chic aesthetic. The kitchen was equipped with top-tier Kitchen Aid appliances - including a single oven, combination microwave, warming drawer, induction hob, and downdraft extraction. Complementing these were a full-height NEFF fridge, a 70/30 fridge freezer, and a dishwasher.
Prioritising both functionality and style, we incorporated a Blanco Sona 1 ½ sink in Alumetallic and a Quooker Fusion Classic Chrome instant boiling water tap. These additions ensure daily kitchen tasks are performed with utmost efficiency without compromising on design.
Ready to transform your space into a modern haven? Reach out to us today.
 Williamsons Kitchens
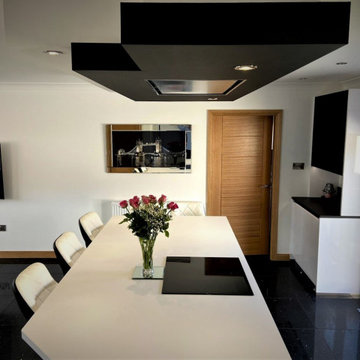
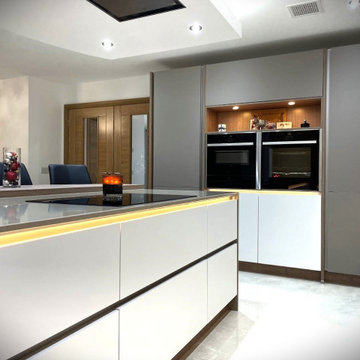
The client had an existing kitchen that we installed over 15 years ago at the front of their house. They wanted to update and move the kitchen to the rear of the home, requiring the removal of partitions and a full redesign. The goal was to create a modern, functional kitchen suitable for entertaining friends and family.
The kitchen was outfitted with the Nolte Lux range featuring Black MatrixArt handleless trims with integrated lighting. The main door colour was selected in Arctic White with an accent in Plus Black Fingerprint proof. This monochrome scheme achieved a sleek, modern look.
We opted for Nolte 25mm Black worktops on the perimeter and a Nolte 40mm White worktop for the island. The kitchen is equipped with high-quality Siemens appliances, including a single oven, combination microwave, induction hob, ceiling extraction, and a full-height fridge.
Extra details include a Blanco Zia 1 ½ sink in Anthracite and a Quooker Fusion Square Stainless Steel instant boiling water tap. The extractor is cleverly integrated into a ceiling drop box with stepped ledge lighting, adding a layer of sophistication.
Interested in a modern, functional kitchen like this? Contact us today to discuss your kitchen design needs.
 Williamsons Kitchens
For their new family home in St Combs, the client approached us with a clear vision: a modern, efficient kitchen equipped with an island and tall units seamlessly integrated into the wall.
We decided on the Nolte Feel range, enhanced by the MatrixArt Handleless trims featuring integrated lighting. The primary colour chosen was white, paired with Lava accent doors to provide depth and contrast.
The 20mm Silestone Coral Clay worktop with a mitred waterfall end panel beautifully complemented the overall design, topped off with a Nolte Holm Oak breakfast bar. Consistency and reliability were pivotal; thus, we opted for an all-NEFF appliance suite. This included a single oven, combi microwave, warming drawer, induction hob, ceiling extraction, full-height fridge and freezer, wine cooler, and dishwasher.
To enhance the kitchen further, we added a Blanco Subline single bowl undermounted sink in Tartufo and a Quooker Stainless Steel FLEX instant boiling water tap. We were also very pleased with the ceramic tiled floor!
Considering a kitchen makeover? Contact us to start your journey.
 Tile Doctor Ltd
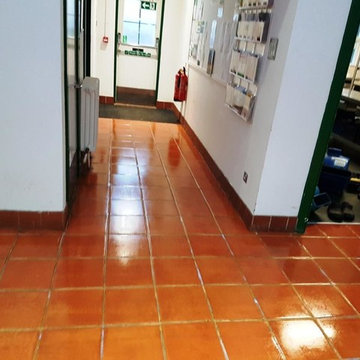
A local cleaning contractor called us in to work on the Terracotta tiled floors at a council building in Amersham. The Terracotta had not been deep cleaned and resealed for about ten years and the sealer had worn off leaving the tile vulnerable to dirt becoming ingrained in the pores of the tile. The grout had also suffered the same fate and had almost gone black in many areas.
This is a common problem with Terracotta which is quite porous and once those pores become ingrained with dirt the tile becomes difficult to clean effectively. The solution is to seal the tile however sealers wear off over time and this was basically the problem.
After discussing the issues we agreed on a plan of action to deep clean the Terracotta tile and grout and then re-seal to protect it. Due to the busy nature of the building we agreed to do the work between Christmas and New Year when we knew the building would be empty.
We started by applying a strong dilution of Tile Doctor Oxy-Gel which is a strong tile cleaning product that being in a gel form ensures it sits on the tile for longer, giving it a longer effective dwell time so it can really eat into and loose the dirt. After approximately twenty minutes the gel was scrubbed into the tile with a black scrubbing pad fitted to a rotary machine. This broke down most of the dirt and removed any remaining sealer. Once the whole floor had been treated in this manner it was rinsed thoroughly with water which was then extracted using a wet vacuum.
With the soiled cleaning solution removed I could see the next step would be to spot clean stubborn staining and clean the grout. For this task I used a strong dilution of Tile Doctor Pro-Clean scrubbing it in by hand using stiff brushes and aided with a hand-held steamer to help treat the stubborn staining. Once done the floor was given a final rinse and then as much moisture as possible removed with the wet vacuum.
We then left the floor to dry off completely and came back a couple of days later to seal the Terracotta tile.
I mentioned earlier that Terracotta is porous; in fact it’s probably the most porous material I deal with, so to fully seal the floor I had to apply eight coats of Tile Doctor Seal and Go which will provide complete and long lasting protection against staining and dirt. Seal and Go also adds an appealing satin sheen to the tile and the new seal will make it much easier to clean in future.
The floor tile and grout now look much healthier and I’m sure the council will be very impressed when they go back to work after the holidays.
Happy New Year…
Andrew Newstead
North Buckinghamshire Tile Doctor
 Tile Doctor Ltd
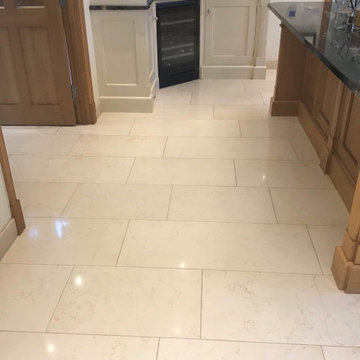
These photos are of a four-year-old Limestone kitchen floor at a property in Boughton that the customer was finding hard to keep clean and maintain a shine. Part of the problem was he owned two dogs and we often warn about the problems of dog urine on sealed tile and stone due to it being high in nitrogen.
On my initial visit I was able to ascertain that the sealer had almost completely worn off, leaving the stone vulnerable to dirt becoming ingrained into the pores of the stone. I come across this problem a lot, in my experience when stone floors are installed by tilers, they generally apply a single coat of sealant which wears off over time, and as discussed earlier can be prematurely degraded by strong chemicals.
My quote to renovate the Limestone floor was accepted and included a deep clean to the stone and grout, stone polish and then re-seal.
I arrived on site on the arranged date and began by scrubbing all the grout lines with Tile Doctor grout brushes and a 3:1 dilution of Tile Doctor Pro-Clean. I then moved on to a small handheld polishing machine to clean around the tile edges using 800 and 1500 grit diamond encrusted burnishing pad to achieve a deep clean.
The process was then repeated throughout the rest of the area using larger 17” burnishing pads fitted to a floor polishing machine. The burnishing pads I used come in a set of four starting with 400-grit and moving up to 800, 1500 and 3000 grit, after each pad is applied the floor is rinsed with water and the soil extracted with a wet vacuum.
It took me much of the day to complete this stage of the renovation and the floor was still damp so once done I left for the day, allowing the floor to dry off overnight.
I returned the following day to complete the final polish using the 3000-grit burnishing pad, this gave a high polished finish which the customer had requested. This last pad is applied dry with only a little water splashed onto the tile, a process we call a spray burnish.
The floor was then sealed with three applications of Tile Doctor Ultra Seal Sealant to protect the newly restored and polished tiles. Ultra-Seal is a penetrating sealer that soaks into those recently cleaned pores in the stone, occupying the space and preventing any dirt from becoming ingrained there. It’s also a natural look sealer so it doesn’t change the colour of the stone in anyway and is almost indetectable once applied.
“Hard work from Philip has left us with a kitchen floor brought back to life – cleaned and sealed in little over 24 hours – brilliant job – Thanks”
Before leaving I gave the customer some tips on maintenance and a complimentary bottle of Tile Doctor Stone Soap to enable him to keep the floor looking its best, this product works well with the sealant we applied and is PH neutral so won’t degrade the new sealer.
Phil Vissian
Northamptonshire Tile Doctor
 Tile Doctor Ltd
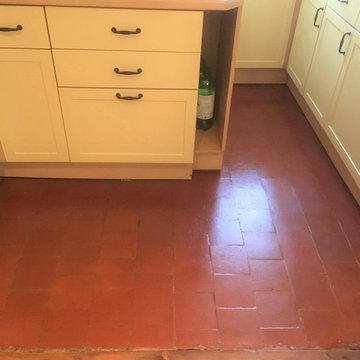
I received a call from this client in Old Marston around two miles north east of the centre of Oxford. They had lifted a lino floor in their kitchen and found an old Quarry Tiled floor underneath and decided to see if they could have it restored.
I went over to survey the floor and could see that the tiles had been covered with a thin layer of levelling screed to ensure the lino didn’t sink into the recesses. I ran some tests to demonstrate how the screed could be removed which worked well and it was apparent that the tiles underneath were intact and could be renovated. I submitted a quotation for removing all the screed, deep cleaning the Quarry tiles and then sealing the tiles to protect them. The client was really pleased that we could restore the floor and the quote was accepted, with a date booked to do the work.
To start the work, I applied undiluted Tile Doctor Grout Clean-up worked in with a small carbide brush attached to a hand-held rotary buffer. The combination of the acid in the Tile Doctor Grout Clean-up combined with the scrubbing action of the brush were effective at removing most of the screed. The small bits of remaining screed were carefully removed by hand, using a floor scraper. The floor was then rinsed with water and the soil removed with a wet vacuum.
For the second phase of the cleaning process I applied Tile Doctor Oxy-Gel which was scrubbed into the floor with a stiff brush rinsing after with water and the soil extracted again using the wet vacuum. After cleaning the floor to remove the dirt I could still see some evidence of the screed on the tiles, so I decided to give the floor an Acid Wash using Tile Doctor Acid Gel which was scrubbed into the floor and rinsed off as before. Tile Doctor Acid Gel is of course an acidic product so once it was removed, I decided to rinse the floor with Tile Doctor Neutral Cleaner to neutralise the pH levels in the floor. The wet vacuum was used again to remove as much moisture from the Quarry tiles as possible before leaving the now clean floor to dry off fully overnight.
I returned to seal this floor the next day. First, I checked the floor was fully dry with the damp meter, it was within the recommended range, so I was ready to complete the sealing process.
The client was not too sure if they wanted a matt or sheen finish, so I first put a coat of Tile Doctor Colour Grow on the floor to show them the matt finish. Colour Grow is an impregnating sealer that enhances natural colour and protects from within by occupying the pores in the tile. After reviewing the floor, they decided it was not for them, so I followed up by applying several coats of Tile Doctor Seal & Go which adds a nice sheen finish and is compatible with Colour Grow.
The combination of sealers worked very well together, and they were very satisfied with the final result and of course that we had been able to restore the Quarry tiles.
Barry Woodward
Oxfordshire Tile Doctor
 Patience Designs Studio Ltd
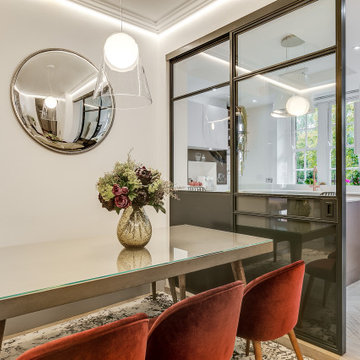
This St Johns Wood mansion block flat was one of our recent projects with a luxurious property developer in the area. We opened up spaces between the hallway, living area and kitchen to create a much more open feel throughout. A bespoke bench wrapped around the living space providing extra seating as well as storage whilst, keeping as much of the floor space free. Hidden cabling, Samsung Frame TV and biofires helped to add the luxuries without drawing away from the tranquillity.
Another view of the St Johns Wood mansion block flat, the modern kitchen layout with it's central island and induction hob and ceiling mounted extraction pendant above. The brushed bronze finish on the island's facade contrasts with the sleek minimal gloss white cabinetry for the rest of the kitchen.
 Cafeina Design
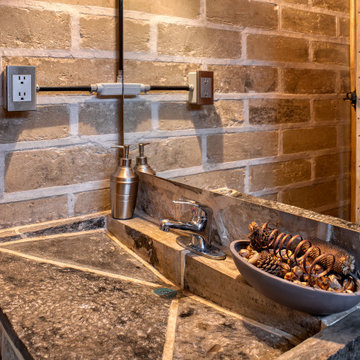
Yolseuiloyan: Nahuatl word that means "the place where the heart rests and strengthens." The project is a sustainable eco-tourism complex of 43 cabins, located in the Sierra Norte de Puebla, Surrounded by a misty forest ecosystem, in an area adjacent to Cuetzalan del Progreso’s downtown, a magical place with indigenous roots.
The cabins integrate bio-constructive local elements in order to favor the local economy, and at the same time to reduce the negative environmental impact of new construction; for this purpose, the chosen materials were bamboo panels and structure, adobe walls made from local soil, and limestone extracted from the site. The selection of materials are also suitable for the humid climate of Cuetzalan, and help to maintain a mild temperature in the interior, thanks to the material properties and the implementation of bioclimatic design strategies.
For the architectural design, a traditional house typology, with a contemporary feel was chosen to integrate with the local natural context, and at the same time to promote a unique warm natural atmosphere in connection with its surroundings, with the aim to transport the user into a calm relaxed atmosphere, full of local tradition that respects the community and the environment.
The interior design process integrated accessories made by local artisans who incorporate the use of textiles and ceramics, bamboo and wooden furniture, and local clay, thus expressing a part of their culture through the use of local materials.
20