
Search results for "Never before seen" in Home Design Ideas
 Hallmark Floors
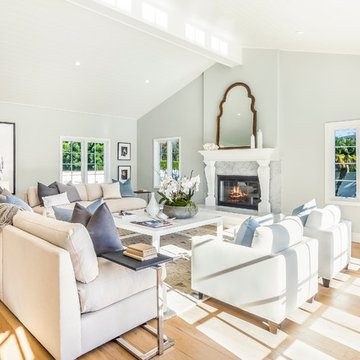
Ventura Marina French Oak Hardwood Floors are seen here in before and after photos provided by an architect who remodeled a home in Rancho Palos Verdes in California.
 suzanneandco
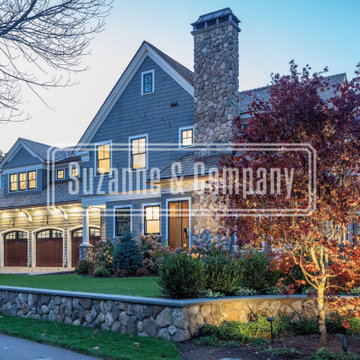
Proudly presenting a masterpiece in the heart of Lexington Center! This residence is a new classic, admired by all who pass by as they are drawn to the sweeping lines of this home, enhanced by copper gutters & handmade copper gas lanterns. The extensive landscaping includes hardscape of fieldstone walls & heated bluestone walkways. Even the driveway has radiant heat; never worry about snow or ice here! The finest materials were used throughout, and every exquisite detail was thought through. A hallmark feature is the living room with custom walnut pocket doors and a wood burning fireplace with white rhino leathered marble and walnut face. The kitchen & butler's pantry are stunning & outfitted with Neolith Calcutta counters and wall slab, amazing lighting & top of the line appliances including Sub Zero & Wolf. This home was built to entertain inside and out. Enjoy the patio year 'round with built-in gas firepit & gas grill. You've never seen a master suite like this one! Truly a must-see property.
 Advance Design Studio, Ltd.
Willie & Leslie of Barrington Hills loved the location of their home. Its breathtaking views overlooked a wooded backyard and a captivating lake. They didn’t want to move, but they needed more space. But the house was missing that big family room where everyone could gather, relax and converse, and the house was completely cut off visually from the beautiful outdoor view right outside!
They knew what they wanted meant building an addition to their home. They began searching the internet and came across Advance Design Studio, and after browsing through project after project and reading one outstanding client review after another, they were sold on Advance Design. Additionally, they loved Advance Design’s “Common Sense Remodeling” process and felt confident that it would allow the Design/Build company to easily coordinate the multiple projects they wanted to complete all at one time. Willie and Leslie immediately set up a meeting with Owner Todd Jurs and Project Designer Claudia Pop. When the meeting ended, they were sure that Advance Design were the right people and the right approach for their project.
"Establishing a direction and a budget is always key in project of this size," Todd said. "This house was screaming for a family room and it didn't have one. Ultimately, it's about working together towards the same goal of a beautiful functional addition."
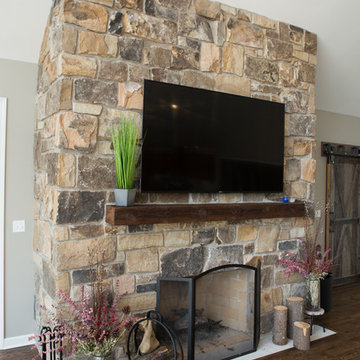
The project consisted of a significant family room addition with an extraordinary vaulted ceiling and floor to ceiling fireplace, a guest suite renovation with a luxury bath, a garage addition, and an adjoining outdoor patio renovation complete with a fantastic built in grilling station. The main goal was to add comfort and space to the existing home that would last their lifetime, and finally allow them to capture the amazing view of the backyard and lake that they never could really enjoy previously.
Willie, Leslie and Claudia paid special attention to designing the space to make sure that the footprint of the room did not interfere with the views. Floor to ceiling Pella windows were incorporated into a spectacular window wall to provide plenty of natural light.
Vaulted ceilings gave the room a bigger feel and the stunning floor to ceiling masonry fireplace was designed giving the room a rustic, comfortable feel of a Colorado Lodge. Barnwood doors and exposed wooden beams accentuate the crackling fireplace and family gathering space. An oversized statement chandelier bathes the space in soft light once the sun sets and compliments the exposed wood and fireplace perfectly.
“It simple elegant and beautiful,” Designer Claudia Pop said. “It is a great family room that captures the views perfectly. They love the fireplace, the barndoors and the openness of the space we designed for the whole family now to enjoy.”
And when warm weather beckons, the outdoor patio is a terrific place to spend an evening. The family now enjoys fall nights in front of their outdoor fireplace overlooking the quiet lake. Dekton Trillium Quartz counters tops adorn an amazing grilling bar. Nearly indestructible, they are the only manufactured stone product designed exclusively to withstand high heat in summer and extreme cold temperatures in winter.
The guest bath renovation makes Willie and Leslie’s friends and family feel like they are staying at a 5-star hotel. Carlisle colored Maple cabinets from Medallion make a roomy dual vanity more than adequate with plenty of space to get ready for the day after a peaceful night’s sleep. Cambria Quartz countertops are durable and elegant, while contrasting the neutral cabinets flawlessly. Heated flooring from Warmly Yours is the cherry on top for this cozy guest bath.
All the projects turned out better than they even imagined. Willie and Leslie now have a spacious family room with even better views of the lake and woods, a much larger garage, a fantastic relaxing outdoor patio, and a guest bath that makes it almost impossible to get the guest to leave after their stay.
Are you thinking about a remodeling project? Talk to the experts at Advance Design about the renovation of your dreams. Now is the perfect time to renovate. Check out other amazing projects here. With “Common Sense Remodeling”, the process of renovating your home has never been easier. Contact us today at 847-836-2600 or schedule an appointment to talk with us about your kitchen remodeling project, or any other home renovation you are planning. Our talented team can help you design and build the new space you’ve been dreaming about.
Find the right local pro for your project
 Bilotta Kitchen & Home
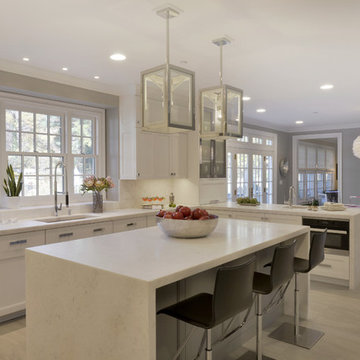
From the outside of this very traditional home in Harrison, New York, you would never expect the contemporary styling and pops of color throughout the interior, including the white feather chandelier and oversized painting of Marilyn Monroe with pink bubblegum, both of which accent the dinner table. When the client first came into meet with Bilotta designer, Danielle Florie, they had an idea of what they wanted, and what they didn’t want. They have modern/transitional taste and wanted both an aesthetically “wow” kitchen that was also very functional. Danielle made it come to life. They had been collecting photos for ten years before they decided to pull the trigger. They opted for Bilotta’s private cabinetry line, the Bilotta Collection, and selected a frameless, stepped door with double tiered wall cabinets, all accented by polished chrome rectangular pulls and square knobs. Instead of a deep corner cabinet they went with thick alumasteel shelves in the corner of the kitchen. At the peninsula they added some “bling” with the polished chrome and glass doors above the appliance garage. Also at the peninsula they decided to face their secondary, “prep” sink out towards the dinner table primarily so the kids could wash their hands before eating. There is also an undercounter beverage center to the right of that sink for easy access to drinks. Instead of going with a smooth painted finish they opted for a hand-brushed finish for a little texture. All appliances are Miele including their brand new 48” duel fuel range, smart enough on its own to tell you how to cook! The backsplash behind the range is the Stone Fox Collection from Ellen Blakeley of Ellen Blakely Studio in Santa Rosa, CA. It is a custom made tempered glass mosaic. The countertops and rest of the backsplash are White Diamond marble from Rye Marble, and the flooring is a porcelain Tile from Terra Tile. Designer: Danielle Florie. Photo Credit: Peter Krupenye
 Inspired Closets Baton Rouge
You open your kitchen cabinet. It's a mess. An endless abyss.
You're looking for olive oil to sauté delicious garlic and onions for dinner.
You know you have it. Where could it be?
Cooking your favorite family meal can take longer than the Macy's Thanksgiving Day Parade without organization to find what you need.
That's what happened each & every time one of our recent Baton Rouge clients, Jan, tried to cook a meal in her home.
Searching For A Pantry Solution
Jan and her family moved into their new home in 2017 despite not having a pantry. Knowing they needed one desperately, Jan wondered if a pantry could fit in their vast laundry room.
Instead of trying the DIY route, Jan wanted professional help to get it done right.
Jan saw an Inspired Closets sign on the lawn of a home in her neighborhood. She decided to visit their showroom to meet with our expert designer, Felicity.
After Jan shared her vision of what they wanted in a pantry, Felicity got to work! She created a custom design accomplishing everything Jan wanted. So there was never a need to shop around for other companies.
Let The Fun Begin: The Design & Construction Process
Jan thought the process was terrific. Much easier than they thought it would be. The 3D rendering of the project allowed them to see their dream space before installation began.
And, during the process, Jan realized she wanted to expand the project by redoing the laundry room as well!
Jan said, "I was able to make a few tweaks until it was perfect."
Felicity had a contractor she worked with closely. Together they handled it all, making it super easy for them with no mess or stress left behind.
A True Eye-Opening Experience: Make Getting The Ingredients The Easiest Part
"The functionality was the best part," says Jan. Finally, her family could see everything.
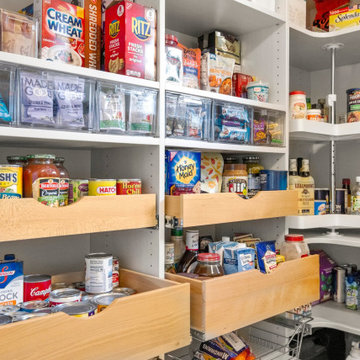
Inspired Closets put everything in plain sight by creating:
- clear acrylic snap drawers to see everything
- sliding pull-out drawers for canned goods
- a produce pull-out drawer
- a basket for chips and snacks that the kids loved
- a lazy Susan that holds vinegar, oils, and bottled items
Felicity maximized every inch of space in the design. Jan and her family were amazed the room had a wide-open feel, even with all the items in the room. The area was functional and beautiful.
Saving Time, Money, And Stress
But it wasn’t just pretty to look at. Now that everything is more accessible in her pantry, making a grocery list is a cinch. Jan found herself saving money by not buying things she already owned but simply couldn’t see.
"I love how the kids can find things so quickly. We never have to guess where stuff is, making daily life easier," Jan says.
Another Happy Ending
Jan’s family could not be more satisfied with their reimagined space, telling everyone they know not to be overwhelmed when considering a new project.
Let us help get rid of the mess and stress in your pantry or laundry space like we did for Jan!
Whether you’re embarking on your new construction, forever home, or a renovation to make life better, just imagine how we can help you create your dream come true.
 RAJ Kitchen and Bath, LLC
 “Full apartment design”.
IF you have not yet seen this apartment conversion before, we strongly urge you to go to the bottom left of this page and click on the short 2-minutes video. It would put a lot of things into perspective when you come back and continue reading this.
It is true we were literally handed the keys and told a list of things that they wanted to have happen and we were to go into the apartment, look at the space and come up with a design that would satisfy all of that need. UNTIL we showed up! The unit had really seen some better days but we knew we had to look past that and come up with a concept that would work for them.
The immediate challenges were centered around 3 big ideas:
1. Adding a second bedroom to the already small footprint
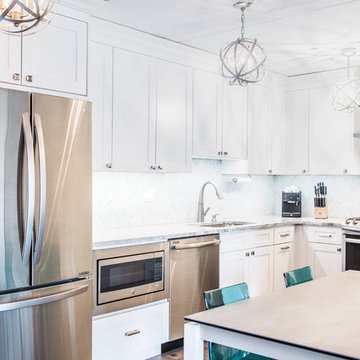
2. Figuring out a way to make the kitchen bigger, better and brighter
3. Creating a master room walk in closet
It’s always difficult to add new rooms into existing footprint without expanding out or up and not incurring any opportunity cost. In this case, that was exactly what we had to do. Item one and two above had to be tackled as one. We went ahead and switched out the location of the dining room and eliminating an area where there was a “nook” type eat-in area. By doing so, we were able to cut right into that footprint and change the layout of the kitchen.
That one move allowed us to dig into the kitchen design because it was now the main focal point in the apartment. It was no longer an option to keep it in that tiny hole where it was, so we had to ensure that this design was functional and aesthetically pleasing at the same time. By adding the table into the space where an Island typically would go, we were able to both cut cost and still provide a dining experience. The Table serves as an Island as well when cooking.
We then proceeded to block in the existing doorway to the dining room. By doing this, we were able to create a full room which allowed us to put a door on the other side and called that room Bedroom #2. This was easier to do because all of the mechanicals were already in that space (light, heater and windows). By shifting things around, we also achieved a huge wall to wall closet from inside. PERFECT!
Then we moved into the Single bedroom. We thought it was a big room with a small closet, so by creatively adding an L shaped wall and steal some footprint into the bedroom side, we were able to put a door on that new room and design it for the walk-in closet. Even after this, the bedroom still holds a queen size bed with 2 night stands, a TV on the wall, a sitting chair and plenty of room to walk around. This was done by rethinking the location for the bed and night stands.
The bathroom was gutted to make sure there was no leaks and rebuild from the ground up. We kept all of the plumbing where it was, added a new vanity, medicine cabinet, tiles and lighting and it was done.
From there, the rest of the unit had new flooring all throughout, paint, and lighting. After completion and walk through, this project was handed over back to the clients.
Execution and collaboration between all the trades were: Reggie and his team from Premier Interiors and Rohan from RD Mechanical Services.
p.s. Please see our website to see the video.
 RAJ Kitchen and Bath, LLC
 “Full apartment design”.
IF you have not yet seen this apartment conversion before, we strongly urge you to go to the bottom left of this page and click on the short 2-minutes video. It would put a lot of things into perspective when you come back and continue reading this.
It is true we were literally handed the keys and told a list of things that they wanted to have happen and we were to go into the apartment, look at the space and come up with a design that would satisfy all of that need. UNTIL we showed up! The unit had really seen some better days but we knew we had to look past that and come up with a concept that would work for them.
The immediate challenges were centered around 3 big ideas:
1. Adding a second bedroom to the already small footprint
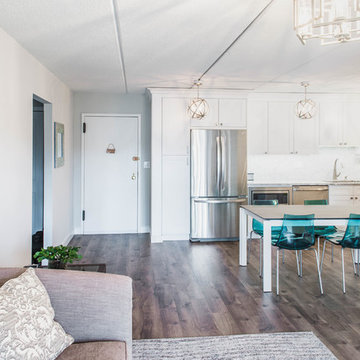
2. Figuring out a way to make the kitchen bigger, better and brighter
3. Creating a master room walk in closet
It’s always difficult to add new rooms into existing footprint without expanding out or up and not incurring any opportunity cost. In this case, that was exactly what we had to do. Item one and two above had to be tackled as one. We went ahead and switched out the location of the dining room and eliminating an area where there was a “nook” type eat-in area. By doing so, we were able to cut right into that footprint and change the layout of the kitchen.
That one move allowed us to dig into the kitchen design because it was now the main focal point in the apartment. It was no longer an option to keep it in that tiny hole where it was, so we had to ensure that this design was functional and aesthetically pleasing at the same time. By adding the table into the space where an Island typically would go, we were able to both cut cost and still provide a dining experience. The Table serves as an Island as well when cooking.
We then proceeded to block in the existing doorway to the dining room. By doing this, we were able to create a full room which allowed us to put a door on the other side and called that room Bedroom #2. This was easier to do because all of the mechanicals were already in that space (light, heater and windows). By shifting things around, we also achieved a huge wall to wall closet from inside. PERFECT!
Then we moved into the Single bedroom. We thought it was a big room with a small closet, so by creatively adding an L shaped wall and steal some footprint into the bedroom side, we were able to put a door on that new room and design it for the walk-in closet. Even after this, the bedroom still holds a queen size bed with 2 night stands, a TV on the wall, a sitting chair and plenty of room to walk around. This was done by rethinking the location for the bed and night stands.
The bathroom was gutted to make sure there was no leaks and rebuild from the ground up. We kept all of the plumbing where it was, added a new vanity, medicine cabinet, tiles and lighting and it was done.
From there, the rest of the unit had new flooring all throughout, paint, and lighting. After completion and walk through, this project was handed over back to the clients.
Execution and collaboration between all the trades were: Reggie and his team from Premier Interiors and Rohan from RD Mechanical Services.
p.s. Please see our website to see the video.


 OKLAHOMA SHUTTERS
Benefits of Plantation Shutters
Plantation shutters offer advantages and benefits to homeowners over other window coverings including:
• A permanent addition to a house: While they don't add much to the sale price and don't guarantee a return on investment, the curb appeal helps the house sell faster. The permanency of plantation shutters allows them to be included in appraisals.
• Versatility: Many have the ability to open only halfway if desired. If you want to let in all the light, plantation shutters swing away from the window to grant an unobstructed view.
• Insulation: When all louvers are closed, a good insulating barrier is created, trapping unwanted temperatures and saving you money on your energy bill.
• Easy maintenance: With wide louvers, a simple wipe-down is often all that's needed. Vinyl shutters can be taken off their hinges and sprayed off for a major cleaning.
• Elegance: The classic, yet modern look conveys a permanency like no other window dressing can. Whether painted or natural wood, they all have a look that says; welcome home.
Wood vs. Faux Wood
It's not hard to argue that natural wood is more appealing than vinyl or PVC. However, "faux wood," as it's sometimes called, has some advantages:
• Price -- Faux wood shutters are often lower in price than real wood.
• Weight -- Because some shutters are made "hollow core" (as opposed to vinyl-wrapped medium density fiberboard, MDF), they can be significantly lighter.
• Moisture Resistance -- If you live in an area with high humidity, hollow faux wood or aluminum core will resist expanding and sagging. (MDF core louvers will tend to expand and crack as the material swells with moisture.)
Natural wood is the choice for those who have a very healthy budget or for whom a specific appearance is a must. Among the advantages are:
• Size -- Because wood plantation shutters are made of hardwood, they can be quite a bit larger than plastic or vinyl. Vinyl shutters larger than 29 inches may be prone to sag, so they need divider rails or other supports which can destroy the traditional look of a plantation shutter.
• Natural -- While vinyl or plastic shutters can be painted to match any color scheme, the natural shades and finishes of the various species of wood have something for every look.
• Classic -- While many plastic shutters can be made to look like real wood, the faux wood finishes can vary significantly depending on manufacturer and model. Up close, it can be easy to tell they're plastic. The warmth of natural wood is a classic feel that's impossible to beat.
Popular Plantation Shutter Brands
When you go to purchase your plantation shutters, brands names may offer a good representation of high-, mid-, and low-cost range of what's available. Which one you choose depends on your budget and your tastes. Hunter-Douglas and Norman Shutters produce three lines of plantation shutters in both real wood and faux wood styles. A higher-end product, Hunter-Douglas may be worth the cost for beauty and quality of workmanship. The Window Outfitters and Sunland produce a mid-cost line of shutters. The mid-range pricing may be for those who are balancing aesthetics with a budget. National franchise and or box stores may not offer an in-house expert or designer. Look to local companies that specialize in plantation shutters looking online may offer a low-cost brand for budget-minded DIYers. Available in both faux and real wood, the affordability combines with the visual appeal to make this a very popular choice for plantation shutters. Regardless of which line you go with, be sure to ask about frames. Generally all manufactures offer frame choices and may add to the cost, but they add an unsurpassed beauty and warmth to a room with plantation shutters.
Plantation shutters look like similar to wooden blinds, but there are significant differences. Blinds are often narrow, made of aluminum or vinyl, and the slats tilt based on a gear and pulley mechanism and they hang in the window with cords. By contrast, plantation shutters have wide compound louvers that fit into a frame and are controlled by way of a wooden rod running up the middle. When not needed, they can be manufactured to swing back onto the wall. Options to are available to build a more contemporary look with a larger view with a “hidden tilt” feature.
Cost of Plantation Shutters
Nationally, the cost of plantation shutters, depending on their size and the material, whether or not they are custom arches and colors or stains, may vary. Most manufacturers want their shutters to be professionally installed to keep the warranty intact which is a benefit to the customer in the long run. They will usually have a limited lifetime warranty.
Cost of Installation
Costs for having plantation shutters installed by a contractor are a bit more predictable. Contractors who have installed plantation shutters before can quickly get accurate measurements and suggest which materials would work best in different rooms. For example, while natural wood may look beautiful in your living room, it might not be so practical in a bathroom where moisture will cause the wood to warp. The size, material, and quality of the shutter will have a significant effect on the cost. Contractors usually go through a shutter supplier and can get various sizes that are not normally available at home improvement stores. Hiring a professional team of knowledgeable suppliers and installers is a good choice.
Here are some sample prices of the shutters most contractors use for standard-sized windows: In general, plantation shutters should cost approximately $20 to $26 per square foot. Labor costs depend on factors such as the contractor's workload, remoteness of the location, environment, and the contractor's overhead. Labor generally runs about $100 per hour and will be added to the shutter cost.
• 16x20 -- Faux wood $120. Real wood $156
• 24x50 -- Faux wood $160. Real wood $208
• 36x54 -- Faux wood $270. Real wood $351
• 36x60 -- Faux wood $300 Real wood $390
• 42x72 -- Faux wood $420. Real wood $546
• 48x82 -- Faux wood $550. Real wood $715
DIY
Plantation shutters can be purchased and installed by the homeowners. How much they cost will depend on size and material. Faux wood shutter’s cost depends on size and wooden shutter’s cost will depend on size and whether or not they are painted or stained.
• Natural wood is $90-$600 depending on size. Many companies offer standard stained selection but custom color matching may be available from $175 -$250.
• Faux wood will be from $120-$500.
• Additional tools include: Hang Strips $4-$15 and about $4 for mounting hardware. Locks or closures can cost up to $15 for each shutter.
Finally, if you order them online, you can expect to pay $30-$70 shipping per shutter or per set of shutters per window depending on the supplier. Keep in mind that even if you're handy with tools, installing shutters can be time-consuming if you've never done it before there is defiantly a learning curve.
 AllThingsDeco
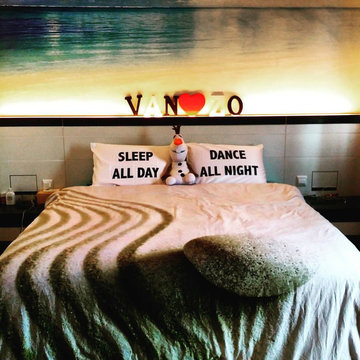
Calling all party animals! The perfect bedding accessory for those who love to dance until the wee hours. Our SLEEP ALL DAY, DANCE ALL NIGHT by ATD is a pair of pillowcases for those who don’t want to go home before dawn, and never leave the house before sunset!
This double-sided, super comfy pair of pillowcases will make you feel as if you’re sleeping on a cloud. With SLEEP ALL DAY, DANCE ALL NIGHT by ATD, there’s no excuse to miss out on beauty sleep – even if you like to party ’til dawn!
Pillowcase only, comes in a pair.
 Hallmark Floors
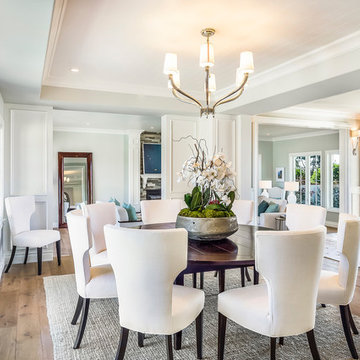
Ventura Marina Oak Hardwood Floors are seen here in before and after photos provided by an architect who remodeled a home in Rancho Palos Verdes in California.
 Paintzen, Inc.
When it comes to finding inspiration for your house or apartment design, there are a variety of routes you can take. For some, it is important to dive into the latest trends in fashion and art, using only the most popular decor pieces and embracing the color palettes seen on runways or in home and garden magazines. But for others, it’s simply about discovering what feels most like “home.”
Ashley Steele, the creator of A Styled Affair, was part of the latter group. “Since my husband and I were moving into a space that was previously owned, I needed a way to make it feel like it was truly ours, and unique to us,” she told our team.
A Styled Affair sprang from Ashley’s passion for fashion, and need for a creative outlet. But it soon became more than that. She developed a following, and it quickly became a place where she could share her personal style, travel adventures, and lifestyle tips. “While the blogging industry has become overwhelmed with people sharing their favorite home decor or make-up tips, I think what sets A Styled Affair apart is my commitment to stay true to my unique taste. I have always marched to the beat of my own drum – and that carries through in the clothes I wear, the decor I select for our home, and the travels I plan.”
Paintzen connected with Ashley as she was settling into her new home in Boston’s Seaport District. Although she and her husband have lived in Boston for almost 8 years, they were used to smaller, more traditional spaces. Their new home is much bigger, and more modern, than any place they lived before. “I wanted to select colors of comfort, simplicity, and sophistication so we could elevate the space and make it feel more like a home.” Ashley also accurately pointed out that new construction can sometimes feel a little cold and sterile, almost industrial. “I wanted our home to feel like a peaceful oasis after coming in from the bustling city.”
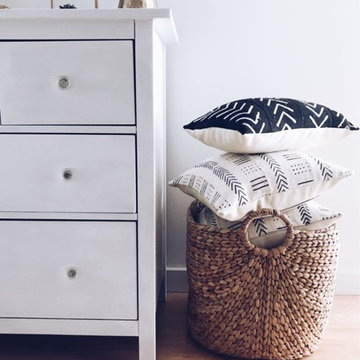
Ashley chose soft white paint for her walls to bring a sense of comfort and zen. With lots of wall decor, art work and carefully selected furniture, the walls serve as a clean and comfortable palette, and allowed her more freedom when making her other design decisions throughout the space. Ashley kept the overall palette fairly neutral, and incorporated “modern bohemian” inspired decor throughout the home; the final product was clean and simple, and catered to her style.
We asked Ashley what she was most excited for now. “I’m most excited to continue to find new decor pieces to compliment the paint colors and decor we’ve already found for the space. We have been really patient with decorating and selected each piece really careful to make sure it is cohesive and flows from room to room. I’m looking forward to enjoying the space with my husband and dog, and entertaining friends and family in the spring and summer!”
A few final questions for Ashley on her experience with Paintzen:
“I would highly recommend Paintzen to anyone, especially those that live in the city. There are so many different paint companies and contractors to choose from but going through Paintzen simplified the process and made me feel comfortable that we had the right team working on our space. Their platform for booking services and choosing paint colors made the process seamless and was a great way to keep track of what we booked and chose for colors. Most importantly, the customer service team was outstanding whenever we had a question or needed to make an adjustment.”
And advice she would give someone repainting their home:
“Patience. I would recommend taking your time and doing your research before selecting paint colors. Lighting changes every color so make sure to bring paint swatches and samples into the space and look at it throughout the day to see the different tones that the light will pick up. I would also recommend researching color trends and recommendations for colors in the family you are looking for. We found our living room color through a blog post listing top-used colors by interior designers and it looks amazing.”
 Taragano Design and Build
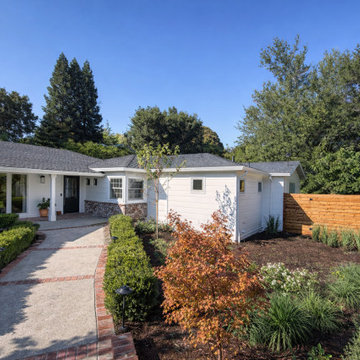
Taragano Design & Build completed this addition in Orinda,
California, extending the front of an existing single story ranch.
The original elevation ran flat across its whole length, which on a
long low house leaves the entry with nothing to distinguish it. The
addition breaks that line by projecting forward, and the entry now
sits in the inside corner where the two volumes meet. That corner
does the work a porch or portico would do on a different house,
without adding anything applied.
Roof pitch and eave height were matched to the original rather than
raised. A taller addition would have read as newer construction
grafted on. Holding the ridge below the existing line keeps the
house reading as one building, which is the entire test on a front
elevation.
The bay window carries a stone base rather than running siding to
grade. That detail is practical before it is decorative. Splash
back from the walkway and planting beds is what eventually damages
siding at the bottom course, and stone at the base ends that
problem permanently on the most exposed face of the addition.
Approach was reworked at the same time. The walkway swings across
rather than running straight at the door, so the house is seen
before it is entered.
Licensed general contractor, CSLB #1143420. Diamond Certified.
 Shirley Chen
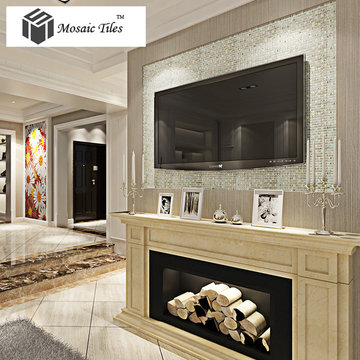
Being occupied in heavy workloads, Emma is surrounded by in a gray environment every day. Sometimes, when she takes a break from, she will remember the boy who promised her an iridescent home, but she clearly knows that they had broken up for a long time and she will never what her ex said before he leaves for France.
They hardly have contacted each other during these years. What is more, she heard that his settled down from their common friends. When she is together with her parents, they told her it is time to find a new boy.
Is it time to…? Is it? But she can’t forget her iridescent dream.
One day, she got off work as usual. She saw a man who is standing in the door of her apartment. She recognized him although they had separated for many years.
He walked up to her and lovingly said, “hi, long time no see, how are you? Do I have chance to achieve my promise? Giving you a iridescent dream.”
She can’t help crying for movement, but she asked him why, because he told her that he would stay in France for his further study.
He said, “ I can’t and I will never forget you, so I design a iridescent tiles for you, for our home, when I was learning design in France. It is white and silver, can be used for bathroom, kitchen and backsplash. I think you will like it , don’t I ?”
Emma smiled and finally her iridescent dream was came true.
Do you want a iridescent dream? You can learn more though: http://www.tstmosaictiles.com/index.php?route=product/product&path=33_60&product_id=50
 Tile Doctor Ltd
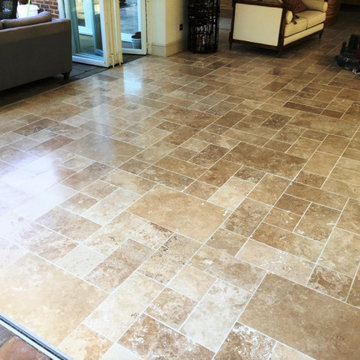
This property in Godalming had the whole downstairs floor tiled with Fired Earth Limestone tiles nine years prior and had never had it cleaned or maintained professionally. The once beautiful stone was now looking dull and the grout had turned black with dirt leaving the floor looking uninviting.
This is quite normal for stone floors as it is the sealer that protects the stone from dirt and enhances its look. Most sealers wear off after three to four years sealer and in this case after nine years it was well overdue a deep clean and reseal.
I visited the property to survey the floor. It was indeed looking in need of some attention and the kitchen was particularly bad. To restore the appearance of the Limestone tile and grout the floor would need to be stripped of what remains of the old sealer, then deep cleaned with attention to the grout, polished with burnishing pads and then finally resealed. I was confident I could get it restored to a nearly new finish and to prove it I completed a small demonstration clean which the homeowner was very happy with. They agreed to my quote and we scheduled in a couple of days to carry out the work.
On day one I started by cleaning the grout using a strong dilution of Tile Doctor Pro-Clean. its run along the grout line and then left to soak in for about ten minutes so it can get to work breaking down dirt and old sealer. The grout is then scrubbed using a grout brush which is then scrubbed backwards and forwards along the grout line until clean. The area is then rinsed with water and all the waste removed with a wet vacuum cleaner.
Next, I turned my attention to the Limestone tiles which needed stripping of any remaining sealer, cleaned and polished. I find the best way to do this is by apply a set of diamond encrusted Burnishing pads in sequence starting with a coarse 400-grit followed by 800, 1500 and finally finishing with an extra fine 3000 grit. Water is used to lubricate the burnishing process and the slurry is rinsed and extracted off the floor between pads. Each pad is run over the tiles three times, and it was a large floor so as you can imagine this process took most of the day.
I left the floor to dry out overnight and returned the next day to seal the Limestone. Before doing that, I reviewed my previous day’s work and I cleaned up any areas that needed further attention. Next step was to ensure the floor was dry as I don’t recommend applying a sealer to damp tile as you won’t get an even appearance, so before sealing a floor I tested for moisture using a damp meter.
To seal the floor, I applied two coats of Tile Doctor Ultra Seal which is an impregnating sealer that works by occupying the small pores in the stone to prevent dirt becoming ingrained there. Limestone is a light stone and most customers like that appearance so I find it best not to use a colour enhancing sealer as it can darken the stone. Ultra-Seal doesn’t contain any colour enhancer and leaves the floor with a natural finish whilst allowing the stone variations and patterns to show through.
Once the sealer was dry, I gave it a further polish with the 3000-grit pad which further brought out the natural beauty of the stone. My client was very happy with the floor, it really lifted the who area and the Kitchen in particular.
Rupert Mcleod
West Surrey Tile Doctor
 Bilotta Kitchen & Home
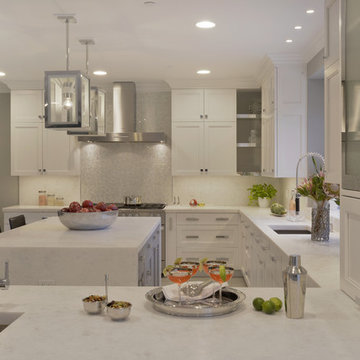
From the outside of this very traditional home in Harrison, New York, you would never expect the contemporary styling and pops of color throughout the interior, including the white feather chandelier and oversized painting of Marilyn Monroe with pink bubblegum, both of which accent the dinner table. When the client first came into meet with Bilotta designer, Danielle Florie, they had an idea of what they wanted, and what they didn’t want. They have modern/transitional taste and wanted both an aesthetically “wow” kitchen that was also very functional. Danielle made it come to life. They had been collecting photos for ten years before they decided to pull the trigger. They opted for Bilotta’s private cabinetry line, the Bilotta Collection, and selected a frameless, stepped door with double tiered wall cabinets, all accented by polished chrome rectangular pulls and square knobs. Instead of a deep corner cabinet they went with thick alumasteel shelves in the corner of the kitchen. At the peninsula they added some “bling” with the polished chrome and glass doors above the appliance garage. Also at the peninsula they decided to face their secondary, “prep” sink out towards the dinner table primarily so the kids could wash their hands before eating. There is also an undercounter beverage center to the right of that sink for easy access to drinks. Instead of going with a smooth painted finish they opted for a hand-brushed finish for a little texture. All appliances are Miele including their brand new 48” duel fuel range, smart enough on its own to tell you how to cook! The backsplash behind the range is the Stone Fox Collection from Ellen Blakeley of Ellen Blakely Studio in Santa Rosa, CA. It is a custom made tempered glass mosaic. The countertops and rest of the backsplash are White Diamond marble from Rye Marble, and the flooring is a porcelain Tile from Terra Tile. Designer: Danielle Florie. Photo Credit: Peter Krupenye
 Phoenix Home Remodeling
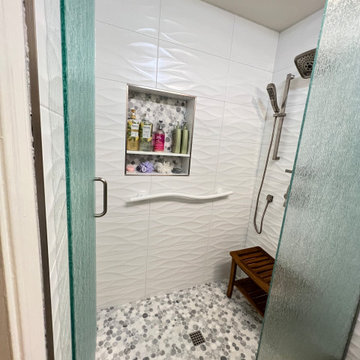
It was a great experience working with Barbara & Peter on their bathroom remodel. They never did a remodel before on their 1983 built house and were looking to refresh the outdated master bathroom.
A new custom shower was installed with a new backer board, waterproof, and shower wall tile. They chose Idole Tear White ceramic tile from Floor & Decor for the shower wall tile.
They picked White Marble Flat Pebble for the new shower floor tile and the new shower wall niche. They also had us install a new shower handheld fixture, shower head, and grab bar that has a fun curve to it and matches the shower wall.
They also had us install a new frameless tempered rain glass with a door on the new shower.
For the bathroom flooring, we used Valley Ridge Mansfield Amber III Porcelain, which adds a fresh and sleek feel to the area.
 Degnan Design-Build-Remodel
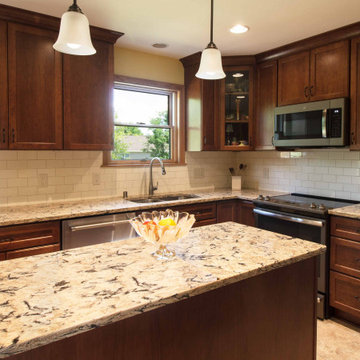
The full countertop of the peninsula used to be the favorite work area for Mark and Kim, because there were no upper cabinets there to obstruct their comfort. But they also recognized that they never actually utilized the entire 36-in of depth within that old peninsula. And they never used any bar stools underneath the overhang, and so that part was of no value to them. Hence, an island of the perfect size came into play. Island cabinets of 60 inches by 24 inches gave them the cabinet storage they needed, and the overhanging front to back and side to the side provided an island top that gave them every inch of workspace they required while maintaining proper distance to the dishwasher, the range, and the refrigerator.
Furthermore, by straightening the run of cabinets along the outside wall, an inside corner was eliminated. The net result was to give them more cabinet storage than they had before, and better usability in their countertop space.

 Carl Mattison Design
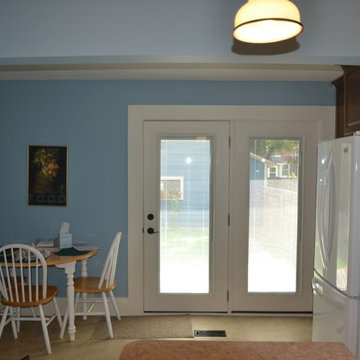
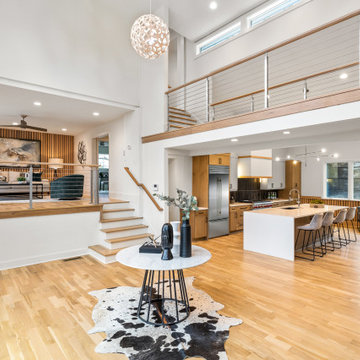
Take a home that has seen many lives and give it yet another one! This entry foyer got opened up to the kitchen and now gives the home a flow it had never seen.
 BARRETT LAWN CARE
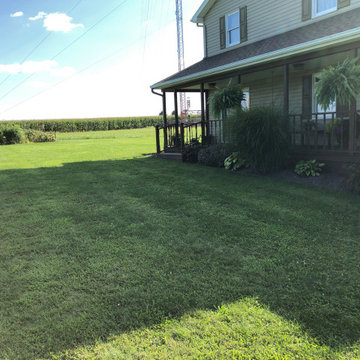
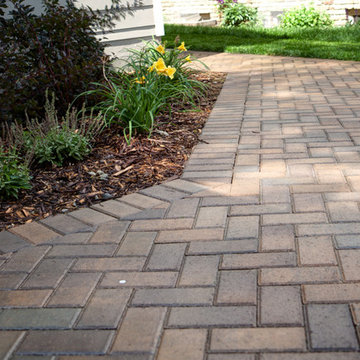
Irrigation, landscape, and patio installation in Edina.
Happy Returns daylilies and astilbe can be seen here.
Example of a classic patio design in Minneapolis
Example of a classic patio design in Minneapolis
 Advance Design Studio, Ltd.
Willie & Leslie of Barrington Hills loved the location of their home. Its breathtaking views overlooked a wooded backyard and a captivating lake. They didn’t want to move, but they needed more space. But the house was missing that big family room where everyone could gather, relax and converse, and the house was completely cut off visually from the beautiful outdoor view right outside!
They knew what they wanted meant building an addition to their home. They began searching the internet and came across Advance Design Studio, and after browsing through project after project and reading one outstanding client review after another, they were sold on Advance Design. Additionally, they loved Advance Design’s “Common Sense Remodeling” process and felt confident that it would allow the Design/Build company to easily coordinate the multiple projects they wanted to complete all at one time. Willie and Leslie immediately set up a meeting with Owner Todd Jurs and Project Designer Claudia Pop. When the meeting ended, they were sure that Advance Design were the right people and the right approach for their project.
"Establishing a direction and a budget is always key in project of this size," Todd said. "This house was screaming for a family room and it didn't have one. Ultimately, it's about working together towards the same goal of a beautiful functional addition."
The project consisted of a significant family room addition with an extraordinary vaulted ceiling and floor to ceiling fireplace, a guest suite renovation with a luxury bath, a garage addition, and an adjoining outdoor patio renovation complete with a fantastic built in grilling station. The main goal was to add comfort and space to the existing home that would last their lifetime, and finally allow them to capture the amazing view of the backyard and lake that they never could really enjoy previously.
Willie, Leslie and Claudia paid special attention to designing the space to make sure that the footprint of the room did not interfere with the views. Floor to ceiling Pella windows were incorporated into a spectacular window wall to provide plenty of natural light.
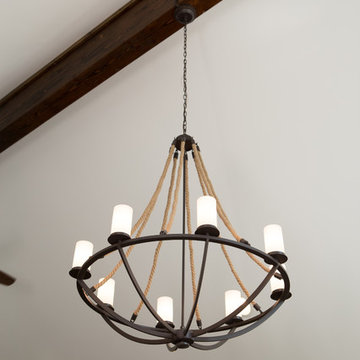
Vaulted ceilings gave the room a bigger feel and the stunning floor to ceiling masonry fireplace was designed giving the room a rustic, comfortable feel of a Colorado Lodge. Barnwood doors and exposed wooden beams accentuate the crackling fireplace and family gathering space. An oversized statement chandelier bathes the space in soft light once the sun sets and compliments the exposed wood and fireplace perfectly.
“It simple elegant and beautiful,” Designer Claudia Pop said. “It is a great family room that captures the views perfectly. They love the fireplace, the barndoors and the openness of the space we designed for the whole family now to enjoy.”
And when warm weather beckons, the outdoor patio is a terrific place to spend an evening. The family now enjoys fall nights in front of their outdoor fireplace overlooking the quiet lake. Dekton Trillium Quartz counters tops adorn an amazing grilling bar. Nearly indestructible, they are the only manufactured stone product designed exclusively to withstand high heat in summer and extreme cold temperatures in winter.
The guest bath renovation makes Willie and Leslie’s friends and family feel like they are staying at a 5-star hotel. Carlisle colored Maple cabinets from Medallion make a roomy dual vanity more than adequate with plenty of space to get ready for the day after a peaceful night’s sleep. Cambria Quartz countertops are durable and elegant, while contrasting the neutral cabinets flawlessly. Heated flooring from Warmly Yours is the cherry on top for this cozy guest bath.
All the projects turned out better than they even imagined. Willie and Leslie now have a spacious family room with even better views of the lake and woods, a much larger garage, a fantastic relaxing outdoor patio, and a guest bath that makes it almost impossible to get the guest to leave after their stay.
Are you thinking about a remodeling project? Talk to the experts at Advance Design about the renovation of your dreams. Now is the perfect time to renovate. Check out other amazing projects here. With “Common Sense Remodeling”, the process of renovating your home has never been easier. Contact us today at 847-836-2600 or schedule an appointment to talk with us about your kitchen remodeling project, or any other home renovation you are planning. Our talented team can help you design and build the new space you’ve been dreaming about.
50