Search results for "Potential returns" in Home Design Ideas

The owner of this period cottage in the old market town of Tadcaster near Leeds, had what was once a beautiful Yorkshire stone floor in the kitchen. It has been a long time since it had been given a proper clean so over the years and with the Kitchen being a high traffic area the whole floor including the grout had darkened and he now wanted it refurbished in time for Christmas.
I visited the property to assess what needed to be done and could see straight away that any protective sealer that was once on the floor had long since worn off. In fact, it was so consistently dirty with years of built-up grease and dirt I had to wonder if one had ever been applied.
I explained what the floor needed was a really deep intensive clean and then a sealer applied to make it easy to keep clean. The problem with most tile and stone is its porosity and if left unprotected dirt easily becomes lodged into its pores making cleaning a struggle.
To prove the difference that can be achieved and to allow me to work out a process on which I could base an accurate quote I ran a test clean on part of the kitchen floor. The test clean went very well, the difference was remarkable, and the cleaned section really stood out. Pleased with the potential of a clean floor they accepted my quote, and we pencilled a date in the diary.
I returned on the appointed date and began by removing the kickboards from under the kitchen units to protect them from splashing. Next, I set about spaying the floor with a strong dilution of Tile Doctor Pro-Clean, this is a purpose made tile and grout cleaner that eats into the grease and dirt so it can be removed. This product works best if you leave it for ten minutes before scrubbing in using a heavy-duty machine fitted with a heavy-duty brush. The soil released from the floor was then extracted using a wet vacuum.
The Pro-Clean did a good job on the grout however it was clear something stronger was required to really get the stone clean, so I stepped up a gear and applied Tile Doctor Remove and Go using the same process as before. This is a really good product for removing deeply ingrained grease and dirt.
The final step of the cleaning process was to give the stone and acid wash using Tile Doctor Grout Clean-Up to remove old grout haze and other mineral deposits; additionally, being an acidic product, it counters the alkaline cleaning products used earlier neutralising the pH level of the floor and leaving it ready for sealing.
Before sealing I like to discuss the different products available and the finishes they can provide. In this case my clients’ main concerns were that they wanted the stone to look natural and easy to maintain going forward.
With this in mind, Tile Doctor Seal & Go Extra was chosen, it’s a modern acrylic-based sealer that brings out the natural colours in the stone and gives a very slight smooth finish. The protection it provides will prevent dirt becoming ingrained int the pores of the stone and ensure the floor is easier to maintain. Several coats were applied, until we achieved the required finish.
The deep cleaning process and fresh sealer transformed the stone floor bringing out its original beauty and my customer couldn’t believe the difference in the floor and was highly delighted.
For aftercare I gave the client a bottle of Tile Doctor Neutral Cleaner, this product is pH neutral so it will clean the floor but won’t damage the sealer. Often people use household cleaners for cleaning tiled floors, but due to the strong chemicals they contain, they can do more harm than good by slowly stripping away the protective sealer and taking the floor back to square one. Tile Doctor Neutral Tile Cleaner is reasonably priced, and the concentrated formula means a small amount goes a long way so it’s well worth using.
This was a pleasurable job for me as it was good to see the floor transform from dull and lifeless to clean and showing the natural colour and beauty of the York stone, and always lovely to have another satisfied client.
Simon Testa
North East Yorkshire Tile Doctor

These are returning clients of Sosna, who purchased a condo built in 2009 to be their forever home to enjoy now that they are retired . Although the area and views are beautiful, the condo felt small, dark, and dated. The layout was also not functional, and had a lot of wasted space. They wanted the space to fit their lifestyle and feel like it was their own.
Having worked with Sosna previously, they knew they could put their full trust in Sosna. During the renovation, they were able to visit their cottage and relax, knowing their home was in good hands. Their only worry was that the condominium rules would restrict or delay the job. These worries were laid to rest, as Sosna developed a respectful and trusting relationship with the building management during construction.
In the Kitchen and eating area, we kept the existing footprint, but installed plenty of new cabinetry to provide much more functional storage, ensuring every square inch of the space was used to its full potential as a useful space. A white marble countertop and lower cabinetry made the space feel bright and open.
In the Master Bathroom, we re-worked the layout to allow for a larger, more functional and luxurious shower with a built in seat and nooks. During the design phase, we noticed that our clients had been hang drying clothing using a small rack in the bathtub. New hanging rods were installed above a new bathtub to provide a more functional solution for hang drying clothing that did not require having to move drying racks in and out of the space when needed. Beautiful patterned floor tiles were accented as well in the shower nooks to tie the bright new space together.
The Guest Bathroom was dark and dated. We were able to give it a welcoming facelift, giving it a more open and airy feel and a pop of colour in the shower.
Finally, we replaced the previously mismatched laminate flooring throughout the home with a darker vinyl flooring, all flowing in the same direction to provide a seamless and cohesive flow throughout the home, not to mention easy maintenance!
In the end, our clients were delighted with the care and quality of work put into their home, as well as the ease of the process from design to completion.
If you’re ready to make your forever home feel like it’s been made just for you, contact us to get started! We’re the Renovator You Can Count On!
Sosna Inc
7250 Keele Street, Unit 372
Vaughan, ON L4K 1Z8
416-888-7366 (RENO)
Website: sosna.ca
Email: contact@sosna.ca

After serving as a rental for some time, this home was ready to be reclaimed by its owner and her son.
Gutting “back to the studs” was an understatement for this one. This transformation involved replanning everything; including the roof, the HVAC system, the entire plumbing system, and relocating the side entrance and staircase to the back of the house. Only the subfloors, the exterior framing structure, and the brick remains from this original 1940’s-built bungalow.
When we’re renovating an old structure, we’re bound to find some surprises. This renovation did not disappoint! From basement to roof, we found more than a few, shall we say, potentially catastrophic surprises along the way.
Let’s start with the basement. The homeowner wanted to update the basement and make it a usable living space for her adult son as well as a spa with a sauna for her. This required bringing the 6 foot ceiling height up to code at 7 feet. To do this, we had to re-think the HVAC system that was in the basement ceiling. When we opened up the basement ceiling to remove the HVAC supply and return trunks, we discovered asbestos! The asbestos had to be removed before we could dismantle and remove the HVAC system.
For the main floor, when we were replanning the existing 2-bedroom layout to create two master bedrooms each with their own ensuites, we looked at the possibility of removing the main load-bearing wall. But our investigations led to the discovery that the load bearing wall was not lined up with the roof or the basement load points, so the load of the house was not continuous throughout. This was a disaster waiting to happen. And as we found out, this lack of alignment was causing major issues with the roof when we went to replace the shingles. We discovered portions of the roof truss in very poor condition, literally moments away from giving out. These were replaced and other truss components were fortified before we went on to re-shingle the roof and replace all the soffits and eavestroughs.
Once the structural and space planning elements were sorted out, we could turn our focus to helping this homeowner select the finishes she and her son wanted for their new spaces. She wanted white all the way, and he wanted bold colours. You will see these color choices reflected in their private bathrooms as well as in the upper kitchen and living area that she will mostly use, and the basement entertainment area that he will mostly use.
To round out the personalization of this made-new-again home, we converted the basement into an entertainment center with a bar for her son, and a sauna and third full bathroom with a jacuzzi tub for a spa-like feel for her.
Without having to build from scratch, this homeowner got the custom home of her dreams.
While you “can’t teach an old dog new tricks”, the sky’s the limit on how you can transform an old home into the home of your dreams. When your “old dog” needs some new tricks, we are the Renovator You Can Count On.
Find the right local pro for your project

Condo à aire ouverte initialement vide, que nous avons aménagé avec du mobilier et des accessoires au gout du jour en vue de le sublimer et séduire les potentiels acheteurs. Notre intervention vise à hâter la vente de cette propriété tout en optimisant un appréciable retour sur investissement.
Initially an empty open-plan condo, we fitted it out with modern furnishings and accessories to enhance its appeal to potential buyers. Our intervention is designed to accelerate the sale of this property while optimizing the return on investment.

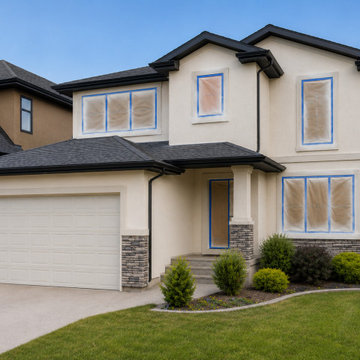
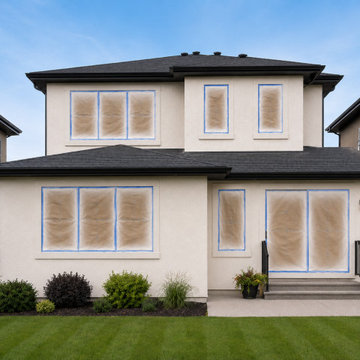
Give your stucco home a fresh, modern look with a light cream repaint that creates a striking contrast against dark fascia, trim and doors. This elegant colour combination adds warmth, sophistication and stronger curb appeal while helping the property appear cleaner, newer and more valuable.
Exterior stucco painting is a cost-effective way to transform your home without the expense of major renovations. While it cannot guarantee a specific increase or “multiply” the home’s value, a professional repaint can deliver an excellent return by improving first impressions and attracting potential buyers.
Art‑Tek Construction specializes in professional stucco house painting in Edmonton and surrounding areas, using durable exterior coatings designed for Alberta’s demanding weather.
Contact us for a free estimate.
#StuccoPainting #ExteriorHousePainting #EdmontonPainters #StuccoRepainting #CurbAppeal #HomeImprovement #ArtTekConstruction
These photographs below are of a Slate Tiled Kitchen floor taken at a customer’s house in Henley-on-Thames which, as its name suggests, sits alongside the River Thames in Oxfordshire. My client’s Slate kitchen floor had recently been cleaned with unsuitable cleaning products which I suspect impacted the sealer leaving it looking dull. Sealers really to improve the look of a stone floor so unsurprisingly once the sealer had been damaged my client had been unable to find a cleaning product that could have any kind of positive effect on the tiles.
It’s fairly well known that many supermarket quality cleaners are only really designed for use on Ceramic or Porcelain tiled floors as they contain acids which strip away at sealers and acid sensitive stone floors, leaving the stone beneath vulnerable. So your select a cleaning product for your floor always read the small print on the back of the label and make sure you avoid anything that mentions not for use on acid sensitive stone; belter still Tile Doctor have a number of products for cleaning tiled floors including Neutral Cleaner and Stone Soap.
To clean the floor and remove any remaining sealer I first made a strong dilution of Tile Doctor Pro Clean which is a strong alkaline cleaner and then spread this over the floor, leaving it to dwell. This allows the cleaner to seep into the slate and get underneath, breakdown sealers and start to lift out ingrained dirt.
Following a dwelling period of roughly ten minutes, I agitated the floor periodically with a rotary machine fitted with a black scrubbing pad and scrubbed along the grout lines with a stiff grout brush. I then used a wet vacuum to extract the resultant slurry away and then followed up by rinsing the floor with clean water, and once again vacuumed up the residue.
Any stubborn areas were retreated until I was happy with the floor and then I left the floor to dry off completely overnight, in preparation for sealing the following day.
Upon my return to the house the following day, I ran some damp tests on different parts of the floor to check for any excess moisture which could potentially damage the performance of the sealer. Once I was satisfied that the floor was completely dry, I proceeded to seal the tiles using Tile Doctor Seal & Go. This will provide a robust surface seal for the future, along with an aesthetically pleasing low-sheen finish.
This sealer works particularly well on Slate tiles and, being a water-based sealant, additionally Seal & Go does not emit an unpleasant smell as it dries. Slate is quite a porous stone so I applied six coats of seal to provide long-lasting protection.
Barry Woodward
Oxfordshire Tile Doctor

After serving as a rental for some time, this home was ready to be reclaimed by its owner and her son.
Gutting “back to the studs” was an understatement for this one. This transformation involved replanning everything; including the roof, the HVAC system, the entire plumbing system, and relocating the side entrance and staircase to the back of the house. Only the subfloors, the exterior framing structure, and the brick remains from this original 1940’s-built bungalow.
When we’re renovating an old structure, we’re bound to find some surprises. This renovation did not disappoint! From basement to roof, we found more than a few, shall we say, potentially catastrophic surprises along the way.
Let’s start with the basement. The homeowner wanted to update the basement and make it a usable living space for her adult son as well as a spa with a sauna for her. This required bringing the 6 foot ceiling height up to code at 7 feet. To do this, we had to re-think the HVAC system that was in the basement ceiling. When we opened up the basement ceiling to remove the HVAC supply and return trunks, we discovered asbestos! The asbestos had to be removed before we could dismantle and remove the HVAC system.
For the main floor, when we were replanning the existing 2-bedroom layout to create two master bedrooms each with their own ensuites, we looked at the possibility of removing the main load-bearing wall. But our investigations led to the discovery that the load bearing wall was not lined up with the roof or the basement load points, so the load of the house was not continuous throughout. This was a disaster waiting to happen. And as we found out, this lack of alignment was causing major issues with the roof when we went to replace the shingles. We discovered portions of the roof truss in very poor condition, literally moments away from giving out. These were replaced and other truss components were fortified before we went on to re-shingle the roof and replace all the soffits and eavestroughs.
Once the structural and space planning elements were sorted out, we could turn our focus to helping this homeowner select the finishes she and her son wanted for their new spaces. She wanted white all the way, and he wanted bold colours. You will see these color choices reflected in their private bathrooms as well as in the upper kitchen and living area that she will mostly use, and the basement entertainment area that he will mostly use.
To round out the personalization of this made-new-again home, we converted the basement into an entertainment center with a bar for her son, and a sauna and third full bathroom with a jacuzzi tub for a spa-like feel for her.
Without having to build from scratch, this homeowner got the custom home of her dreams.
While you “can’t teach an old dog new tricks”, the sky’s the limit on how you can transform an old home into the home of your dreams. When your “old dog” needs some new tricks, we are the Renovator You Can Count On.

These are returning clients of Sosna, who purchased a condo built in 2009 to be their forever home to enjoy now that they are retired . Although the area and views are beautiful, the condo felt small, dark, and dated. The layout was also not functional, and had a lot of wasted space. They wanted the space to fit their lifestyle and feel like it was their own.
Having worked with Sosna previously, they knew they could put their full trust in Sosna. During the renovation, they were able to visit their cottage and relax, knowing their home was in good hands. Their only worry was that the condominium rules would restrict or delay the job. These worries were laid to rest, as Sosna developed a respectful and trusting relationship with the building management during construction.
In the Kitchen and eating area, we kept the existing footprint, but installed plenty of new cabinetry to provide much more functional storage, ensuring every square inch of the space was used to its full potential as a useful space. A white marble countertop and lower cabinetry made the space feel bright and open.
In the Master Bathroom, we re-worked the layout to allow for a larger, more functional and luxurious shower with a built in seat and nooks. During the design phase, we noticed that our clients had been hang drying clothing using a small rack in the bathtub. New hanging rods were installed above a new bathtub to provide a more functional solution for hang drying clothing that did not require having to move drying racks in and out of the space when needed. Beautiful patterned floor tiles were accented as well in the shower nooks to tie the bright new space together.
The Guest Bathroom was dark and dated. We were able to give it a welcoming facelift, giving it a more open and airy feel and a pop of colour in the shower.
Finally, we replaced the previously mismatched laminate flooring throughout the home with a darker vinyl flooring, all flowing in the same direction to provide a seamless and cohesive flow throughout the home, not to mention easy maintenance!
In the end, our clients were delighted with the care and quality of work put into their home, as well as the ease of the process from design to completion.
If you’re ready to make your forever home feel like it’s been made just for you, contact us to get started! We’re the Renovator You Can Count On!
Sosna Inc
7250 Keele Street, Unit 372
Vaughan, ON L4K 1Z8
416-888-7366 (RENO)
Website: sosna.ca
Email: contact@sosna.ca

VICTORIAN LAKEFRONT BEFORE & AFTER
This neglected Victorian on the waterfront in Hudson was a perfect example of a diamond in the rough. But its new owners recognized its potential and (lucky for us) we were hired to redesign the main floor. Everything was replaced, from the uneven and mismatched floor boards, to the dilapidated, rickety old staircase. Not to mention, new windows, sexy new hot water heaters imported from England., a new kitchen and main floor bathroom. The entire house was painted Moonshine by Benjamin Moore - a watery blue-grey colour which works perfectly with all the wood and white trim. The kitchen was gutted and reconfigured to optimize the fantastic water views allowing the owners to relax at their new island (with soapstone counters). The beautiful blue backsplash tiles make this traditional white kitchen anything but boring. And we painted the adjacent dining room ceiling the same deep blue colour to add impact.
Our clients had travelled all over the world for work before returning to Montreal, and their art collection, geological artifacts, wool rugs and assortment of wood furniture (collected in Chile, Mexico and Arizona to name a few places) give this updated Victorian a lived-in, eclectic look. We added some unexpected lighting with a nod to the Victorian age throughout and the back room, once the exterior porch, is now a the perfect retreat to relax, hold book club meetings or just enjoy the views from the elegant new furniture or the newly reupholstered family heirloom bench.

The architect and designer Guy Derwent was approached by his client with a clear and compelling brief: to completely transform a grand Victorian terrace house they were planning to renovate. The client envisioned something far beyond a standard renovation – this was to be a bold and dramatic reimagining of a family home that could grow with them over time.
With the property having remained largely untouched for more than fifty years, the architects saw an opportunity to unlock its potential and deliver a contemporary design that would contrast beautifully with its Victorian heritage.
The existing layout consisted of a series of small, disconnected rooms to the rear of the house. To respond to the client’s need for openness and flexibility, the architect proposed a radical restructuring of the ground floor:
The rear rooms were completely removed
Suspended timber floors were lowered by up to two metres to align with the garden
Two bold extensions were added
The first extension filled in the side return with a London stock brick facade and a glazed roof, while the second – a striking black steel and glass pavilion was glazed on three sides and placed along the garden elevation.
This new pavilion redefined the building’s relationship with the garden. Its steel-framed glazing created a seamless dialogue between interior and exterior, offering a sense of immersion in the surrounding landscape.
At the heart of the plan sits a dramatic, five-metre-tall dining space that acts as a transition from the original entrance hall into the new addition. A large, circular cast-glass window, framed in steel, provides a visual and spatial link between old and new, allowing light and movement to travel through the depth of the home.
Throughout the project, a series of black metal elements were introduced as sculptural interventions – each marking moments of transformation within the house. These included the bespoke steel framed circular window, a custom metal staircase, a cylindrical support column, and the striking steel and glass garden pavilion. Together, they formed a coherent architectural language that underscored the project’s bold intent.
Our steel windows and doors played a vital role in delivering the project’s vision. The architects chose steel for its refined sight lines and distinctive material character, which helped bridge the gap between the historical context of the building and the bold new additions.
The black steel frames provided a crisp contrast to the pale London stock brick and added definition to the glazed pavilion, reinforcing the sense of architectural precision. In particular, the fine steel profiles of the garden room allowed the extension to feel both lightweight and immersive, blurring the boundary between the house and its garden.
The architect drew inspiration from the Bauhaus Movement, particularly the work of Walter Gropius, whose approach to functional beauty and industrial materials informed the design of the garden pavilion.
Here, our glazing system was used not just for transparency, but as an expressive architectural element. The carefully proportioned panels help to conceal the roof thickness and reinforce the pavilion’s industrial yet abstract character – a deliberate nod to product design and modernist detailing.
Sustainability was an important factor in the selection of materials. Our steel systems, made from 99% recycled content and 100% recyclable, aligned with the project’s broader environmental goals.
The architects noted that this commitment to material longevity and circularity was central to their decision to use steel. The durability and recyclability of the windows and doors ensured the project met both aesthetic and ethical criteria.
This London terrace house now stands as a celebration of contrast – between heritage and innovation, solidity and transparency, tradition and transformation. Our steel windows and doors were not simply components; they were essential tools in crafting a home that is as bold and expressive as it is functional.
The result is a home designed for modern family life, where light, space, and materiality come together in perfect harmony.

VICTORIAN LAKEFRONT BEFORE & AFTER
This neglected Victorian on the waterfront in Hudson was a perfect example of a diamond in the rough. But its new owners recognized its potential and (lucky for us) we were hired to redesign the main floor. Everything was replaced, from the uneven and mismatched floor boards, to the dilapidated, rickety old staircase. Not to mention, new windows, sexy new hot water heaters imported from England., a new kitchen and main floor bathroom. The entire house was painted Moonshine by Benjamin Moore - a watery blue-grey colour which works perfectly with all the wood and white trim. The kitchen was gutted and reconfigured to optimize the fantastic water views allowing the owners to relax at their new island (with soapstone counters). The beautiful blue backsplash tiles make this traditional white kitchen anything but boring. And we painted the adjacent dining room ceiling the same deep blue colour to add impact.
Our clients had travelled all over the world for work before returning to Montreal, and their art collection, geological artifacts, wool rugs and assortment of wood furniture (collected in Chile, Mexico and Arizona to name a few places) give this updated Victorian a lived-in, eclectic look. We added some unexpected lighting with a nod to the Victorian age throughout and the back room, once the exterior porch, is now a the perfect retreat to relax, hold book club meetings or just enjoy the views from the elegant new furniture or the newly reupholstered family heirloom bench.

BEFORE HIRE HOME STAGER PLZ CHECK REFERENCES AND THERIR WORK✔️✔️✔️✔️✔️
PLEASE SEE MY OTHER ADDS OF MY WORK
REFERENCES FROM SATISFIED REALTORS ! INVESTORS AND AGENTS AVALAIBLE UPON REQUEST
********CERTIFIED HOME STAGER AND INTERIOR DESIGNER*********
Are You Planning to SELL YOUR HOME/HOUSE?
Do You Want The BEST RETURN On Your Investment?
Let MESA HOME STAGING Transform Your Property And Help Realize it's MAX POTENTIAL. We Take Pride in Ourselves on Delivering the Best Results At A Fair Price.
Weather It's A Vacent Home, Or A Occupied Home, Or You Require Furniture and Accessory Rentals, Or Just Need Us To Work With Your Current Furniture, The Professional Stagers at Mesa Homes Staging Can Assist You With Every Aspects of Staging A Home Within Your Budget.
**************CUSTOMER SATISFACTION GUARANTEED**************
REFERENCES AVAILABLE FROM SATISFIED CUSTOMERS AND REALTORS.
********WE HAVE OUR OWN INVENTORY YOU CAN SELECT FROM!!!
SPECIAL PACAGES AVALAIBLE FOR INVESTERS AND REALTORS
CALL US TODAY AT 647-640-6372
MORE THAN 7 YEARS OF EXPERIENCE
SERVICING : GTA, DURHAM REGION, HALTON REGION and SURROUNDING AREAS.

VICTORIAN LAKEFRONT BEFORE & AFTER
This neglected Victorian on the waterfront in Hudson was a perfect example of a diamond in the rough. But its new owners recognized its potential and (lucky for us) we were hired to redesign the main floor. Everything was replaced, from the uneven and mismatched floor boards, to the dilapidated, rickety old staircase. Not to mention, new windows, sexy new hot water heaters imported from England., a new kitchen and main floor bathroom. The entire house was painted Moonshine by Benjamin Moore - a watery blue-grey colour which works perfectly with all the wood and white trim. The kitchen was gutted and reconfigured to optimize the fantastic water views allowing the owners to relax at their new island (with soapstone counters). The beautiful blue backsplash tiles make this traditional white kitchen anything but boring. And we painted the adjacent dining room ceiling the same deep blue colour to add impact.
Our clients had travelled all over the world for work before returning to Montreal, and their art collection, geological artifacts, wool rugs and assortment of wood furniture (collected in Chile, Mexico and Arizona to name a few places) give this updated Victorian a lived-in, eclectic look. We added some unexpected lighting with a nod to the Victorian age throughout and the back room, once the exterior porch, is now a the perfect retreat to relax, hold book club meetings or just enjoy the views from the elegant new furniture or the newly reupholstered family heirloom bench.

Sponsored
Westerville, OH
Custom Home Works
Franklin County's Award-Winning Design, Build and Remodeling Expert

VICTORIAN LAKEFRONT BEFORE & AFTER
This neglected Victorian on the waterfront in Hudson was a perfect example of a diamond in the rough. But its new owners recognized its potential and (lucky for us) we were hired to redesign the main floor. Everything was replaced, from the uneven and mismatched floor boards, to the dilapidated, rickety old staircase. Not to mention, new windows, sexy new hot water heaters imported from England., a new kitchen and main floor bathroom. The entire house was painted Moonshine by Benjamin Moore - a watery blue-grey colour which works perfectly with all the wood and white trim. The kitchen was gutted and reconfigured to optimize the fantastic water views allowing the owners to relax at their new island (with soapstone counters). The beautiful blue backsplash tiles make this traditional white kitchen anything but boring. And we painted the adjacent dining room ceiling the same deep blue colour to add impact.
Our clients had travelled all over the world for work before returning to Montreal, and their art collection, geological artifacts, wool rugs and assortment of wood furniture (collected in Chile, Mexico and Arizona to name a few places) give this updated Victorian a lived-in, eclectic look. We added some unexpected lighting with a nod to the Victorian age throughout and the back room, once the exterior porch, is now a the perfect retreat to relax, hold book club meetings or just enjoy the views from the elegant new furniture or the newly reupholstered family heirloom bench.

Here’s an interesting work I recently completed on a red Quarry tiled floor at a house in the town of Abington, Northampton. In post-war Britain (more specifically in the 1940s and 1950s), many new homes were built with Quarry tiled hallways and kitchens, so quite a popular feature back then. These floors are typically quite hard wearing and therefore ideal for such high traffic areas; additionally they don’t need a great deal of maintenance but their appearance will degrade over time.
In this particular house, the Quarry tiled floor had been covered with linoleum for many years, causing significant patches of visible black mould. The floor also had a loose tile (which I promptly reset to mitigate the potential tripping hazard) and splashes of paint due to a lack of precaution while the house was being renovated. Needless to say, the floor needed a lot of work.
Before beginning the cleaning I made sure to vacuum up all of the loose debris from the floor. I then applied Tile Doctor Remove & Go to the tiles, left it to dwell for a short period, and then agitated the area with a black stripping pad, adding water to aid the process. This helped to break down any old and ineffectual sealer, along with the paint splashes marking the tiles, leaving a much cleaner and more refined appearance.
I followed this up with Tile Doctor Grout Clean-Up to eliminate the odd speck of cement and grout haze dating back to when the floor was first installed; Gout Clean-up has an acid base so it’s not advised to leave it on the tiles for too long, consequently as soon as I was happy it had done the job I rinsed it off with water and give the floor a thorough wash down.
I used a wet-vacuum machine to extract as much water as possible and gave the floor a once over with steam cleaner which improves the evaporation of any remaining moisture by heating up the tiles.
After completing the cleaning process, I left the house to allow time for the floor to dry completely. Upon my return, I conducted a damp test which showed the floor needed to dry further before sealing so I left an industrial fan in place for a couple of hours to help speed things up.
Once I was satisfied that the floor was dry enough to take the sealant, I sealed the floor using Tile Doctor Colour Grow which is an interesting product that will not only provide durable stain protection but also improves the natural colours of the tile.
While the floor required a lot of time and work to restore, I think you will agree the results were certainly worth waiting for.
Phil Vissian
Northamptonshire Tile Doctor

This is a job I recently completed in the small town of Braunstone, which lies just outside the city boundaries of Leicester, Leicestershire. My client wanted a restorative cleaning and sealing service for their very old Quarry tiled bathroom floor, which dates back to the Edwardian period. The floor was suffering from paint and adhesive staining, and was now in dire need of a thorough clean more generally along with a fresh seal to protect it from further damage.
I treated the floor in the first instance Tile Doctor Remove & Go which is a powerful stripper that breaks down old sealers remaining on the floor, as well as inherent paint and adhesive contamination. Remove & Go also contains cleaning properties which allows it to draw out ingrained dirt from the stone, lifting it to the surface. The product was applied to the floor and allowed to dwell for approximately thirty minutes prior to agitation with a hand-held rotary polisher fitted with a small black stripping pad.
The resulting slurry was promptly removed using a wet vacuum machine and our specialist Tile Doctor Acid Gel was then applied to the floor. Acid Gel is a blend of phosphoric and hydrochloric acids in gel form, and is specially formulated to treat grout haze and efflorescence on both wall and floor tiles.
Readers should be aware that this product is not suitable for use on acid-sensitive stone tiles such as Marble, Limestone and Travertine as it can potentially cause severe etching. In this case Acid Gel was left to dwell for ten minutes prior to agitation. This was effective in removing the white efflorescence salt staining that was present in several concentrated areas. Once again, the resulting slurry was vacuumed away, and the entire floor was rinsed with clean water.
The floor was left to dry for roughly twenty four hours before I returned to seal the floor. My choice of sealer in this case was Tile Doctor Colour Grow, a colour enhancing, impregnating sealer. The sealer will help to protect the tiles from soil ingress, and both water and oil based spills.
As you can see from the ‘Before’ and ‘After’ photographs, a marked difference was made to the appearance of this Quarry tiled floor. A professional and carefully thought out approach was taken to tackling the innate problems, particularly relating to efflorescence and paint and adhesive staining, and my client was extremely pleased with the results.
Kay Sylvester
Leicestershire Tile Doctor

Victorian tiles are very hard-wearing and historically a popular choice for heavy traffic areas such as hallways. Still popular today they are nonetheless like most tiles and can become ingrained with dirt over time.
This particular floor, located in a property in the old market town of Tewkesbury is a good example of a floor that was in good physical condition, but heavily ingrained with dirt due to a lack of regular maintenance. At a loss for how to remedy the situation by themselves, the property owner asked me to pay a visit to restore the tiles back to their best possible condition.
In this particular scenario, I opted to mix and apply a solution of different cleaning products from our professional range, each serving a different purpose. These products were Tile Doctor Pro Clean, Tile Doctor Remove and Go, and Tile Doctor NanoTech HBU. Remove and Go serves the purpose of stripping away any old sealer on the tiles, while Pro Clean is an alkaline cleaner that reliably removes dirt and staining. NanoTech HBU is a particularly powerful cleaner which utilises nano-sized particles to penetrate deep into the pores of the stone, get underneath difficult stains and lift them out.
I spread this potent solution across the length and width of the tiled hallway and left it to soak for approximately 10 minutes, before using a black scrubbing pad fitted to my buffing machine to give the tiles a deep scrub. Next, I rinsed the soiled solution away and neutralised the chemicals with plain water, before extracting any residue using a wet vacuum. I repeated the cleaning process several times to achieve the best results possible, and I also employed the aid of a steam cleaner to spot clean any particularly stubborn marks.
Cleaning the floor took two days in total. At the end of the second day, I gave the floor a thorough and final rinse before leaving it to dry completely overnight. The next day, I returned to the property to seal the floor after checking the floor was dry. Ensuring before sealing that the floor is completely dry is crucial – even the smallest quantity of moisture remaining can potentially cloud the sealer and damage its performance.
My choice of sealer was Tile Doctor Colour Grow, an impregnating sealer that penetrates and fills the pores of the tile to prevent trapped dirt and makes regular cleaning much easier. Colour Grow is a great choice of sealer for Victorian tiles because it really enhances the colourful patterns which are characteristic of this type of tile.
My customer was very impressed with the service and remarked on the huge improvement to the appearance of the floor. You can see this for yourself – just take a look at the before and after photos!
Malcolm Crowther
Gloucester Tile Doctor

Not too long ago, I was called up to the harbour town and seaside resort of Ilfracombe, situated on the North Devon coast. Ilfracombe is a historic area within Devon, with the Celts having first settled on its hilly plains during the Iron Age.
My client asked me to take a look at a Quarry tiled floor which was in need of a serious amount of cleaning. This largely due to the fact that there were dozens of layers of old sealer on the floor which had been left untouched from many years previously, as well as a significant build-up of general dirt and muck.
In order to give this floor a thorough cleaning, I needed to use a strong combination of products, namely NanoTech HBU Remover mixed with Tile Doctor Remove & Go. Nanotech HBU is a heavy build-up remover which uses nano-sized particles to penetrate below tough stains, and lift them out of the stone, whilst Remove & Go is a multi-purpose stripper that provided additional help in removing the many layers of sealer left on the floor. I applied the solution to the floor and left it to dwell for 40 minutes, before using a Polybrush to work it into the Quarry tiles.
Since the floor really was in dire need of a deep clean after years of neglect, I also used a black buffing pad attached to a buffing machine, as well as a steam machine to make sure I removed as much of the old sealer and dirt as possible. This was slow and painstaking work, but it was worth it to get the Quarry tiles back to looking their best again. Once this was complete, I rinsed the floor several times before leaving it for a few days to dry before sealing.
On my return visit, the floor was dry enough to commence sealing. It was important that the floor was dry and any excess moisture had evaporated because it has the potential to compromise the sealer as it cures leading to unexpected results. My sealer of choice was Tile Doctor Seal & Go, a sealer which is suitable for use on internal unsealed, porous surfaces including textured Quarry, Slate, Victorian tile and several others. I carefully applied several coats allowing each coat to dry before applying the next to provide a subtle low-sheen finish that will help protect the surface from stains in the future.
The results were excellent, especially considering that the floor had evidently not been treated to a proper clean for many years.

The owner of this house in Chaplefields near Coventry had bought this property as an investment and was keen to improve its appearance. As part of this work he had lifted the vinyl tiles in the hallway and discovered a lovely Edwardian tiled floor. Unfortunately, whoever had laid the Vinyl tiles had decided to use Tar as an adhesive and this had left a black mess all over the floor.
Realising the potential value an original feature such as this could add to the property he was keen to restore the tiles but not so keen to deal with the Tar, so we were asked to deal with the problem and restore the floor as close to its original condition as possible.
To get the tiles clean and remove the horrible tar I applied a strong dilution of Tile Doctor Remove and Go, which as its name suggest is great for removing coverings from tiles. I applied the Remove and Go with a mop, left it to soak in for a few minutes and then worked it in using a rotary machine fitted with a black scrubbing pad. The soil was extracted off the floor using a wet and dry vacuum and then the process repeated until I was happy all the tar was gone.
I then gave the tiles an acid wash using Tile Doctor Acid Gel; this serves to break down alkaline mineral deposits such as cement and grout smears, it also counters any efflorescence problems which can be an issue with these old floors where no damp proof membrane has been installed.
Finally, the floor was given a rinse with clean water and a steam clean to remove any trace of cleaning products and to neutralise the tiles in preparation for sealing.
I left the floor to dry off overnight and returned to the property to seal the tiles the next day. To seal the tiles, I used three coats of Tile Doctor Seal and Go which is a water based sealer that leaves a subtle sheen finish and being water based doesn’t leave a smell as it dries. The sealer will provide durable protection going forward preventing dirt from becoming ingrained into the pores of the tile and ensuring it remains easy to clean and keeping its appearance for some time to come.
The floor now looks fantastic and gives a great impression when you come into the property which is exactly what the owner wanted.
Mick Gayton
Warwickshire Tile Doctor

VICTORIAN LAKEFRONT BEFORE & AFTER
This neglected Victorian on the waterfront in Hudson was a perfect example of a diamond in the rough. But its new owners recognized its potential and (lucky for us) we were hired to redesign the main floor. Everything was replaced, from the uneven and mismatched floor boards, to the dilapidated, rickety old staircase. Not to mention, new windows, sexy new hot water heaters imported from England., a new kitchen and main floor bathroom. The entire house was painted Moonshine by Benjamin Moore - a watery blue-grey colour which works perfectly with all the wood and white trim. The kitchen was gutted and reconfigured to optimize the fantastic water views allowing the owners to relax at their new island (with soapstone counters). The beautiful blue backsplash tiles make this traditional white kitchen anything but boring. And we painted the adjacent dining room ceiling the same deep blue colour to add impact.
Our clients had travelled all over the world for work before returning to Montreal, and their art collection, geological artifacts, wool rugs and assortment of wood furniture (collected in Chile, Mexico and Arizona to name a few places) give this updated Victorian a lived-in, eclectic look. We added some unexpected lighting with a nod to the Victorian age throughout and the back room, once the exterior porch, is now a the perfect retreat to relax, hold book club meetings or just enjoy the views from the elegant new furniture or the newly reupholstered family heirloom bench.
7