
Search results for "Regularly clean" in Home Design Ideas
 Architect Mason Kirby Inc.
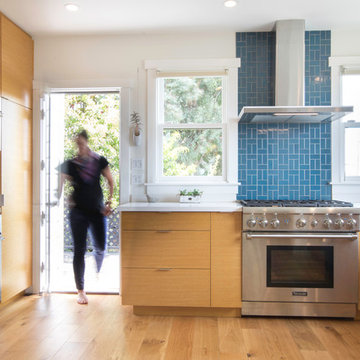
Example of a mid-sized mid-century modern u-shaped medium tone wood floor and brown floor open concept kitchen design in San Francisco with an undermount sink, flat-panel cabinets, medium tone wood cabinets, blue backsplash, ceramic backsplash, stainless steel appliances, no island, white countertops and solid surface countertops

 Jonathan Mitchell Photography
Design by Mill Valley based Richardson Architects.
Kitchen - transitional l-shaped light wood floor and beige floor kitchen idea in San Francisco with a farmhouse sink, shaker cabinets, black cabinets, white backsplash, stainless steel appliances and an island
Kitchen - transitional l-shaped light wood floor and beige floor kitchen idea in San Francisco with a farmhouse sink, shaker cabinets, black cabinets, white backsplash, stainless steel appliances and an island
 Tile Doctor Ltd
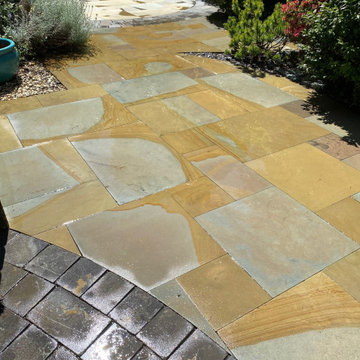
This Indian Sandstone Patio in Bolton-Le-Sands near Lancaster had not been cleaned successfully for several years. Although the owner had power washed it on occasion, that won’t rid you of Black Spot, Mould, Lichen etc and this will build-up over the years. It does clean the stone up to a certain standard but at some point, it will need further treatment.
My client had now reached this point and decided to give Tile Doctor a call to have it renovated. We discussed the Patio which ran around the house and calculated that it measured approximately 60m2. With the measurements and a summary of the issues I was able to work out a quote which they were happy to accept.
To improve the appearance of the stone I started by giving it a power wash to remove the general grime and dirt. I used a top of the range Karcher Pressure Washer for this which can apply up to 20 bars of pressure. The machine also comes with a spinner attachment results in a much more even clean than simply using the spray head.
The patio was left to dry for thirty minutes before applying neat Tile Doctor Patio & Brick Driveway Cleaner. Please note this is a very powerful product meant for professional use so if you’re using it always wear gloves and protective glasses. You leave it on the stone for ten minutes or longer before working it in. The directions on the back of the bottle say recommend leaving it for two to four hours, but its general advice. Personally, I find it is best to test the timing on a small inconspicuous area first, leave it on for say ten minutes then add a bit of water, scrub the surface and if the Black Spot disappears then that is all the time you need. If the stain is stubborn, increase the time. The two to four hour recommendation is really for difficult Black Spots that have become ingrained into the stone and then the product needs longer to digest the stain before it can work.
Once that was done, I used the power washer on low pressure to wash the products off the stone and into the sewerage drain, a wet vacuum comes in handy for this. Don’t dispose of it into the grass or planting areas as the strong chemicals in the product could upset them. Many properties have a soak away to capture rainwater from gutters, so you need to make sure it’s the sewage drain you are using.
As you can see on the pictures, this product really does work and got rid of the Black Spot completely. To maintain the patio a regular jet wash was recommended, the household versions are ideal for keeping it clean and tidy.
Due to the size of the Sandstone patio the whole process took around six hours to complete. Once done though the patio looked transformed and was all ready for a barbeque and some guests. Hopefully, it will stop raining long enough for this to happen.
Russell Taylor
Lancashire Tile Doctor
Find the right local pro for your project
 Tile Doctor Ltd
Sealers really do bring out the best in Terracotta tiles, however the catch is they will wear off over time and if you want to maintain that appearance you have to work out a regular maintenance plan. If you don’t maintain the sealer you will find that the sealer near the most heavily used areas such as doors etc. will wear away first and once that happens dirt will become ingrained in the tile and becomes difficult to clean resulting in a patchy appearance.
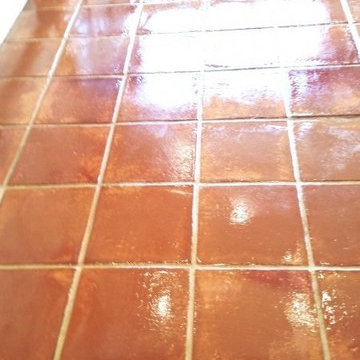
The remaining sealer on this Terracotta tiled kitchen floor at a house in the town of Wickford, Essex was no longer effective and had worn completely off in places. The solution was to strip off the old sealer, clean the Terracotta tile and gout and then re-seal with a fresh seal.
I started by giving the floor a deep clean with Tile Doctor Pro Clean diluted 2 parts water to 1 part cleaner. This is quite a strong dilution designed to allow the removal of the sealer and was left to dwell on the floor for ten minutes before working it into the floor using a scrubbing machine fitted with a black pad. Surprisingly the sealer was proving difficult to shift in certain areas and I had to repeat the process a few times and made sure to give the grout a good scrubbing as well.
I managed to get rid of most of the sealer using this process and for the remaining stubborn areas I used a stronger product called Tile Doctor Remove and Go which is a very effective coatings remover that is safe to use on tiles. This did the trick and the floor was now free of sealers and the grout was looking much better too, the resultant slurry was removed using a wet vacuum and I then rinsed the floor several times with water before leaving it to dry for weekend.
Tile Doctor Colour Grow which is an impregnating sealer that seeps into the pores of the tile to block them and prevent contaminates becoming ingrained in there and it also enhances the natural colours. Once this was dry I followed up with a number of coats of Tile Doctor Seal and Go which is topical sealer that will protect the surface and adds a nice sheen to the floor and is a popular choice for Terracotta and Quarry tiles.
I’m not sure my photographs do this post any justice however hopefully you can see that floor was quite transformed, the grout is much cleaner and the colours in the Terracotta have really come to life.
Nick Murphy
South Essex Tile Doctor
 Tile Doctor Ltd
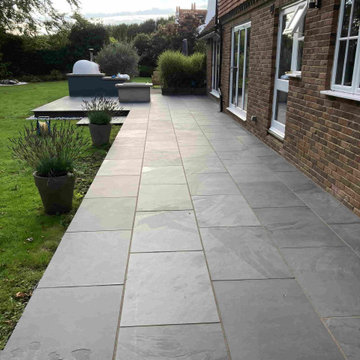
Our client in the villager of Pembury was feeling really deflated after having a Slate Patio laid adjacent to the full length of her house, however the builder had not applied the sealer correctly creating a mess which ruined the appearance of the stone.
Unfortunately, it is not that unusual to be contacted about this sort of situation, applying a sealer is not as easy as manufactures make out. There are lots of factors to consider, choosing the right sealer, is the stone damp, how do you know if you have applied too much, and it often catches tradesmen out. I was able to reassure them that with the right combination of products and equipment the problem could be rectified.
The first job was to strip off the old sealer which was done using a product called Tile Doctor Remove and Go. The name of this product pretty much says it all and once applied to the stone it is left to soak in for ten to twenty minutes before being scrubbed in with a rotary machine fitted with an abrasive burnishing pad.
Tile Doctor Remove and Go is a multi-purpose stripper which will remove most coatings and sealers, including epoxy grout haze which is another common problem we encounter when tradesmen have not cleaned up properly after grouting. It is also good for removing heavy build ups of grease. I used several burnishing pads of different grits going from coarse to smooth on this patio, rinsing and extracting the soil after each pad.
It was a large area, so this process took up most of the day on its own, fortunately I use a van mounted high pressure cleaning and extraction system to remove the soil which is very efficient and leaves the stone bright clean and reasonably dry afterwards. This ensures the process can be carried out with minimal mess.
It was a nice warm summers day and although cloudy we didn’t get any rain overnight, so after checking the forecast I was able to return the next day and apply a fresh sealer to the Slate.
My client wanted a natural look, so I used Tile Doctor Ultra Seal. This product is a no-sheen, natural-look, impregnating sealer which is formulated to provide maximum stain protection. These impregnating sealers work by penetrating the stone, occupying its pores, and thus preventing dirt from residing there.
The client was so happy and relieved to see the results on what a very expensive patio and commented she was eager to get the first barbecue of the season underway.
We recommended that a regular with the jet wash should keep the patio in good condition and in a few years time we could return to reapply the sealer for them.
Michael Conlon
South Kent Tile Doctor

 The Grime Boss
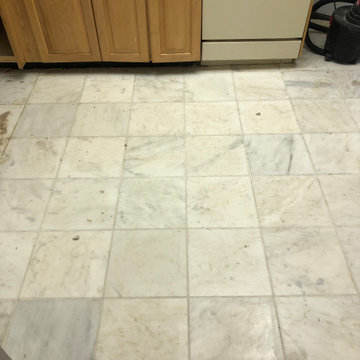
Here's is a dull marble floor The Grime Boss restored in Arlington, VA. This marble floor has lost its luster and shine over time.
There are several reasons why a marble floor may become dull. Over time, foot traffic, spills, and regular wear and tear can cause the surface to become scratched and scuffed. Harsh cleaning chemicals or improper cleaning techniques can also damage the finish of the marble and leave it looking dull and lackluster.
Fortunately, there are several ways to restore the shine to a dull marble floor. Professional polishing can remove surface scratches and restore the natural shine of the marble. Regular maintenance, such as sweeping and mopping with a pH Neutral cleaning solution, can also help to keep the marble looking its best.

Sponsored
Columbus, OH

Hope Restoration & General Contracting
Columbus Design-Build, Kitchen & Bath Remodeling, Historic Renovations
 Tile Doctor Ltd
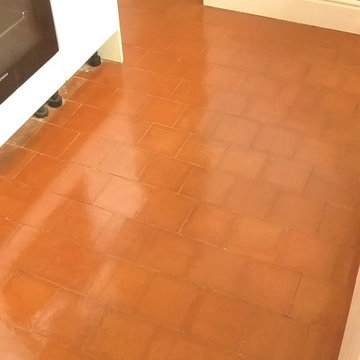
Here’s a job I recently completed in the heartland of the English pottery industry, Stoke-on-Trent. In this particular instance I was commissioned by my client to restore the appearance of the Quarry tiled floor in her kitchen which as you can see from the photo below was far from looking it’s best. Quarry tiles are typically a very hard wearing stone, but in high traffic areas like a kitchen, even this type of tile will require regular maintenance.
My first task, before beginning the restoration, was to remove the kickboards from around the bottom of the kitchen units, to prevent them from being damaged during the process. The next step was to acid wash the tiles using Tile Doctor Grout Clean-Up which was scrubbed into the tiles to remove old grout and plaster that had become stuck to the surface of the tiles at some point in the past. Once this had done its job I rinsed the entire floor with water washing away the excess soiled residue and any trace of acid.
The next step was to give the tiles a good clean using Tile Doctor Pro Clean, which is a high alkaline cleaner suitable for use on a range of natural stone floors. This was left to dwell on the tiles for ten minutes, allowing it time to seep into the stone to get underneath – and lift out – the ingrained dirt. I then agitated the solution with a scrubbing brush to remove the muck from the surface of the tiles. The floor was then given another rinse with water, and this was extracted using a wet vacuum.
I left the floor to dry after cleaning for more than 24 hours, making sure that it would be ready for sealing the next day. Upon my return to the house I checked the floor was dry and then sealed the floor using four coats of Tile Doctor Seal & Go, which provides a robust surface seal and a durable low-sheen finish. The product is suitable for use on internal, unsealed, porous surfaces.
The photographs above bears witness to the massive improvement which has been made to the quarry tiles, which has not only completely transformed the look of the tiles but also the appearance of the kitchen.
Trevor Preece
Staffordshire Tile Doctor

 Five Star Tree Care
Storms are nature’s way of cleaning out the atmosphere and showing off her awesome power. As essential as this process may be, it can also cause tree damage. If your trees suffer damage during a storm, there are a few things you should do to set things back to their proper order, such as hire a tree removal service. Before you start cleaning up the mess, however, take a look at our suggestions to ensure you are doing what’s best for your trees and your property.
Check the Damage
Before you do anything, you should take the time to check the damage on your property and to the trees themselves. Sometimes broken branches and fallen leaves can hide serious damage that may require special attention. Check to ensure that there is no damage to your property, home, cars, and electrical lines. Next, after you confirm that there is no immediate danger, you can start assessing the tree itself. If you find serious damage to your trees such as splitting, leaning, or even burns from a lightning strike, it is best to call in professionals for help. If the tree is leaning on your home or vehicle, it is also a good idea to have a professional tree care service move forward with the cleanup.
Clean Up Minor Damage and Debris
After the storm has calmed down, and you have assessed the fallout, you can start your yard cleanup. Stick to cleaning up small branches and twigs in addition to leaves and other debris. Avoid large branches, any trees that may be leaning or heavily damaged. Even if your tree is upright, but showing signs of damage you should steer clear until the professionals can assess the situation. Pay close attention to any branches or trees that may be leaning near overhead power lines and also avoid damaged trees that are planted near underground utilities such as gas or power mains.
Call the Professionals at Five Star Tree Services
Anytime a storm damages your landscape, plants, or trees, a professional team of arborists can help. Not only are they trained in the proper methods of cleaning up storm debris in a safe manner, but they can also help decide the best course of action to save or remove your damaged trees. As tree care professionals, every team from Five Star Tree Services will arrive with the proper equipment needed to get the job done safely.
Five Star is fully certified and will also work with your insurance company to assess the damage and coordinate extended cleanup services if needed. For trees that are damaged but still have a chance of surviving, our experienced arborists will create a customized treatment plant and pruning plant to give your tree the best chance of survival. If other treatments are needed, we will also support your tree during its recovery until it is back to its healthy state. For more information regarding our storm tree services in Richmond Hill or our regular tree care services, give us a call at (416) 990-3355 today.
 Tile Doctor Ltd
Lichen, moss and other plant-based staining is a common sight on patios exposed to the UK climate. For many property owners, it’s a very difficult task to keep patios looking great in the face of the natural effects of the environment. However always happy to help Tile Doctor is available to provide the professional cleaning and sealing needed on a regular basis.
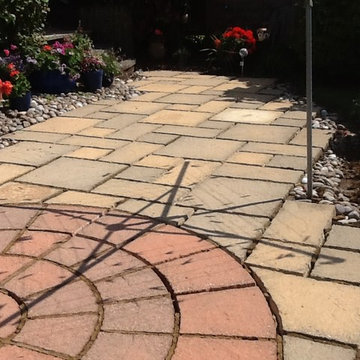
This Sandstone tiled patio in Rushden was certainly a prime candidate for restoration. Not only was it completely covered in lichen and moss, but it was also cracked in parts and missing grout. The patio would therefore need not only cleaning and sealing, but also re-grouting.
To begin the restoration, I opted to power jet wash the entire area to remove as much of the initial layers of moss. Then, I mixed a strong dilution of Tile Doctor Pro Clean, which is a powerful and reliable alkaline cleaner suitable for use on both internal and external natural stone tiles. This was applied liberally to the patio and scrubbed into the stone to cut through the particularly stubborn stains. The two photos below show the fantastic result.
After completing the cleaning phase, I allowed the patio to dry completely overnight before returning to re-grout the entire area with mortar. To finish off I applied a fresh sealer in the form of Tile Doctor Seal and Go Extra, which an acrylic-based, fully breathable sealer appropriate for outside use.
The below pictures show the final result. As you can see, it was a complete transformation – and my very happy customer will agree! With the right products and methods, it’s possible to bring new life back to weathered patios.
Phil Vissian
Northamptonshire Tile Doctor
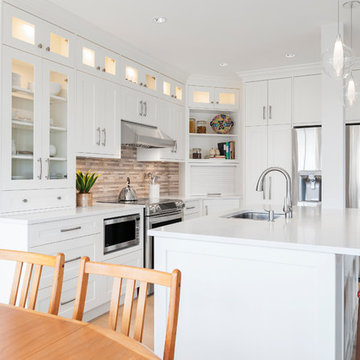
 MAC Reno Design Build LTD ( MAC Renovations)
Example of a mid-sized transitional l-shaped laminate floor eat-in kitchen design in Vancouver with an undermount sink, shaker cabinets, white cabinets, quartz countertops, gray backsplash, glass tile backsplash, stainless steel appliances and an island


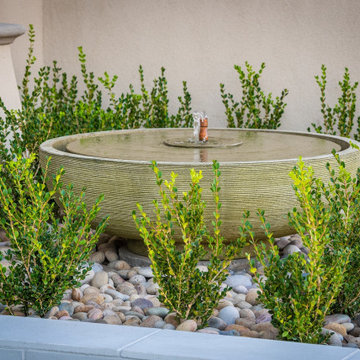
 Conscious Environments Inc.
This fountain is a great addition to a front yard entry. Clean and simple with a subtle water noise for visual and auditory interest. The fountain is surrounded by boxwood hedges, Mexican Beach cobble, and white precast concrete.

Sponsored
Columbus, OH
Hope Restoration & General Contracting
Columbus Design-Build, Kitchen & Bath Remodeling, Historic Renovations



 Red Dot Studio
A place to relax, read and play games and a little office space is how our outbuilding in Mill Valley was described. It added an extra living room and some coveted square footage to a hard to add onto home in a desirable part of town. The outbuilding was placed on axis with the main house, connected by a deck with a view to the yard in between. To keep all the books and games in order, the main room was lined with fin-ply cabinetry. The floor is an engineered wide plank rustic oak. A simple clean burning wood fireplace will provide heat when needed. The outbuilding has the feel of a classic summer cabin, only with better insulation for year round use.
PHOTOGRAPHER JOSEPH SCHELL
CONTRACTOR ABACUS BUILDERS



 RoomService 360
Spyder Wood Dining Table delivers a delightfully original design and material combinations. Manufactured in Italy by Cattelan Italia, and designed by Philip Jackson, Spyder Wood Dining Table takes advantage of its high modern base and incorporates it with the more organically inclined top.
Sponsored
Columbus, OH
Hope Restoration & General Contracting
Columbus Design-Build, Kitchen & Bath Remodeling, Historic Renovations
 Tile Doctor Ltd
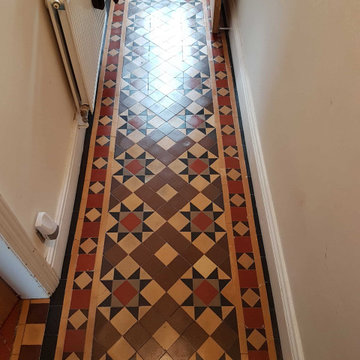
This client had just moved into a property in York and having pulled back the old carpet revealed a lovely old period Victorian tiled floor she didn’t know existed when she bought the house!
I went over at the beginning of this year to survey the floor and could see that fortunately, no glue or carpet grips had been used to secure the carpet; additionally the floor was in good physical condition considering its age with no cracks or loose tiles. The tiles were however very dusty and dirty with ingrained dirt and so had probably been covered with carpet for a very long time. The hallway was quite dark I’m afraid with little natural light so apologies for the photographs.
With old houses like this you never know what you are going to find so whilst I was there surveying the floor, I took some moisture readings with a damp meter on the floors and walls. The readings came back low so no sign of damp which was a relief to the owner.
We agreed a price for the work, and I arranged to come back the following week.
I must admit I do like York, its steeped in history and famous for its Cathedral and Viking museum. The houses in the city have loads of character and period features like this floor are quite common.
I deep cleaned the floor with a strong 1:3 dilution of Tile Doctor Pro-Clean worked in with a black scrubbing pad fitted to a rotary machine. Initially the solution was left to soak into the tile before being agitated by the machine. The soil was then rinsed off with minimal water and then extracted with a wet vacuum.
I followed this up with an Acid Wash using Tile Doctor Acid Gel to further clean up the tiles and help inhibit any potential efflorescent salt issues which are common in floors of this age due to the absence of the damp proof membrane. The floor was given a further rinse and extraction and allowed to dry out fully overnight. I needed the floor to be dry for the next day so it could be sealed.
I came back the next day and started by taking more damp readings which showed similar readings to the day before. Given the low readings I was able to move straight onto sealing which was done using four coats of Tile Doctor Seal and Go. This product works really well on old Victorian Tiles like these and being water based it doesn’t leave a smell as it dries.
Once the final coat of sealer had dried there was a significant improvement in the appearance of the floor which was much appreciated by client who was very happy with the end result.
For aftercare I recommended the use of Tile Doctor Neutral Tile Cleaner to maintain the floor, it has a nice fresh smell and can be used regularly due to its pH neutral nature which won’t prematurely erode the sealer like stronger bleach based cleaners.
Nigel Stoker
North West Yorkshire Tile Doctor

 Pixers
Living room - mid-sized transitional enclosed carpeted living room idea in London with multicolored walls

25