
Search results for "Self importance" in Home Design Ideas
 Rebecca Reynolds
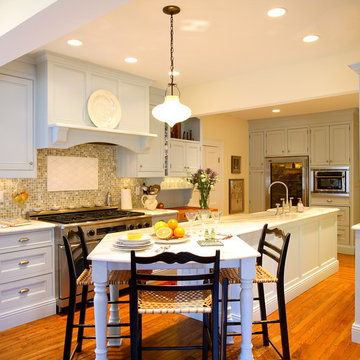
Example of a classic medium tone wood floor kitchen design in New York with a farmhouse sink, recessed-panel cabinets, blue cabinets, beige backsplash, mosaic tile backsplash, stainless steel appliances and an island

 Floret
Learn seed starting basics and get a jump start on growing the flower garden of your dreams. In this striking guide you will find everything you need to grow, harvest, and arrange stunning seasonal blooms. With equal parts instruction and inspiration, Floret Farm’s Cut Flower Garden welcomes you into Erin Benzakein’s abundant, bloom-filled world, and is a feast for every flower lover’s eyes and soul. Floret Farm's Cut Flower Garden. Written by Erin Benzakein with Julie Chai. Photos by Michèle M. Waite. Published by Chronicle Books.
 Woodling Landscape Design
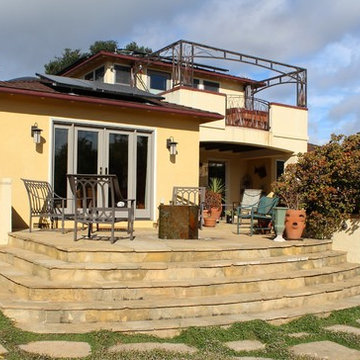
Large, historic home from the 1930's overlooking downtown Santa Cruz. My clients are self-described "plantaholics" and tend to buy many plants, only to have them die. They have an extensive gardening area and low water budget. Our main goal was to make the overall design cohesive between various areas of the garden while utilizing interesting and unusual plant selections - a very fun project for me! We removed over 3,000 square feet of traditional grass and replaced it with several lawn alternatives. The first is a walkable groundcover that uses a fraction of the water of regular grass (and can be seen here in several seasons, one of which has tiny flowers); The second is a California native grass that grows long (or can be kept short) and can tolerate some shade. Both of these are excellent choices for clients with children or dogs who want a green patch without using excessive water. My clients love plants from Australia and South Africa so plants from the Proteacea and other Southern Hemisphere beauties are used predominantly throughout the project. Clean, flowing water is so important for wildlife and the beautiful stone fountain is a constant gathering spot for birds and other animals. My clients are beyond thrilled with their gorgeous, nature-filled garden and ever-expanding plant knowledge.
Find the right local pro for your project

 Wine Cellars by Coastal
We installed a ceiling-mounted WhisperKool 8000. The WhisperKool 8000 is a modern, self-contained cooling unit that works enough to cool a mid-sized wine room such as this one. The cooling unit also had a matte black finish, which perfectly fit the room's aesthetic.
Learn more about this project here: https://www.winecellarsbycoastal.com/modern-wine-room-with-led-light-panel.aspx
Coastal Custom Wine Cellars
8 Waltham Rd.
Ladera Ranch, CA 92694
+1 (949) 200-8134
Learn more about the importance of maintaining a cool wine room temperature here: https://www.coastalcustomwinecellars.com/tips-in-proper-wine-storage-and-serving-of-wines-at-the-right-temperature/
 The Outdoor Kitchen Design Store
Seriously Sizzling in Southampton
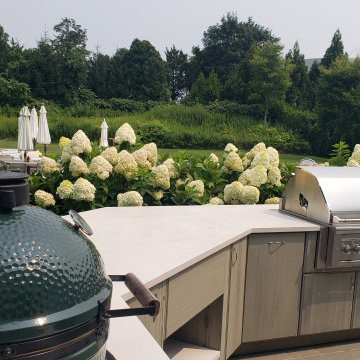
When your home becomes the host place to be its important to design a exterior self sustaining outdoor kitchen, sit up bar and beverage stand separately from the sink island. Just envision how the functionality of your indoor kitchen space works. Create a similar but larger footprint as the outdoors has many and yet but larger functions going on simultaneously. When the Outdoor Kitchen design meets this criteria amazing things happen outdoors. Kids positioned at play, the gentlemen grilling and conversing and the women prepping and anchoring both the indoor and outdoor kitchen space. A true success! This outdoor space is an exciting exterior to design and to build. Many facets, functions and much framework to fit in the outdoor patio space. Never the less what the elements of the Outdoor Kitchen will be. After that is configured many colors, styles and doors are brought into play for decisions to be made.
 Factor Design Build
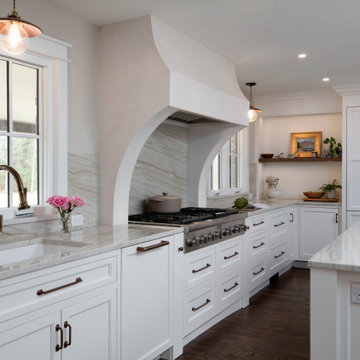
The goal of this kitchen remodel was to create a more functional and enlarged kitchen because the owner is an avid cook. Expanding the available space for the kitchen involved moving the patio doors to the family room to access the backyard under a newly constructed porch roof. The owners stand at different heights and the goal of the overall kitchen design was to be a comfortable workspace for all the residents. They opted to eliminate upper cabinets, since they are hard to reach and instead incorporate tall pantry-style cabinets at the north wall, complete with a very important breakfast coffee, smoothie, and juice station that is "hidden" behind tuck-away doors. Every inch of the kitchen was considered to store all their essentials, including a designated spot for a step-stool. This kitchen design also incorporates double dishwashers.
This self-described style is New Traditional with a West coast cool-casual with some east coast English antiques and that are reflected in the home elsewhere, The home also reflected a slightly French design style, so Factor Design Build aimed for a clean, classic, and timeless look with a custom Venetian plaster hood, Quartzite countertops, and inset cabinets. The view to the backyard was enhanced by flanking the hood with large windows. The clients felt that it was important that most-touched items be high-quality and unlacquered metal, so the cabinet hardware is by Ashley Norton, and the plumbing fixtures from Waterworks. The clients had a special affinity for the Chamonix quartzite for the countertops and splash.
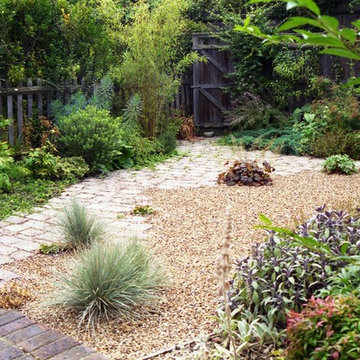
 English Landscape LLC
Inspiration for a small mediterranean drought-tolerant and full sun backyard stone landscaping in London.
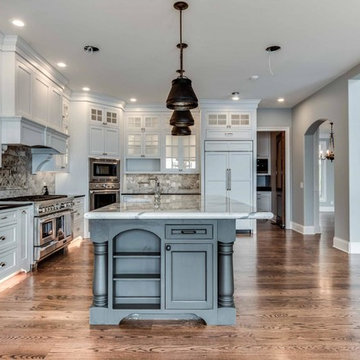
Sponsored
Fredericksburg, OH

High Point Cabinets
Columbus' Experienced Custom Cabinet Builder | 4x Best of Houzz Winner
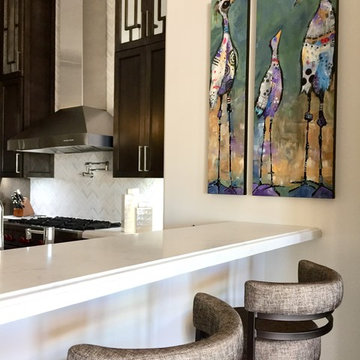
 Camille Self Designs
The art transitions from dining area to a stunning open kitchen using the colors of the conjoined space. Color is important when using light and dark material contrasts.

 Mayflower Construction Group
In today's blog, we're continuing to discuss tips to help you tackle your dream renovation
Self-care for your own renovation sanity is vitally important. Of course, having an experienced construction team with decades of experience and expertise makes renovating a thousand times easier. As always, our Mayflower design consultants we’re here to help you every step of the way.
Use the QR code or link below to read the full blog.
Link: https://mayflowerva.com/how-to-stay-sane-during-your-renovation-part-2/
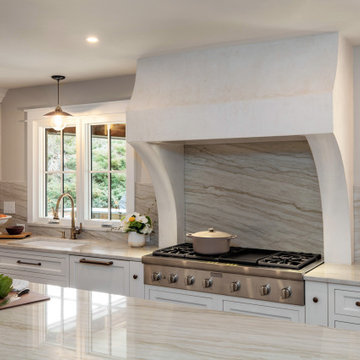 Factor Design Build
The goal of this kitchen remodel was to create a more functional and enlarged kitchen because the owner is an avid cook. Expanding the available space for the kitchen involved moving the patio doors to the family room to access the backyard under a newly constructed porch roof. The owners stand at different heights and the goal of the overall kitchen design was to be a comfortable workspace for all the residents. They opted to eliminate upper cabinets, since they are hard to reach and instead incorporate tall pantry-style cabinets at the north wall, complete with a very important breakfast coffee, smoothie, and juice station that is "hidden" behind tuck-away doors. Every inch of the kitchen was considered to store all their essentials, including a designated spot for a step-stool. This kitchen design also incorporates double dishwashers.
This self-described style is New Traditional with a West coast cool-casual with some east coast English antiques and that are reflected in the home elsewhere, The home also reflected a slightly French design style, so Factor Design Build aimed for a clean, classic, and timeless look with a custom Venetian plaster hood, Quartzite countertops, and inset cabinets. The view to the backyard was enhanced by flanking the hood with large windows. The clients felt that it was important that most-touched items be high-quality and unlacquered metal, so the cabinet hardware is by Ashley Norton, and the plumbing fixtures from Waterworks. The clients had a special affinity for the Chamonix quartzite for the countertops and splash.

 SabaRehman Abdulrehman
Phoenix's food scene is vibrant and thriving, but also one of the most closely watched in the country. Health inspectors in Maricopa County are strict, and customers expect spotless dining spaces.
To stay competitive, restaurant owners and food vendors must stay on top of evolving health codes, sanitation protocols, and food safety benchmarks. That starts with a firm grip on restaurant cleaning safety standards. Ignoring sanitation rules risks more than bad reviews. It invites citations, customer complaints, and operational shutdowns.
Whether you're operating a food truck or a restaurant, following these Phoenix cleaning standards helps you stay compliant, pass health inspections, and build customer trust.
Importance of a Clean Phoenix Restaurant that Follows Food Health and Safety Standards
The restaurant industry in Phoenix operates under strict oversight. The Maricopa County Environmental Services Department conducts regular inspections, and violations can result in fines or closures. In this climate, restaurant cleaning is not just a hygiene standard. It is a business-critical measure.
Proper food handling and establishment cleaning protocols reduce the risk of foodborne illnesses, control pests, protect equipment, and keep your staff safe. Inconsistent practices, on the other hand, can quickly become liabilities.
Start With the Food Code
Phoenix food vendors must comply with the 2017 FDA Food Code as adopted by Maricopa County. This includes rules on:
- Sanitizing food-contact surfaces after each use
- Maintaining proper water temperatures for dishwashing
- Cleaning restrooms frequently and keeping them stocked
- Storing cleaning chemicals away from prep areas
- Daily: Wipe prep tables, mop floors, clean grills, sanitize cutting boards
- Weekly: Deep clean kitchen hoods, polish cooking equipment, disinfect drains
- Monthly: Check pest control measures, clean freezer coils, and inspect HVAC filters
- Using the right sanitizers and PPE
- Logging cleaning times and who performed the task
- Identifying signs of mold, grease buildup, or rodent activity
- Conducting thorough surface cleaning to ensure all food-contact surfaces are sanitized regularly
- Food-safe and non-corrosive
- Effective against norovirus, salmonella, and E. coli
- Clearly labeled and stored in original containers
- Seal gaps around doors and pipes
- Store dry goods in sealed, elevated containers
- Keep outdoor waste bins locked and distanced from entry points
- Record cleaning completion in real time
- Alert managers when tasks are missed
- Keep a historical record for inspections
- Is certified and understands the Arizona food codes
- Provides documented service reports
- Offers customized cleaning plans
- Offers flexible scheduling around your operating hours
- Cross-contamination prevention: Regularly clean food prep surfaces and tools, and use separate equipment for raw meats, vegetables, and ready-to-eat foods. Proper cleaning prevents any contact with food that could lead to cross-contamination and affects food quality.
- Temperature monitoring: While not directly related to cleaning, maintaining proper food temperature is essential. Hot foods should be stored above 140°F, and cold foods below 40°F. Regularly monitor temperatures and clean temperature gauges to ensure accuracy.
- Proper storage: Use clean storage containers and shelving for food storage, keeping items off the floor. Ensure all food is sealed and labeled to avoid contamination risks and comply with food safety standards.
 Elite Landscaping Omaha
2019 Silver Winner | PHTA International Awards of Excellence
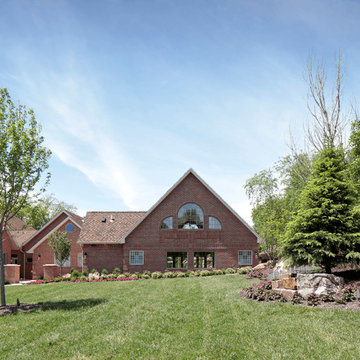
This custom, design-build project in Lincoln, NE is all about attention to detail. A concrete swimming pool, spa and outdoor patio with a 1,600 square foot bar and grill building are the focal points of the outdoor entertaining area. The pool features an infinity-edge spa, natural stone waterfall and slide, swim up bar with levitating stainless steel bar stools, and zero-entry pool edge.
It was important to the clients, who are from the Midwest, to incorporate natural stones and colors from the region. The outdoor landscape design also ensures enjoyment and safety for their family and young grandchildren.
The pool is a custom shotcrete structure that is 1,147 square feet. It has a beautiful natural stone and shotcrete waterfall with a built in Dolphin slide, and underwater bench. Opposite of the waterfall are five custom-built levitating stainless steel bar stools with an in-pool walk lane and a full swim up bar. A pallet of glass tile gives this natural, freeform pool some shine. The glass-walled, infinity-edge spa features a separate filtration system, heater, pumps and air blower that run off automation. Across from the spa is a custom-cut, flagstone beach entry with LED-lit bubblers for the grandkids.
We incorporated the brick and architectural design of the home throughout the outdoor building, and continued this look into the open-concept bar and grill. The bar and grill is over 1,600 square feet and seats 50 with beautiful, hand-tufted booths, bar stools, professional bar equipment, custom granite tops, and even a men’s and women’s bathroom. Two 16’ wide glass bi-folding doors flawlessly incorporate the covered outdoor travertine courtyards, with matching travertine flooring used inside the building.
A 27’ linear fire pit with natural stone wall includes five stainless steel scupper boxes to match the bar stools. The project has over 6,000 square feet of “tiramisu” travertine used in the patios and courtyards, including a second natural stone fire pit and seating wall.
This project sits on a natural spring, so the entire design was elevated to help mitigate groundwater, and also provide a safer barrier to the pool. A second stream and waterfall are fed by the natural spring runoff water, which is also used for irrigation purposes. This self-contained stream and waterfall extend the enjoyment of the outdoor space further into the season, when the pool system shuts down for the winter months. Large spruce trees and a variety of maples were planted along the property, incorporating natural landscaping materials and design concepts to both provide privacy and manage downhill drainage.
The energy-efficient outdoor lighting system is fully programmable for zoning, dimming, and color changing. In addition, the pool pumps and in-pool LED lights are also automated, and all can be programmed from a simple, smartphone app.
 MODIVO LIGHT
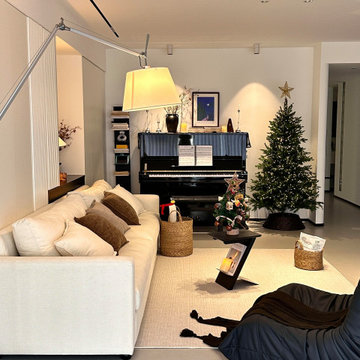
This is our first time decorating a house. Starting from knowing nothing at all to now having the hard decoration completed, we have experienced every emotion along the way—anxiety, doubt, tiredness, hesitation, joy, satisfaction, and touch. We learned and explored on our own, and bit by bit, we finished decorating our home. We’ve accumulated so much experience in this process, and now we want to share it, hoping it can be of a little help to all of you who are doing your own home decoration.
Preparations in Advance
1、Clarify your own ideas: Whether you are looking online, talking to designers, or copying ideas from friends' homes, you should have a clear vision of what your home should look like before designing—such as the style, color scheme, and elements to be used... It is crucial to avoid wanting to install everything that looks good in others' homes in your own. This way, you can clearly put forward your requirements during the design and decoration process, and also avoid frequent revisions to the plan, which may lead to unnecessary rework.
2、Understand your own needs: You need to first figure out the needs of your family, such as how many people live in the house permanently, how many rooms are needed, everyone's living habits, and daily preferences... A home is always for living in, so functionality is always the most important. It is best to list these needs and give priority to meeting them during the design and decoration. This way, you won't find out after decoration that many necessary things are missing, while a bunch of installed things are useless.
3、Determine your budget: There are ways to decorate with more money, and also ways to do it with less. No matter how much money you have, the decorated house can be both beautiful and practical. Therefore, it is essential to decide exactly how much you want to spend on decoration. In every link, such as designing the plan, making a budget table, selecting materials, and construction, you should act in accordance with your own budget.
4、Understand the advantages and disadvantages of your house: There is no perfect house in the world, and every house has its pros and cons. Your design plan should avoid its shortcomings and amplify its advantages. I once wrote an article about the drawbacks of my house ("My house is not perfect, but I still want to find ways to save it"), so we figured out solutions to these problems during the decoration.
5、Learn as much decoration knowledge as possible in advance: Although you can pick up this knowledge in the subsequent decoration process, it is better to learn more beforehand. This will make you much more calm when facing problems.
6、Know your strengths: Before decoration, you must be clear about what you are good at and what you are not. If you are good at design, do the design yourself; if you are skilled at bargaining, go buy building materials on your own; if you have strong hands-on ability, you can even do the decoration and repairs yourself... During the decoration process, you should focus on what you are good at, and leave what you are not good at to others.

 Tile Doctor Ltd
During an inspection for alteration work, this customer from Cheshunt discovered what appeared to be an original encaustic tiled floor under the hallway carpet. Keen to work out what it was, and have it restored, I was asked to pop round and look.
I went over as requested to survey the hallway floor and confirm their suspicions. The carpet had been secured with gripper rods glued onto the floor and that came away easily enough. Underneath, the tiles had been covered with self-levelling cement which had to be carefully scraped away to reveal the tiles.
I ran a test to see if the cement leveller could be easily removed and using a combination of a scraper with Tile Doctor Pro-Clean, I was able to confirm the tiled floor was indeed salvageable. The house was Edwardian, and the tiles had been laid in a classic black and white geometric pattern typical of the period so I suspect the floor was indeed original.
I worked out a quote to restore the whole floor including the removal of the cement, deep cleaning and then sealing the tiles. Without removing all the cement, it would be difficult to price for replacing broken tiles, but I suspected there may be a few as its quite usual for a floor of this age. Keen to have the floor restored we were given the go-ahead and a date scheduled for the work to start.
The first step was to remove all the carpet and gripper rod so we could see the full extent of the self-levelling screed. Once done it was a case of carefully chipping and scraping away to break up the cement until the tiled floor had been fully revealed. Its slow and detailed work but quite rewarding when the tiled floor is finally revealed. The tiles had survived well under the carpet and cement but as suspected a few repairs and replacement would be needed.
With all the cement brushed away work moved onto cleaning which started with a strong dilution of Tile Doctor Pro-Clean applied to the floor and left to soak in for fifteen minutes the scrubbed in with a rotary machine fitted with a Black pad. A lot of soiling is generated from this which is rinsed off with water and extracted with a wet vacuum. The floor was then inspected and the process repeated where required.
The next step was to treat the tiles to an acid wash using Tile Doctor Grout Clean-up. This is applied as before and has several benefits including dissolving the remaining cement residue and neutralising the pH of the floor after the use of Tile Doctor Pro-Clean which is a strong alkaline.
The floor was then inspected and the broken tiles carefully removed so they could be replaced. This is delicate work as lifting a tile can sometimes upset its neighbour and before you know it the size of the work has tripled. Replacement tiles were then cut to fit the existing geometric pattern and secured into place with a rapid set adhesive and grouted in.
Once the replacement tile and grout had set, the floor was given a light clean using Tile Doctor Neutral Tile Cleaner and then left to dry out overnight.
The next day the tiles were sealed using a single coat of Tile Doctor Colour Grow and the followed up with give coats of Tile Doctor Seal & Go. Colour Grow is an impregnator that soaks into the pores of the tile protecting it from within and improving colour, where as Seal and Go adds a nice subtle sheen to the tiles. Both products are breathable which is an important feature with old floors that don’t have a damp proof membrane.
For aftercare I recommended Neutral Tile Cleaner which is a gentle but effective tile cleaning product that won’t damage the sealer.
Robert Voyce
Hertfordshire TIle Doctor

 RetractableAwnings.com Inc.
PROJECT DESCRIPTION
The customer requested a gargantuan 39 ½ foot wide x 11 ½ foot projection, attached 3 span (2 post) water proof retractable dining area patio cover system with front water drainage. The plan was to have rain water drain through the optional downpipes and off the 3rd story deck. The entire system used one continuous piece of fabric and one motor. The system frame and guides are made entirely of non-rusting aluminum (unit is close to the Caribbean Sea) which is powder coated using the Qualicoat® powder coating process. Frame color chosen was RAL 1013 Ivory. The stainless steel components used were Inox (470LI and 316) which are of the highest quality and have an extremely high corrosion resistance (unit is near the sea). In fact, the components meet the European salt spray corrosion test as tested by Centro Sviluppo Materiali in Italy.
Fabric specified was Ferrari 302 Precontraint Color Salmone, a PVC fabric that is self-extinguishing (fire retardant) and totally water-proof (not water-resistant). This retracting patio cover system has a Beaufort wind load rating Scale 8 (up to 46mph) with the fabric fully extended and in use. This Beaufort wind load requirement was important due to high winds coming off the sea.
A brown hood with end caps was also used to prevent rain water, leaves and debris from collecting in the folds of fabric when not in use. A motor safety box with motor was attached to the wall. The client chose to control the system with a Somfy remote control.
PURPOSE OF THE PROJECT
The purpose of the project was to design and cover an elegant dining area, which can now be used 24/7/365 allowing for breakfast, lunch, dinner, parties, entertainment and at the same time not blocking the incredible Belize mountain views and enjoying the cool trade wind breezes. The Sleeping Giant Rainforest Lodge is known worldwide for its outstanding hospitality and service and was included in an online Belize travel story completed by Justin Balog a photographer, filmmaker, storyteller, and explorer of the creative frontier - freelancer for National Geographic. Click on the link below:
http://www.hossedia.com/travel/photographers-guide-to-belize/
The Sleeping Giant Rainforest Lodge is tourist friendly and offers intimate dining areas, such as under their retractable deck cover system. You can sit on the deck and listen to the sounds of the creek and watch the birds come alive. The lodge is in the perfect location on a gently sloping terrace along the Sibun River basin and surrounded by the Maya Mountains. Prominently overlooking the site is the majestic Sleeping Giant Mountain from where the lodge gets its name.
Belize is a fascinating melting pot of people and that is reflected in the food, a delicious blend of Belizean, Central and North American cuisine. Now the food can be enjoyed under a waterproof (not water resistant) retractable cover system that provides heat, glare, UV, sun and heavy rain protection and most importantly shade protection.
PROJECT COMPLEXITY AND UNIQUENESS
The project, product and installation were not complicated. What was a challenge was the location. The restaurant is located in gorgeous Belmopan, Belize, Central America. Since ocean freight is not available from Europe directly to Belize the product had to be shipped to Miami, Florida, unloaded and then re-shipped to Belize. The other challenge was hoisting all the extrusions and fabric to the 3rd floor of the lodge without damaging the wood or construction of the lodge.
PROJECT RESULTS
The client is ecstatic with the results of their retractable patio cover system. The retractable patio cover now makes it possible for the client and the lodge patrons to use a very large deck area throughout the year as the area is now protected from sun, UV, glare, heat, heavy rains and even hail. All customer requirements and goals were achieved within budget and on time.
 Ridgeline Renovations
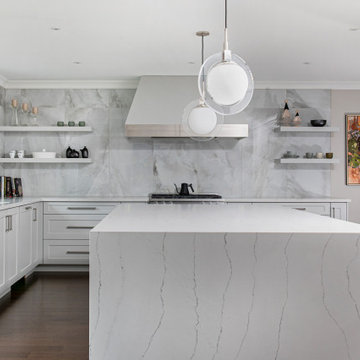
A complete remodel of this entire home provided the flow and functionality our clients hoped for, within a space that befittingly showcased their favourite artwork and unique elements of personal self-expression. An artistic spirit is apparent throughout the home as complementary tones of blues, greys, and whites reflect and enhance the ethereal worlds depicted in their cherished art collection.
Art is just one of the passions of this family, who also required a kitchen suited to their love of cooking. Vast counter space with high-end finishes and substantial storage in the form of elegant cabinetry frame the centrepiece – a beautifully anachronistic oven imported from France. With its pastel cerulean colour, the range draws the eye and evokes the homeowners’ artistic sensibilities.
Similar pops of blue infuse the rest of the home with this cool worldliness, from the refinished bathroom with its walk-in closet, to the décor surrounding the stonework fireplace. This domestic composition is one which could surely fit in alongside our clients’ collection.
 Natural Stone Institute
No greater compliment of a material is possible than when stone is selected for a historic property renovation within a home rich in tradition and with a celebrated past. This new feature stair addition to a private residence in Toronto, Canada, has an equally compelling story to tell.
Originally envisioned as a wall-supported, cantilevered stone stair, the owner boldly accepted a unique solution for their showpiece element. The 19-tread stair would be designed with 550 lb. solid stone treads, and fully
liberated from traditional supports and the adjacent rubble wall. To say, “it would float” is not an exaggeration. The stair would be designed as a monolithic beam spanning 16.5 feet, 10 feet high and 41 inches wide. Aesthetically bold, with a reduced tone from
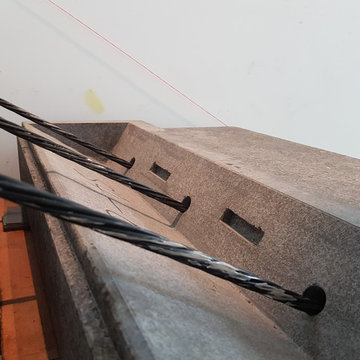
pure black, the basalt stone was the perfect contrast for the white modern interior of the home. The 3-1/2" tension cables played the most important role by resisting the large bending moment generated by the stone load and stair geometry. Fabrication required precise coordination and care to ensure perfect alignment of the interlocking key, and the corresponding cable holes.
The fabrication challenge was achieving the highest level of accuracy in notching, coring, and replicating each tread identically. Expert precision and skill were key to nesting each tread in sequence and simultaneously with the strands. Meticulous alignment and exacting tolerance assured the true performance and aesthetics were delivered. Hydraulic post-tensioning pulled each cable to 120 kiloNewtons or 27,000 lbs, infusing strength and structural integrity. Removing the temporary support and testing was the last critical step—it was the first time the stone stair would be self-supporting.
The “floating” stair is an ultimate achievement and example of innovation, material strength, fabrication quality, installation precision, and expert coordination. A perfect final chapter to a historical journey and modern ode to stone as structure.
 Designs by KS
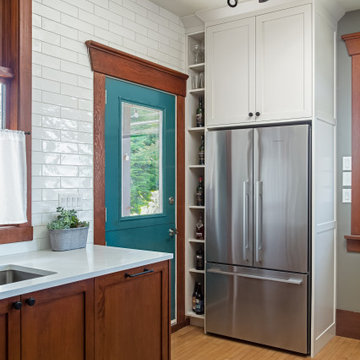
We partnered up with Furtado Contracting to update the kitchen in this stunning 100 year old house in Vancouver. The vision was to freshen up the dated cabinetry and countertops to a style that would lend well to the age of the home, while providing more storage and new appliances.
Layout: The gas range was previously hidden from the dining room by a pony wall. It was decided early on to remove the pony wall, opening the space visually while providing added counter space behind the range. The removal of the pony wall also allowed us to add additional storage on the dining room side of the kitchen.
The fridge was the next item to be relocated. Previously encroaching into the walkway, the fridge was previously placed where our new microwave lives. The fridge now sits in the perfect spot, next to a narrow open-self cabinet which was another wish list from the client, to display bottles and decorative items.
Storage in this kitchen increased by mounting the upper cabinets to the ceiling and improving the lower cabinets by adding more drawers and interior accessories like pullouts, spice storage and a super-susan in the base-corner cabinet.
Materials:
The materials used were extra important to this renovation to ensure we complimented the age of the home. To achieve the right look, shaker doors were used on all cabinets. The painted white cabinets were constructed of a Maple species and painted in Benjamin Moores ‘Silver Satin’. On the base cabinets, a Cherry species was used in a warm stain. To brighten up the room, Caesarstone countertops in ‘Frosty Carrina’ were paired with a white tile in a subway pattern from Olympia Tile.
The details on the crown moulding, door-style panels, cabinetry hardware, kitchen faucet and pendant light fixture are what made this space feel warm and welcoming for the 21st century.
 Designs by KS
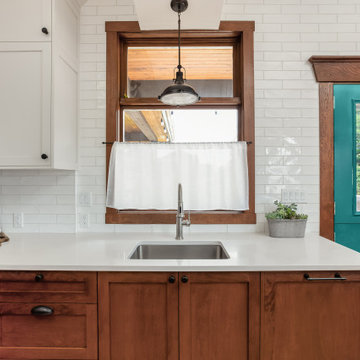
We partnered up with Furtado Contracting to update the kitchen in this stunning 100 year old house in Vancouver. The vision was to freshen up the dated cabinetry and countertops to a style that would lend well to the age of the home, while providing more storage and new appliances.
Layout: The gas range was previously hidden from the dining room by a pony wall. It was decided early on to remove the pony wall, opening the space visually while providing added counter space behind the range. The removal of the pony wall also allowed us to add additional storage on the dining room side of the kitchen.
The fridge was the next item to be relocated. Previously encroaching into the walkway, the fridge was previously placed where our new microwave lives. The fridge now sits in the perfect spot, next to a narrow open-self cabinet which was another wish list from the client, to display bottles and decorative items.
Storage in this kitchen increased by mounting the upper cabinets to the ceiling and improving the lower cabinets by adding more drawers and interior accessories like pullouts, spice storage and a super-susan in the base-corner cabinet.
Materials:
The materials used were extra important to this renovation to ensure we complimented the age of the home. To achieve the right look, shaker doors were used on all cabinets. The painted white cabinets were constructed of a Maple species and painted in Benjamin Moores ‘Silver Satin’. On the base cabinets, a Cherry species was used in a warm stain. To brighten up the room, Caesarstone countertops in ‘Frosty Carrina’ were paired with a white tile in a subway pattern from Olympia Tile.
The details on the crown moulding, door-style panels, cabinetry hardware, kitchen faucet and pendant light fixture are what made this space feel warm and welcoming for the 21st century.
 Natural Stone Institute
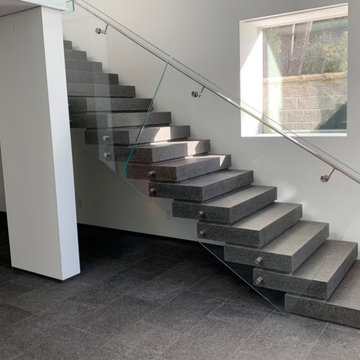
No greater compliment of a material is possible than when stone is selected for a historic property renovation within a home rich in tradition and with a celebrated past. This new feature stair addition to a private residence in Toronto, Canada, has an equally compelling story to tell.
Originally envisioned as a wall-supported, cantilevered stone stair, the owner boldly accepted a unique solution for their showpiece element. The 19-tread stair would be designed with 550 lb. solid stone treads, and fully
liberated from traditional supports and the adjacent rubble wall. To say, “it would float” is not an exaggeration. The stair would be designed as a monolithic beam spanning 16.5 feet, 10 feet high and 41 inches wide. Aesthetically bold, with a reduced tone from
pure black, the basalt stone was the perfect contrast for the white modern interior of the home. The 3-1/2" tension cables played the most important role by resisting the large bending moment generated by the stone load and stair geometry. Fabrication required precise coordination and care to ensure perfect alignment of the interlocking key, and the corresponding cable holes.
The fabrication challenge was achieving the highest level of accuracy in notching, coring, and replicating each tread identically. Expert precision and skill were key to nesting each tread in sequence and simultaneously with the strands. Meticulous alignment and exacting tolerance assured the true performance and aesthetics were delivered. Hydraulic post-tensioning pulled each cable to 120 kiloNewtons or 27,000 lbs, infusing strength and structural integrity. Removing the temporary support and testing was the last critical step—it was the first time the stone stair would be self-supporting.
The “floating” stair is an ultimate achievement and example of innovation, material strength, fabrication quality, installation precision, and expert coordination. A perfect final chapter to a historical journey and modern ode to stone as structure.
6