
Search results for "Simply remove" in Home Design Ideas
 Level Custom Build
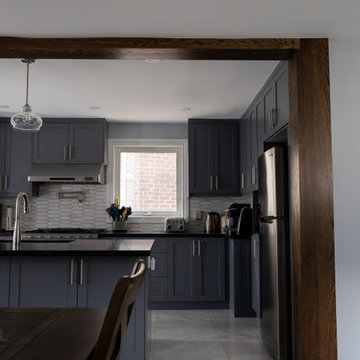
Our team completed this simple and beautiful kitchen in 2023. We removed the kitchen partition wall and installed a 3-ply LVL beam which we then cladded in an unfinished oak veneer. The cabinets were built custom and painted Benjamin Moore Gunmetal - 1902. We also tiled the kitchen, dining and sitting area floor, and backsplash. The idea was to simply maximize the kitchen space but to open up area and allow more natural light in. The clients have a rear addition with a separate living area which made this layout more feasible.
 RAJ Kitchen and Bath, LLC
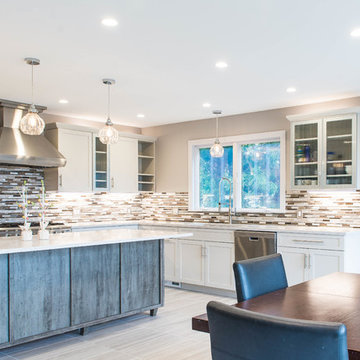
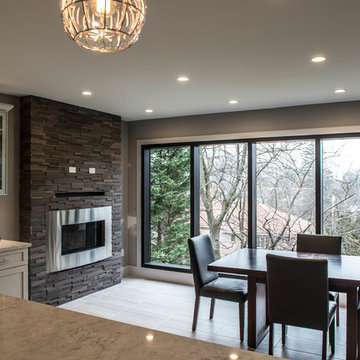
There were a few difficulties in making this kitchen any better than how it was. There was a separate staircase that had access to the second floor which was located in the kitchen. This left just enough room to push the dining room to one side. Then, there was the porch. A really nice panoramic view of the back, but was somehow under-used by the family during the summer months. Then, it was the size of the kitchen. It simply was way too small for a growing family, and while it had a peninsular in place, the flow just didn’t work. I remember watching them one day demonstrating how awkward it was using the kitchen. We got it! We had our marching orders to go and figure out how to make this kitchen work for this family.
Everything in the room was fair play. The design was done to make the kitchen very open. For a few ideas, we incorporated the porch in the kitchen by using the nana wall idea but it ended up being too cost prohibitive to do so. We then decided to do a permanent fix by using a commercial glass wall application. Once we figured that out, we moved back inside and removed the staircase. This gave us two added benefits. One allowed us to really reconfigure the kitchen and the other opened up the second floor for a huge built in closet system.
We relocated the windows, added a fire place with a built In TV above. From there, it was onto the kitchen itself which contained a huge Island with seating, large kitchen sink and built in appliances which was set up in a way to take advantage of the new layout. We re-positioned the kitchen facing the beautiful views outside rather than looking towards a wall. Now, when you enter the house up the entry stairs, the kitchen now draws you into the magnificent new open space. This is now setup for entertaining, relaxation, hanging out and most of all, preparing meals in a room where you only have to leave if you want to.
This one was all about the design. Design was what made this space. Setting this space up for success was crucial, and this kitchen is a great example of how design can cover a multitude of sins in Kitchen designs.
… Just close your eyes for a second and imagine waking up one winter morning and having a cup of coffee and watching the snow fall through those huge windows, leaning up against those 3D feature walls while watching the kids sitting around the table enjoying those warm radiant heated floors in this spacious kitchen…..
 User
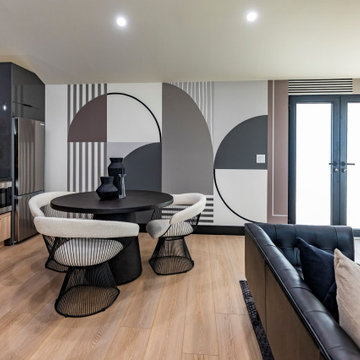
UserAll Weather teamed up with the Property Brothers and Queen of Broadway Idina Menzel on this week’s episode of HGTV’s hit show CELEBRTIY IOU. In the Idina Menzel’s Slam Dunk Reno episode, Idina pivots from her award-winning stage, film and music success to give back and surprise her good friend and son’s basketball coach James, by transforming his detached garage into a dedicated office and athletic retreat.
James Hunt founded Culture Run, a youth basketball program that gives kids the skills to succeed in both basketball and life. With IDINA MENZEL’S surprise renovation, James is one step closer to running a centralized training facility and headquarters where kids can drop by for counseling, basketball tips, and more.
When the PROPERTY BROTHERS meet up with Idina to demo the garage, they involve her in every step. Menzel gets her hands dirty by swinging a sledgehammer, operating an electric hand saw and removing storage bins. “I didn’t know they get as down and dirty as they do,” Menzel commented. “I also didn’t know they were gonna have me do so much!” Menzel also helped choose the tile, cabinets, hardware, flooring and the overall color palette.
All the effort was worthwhile because Menzel was able to surprise James with the basketball hangout and showstopping of his dreams. The newly dedicated office and athletic retreat features All Weather SERIES 7000 French Swing Doors and SERIES 5000 casement and fixed windows to allow natural light and fresh air in; a sleek kitchenette with an induction cooktop; a modern bathroom with a 7 1/2′ tall shower head for basketball players; a comfortable seating area for James to review film, meet with his players or simply relax; and a unique basketball themed wall mural.
Check out more PROJECT PHOTS here.
Now in its third season, Celebrity IOU gives celebrities a chance to show their deepest gratitude to friends, family and mentors by giving them a surprise renovation courtesy of Drew and Jonathan Scott.
Find the right local pro for your project
 Classic Kitchens Designs & Renovations Ltd.
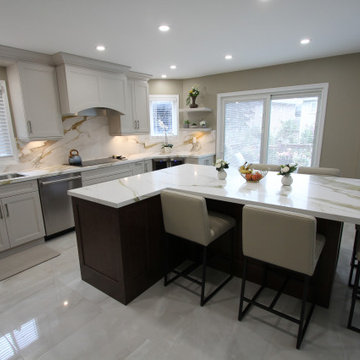
Our client had a dark kitchen that was very popular back in the day, however times change and it was time for something brighter and more airy, with better functionality. We started by removing bulkheads and changing out the flooring to a modern, 24x24 porcelain tile. Custom, Benjamin Moore painted cabinetry was then installed, following by stunning Porcelain countertops with matching backsplash. The result is simply stunning! Be sure to have a look at the before pics to see where we started.
 Drury Design
Design objectives for the remodel were aimed at giving the kitchen a larger feel, more room for cooking and extra seating for entertaining:
-Island with seating
-Space for a larger range/cooking area
-More storage with cabinets to the ceiling
-Making the original dining room blend with the kitchen so it all feels like one space
Design challenges to be solved:
-Making the header between the kitchen and the old dining room make sense as we combined the two spaces
-Avoid feeling crammed – a large island with seating still needed space for people walking around the space
-Refrigerator location – the header and window placements needed to stay, so finding a new and functional place for the fridge was a priority
-Add a large hood for wow-factor appeal
Design solutions fell into place as the overall layout came together:
-A large island to seat their four-person family comfortably. -Seating on two sides of the island improves conversation and has a great look.
-Knocking out a dining room wall gave us more room for the island. The leftover part of the dining was perfect for a dry bar/beverage area.
-The refrigerator needed to blend in and also be easily accessible. We removed the built-in pantry and used this space to house the refrigerator/freezer. Then we added tall pantry cabinets throughout the kitchen to make up for the loss of space.
-A large metal hood broke up the space and made for a fun statement piece
The new space is perfect for family time when the kids are back. It’s more conducive for being together, hanging out together, and entertaining with different friend groups together… the family simply spends more time together when they’re together in their new space.
“It’s the design and the openness,” the mom says. “Everybody loves it and gathers around the island all the time. It’s the lighting, too – it’s brighter in here. It’s just more open. We love it!”
 Houseplay Renovations LLC
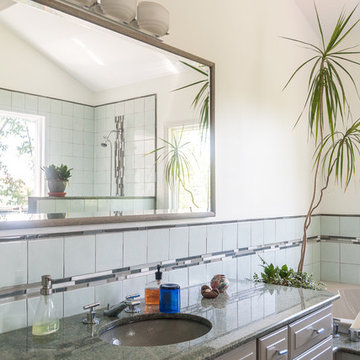
What if your bathroom could be not just lackluster, but a place of real luxury … spacious, fresh, and beautiful? In this project, we gave new life to a bathroom that wasn’t meeting its full potential.
This spacious, sunny bathroom’s layout and design were pre-existing, so the space simply needed freshening up. Our team did just that, through the use of careful planning, new materials, and skilled labor.
With serenity in mind, we created an oasis, painting and tiling to bring the homeowner’s vision to life. While installing new tile required the removal and re-installation of all plumbing fixtures, the transformation was well worth it.
This project is a great example of how choosing materials gives life to a space. Here, the wood-look floor tile, ceramic crackle wall tile, and glass mosaic detail strips join together to create the lush, luxurious look.
Once we’d established a new look for the space, we turned our attention to the finishing touches, such as the deep soaker tub, square drain in the standing shower, and stone tops on the vanity and half-walls. These details complete the room, facilitating a sense of ease and tranquility.
Sometimes, all it takes is a few changes to yield a fantastic result … in this case, a place of peace in the midst of a wild world.
Want to brighten up your home? Contact us; we’re here to help.
Photo Credit: Tamara Templeman
 RAJ Kitchen and Bath, LLC
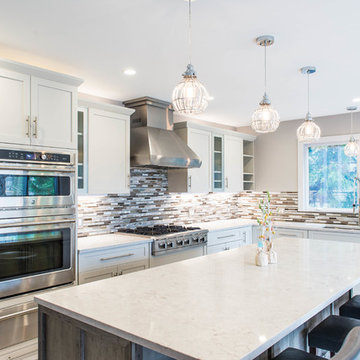
There were a few difficulties in making this kitchen any better than how it was. There was a separate staircase that had access to the second floor which was located in the kitchen. This left just enough room to push the dining room to one side. Then, there was the porch. A really nice panoramic view of the back, but was somehow under-used by the family during the summer months. Then, it was the size of the kitchen. It simply was way too small for a growing family, and while it had a peninsular in place, the flow just didn’t work. I remember watching them one day demonstrating how awkward it was using the kitchen. We got it! We had our marching orders to go and figure out how to make this kitchen work for this family.
Everything in the room was fair play. The design was done to make the kitchen very open. For a few ideas, we incorporated the porch in the kitchen by using the nana wall idea but it ended up being too cost prohibitive to do so. We then decided to do a permanent fix by using a commercial glass wall application. Once we figured that out, we moved back inside and removed the staircase. This gave us two added benefits. One allowed us to really reconfigure the kitchen and the other opened up the second floor for a huge built in closet system.
We relocated the windows, added a fire place with a built In TV above. From there, it was onto the kitchen itself which contained a huge Island with seating, large kitchen sink and built in appliances which was set up in a way to take advantage of the new layout. We re-positioned the kitchen facing the beautiful views outside rather than looking towards a wall. Now, when you enter the house up the entry stairs, the kitchen now draws you into the magnificent new open space. This is now setup for entertaining, relaxation, hanging out and most of all, preparing meals in a room where you only have to leave if you want to.
This one was all about the design. Design was what made this space. Setting this space up for success was crucial, and this kitchen is a great example of how design can cover a multitude of sins in Kitchen designs.
… Just close your eyes for a second and imagine waking up one winter morning and having a cup of coffee and watching the snow fall through those huge windows, leaning up against those 3D feature walls while watching the kids sitting around the table enjoying those warm radiant heated floors in this spacious kitchen…..


 SUPERIOR CHIMNEY SERVICES CORPORATION
As the temperatures continue to climb, and we finally get a chance to enjoy some warm weather, we start to walk around the neighborhood, or even our own homes, to find that lots of work needs to be done. Whether it be weed picking or changing bulbs in the light fixtures there’s always something that needs to be done. However, there’s one thing that can’t wait for your attention and that’s chimney tuckpointing. Why is it so important? Let’s take a look.
Weather and Tuckpointing, Not a Good Match
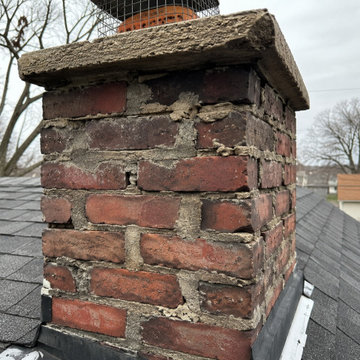
You might have guessed that Chicago and Chicagoland’s weather is brutal on masonry. The city and suburbs average around 35 freeze-thaw cycles every single winter. Every time the cycle occurs, it takes a toll on the chimney's mortar joints. When water gets in and temperatures drop, the water freezes & expands as ice with enough force to crack brick and stone. When Spring comes around, what once was a hairline crack, now gets bigger and allows rain to enter into your home.
This is why the yearly chimney inspection is not optional, according to the CSIA (Chimney Safety Institute of America).
A Little Chicago History
Most homes in neighborhoods like Beverly, Oak Park, Evanston and across the North Shore were built between the 1890s and 1950s. The mortar used in that era had a lifespan of roughly 25–30 years under normal conditions. Under Chicago and Chicagoland conditions? It is reduced. Homeowners buying older properties frequently inherit chimneys that haven't been maintained in a very long time.
When the chimney along with the flashing, bricks, chimney cap and chimney crown are not checked and maintained, loss of structural integrity begins. Water working its way through deteriorated joints reaches the interior of the chimney. This is where it can cause damage to the fire liner while it finds its way into the home. In some situations, compromised masonry near the fireplace can create fire safety concerns.
Getting a Chimney Inspection Early Makes All the Difference
The good news is that chimney tuckpointing, diagnosed early, is simply a repair. The bad news is that homeowners who wait too long can turn the issue into a partial rebuild, or a full chimney rebuild. By the time mortar is visibly crumbling from the street, the damage has already progressed deeper into the chimney structure.
A professional inspection every year is the most cost-effective way to keep the chimney and home heathy. It's often the difference between a few hundred dollars and several thousand.
Not All Tuckpointing Is Equal
One thing worth understanding is that proper tuckpointing requires removing the old mortar to a depth of approximately three-quarters of an inch before new mortar can be applied. Anything less and the new mortar won't bond with longevity / correctly. DIY or companies that just smear new mortar over old joints are doing what's sometimes called "skim coating," and it's essentially cosmetic work that won't hold up.
The type of mortar mix matters too. More modern cement mortars are actually harder than historic brick, which causes the brick itself to absorb, stress and crack rather than the mortar joint. A knowledgeable mason from Superior Chimney will match mortar composition to the brick, only something a real expert can get right.
Contact Superior Chimney today to get a chimney inspection which includes inspecting the exterior chimney today at 877-244-6349.
 RAJ Kitchen and Bath, LLC
There were a few difficulties in making this kitchen any better than how it was. There was a separate staircase that had access to the second floor which was located in the kitchen. This left just enough room to push the dining room to one side. Then, there was the porch. A really nice panoramic view of the back, but was somehow under-used by the family during the summer months. Then, it was the size of the kitchen. It simply was way too small for a growing family, and while it had a peninsular in place, the flow just didn’t work. I remember watching them one day demonstrating how awkward it was using the kitchen. We got it! We had our marching orders to go and figure out how to make this kitchen work for this family.
Everything in the room was fair play. The design was done to make the kitchen very open. For a few ideas, we incorporated the porch in the kitchen by using the nana wall idea but it ended up being too cost prohibitive to do so. We then decided to do a permanent fix by using a commercial glass wall application. Once we figured that out, we moved back inside and removed the staircase. This gave us two added benefits. One allowed us to really reconfigure the kitchen and the other opened up the second floor for a huge built in closet system.
We relocated the windows, added a fire place with a built In TV above. From there, it was onto the kitchen itself which contained a huge Island with seating, large kitchen sink and built in appliances which was set up in a way to take advantage of the new layout. We re-positioned the kitchen facing the beautiful views outside rather than looking towards a wall. Now, when you enter the house up the entry stairs, the kitchen now draws you into the magnificent new open space. This is now setup for entertaining, relaxation, hanging out and most of all, preparing meals in a room where you only have to leave if you want to.
This one was all about the design. Design was what made this space. Setting this space up for success was crucial, and this kitchen is a great example of how design can cover a multitude of sins in Kitchen designs.
… Just close your eyes for a second and imagine waking up one winter morning and having a cup of coffee and watching the snow fall through those huge windows, leaning up against those 3D feature walls while watching the kids sitting around the table enjoying those warm radiant heated floors in this spacious kitchen…..
 The Amendola Group, Inc.
At THE AMENDOLA GROUP, INC., we design + build landscapes and outdoor living spaces with attention to detail, style, and high-quality craftsmanship that is unmatched in the industry.
There are many aspects to consider when hiring a landscaping company for your home or business. Whether you are looking for more privacy, an outdoor living area fit for entertaining, or you simply want to enhance the aesthetics of your property, the team at Amendola Landscapes, Inc. can design the perfect landscape for you.
Your vision is our top priority. We are not satisfied with our work until we have exceeded our client's expectations. We take pride in the quality of our work and it shows—much of our new business is based on client referrals.
No matter the size of the job, Amendola Landscapes, Inc. can take care of all your needs. From the design phase right through the final product, we are always professional and we always over-deliver.
THE AMENDOLA GROUP, INC. — a partner with Amendola Landscapes, Inc. — is a full-service landscape design, build, and maintenance firm located in Dutchess County, NY.
OUR SERVICES INCLUDE: Landscape design | 3d renderings | Custom stonework including both natural stone and UNILOCK pavers and wall stone | Excavation | Custom decking | Landscape lighting | Waterscapes | Commercial snow removal | Professional lawn and garden maintenance
 Total Home
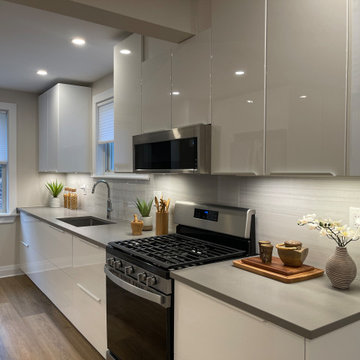
We are very proud of this kitchen renovation, for an older home in Kemptville. The house as you can see from the before photos, was quite dated, to the original kitchen, so it was time for an upgrade.
We removed a wall, separating the dining area to the kitchen, and had to install a beam above the island. We simply clad it in drywall for a clean aesthetic.
You would not know that these two spaces were one and the same.
The quality and care Gilbert executed in this renovation is top notch!
Another quality project by Total Home.
 Level Custom Build
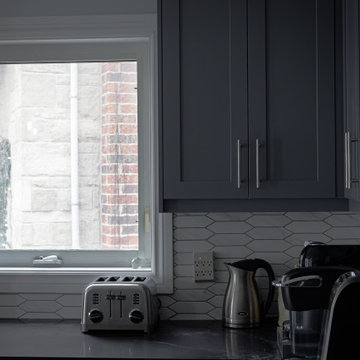
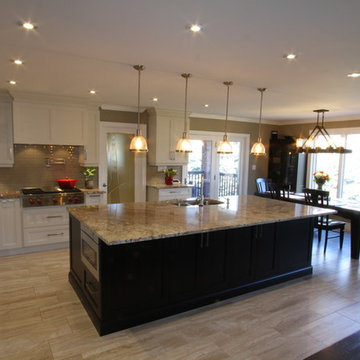
Our team completed this simple and beautiful kitchen in 2023. We removed the kitchen partition wall and installed a 3-ply LVL beam which we then cladded in an unfinished oak veneer. The cabinets were built custom and painted Benjamin Moore Gunmetal - 1902. We also tiled the kitchen, dining and sitting area floor, and backsplash. The idea was to simply maximize the kitchen space but to open up area and allow more natural light in. The clients have a rear addition with a separate living area which made this layout more feasible.
 Classic Kitchens Designs & Renovations Ltd.
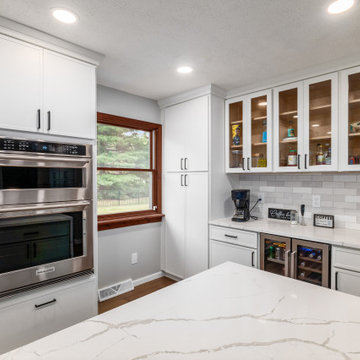
We started with an older home that had a very dated kitchen with an older closed room design that needed to change to open concept to work with how today's families live in their home. To walls were removed to open the floorplan and new porcilain tile and 3/4 oak hardwood were installed to visually separate the family room from the kitchen area. New, custom coloured Benjamin Moore painted Cabinetry was then installed with a custom Island In Alderwood "Espresso" colour. Granite countertops were selected and a Glass Subway tile was installed, complete with a Pot filler over the stove and high volume exhaust fan. The result is simply stunning!! We have also included before pictures to show where we started, and this new kitchen has really come a long way. What a Game Changer!!!!

 Kitchen Solvers of Columbus
For this kitchen remodeling project, our homeowners were looking to change their space to make the kitchen more open. We removed the existing peninsula, which allowed us to install a new kitchen island for them. Some of their cabinets were still in good condition, so we were able to keep them and simply reface them. The rest of the kitchen saw us installing all new cabinets. Our clients went with the Refuge door style in the Agave color from our Kitchen Solvers Showcase Collection. For the island they changed it up and did the cabinets in a pearl color. To finish this beautiful transformation, we installed a new Calcutta Laza quartz countertop along with a Zellenger Pearl backsplash. Just look at this stunning transformation!
 Chicology
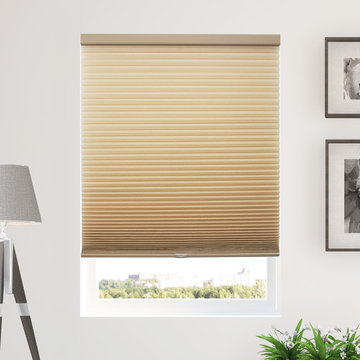
Chicology Cordless Honeycomb Cellular Shades are efficient. Efficient in function. Efficient in performance. Efficient in style. Efficient in design. Efficient in energy. By combining function with stylish design, Chicology Honeycomb Cellular modern shades highlight any room in need while helping against penetrating summer heat or winter air.
The cordless honeycomb cellular shade hexagon unique structure cells design has been mastered to become a premium draft and heat barrier. Chicology Cordless honeycomb cellular shade's marvelous design does an excelent job at being the most energy efficient shades in the market. The honeycomb design does a marvelous job at trapping air keeping your home cool in the summer heat and a great insulator in the winter; saving you money on summer/heating energy bills year round. 9/18-inch single cells creates the best functional eco-friendly shades while maintaining the Chic look you want. The unique honeycomb cellular fabric is timeless yet durable. The honeycomb cells open and close in an accordion fashion, with the simple child and pet safe cordless hassle free lift or pull of a hand. Our cordless lift system provides a fresh look by removing the need for operating cords. Simply cordless, the easy to use cellular shade stays exactly where you want, with no cords attached. Styled in UV protection, energy saver fabrics that filter the natural light beautifully – our window coverings create gentle sun-cover and protection during the day and valued complete privacy at night.
The rich crisp fabric is available in a range of stunning beautiful array of colors, from Morning Mist (White), Morning Croissant (Beige), Morning Pebble (Grey), Morning Fog (Dark Grey), Morning Ocean (Blue), Evening Mist (White with Blackout). All colors come with fabric matching head rail and bottom rail color coordinated to match your shade – for a complete and finished look. Installation is quick and easy. Just install the brackets to the wall or ceiling and clip the head rail on. Capable of both inside and outside mount, the width you purchase is exactly the width you get – there is no deduction. It is available in 3 different lengths: 48, 64, and 84.

 Drury Design
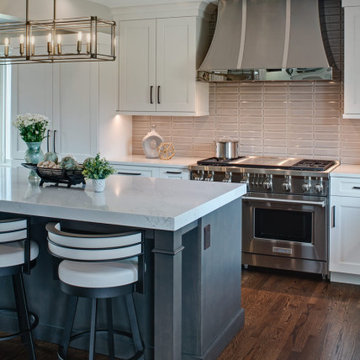
Design objectives for the remodel were aimed at giving the kitchen a larger feel, more room for cooking and extra seating for entertaining:
-Island with seating
-Space for a larger range/cooking area
-More storage with cabinets to the ceiling
-Making the original dining room blend with the kitchen so it all feels like one space
Design challenges to be solved:
-Making the header between the kitchen and the old dining room make sense as we combined the two spaces
-Avoid feeling crammed – a large island with seating still needed space for people walking around the space
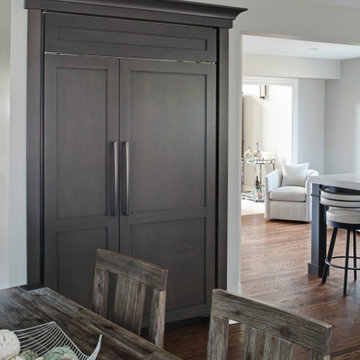
-Refrigerator location – the header and window placements needed to stay, so finding a new and functional place for the fridge was a priority
-Add a large hood for wow-factor appeal
Design solutions fell into place as the overall layout came together:
-A large island to seat their four-person family comfortably. -Seating on two sides of the island improves conversation and has a great look.
-Knocking out a dining room wall gave us more room for the island. The leftover part of the dining was perfect for a dry bar/beverage area.
-The refrigerator needed to blend in and also be easily accessible. We removed the built-in pantry and used this space to house the refrigerator/freezer. Then we added tall pantry cabinets throughout the kitchen to make up for the loss of space.
-A large metal hood broke up the space and made for a fun statement piece
The new space is perfect for family time when the kids are back. It’s more conducive for being together, hanging out together, and entertaining with different friend groups together… the family simply spends more time together when they’re together in their new space.
“It’s the design and the openness,” the mom says. “Everybody loves it and gathers around the island all the time. It’s the lighting, too – it’s brighter in here. It’s just more open. We love it!”
 Drury Design
Design objectives for the remodel were aimed at giving the kitchen a larger feel, more room for cooking and extra seating for entertaining:
-Island with seating
-Space for a larger range/cooking area
-More storage with cabinets to the ceiling
-Making the original dining room blend with the kitchen so it all feels like one space
Design challenges to be solved:
-Making the header between the kitchen and the old dining room make sense as we combined the two spaces
-Avoid feeling crammed – a large island with seating still needed space for people walking around the space
-Refrigerator location – the header and window placements needed to stay, so finding a new and functional place for the fridge was a priority
-Add a large hood for wow-factor appeal
Design solutions fell into place as the overall layout came together:
-A large island to seat their four-person family comfortably. -Seating on two sides of the island improves conversation and has a great look.
-Knocking out a dining room wall gave us more room for the island. The leftover part of the dining was perfect for a dry bar/beverage area.
-The refrigerator needed to blend in and also be easily accessible. We removed the built-in pantry and used this space to house the refrigerator/freezer. Then we added tall pantry cabinets throughout the kitchen to make up for the loss of space.
-A large metal hood broke up the space and made for a fun statement piece
The new space is perfect for family time when the kids are back. It’s more conducive for being together, hanging out together, and entertaining with different friend groups together… the family simply spends more time together when they’re together in their new space.
“It’s the design and the openness,” the mom says. “Everybody loves it and gathers around the island all the time. It’s the lighting, too – it’s brighter in here. It’s just more open. We love it!”
 The Amendola Group, Inc.
At THE AMENDOLA GROUP, INC., we design + build landscapes and outdoor living spaces with attention to detail, style, and high-quality craftsmanship that is unmatched in the industry.
There are many aspects to consider when hiring a landscaping company for your home or business. Whether you are looking for more privacy, an outdoor living area fit for entertaining, or you simply want to enhance the aesthetics of your property, the team at Amendola Landscapes, Inc. can design the perfect landscape for you.
Your vision is our top priority. We are not satisfied with our work until we have exceeded our client's expectations. We take pride in the quality of our work and it shows—much of our new business is based on client referrals.
No matter the size of the job, Amendola Landscapes, Inc. can take care of all your needs. From the design phase right through the final product, we are always professional and we always over-deliver.
THE AMENDOLA GROUP, INC. — a partner with Amendola Landscapes, Inc. — is a full-service landscape design, build, and maintenance firm located in Dutchess County, NY.
OUR SERVICES INCLUDE: Landscape design | 3d renderings | Custom stonework including both natural stone and UNILOCK pavers and wall stone | Excavation | Custom decking | Landscape lighting | Waterscapes | Commercial snow removal | Professional lawn and garden maintenance
 I'm The Man Services
?️ TWO-TONE KITCHEN CABINET REMODEL | COLORADO SPRINGS
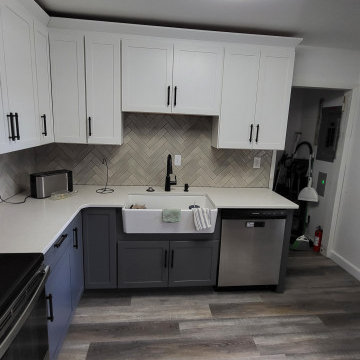
This Colorado Springs kitchen transformation showcases how thoughtful cabinet selection and professional installation can completely change the appearance and functionality of an existing kitchen.
? BRIGHT UPPER CABINETS
White shaker-style upper cabinets were selected to keep the kitchen feeling bright, clean, and open.
? CONTRASTING LOWER CABINETS
Gray lower cabinets create visual contrast and help ground the overall kitchen design while complementing the flooring, countertops, and backsplash.
? PROJECT HIGHLIGHTS
✔️ Existing cabinet removal
✔️ New cabinet layout
✔️ White shaker upper cabinets
✔️ Gray shaker lower cabinets
✔️ Full-height pantry cabinetry
✔️ Increased kitchen storage
✔️ Farmhouse sink cabinet installation
✔️ Dishwasher integration
✔️ Appliance integration
✔️ Professional cabinet leveling
✔️ Cabinet hardware installation
?️ PROFESSIONAL INSTALLATION
Successful cabinet installation requires more than simply attaching cabinets to the wall.
Every cabinet must be carefully positioned, leveled, secured, and aligned to create consistent reveals while properly accommodating countertops, appliances, plumbing, and flooring.
✨ THE RESULT
The completed two-tone cabinet design transformed this kitchen into a brighter, more modern, and functional space with significantly improved storage.
? I'M THE MAN SERVICES
We provide kitchen remodeling, cabinet installation, flooring, tile, and home renovation services throughout Colorado Springs and surrounding communities.
If you need it done right, I'm The Man. ?
48