
Search results for "Starting watering" in Home Design Ideas
 Tile Doctor Ltd
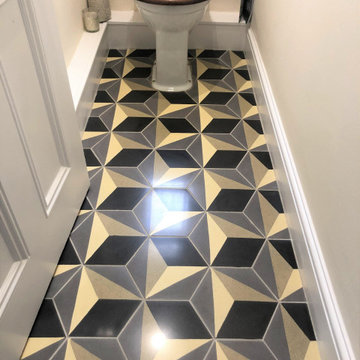
These photographs were taken of a bathroom and WC in a property in Histon The client had just had these modern Encaustic tiles laid a couple of months prior. The owner had never been happy with the final look of them and from the markings on the surface it looked like had been damaged in storage or left outside and neglected. They are a pretty unusual design so I can only assume the tiler thought their appearance was perfectly normal at the time of installation.
I was confident I could improve the appearance of the tiles and gave the client a quote for the work. Whilst she didn’t want to spend more money on her new floor, she did want it to look as it should, so rather reluctantly she agreed to go ahead.
Histon is next to Impington, they are small villages in Cambridgeshire, over the years the two villages have grown and have entwined together. Many villagers in fact do not know where one village starts and the other ends. The have 6 pubs in total!
I wasn’t sure what had been applied to the tiles so after adding protective tape to the wooden skirting I gave them a deep clean with Tile Doctor Remove and Go which was worked into the tiles with a black scrubbing pad. Then to renovate the surface and remove the markings I honed the surface with 400-grit and then 800-grit burnishing pad using water to lubricate the process and rinsing and extracting the soil away after each pad with the wet vacuum.
There were two areas that needed work so whilst one area was drying, I was able to get to work on the second and then return to the first later to apply a sealer. My product of choice for this floor was Tile Doctor Colour Grow which is an impregnating sealer which improves the colour and works by penetrating the pores of the tile and protecting it from within. I applied three coats allowing each one to dry before applying the next. The bathroom now looked as it should have done from the beginning.
My client was very happy with the improvement and left the following 5-Star review.
I only had my floor tiles fitted a few months or so ago and was so disappointed with them. I called Tom and within a few hours, he had transformed them! They look absolutely fantastic! Great value for money as well!
I recommended that in order to maintain the tiles, she should use Tile Doctor Neutral Cleaner, this is a pH neutral cleaner which will keep the floor without harming the sealer. Many tile cleaning products are only designed for Ceramic or Porcelain tiles and are too strong for use on sealed floors where they will strip the sealer off with time.
Tom Conlon
Cambridge Tile Doctor
 Tile Doctor Ltd
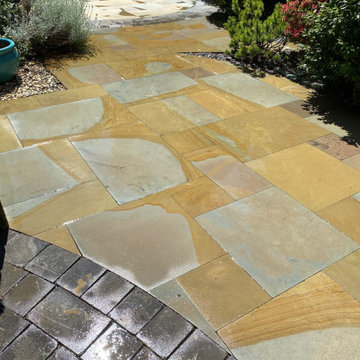
This Indian Sandstone Patio in Bolton-Le-Sands near Lancaster had not been cleaned successfully for several years. Although the owner had power washed it on occasion, that won’t rid you of Black Spot, Mould, Lichen etc and this will build-up over the years. It does clean the stone up to a certain standard but at some point, it will need further treatment.
My client had now reached this point and decided to give Tile Doctor a call to have it renovated. We discussed the Patio which ran around the house and calculated that it measured approximately 60m2. With the measurements and a summary of the issues I was able to work out a quote which they were happy to accept.
To improve the appearance of the stone I started by giving it a power wash to remove the general grime and dirt. I used a top of the range Karcher Pressure Washer for this which can apply up to 20 bars of pressure. The machine also comes with a spinner attachment results in a much more even clean than simply using the spray head.
The patio was left to dry for thirty minutes before applying neat Tile Doctor Patio & Brick Driveway Cleaner. Please note this is a very powerful product meant for professional use so if you’re using it always wear gloves and protective glasses. You leave it on the stone for ten minutes or longer before working it in. The directions on the back of the bottle say recommend leaving it for two to four hours, but its general advice. Personally, I find it is best to test the timing on a small inconspicuous area first, leave it on for say ten minutes then add a bit of water, scrub the surface and if the Black Spot disappears then that is all the time you need. If the stain is stubborn, increase the time. The two to four hour recommendation is really for difficult Black Spots that have become ingrained into the stone and then the product needs longer to digest the stain before it can work.
Once that was done, I used the power washer on low pressure to wash the products off the stone and into the sewerage drain, a wet vacuum comes in handy for this. Don’t dispose of it into the grass or planting areas as the strong chemicals in the product could upset them. Many properties have a soak away to capture rainwater from gutters, so you need to make sure it’s the sewage drain you are using.
As you can see on the pictures, this product really does work and got rid of the Black Spot completely. To maintain the patio a regular jet wash was recommended, the household versions are ideal for keeping it clean and tidy.
Due to the size of the Sandstone patio the whole process took around six hours to complete. Once done though the patio looked transformed and was all ready for a barbeque and some guests. Hopefully, it will stop raining long enough for this to happen.
Russell Taylor
Lancashire Tile Doctor
 THE Remodel Group
Creating a personal wellness retreat doesn't always mean starting from scratch. Through thoughtful design-build solutions, this Portland metro primary bathroom renovation showcases how reimagining your existing space can deliver extraordinary results.
Nestled into the side of Cooper Mountain, this stunning remodel artfully balances bold neutrality with warm, natural elegance. The centerpiece of the transformation—a spacious cedar-clad sauna—connects harmoniously with the expanded double shower, where biophilic accent tile reflects in the striking wall tile like dappled sunlight on water. The refined vanity area, featuring expertly repainted cabinetry and luminous countertops, ties the space together with subtle sophistication.
The success of this luxury renovation stems from strategic space planning and custom craftsmanship. By removing the existing oversized tub and deck—elements that weren't serving the homeowners' needs—we created space for a fully custom two-person sauna. The shower expansion, though modest at 12 inches, significantly enhanced the comfort and functionality for two users, demonstrating how thoughtful design can maximize every square foot.
What sets this project apart is its fully integrated design-build approach. Rather than relying on prefabricated solutions, the custom sauna was designed and constructed from the ground up. This complex undertaking required seamless coordination among electrical, plumbing, and HVAC trades across the Portland Metro Area, all working together to transform a standard bathroom into a high-performance wellness retreat.
Client collaboration played a pivotal role in the project's success. Through detailed 3D renderings, curated photo books, and hands-on material samples, the homeowners could confidently visualize and participate in design decisions. Every element—from the rich cedar sauna cladding to the plumbing fixtures—was carefully selected to create a perfect balance of aesthetics, performance, and budget considerations.
Speaking of budget, strategic decisions helped prioritize the homeowners' main objectives: a comfortable two-person sauna and an expanded shower. Instead of complete replacement, the existing cabinetry received a professional refinishing, maintaining a fresh, cohesive look while reducing material costs. By thoughtfully retaining elements like plumbing fixtures, electrical wiring, and the toilet location, we avoided unnecessary expenses while upgrading lighting with efficient LED fixtures where needed.
This primary bathroom and sauna project exemplifies how a collaborative design-build approach can transform your vision into reality. By combining strategic space planning, custom craftsmanship, and budget-conscious decisions, we created a personalized wellness retreat that delivers both luxury and functionality.
Find the right local pro for your project
 Tile Doctor Ltd
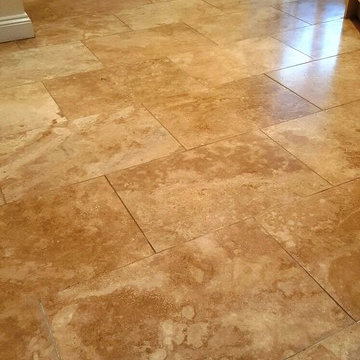
This fantastic Travertine tiled kitchen floor was in a bad way. Not only had it not been treated to a proper clean and seal in a long while, but it has also suffered from natural pitting, leaving lots of little holes that damaged the overall appearance of the floor. Travertine is very aesthetic, but suffers from the drawback of being quite soft compared to other types of stone (typically it sits between 3-4 on the Moh’s scale of mineral hardness).
The customer, who lives in the town of Sleaford a small Lincolnshire market town, was keen to have the situation remedied through a complete restoration. This would need to include small repairs, along with a deep clean and a fresh seal.
My first job was to deep clean the whole area, which I did using a solution of Tile Doctor Pro Clean and clean water. Pro Clean is a strong alkaline product which has a long history of producing reliable results of a wide range of natural stone floors, including Travertine, Granite, Limestone, and Slate. I applied the solution to both the tiles and the grout lines, and proceeded to scrub it in using a scrubbing pad fitted to a rotary floor machine.
This left the floor fresh and clean, but I would also need to restore the polish to the Travertine to really take its appearance to the next level. To do this I used the process known as burnishing, which essentially involves the consecutive application of different gritted pads to achieve a high quality polish on tiles. Our burnishing system, which consists of four pads, achieves fantastic results on high-end polished stone like Limestone, Marble and, of course, Travertine. I started by applying the Coarse grit burnishing pad, before gradually working my way through to the Medium, Fine, and finally Very Fine pads to achieve a brilliant shine and light reflection finish.
To round off the first day of the restoration, I used a flexible matching filler to fill up any pitted holes present on the surface of the tiles. Following this, I installed a turbo dryer to make sure the floor would dry fully overnight, and be ready to seal the following day.
The next day I returned to the property and proceeded to seal the Travertine tiles using several costs of Tile Doctor Colour Grow sealer to protect the tiles and also really enhance the natural colours in the stone. As an impregnating sealer, Colour Grow penetrates into the stone and fills its pores to safeguard it against ingrained dirt and stains from within.
As you can see from the photographs, the combination of a deep clean, high quality polish and fresh seal really transformed the appearance of the floor from dull and lifeless to a really asset to the kitchen. The customer was absolutely delighted with the results, leaving the following feedback: “Very good job – delighted! Thank you Phil!”
Phil Barrs
Lincolnshire Tile Doctor
 Alderland - SF Bay Area Pool & Landscape Co.
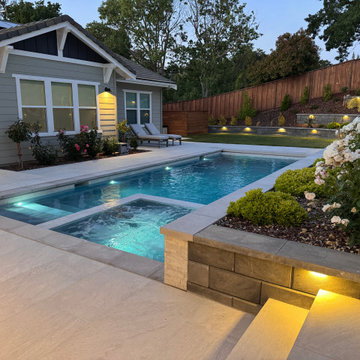
Alderland's contemporary swimming pool and pavilion is a stunning example of modern outdoor living, the pavilion’s minimalist architecture enhances its natural surroundings, creating a tranquil oasis that invites relaxation and socialization. Its thoughtful integration of indoor and outdoor elements makes it a perfect retreat for both leisurely swims and sumptuous gatherings.
 Tile Doctor Ltd
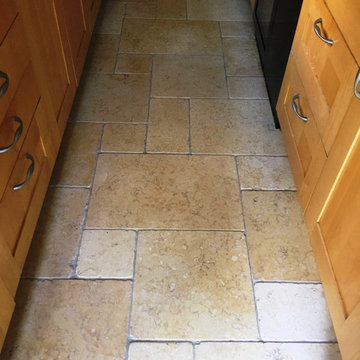
This customer from the south side Shepperton has a galley kitchen installed around twelve years ago with a Limestone floor. Since that time the floor had not been professionally cleaned or the stone re-sealed. The old sealer had long since worn down and was no longer providing any protection to the floor allowing soil and grease from cooking to penetrate the stone and darken the grout. It was now looking permanently dirty and the owner decided it was time to have it renovated.
Shepperton is a suburban village in the borough of Spelthorne, the Thames river is to the south and much of the east. It is set between the towns of Chertsey and Sunbury-on-Thames. The village has a long history and is even mentioned in a document of 959 AD and in the Domesday Book when it was primary farm land, it’s also my base of operation.
To deep clean the stone floor and grout I started with a mixture of Tile Doctor Remove and Go combined 50:50 with Tile Doctor Pro-Clean. This cocktail of sealer remover and cleaning agent was applied to the floor and left to soak in for ten minutes in order to get to work breaking down all the dirt, grease and what was left of the old sealer.
The solution was then worked into the Limestone tiles and grout using a rotary machine fitted with a black scrubbing pad. These pads can struggle to reach into the recesses of the grout lines, so afterwards the grout was scrubbed by hand using a stiff brush along with the more difficult to reach corners that the machine had missed. The floor was then rinsed with water and the products and soil vacuumed off the floor. I repeated the process in a couple of areas where the dirt was a little stubborn. The floor was then clean and after drying out overnight it would be ready for a new seal.
The following day I returned to apply the sealer first checking the floor was dry using a moisture meter. The readings were good, so I set about applying a colour enhancing impregnator sealer Tile Doctor Colour Grow to the Limestone. Tile Doctor Colour Grow works by seeping into the pores of the stone intensifying natural colour, preventing staining and providing a durable protection. Two coats of sealer were applied to the Limestone tile and grout which was all that was needed to return the floor back to its original condition.
The client was very happy with the finished floor and wanted to know how to keep it looking its best going forward. I explained that the best way to keep it looking good is to get maximum longevity from the sealer which will wear down over time but can be prematurely damaged with strong cleaning products. So, for aftercare I recommended the use of Tile Doctor Stone Soap which is designed for everyday cleaning of sealed stone floors.
Jonathan Oldham
South Middlesex Tile Doctor

 TVL Creative Ltd.
This project is an incredible transformation and the perfect example of successful style mixing! This client, and now a good friend of TVL (as they all become), is a wonderfully eclectic and adventurous one with immense interest in texture play, pops of color, and unique applications. Our scope in this home included a full kitchen renovation, main level powder room renovation, and a master bathroom overhaul. Taking just over a year to complete from the first design phases to final photos, this project was so insanely fun and packs an amazing amount of fun details and lively surprises. The original kitchen was large and fairly functional. However, the cabinetry was dated, the lighting was inefficient and frankly ugly, and the space was lacking personality in general. Our client desired maximized storage and a more personalized aesthetic. The existing cabinets were short and left the nice height of the space under-utilized. We integrated new gray shaker cabinets from Waypoint Living Spaces and ran them to the ceiling to really exaggerate the height of the space and to maximize usable storage as much as possible. The upper cabinets are glass and lit from within, offering display space or functional storage as the client needs. The central feature of this space is the large cobalt blue range from Viking as well as the custom made reclaimed wood range hood floating above. The backsplash along this entire wall is vertical slab of marble look quartz from Pental Surfaces. This matches the expanse of the same countertop that wraps the room. Flanking the range, we installed cobalt blue lantern penny tile from Merola Tile for a playful texture that adds visual interest and class to the entire room. We upgraded the lighting in the ceiling, under the cabinets, and within cabinets--we also installed accent sconces over each window on the sink wall to create cozy and functional illumination. The deep, textured front Whitehaven apron sink is a dramatic nod to the farmhouse aesthetic from KOHLER, and it's paired with the bold and industrial inspired Tournant faucet, also from Kohler. We finalized this space with other gorgeous appliances, a super sexy dining table and chair set from Room & Board, the Paxton dining light from Pottery Barn and a small bar area and pantry on the far end of the space. In the small powder room on the main level, we converted a drab builder-grade space into a super cute, rustic-inspired washroom. We utilized the Bonner vanity from Signature Hardware and paired this with the cute Ashfield faucet from Pfister. The most unique statements in this room include the water-drop light over the vanity from Shades Of Light, the copper-look porcelain floor tile from Pental Surfaces and the gorgeous Cashmere colored Tresham toilet from Kohler. Up in the master bathroom, elegance abounds. Using the same footprint, we upgraded everything in this space to reflect the client's desire for a more bright, patterned and pretty space. Starting at the entry, we installed a custom reclaimed plank barn door with bold large format hardware from Rustica Hardware. In the bathroom, the custom slate blue vanity from Tharp Cabinet Company is an eye catching statement piece. This is paired with gorgeous hardware from Amerock, vessel sinks from Kohler, and Purist faucets also from Kohler. We replaced the old built-in bathtub with a new freestanding soaker from Signature Hardware. The floor tile is a bold, graphic porcelain tile with a classic color scheme. The shower was upgraded with new tile and fixtures throughout: new clear glass, gorgeous distressed subway tile from the Castle line from TileBar, and a sophisticated shower panel from Vigo. We finalized the space with a small crystal chandelier and soft gray paint. This project is a stunning conversion and we are so thrilled that our client can enjoy these personalized spaces for years to come. Special thanks to the amazing Ian Burks of Burks Wurks Construction for bringing this to life!
Sponsored
Columbus, OH
Free consultation for landscape design!

Peabody Landscape Group
Franklin County's Reliable Landscape Design & Contracting

 Revolution Home Design
We added a retention wall to increase the accessibility in a yard that was otherwise inaccessible.
Inspiration for a backyard concrete paver retaining wall landscape in Charlotte.
Inspiration for a backyard concrete paver retaining wall landscape in Charlotte.

 Skill Construction & Design, LLC
It sparkles, it shimmers, it glitters, its glass. Glass mosaics are everywhere, from gorgeous kitchen backsplashes like this one, to color baths and reflective fireplaces. But as beautiful as this backsplash is, it’s only the beginning of this great kitchen.
Our kitchen begins with a little bump, a simple little peninsula with room for one. Upon the deep dark espresso cabinets sits the contrasting countertop. The super glossy white stone with subtle swirls reflects the colors of the glass mosaics. We gave the peninsula a little overhang and pulled up an enticing contemporary stool.
Although the kitchen space is fairly large, two walls contained openings to other spaces, while a third contained a large and sunny bay window. Rather than bottle neck our traffic flow, we chose to make the most of the walls we had. We started with a deep undermount stainless steel sink with a far-reaching faucet with pull out spray. Beside this, we placed our contemporary stainless steel dishwasher.
To keep the feeling open and airy we installed dark floating shelves, which really pop against our multicolored glass backsplash. We added lighting under the bottom shelf for extra sparkle, as well as the perfect task lighting.
We needed some wall cabinets, not just for storage but to compliment our microwave. Above the stainless steel stove our matching microwave serves multipurpose, from cooking, to venting, to task lighting the stove. When space counts, make the most of it. We nestled our stove beside the dishwasher, giving ourselves room for a landing zone at the end. The cooking area feels even more spacious set next to our large bay window.
To give us the greatest amount of storage, we added a floor to ceiling pantry. Although it is only 12″ deep, it’s 48″ wide. The clean “slab” style door create an uncluttered look that compliments the patterning of the floor. We used 6″ x 24″ porcelain wood look flooring. This flooring exploded on the market not too long ago, giving you the look of hardwoods, without fear of water, dents and scratches. The floor will never need to be refinished, no matter how much abuse it takes.
Look at all that storage. There’s even room on the bottom for that huge mixer we all seem to have. The pantry gives us plenty of room for all we need to store and it’s 12″ depth means it’s easy to find what you’re looking for. No more pulling out half your stored items just to find that product in the very back.
We round out this fabulous kitchen with a full-sized, bottom freezer, French door refrigerator. Espresso panels encase the sides while a deep and tall upper cabinet gives us room to store some more. By placing the refrigerator between the two entrances to the kitchen, family and friends can get a beverage without getting in the cook’s way.
To direct our lighting around the room and focus on specific areas, we used a long track of spot lights with a contemporary look. Between the window in the daytime, spots and undercabinet lights at night, the kitchen is always bright, even with the darker cabinetry.
http://www.rjkconstructioninc.com/
 Skill Construction & Design, LLC
It sparkles, it shimmers, it glitters, its glass. Glass mosaics are everywhere, from gorgeous kitchen backsplashes like this one, to color baths and reflective fireplaces. But as beautiful as this backsplash is, it’s only the beginning of this great kitchen.
Our kitchen begins with a little bump, a simple little peninsula with room for one. Upon the deep dark espresso cabinets sits the contrasting countertop. The super glossy white stone with subtle swirls reflects the colors of the glass mosaics. We gave the peninsula a little overhang and pulled up an enticing contemporary stool.
Although the kitchen space is fairly large, two walls contained openings to other spaces, while a third contained a large and sunny bay window. Rather than bottle neck our traffic flow, we chose to make the most of the walls we had. We started with a deep undermount stainless steel sink with a far-reaching faucet with pull out spray. Beside this, we placed our contemporary stainless steel dishwasher.
To keep the feeling open and airy we installed dark floating shelves, which really pop against our multicolored glass backsplash. We added lighting under the bottom shelf for extra sparkle, as well as the perfect task lighting.
We needed some wall cabinets, not just for storage but to compliment our microwave. Above the stainless steel stove our matching microwave serves multipurpose, from cooking, to venting, to task lighting the stove. When space counts, make the most of it. We nestled our stove beside the dishwasher, giving ourselves room for a landing zone at the end. The cooking area feels even more spacious set next to our large bay window.
To give us the greatest amount of storage, we added a floor to ceiling pantry. Although it is only 12″ deep, it’s 48″ wide. The clean “slab” style door create an uncluttered look that compliments the patterning of the floor. We used 6″ x 24″ porcelain wood look flooring. This flooring exploded on the market not too long ago, giving you the look of hardwoods, without fear of water, dents and scratches. The floor will never need to be refinished, no matter how much abuse it takes.
Look at all that storage. There’s even room on the bottom for that huge mixer we all seem to have. The pantry gives us plenty of room for all we need to store and it’s 12″ depth means it’s easy to find what you’re looking for. No more pulling out half your stored items just to find that product in the very back.
We round out this fabulous kitchen with a full-sized, bottom freezer, French door refrigerator. Espresso panels encase the sides while a deep and tall upper cabinet gives us room to store some more. By placing the refrigerator between the two entrances to the kitchen, family and friends can get a beverage without getting in the cook’s way.
To direct our lighting around the room and focus on specific areas, we used a long track of spot lights with a contemporary look. Between the window in the daytime, spots and undercabinet lights at night, the kitchen is always bright, even with the darker cabinetry.
http://www.rjkconstructioninc.com/
 Skill Construction & Design, LLC
It sparkles, it shimmers, it glitters, its glass. Glass mosaics are everywhere, from gorgeous kitchen backsplashes like this one, to color baths and reflective fireplaces. But as beautiful as this backsplash is, it’s only the beginning of this great kitchen.
Our kitchen begins with a little bump, a simple little peninsula with room for one. Upon the deep dark espresso cabinets sits the contrasting countertop. The super glossy white stone with subtle swirls reflects the colors of the glass mosaics. We gave the peninsula a little overhang and pulled up an enticing contemporary stool.
Although the kitchen space is fairly large, two walls contained openings to other spaces, while a third contained a large and sunny bay window. Rather than bottle neck our traffic flow, we chose to make the most of the walls we had. We started with a deep undermount stainless steel sink with a far-reaching faucet with pull out spray. Beside this, we placed our contemporary stainless steel dishwasher.
To keep the feeling open and airy we installed dark floating shelves, which really pop against our multicolored glass backsplash. We added lighting under the bottom shelf for extra sparkle, as well as the perfect task lighting.
We needed some wall cabinets, not just for storage but to compliment our microwave. Above the stainless steel stove our matching microwave serves multipurpose, from cooking, to venting, to task lighting the stove. When space counts, make the most of it. We nestled our stove beside the dishwasher, giving ourselves room for a landing zone at the end. The cooking area feels even more spacious set next to our large bay window.
To give us the greatest amount of storage, we added a floor to ceiling pantry. Although it is only 12″ deep, it’s 48″ wide. The clean “slab” style door create an uncluttered look that compliments the patterning of the floor. We used 6″ x 24″ porcelain wood look flooring. This flooring exploded on the market not too long ago, giving you the look of hardwoods, without fear of water, dents and scratches. The floor will never need to be refinished, no matter how much abuse it takes.
Look at all that storage. There’s even room on the bottom for that huge mixer we all seem to have. The pantry gives us plenty of room for all we need to store and it’s 12″ depth means it’s easy to find what you’re looking for. No more pulling out half your stored items just to find that product in the very back.
We round out this fabulous kitchen with a full-sized, bottom freezer, French door refrigerator. Espresso panels encase the sides while a deep and tall upper cabinet gives us room to store some more. By placing the refrigerator between the two entrances to the kitchen, family and friends can get a beverage without getting in the cook’s way.
To direct our lighting around the room and focus on specific areas, we used a long track of spot lights with a contemporary look. Between the window in the daytime, spots and undercabinet lights at night, the kitchen is always bright, even with the darker cabinetry.
http://www.rjkconstructioninc.com/
 Skill Construction & Design, LLC
It sparkles, it shimmers, it glitters, its glass. Glass mosaics are everywhere, from gorgeous kitchen backsplashes like this one, to color baths and reflective fireplaces. But as beautiful as this backsplash is, it’s only the beginning of this great kitchen.
Our kitchen begins with a little bump, a simple little peninsula with room for one. Upon the deep dark espresso cabinets sits the contrasting countertop. The super glossy white stone with subtle swirls reflects the colors of the glass mosaics. We gave the peninsula a little overhang and pulled up an enticing contemporary stool.
Although the kitchen space is fairly large, two walls contained openings to other spaces, while a third contained a large and sunny bay window. Rather than bottle neck our traffic flow, we chose to make the most of the walls we had. We started with a deep undermount stainless steel sink with a far-reaching faucet with pull out spray. Beside this, we placed our contemporary stainless steel dishwasher.
To keep the feeling open and airy we installed dark floating shelves, which really pop against our multicolored glass backsplash. We added lighting under the bottom shelf for extra sparkle, as well as the perfect task lighting.
We needed some wall cabinets, not just for storage but to compliment our microwave. Above the stainless steel stove our matching microwave serves multipurpose, from cooking, to venting, to task lighting the stove. When space counts, make the most of it. We nestled our stove beside the dishwasher, giving ourselves room for a landing zone at the end. The cooking area feels even more spacious set next to our large bay window.
To give us the greatest amount of storage, we added a floor to ceiling pantry. Although it is only 12″ deep, it’s 48″ wide. The clean “slab” style door create an uncluttered look that compliments the patterning of the floor. We used 6″ x 24″ porcelain wood look flooring. This flooring exploded on the market not too long ago, giving you the look of hardwoods, without fear of water, dents and scratches. The floor will never need to be refinished, no matter how much abuse it takes.
Look at all that storage. There’s even room on the bottom for that huge mixer we all seem to have. The pantry gives us plenty of room for all we need to store and it’s 12″ depth means it’s easy to find what you’re looking for. No more pulling out half your stored items just to find that product in the very back.
We round out this fabulous kitchen with a full-sized, bottom freezer, French door refrigerator. Espresso panels encase the sides while a deep and tall upper cabinet gives us room to store some more. By placing the refrigerator between the two entrances to the kitchen, family and friends can get a beverage without getting in the cook’s way.
To direct our lighting around the room and focus on specific areas, we used a long track of spot lights with a contemporary look. Between the window in the daytime, spots and undercabinet lights at night, the kitchen is always bright, even with the darker cabinetry.
http://www.rjkconstructioninc.com/
 Lotus Gardenscapes & Bloom Garden Center
We were lucky to be contacted by a client who designed their own dream home directly abutting a stunning nature preserve. When the homeowners were considering making some adjustments to their property, maintaining the connection between the home and its natural surroundings was of the utmost importance.
The couple wanted to create a space where they could drink in the beauty of the preserve. But what spurred the project was the need to make functional improvements. There was erosion on a hill sloping away from the house that needed to be addressed. Poor drainage saw rainwater was threatening the driveway and deck access on the side of the house.
As careful thinkers, they came into this project brimming with creative ideas for how to transform the space into something functional and worthy of its surroundings. They called us to help tie the project together and execute it.
Initial ideas were for a 3 or 4 season porch that would provide unmatched views of the surroundings, but with the functional aspects of the project, the dream porch was out of budget and still did not address the eroding hillside.
Not to worry the team at Lotus was able to take inspiration from the couples’ ideas, and together, we developed a stunning space truly worthy of the nature preserve around it.
PRACTICAL SOLUTIONS
In landscaping, the importance of water management cannot be overstated. Our first job in the landscape design process was to improve the drainage for the site. Improved drainage protects not just the landscaping, but the home itself. In fact, estimates indicate that water problems are responsible for 85% of home repair expenses in the US annually. To ensure the drainage problems were fixed permanently, Lotus constructed a retaining wall to protect the foundation of the house.
Once we fixed the broken drainage, we moved on to the slope at the side of the house. The hillside was badly eroding, making it another area of concern for the homeowners. Almost immediately, our team of experts saw the eroding hillside not as a problem, but as an opportunity. We fixed some grading issues and then planted the slope with native plants. These served a number of different functions:
Native plants tied the home and its landscape to the nature preserve. The Ann Arbor area features a diverse and beautiful array of plant life and this was something the Lotus team and the homeowners were excited to celebrate.
The plants’ root structure protects the integrity of the hillside. Plant roots act as anchors, gripping the earth and making the soil much more resistant to erosion. Native plants are especially good for this because they evolved alongside the native soil.
Plants on the hillside provided privacy from the neighbors. Look, we love our neighbors. But sometimes, in those quiet moments life affords us all too infrequently, it is nice to have a bit of peace and quiet. While a fence could do the job just as well, a fence isn’t suited to every environment. When your backyard is a nature preserve, you want to feel as connected to the land as possible. Tall native plants add to the feeling of connectedness in a way a fence simply can’t.
BEAUTIFUL RESULTS
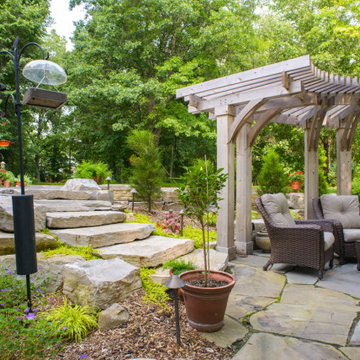
The couple had a deck and a walkout patio, but these spaces felt disconnected. Many of the solutions they put forward were attempts to address this separation. Working with our designers, we created a beautiful, tiered walkway that connected the deck and the walkout using modern bluestone from Rock Bottom Stone Supply, right here in Michigan. We added lighting features that would increase the feeling of connectivity between these spaces.
We set out to create a space that would hover between the patio and the deck. This space would make our homeowners feel connected to the nature preserve around them while allowing them to feel creative and comfortable.
To start, we made benches, stairs, and a built-in table. From there we finished with a cedar pergola that would give them shade in the summer months. We ended up making the pergola curved so it would relax into the space and provide a bit of the wow factor. We connected the deck and the walkout and paid homage to the slope and the preserve by installing still more native plants.
All in all, the space completely rejuvenated the couple’s yard. It proved an elegant solution to a number of practical problems and served as a connection between the house and the stunning property onto which the house was built.
At Lotus, we have proven our ability to provide similar solutions for many properties like this, but this one stands out. If for no other reason than to remind us, again and again, that nature and natural beauty are truly worth celebrating.
Designer: Traven Pelletier
Location: Brighton, Mi
Materials: Limestone outcrop, bluestone patio, cedar pergola, all natural stone
Vendors: Rock Bottom Stone supply in Burton, Michigan, Hobart stone in New York is bluestone supplier
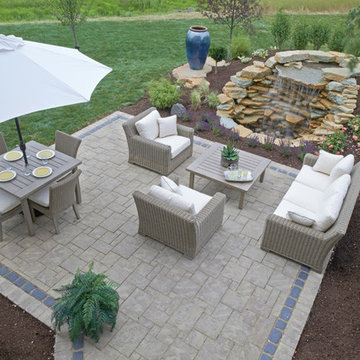

 yardscapes Inc.
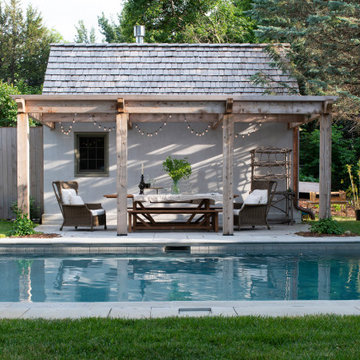
I was initially contacted by the builder and architect working on this Modern European Cottage to review the property and home design before construction began. Once the clients and I had the opportunity to meet and discuss what their visions were for the property, I started working on their wish list of items, which included a custom concrete pool, concrete spa, patios/walkways, custom fencing, and wood structures.
One of the largest challenges was that this property had a 30% (or less) hardcover surface requirement for the city location. With the lot size and square footage of the home I had limits to how much hardcover we could add to property. So, I had to get creative. We presented to the city the usage of the Live Green Roof plantings that would reduce the hardcover calculations for the site. Also, if we kept space between the Laurel Sandstones walkways, using them as steppers and planting groundcover or lawn between the stones that would also reduce the hard surface calculations. We continued that theme with the back patio as well. The client’s esthetic leaned towards the minimal style, so by adding greenery between stones work esthetically.
I chose the Laurel Tumbled Sandstone for the charm and character and thought it would lend well to the old world feel of this Modern European Cottage. We installed it on all the stone walkways, steppers, and patios around the home and pool.
I had several meetings with the client to discuss/review perennials, shrubs, and tree selections. Plant color and texture of the planting material were equally important to the clients when choosing. We grouped the plantings together and did not over-mix varieties of plants. Ultimately, we chose a variety of styles from natural groups of plantings to a touch of formal style, which all work cohesively together.
The custom fence design and installation was designed to create a cottage “country” feel. They gave us inspiration of a country style fence that you may find on a farm to keep the animals inside. We took those photos and ideas and elevated the design. We used a combination of cedar wood and sandwich the galvanized mesh between it. The fence also creates a space for the clients two dogs to roam freely around their property. We installed sod on the inside of the fence to the home and seeded the remaining areas with a Low Gro Fescue grass seed with a straw blanket for protection.
The minimal European style custom concrete pool was designed to be lined up in view from the porch and inside the home. The client requested the lawn around the edge of the pool, which helped reduce the hardcover calculations. The concrete spa is open year around. Benches are on all four sides of the spa to create enough seating for the whole family to use at the same time. Mortared field stone on the exterior of the spa mimics the stone on the exterior of the home. The spa equipment is installed in the lower level of the home to protect it from the cold winter weather.
Between the garage and the home’s entry is a pea rock sitting area and is viewed from several windows. I wanted it to be a quiet escape from the rest of the house with the minimal design. The Skyline Locust tree planted in the center of the space creates a canopy and softens the side of garage wall from the window views. The client will be installing a small water feature along the garage for serene noise ambience.
The client had very thoughtful design ideas styles, and our collaborations all came together and worked well to create the landscape design/installation. The result was everything they had dreamed of and more for their Modern European Cottage home and property.
 TVL Creative Ltd.
This project was such an incredible design opportunity, and instilled inspiration and excitement at every turn! Our amazing clients came to us with the challenge of converting their beloved family home into a welcoming haven for all members of the family. At the time that we met our clients, they were struggling with the difficult personal decision of the fate of the home. Their father/father-in-law had passed away and their mother/mother-in-law had recently been admitted into a nursing facility and was fighting Alzheimer’s. Resistant to loss of the home now that both parents were out of it, our clients purchased the home to keep in in the family. Despite their permanent home currently being in New Jersey, these clients dedicated themselves to keeping and revitalizing the house. We were moved by the story and became immediately passionate about bringing this dream to life.
The home was built by the parents of our clients and was only ever owned by them, making this a truly special space to the family. Our goal was to revitalize the home and to bring new energy into every room without losing the special characteristics that were original to the home when it was built. In this way, we were able to develop a house that maintains its own unique personality while offering a space of welcoming neutrality for all members of the family to enjoy over time.
The renovation touched every part of the home: the exterior, foyer, kitchen, living room, sun room, garage, six bedrooms, three bathrooms, the laundry room, and everything in between. The focus was to develop a style that carried consistently from space to space, but allowed for unique expression in the small details in every room.
Starting at the entry, we renovated the front door and entry point to offer more presence and to bring more of the mid-century vibe to the home’s exterior. We integrated a new modern front door, cedar shingle accents, new exterior paint, and gorgeous contemporary house numbers that really allow the home to stand out. Just inside the entry, we renovated the foyer to create a playful entry point worthy of attention. Cement look tile adorns the foyer floor, and we’ve added new lighting and upgraded the entry coat storage.
Upon entering the home, one will immediately be captivated by the stunning kitchen just off the entry. We transformed this space in just about every way. While the footprint of the home ultimately remained almost identical, the aesthetics were completely turned on their head. We re-worked the kitchen to maximize storage and to create an informal dining area that is great for casual hosting or morning coffee.
We removed the entry to the garage that was once in the informal dining, and created a peninsula in its place that offers a unique division between the kitchen/informal dining and the formal dining and living areas. The simple light warm light gray cabinetry offers a bit of traditional elegance, along with the marble backsplash and quartz countertops. We extended the original wood flooring into the kitchen and stained all floors to match for a warmth that truly resonates through all spaces. We upgraded appliances, added lighting everywhere, and finished the space with some gorgeous mid century furniture pieces.
In the formal dining and living room, we really focused on maintaining the original marble fireplace as a focal point. We cleaned the marble, repaired the mortar, and refinished the original fireplace screen to give a new sleek look in black. We then integrated a new gas insert for modern heating and painted the upper portion in a rich navy blue; an accent that is carried through the home consistently as a nod to our client’s love of the color.
The former entry into the old covered porch is now an elegant glass door leading to a stunning finished sunroom. This room was completely upgraded as well. We wrapped the entire space in cozy white shiplap to keep a casual feel with brightness. We tiled the floor with large format concrete look tile, and painted the old brick fireplace a bright white. We installed a new gas burning unit, and integrated transitional style lighting to bring warmth and elegance into the space. The new black-frame windows are adorned with decorative shades that feature hand-sketched bird prints, and we’ve created a dedicated garden-ware “nook” for our client who loves to work in the yard. The far end of this space is completed with two oversized chaise loungers and overhead lights…the most perfect little reading nook!
Just off the dining room, we created an entirely new space to the home: a mudroom. The clients lacked this space and desperately needed a landing spot upon entering the home from the garage. We uniquely planned existing space in the garage to utilize for this purpose, and were able to create a small but functional entry point without losing the ability to park cars in the garage. This new space features cement-look tile, gorgeous deep brown cabinetry, and plenty of storage for all the small items one might need to store while moving in and out of the home.
The remainder of the upstairs level includes massive renovations to the guest hall bathroom and guest bedroom, upstairs master bed/bath suite, and a third bedroom that we converted into a home office for the client.
Some of the largest transformations were made in the basement, where unfinished space and lack of light were converted into gloriously lit, cozy, finished spaces. Our first task was to convert the massive basement living room into the new master bedroom for our clients. We removed existing built-ins, created an entirely new walk-in closet, painted the old brick fireplace, installed a new gas unit, added carpet, introduced new lighting, replaced windows, and upgraded every part of the aesthetic appearance. One of the most incredible features of this space is the custom double sliding barn door made by a Denver artisan. This space is truly a retreat for our clients!
We also completely transformed the laundry room, back storage room, basement master bathroom, and two bedrooms.
This home’s massive scope and ever-evolving challenges were thrilling and exciting to work with, and the result is absolutely amazing. At the end of the day, this home offers a look and feel that the clients love. Above all, though, the clients feel the spirit of their family home and have a welcoming environment for all members of the family to enjoy for years to come.
 Skill Construction & Design, LLC
It sparkles, it shimmers, it glitters, its glass. Glass mosaics are everywhere, from gorgeous kitchen backsplashes like this one, to color baths and reflective fireplaces. But as beautiful as this backsplash is, it’s only the beginning of this great kitchen.
Our kitchen begins with a little bump, a simple little peninsula with room for one. Upon the deep dark espresso cabinets sits the contrasting countertop. The super glossy white stone with subtle swirls reflects the colors of the glass mosaics. We gave the peninsula a little overhang and pulled up an enticing contemporary stool.
Although the kitchen space is fairly large, two walls contained openings to other spaces, while a third contained a large and sunny bay window. Rather than bottle neck our traffic flow, we chose to make the most of the walls we had. We started with a deep undermount stainless steel sink with a far-reaching faucet with pull out spray. Beside this, we placed our contemporary stainless steel dishwasher.
To keep the feeling open and airy we installed dark floating shelves, which really pop against our multicolored glass backsplash. We added lighting under the bottom shelf for extra sparkle, as well as the perfect task lighting.
We needed some wall cabinets, not just for storage but to compliment our microwave. Above the stainless steel stove our matching microwave serves multipurpose, from cooking, to venting, to task lighting the stove. When space counts, make the most of it. We nestled our stove beside the dishwasher, giving ourselves room for a landing zone at the end. The cooking area feels even more spacious set next to our large bay window.
To give us the greatest amount of storage, we added a floor to ceiling pantry. Although it is only 12″ deep, it’s 48″ wide. The clean “slab” style door create an uncluttered look that compliments the patterning of the floor. We used 6″ x 24″ porcelain wood look flooring. This flooring exploded on the market not too long ago, giving you the look of hardwoods, without fear of water, dents and scratches. The floor will never need to be refinished, no matter how much abuse it takes.
Look at all that storage. There’s even room on the bottom for that huge mixer we all seem to have. The pantry gives us plenty of room for all we need to store and it’s 12″ depth means it’s easy to find what you’re looking for. No more pulling out half your stored items just to find that product in the very back.
We round out this fabulous kitchen with a full-sized, bottom freezer, French door refrigerator. Espresso panels encase the sides while a deep and tall upper cabinet gives us room to store some more. By placing the refrigerator between the two entrances to the kitchen, family and friends can get a beverage without getting in the cook’s way.
To direct our lighting around the room and focus on specific areas, we used a long track of spot lights with a contemporary look. Between the window in the daytime, spots and undercabinet lights at night, the kitchen is always bright, even with the darker cabinetry.
http://www.rjkconstructioninc.com/
 Skill Construction & Design, LLC
It sparkles, it shimmers, it glitters, its glass. Glass mosaics are everywhere, from gorgeous kitchen backsplashes like this one, to color baths and reflective fireplaces. But as beautiful as this backsplash is, it’s only the beginning of this great kitchen.
Our kitchen begins with a little bump, a simple little peninsula with room for one. Upon the deep dark espresso cabinets sits the contrasting countertop. The super glossy white stone with subtle swirls reflects the colors of the glass mosaics. We gave the peninsula a little overhang and pulled up an enticing contemporary stool.
Although the kitchen space is fairly large, two walls contained openings to other spaces, while a third contained a large and sunny bay window. Rather than bottle neck our traffic flow, we chose to make the most of the walls we had. We started with a deep undermount stainless steel sink with a far-reaching faucet with pull out spray. Beside this, we placed our contemporary stainless steel dishwasher.
To keep the feeling open and airy we installed dark floating shelves, which really pop against our multicolored glass backsplash. We added lighting under the bottom shelf for extra sparkle, as well as the perfect task lighting.
We needed some wall cabinets, not just for storage but to compliment our microwave. Above the stainless steel stove our matching microwave serves multipurpose, from cooking, to venting, to task lighting the stove. When space counts, make the most of it. We nestled our stove beside the dishwasher, giving ourselves room for a landing zone at the end. The cooking area feels even more spacious set next to our large bay window.
To give us the greatest amount of storage, we added a floor to ceiling pantry. Although it is only 12″ deep, it’s 48″ wide. The clean “slab” style door create an uncluttered look that compliments the patterning of the floor. We used 6″ x 24″ porcelain wood look flooring. This flooring exploded on the market not too long ago, giving you the look of hardwoods, without fear of water, dents and scratches. The floor will never need to be refinished, no matter how much abuse it takes.
Look at all that storage. There’s even room on the bottom for that huge mixer we all seem to have. The pantry gives us plenty of room for all we need to store and it’s 12″ depth means it’s easy to find what you’re looking for. No more pulling out half your stored items just to find that product in the very back.
We round out this fabulous kitchen with a full-sized, bottom freezer, French door refrigerator. Espresso panels encase the sides while a deep and tall upper cabinet gives us room to store some more. By placing the refrigerator between the two entrances to the kitchen, family and friends can get a beverage without getting in the cook’s way.
To direct our lighting around the room and focus on specific areas, we used a long track of spot lights with a contemporary look. Between the window in the daytime, spots and undercabinet lights at night, the kitchen is always bright, even with the darker cabinetry.
http://www.rjkconstructioninc.com/
Sponsored
Columbus, OH
Free consultation for landscape design!
Peabody Landscape Group
Franklin County's Reliable Landscape Design & Contracting
 Shade And Shutter Systems, Inc
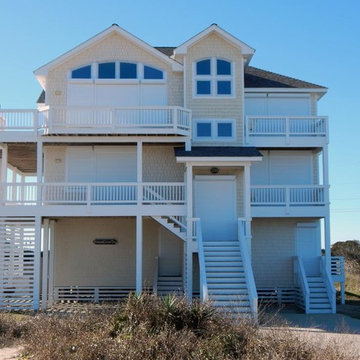
Rolling Shutters are the ultimate solution when you want to protect what’s behind your windows and doors. With Rolling Shutters, enjoy peace of mind knowing that your home has a sturdy layer of hurricane protection and storm protection. Rolling shutters shield against wind-blown debris, sand blasting and water penetration. Strong, secure, and durable, our Rolling Hurricane Shutters are proven to reduce energy and maintenance costs while making your home more comfortable to live in.
Hurricane Shutters
Hurricane Shutters are the premier protection against snow and ice storms, driving rain, high winds, and flying debris. We have huge selection of Hurricane Protection products for all types of applications. We specialize in new construction, retrofit projects and custom applications designed around more complex installations.
Hurricane Shutters protect your windows and doors from water penetration and breakage during hurricanes and Nor’easters bringing you comfort and protection. Even when you are not physically at the location of the storm, rolling shutters can offer you peace of mind. Homes and businesses not equipped with rolling shutters may experience glass breakage and door failures during high winds. Ultimately, those openings in the structure’s envelope can cause complete devastation to the home or business. Once the air pressure enters a building, no matter the type of construction, the likelihood of other windows and doors failing rises. If the pressure grows beyond a certain point, walls and and roof components begin to fail.
Security Shutters
Security Shutters are one of the best ways to discourage intruders from attempting to enter your home or business. This deterrent measure is just where rolling shutters start. While in the down position, rolling shutters can be locked in place by a motor, a gear, a keyed switch or by a separate locking device.
Rolling Shutters have been used as security shutters all over the world for decades with incredible success. Sometimes labeled as metal shutters and metal security shutters, they all have subtle differences, and the differences can’t be seen with the rolling shutter in the down position.
Security Shutters typically have end-retention pins that lock into the guide rails from the top. These pins are located throughout the entire curtain and are protected from manipulation while the curtain is in the close position.
Storm Shutters
Storm Shutters are the broad category of Storm Protection products. Of course, they come in all types of sizes, features and functionality. We have a full line of rolling shutters, hinged storm shutters and storm panels for you to to explore on our website or we would love for you to swing by one of our showrooms to see live demo models.
Storm Shutters are specifically engineered and designed for high hinds, flying debris protection and ultimately given a rating for Hurricane Protection. A little known fact: The most damaging type of wind value is not the force of the wind blowing directly on your home. This force is called positive pressure, and typically, many believe this is the strongest force against their home or business. Believe it or not, the negative pressure, or, the air passing by your windows and doors, has far greater power. Many low-grade storm shutters and hurricane protection products fail under this pressure.
Solar Shutters
Solar Shutters have a double wall construction and filled with a specialized polyurethane foam designed to increase R-factor and deflect solar penetration. Many rolling shutters can perform this function, but not all are created equal. The energy efficiency of exterior rolling shutters is up to 95% more effective than interior solar shades.
Solar Shutters have many unique and positive “side effects” from their dense foam-filled curtain profile. Many homeowners have taken advantage of energy savings by using these types of rolling shutters in both the summer and winter seasons. Reducing heating and air conditioning expenses throughout the entire year is not always our first thought, but many home and business owners have expressed massive savings. Not only do they block up to 90% of heat gain and loss, they also provide incredible noise control opportunities.
Privacy Shutters
Privacy Shutters are a great way to close of areas of your home or business from others. Some rolling shutters are equipped with perforations allowing ambient light to pass through when needed.
Privacy Shutters have many uses and are creatively used throughout the world in homes and businesses for all kinds of reasons. Close off food preparation areas, work shops, stock rooms, gun safes, closets, liquor cabinets and bars. Some business owners use rolling shutters to close off the outside world after working hours, to protect the last few employees as they finish money counts, paperwork, and prepare bank deposits.
If you have any questions or need additional information, our Product Specialists are available 800-522-1599

 Envision Web
Stuart Wade, Envision Virtual Tours
Envision Virtual Tours and High Resolution Photography is your best choice to find just what you are looking for in the Ellijay, Ga. area .Ellijay, Georgia, known as the “Apple Capital” of Georgia, is located between the Ellijay and Cartecay Rivers where they join to make the Coosawattee River and is the county seat of Gilmer County, Georgia. The origin of the city’s name is not certain but thought to be the English derivative of an Indian word(s) meaning “many waters”, “place of green things” or “new ground”. Some histories say it may have been named for an Indian chief.
Inhabited for countless years by the Cherokee people indigenous to the North Georgia, the area was first mentioned as a village and trade center before the onslaught of white settlers inhabited the region. During the 1830’s both white settlers and Indians occupied Ellijay. During the original land lottery in 1832, Martin Scalf acquired the 160 acre lot where the town now stands. In 1833, Clemonds Quinland bought 10 acres from Scalf, retained one acre for himself and donated the rest of the purchase to the County. A plan for twenty town lots, streets and a public square was created and the streets were oriented to allow maximum sunlight exposure to the buildings.
Proceeds from lot sales were used to build a jail and courthouse and pay other city expenses. During this same year, Gilmer County was appropriated $800.00 from the State to build a school, and a three-acre lot was donated for the city cemetery. On December 29, l834, Ellijay was incorporated and designated as the County seat of Gilmer County. By 1837, the town had twenty dwellings, three stores and one attorney. Most of these early buildings were of log construction.
Many roads led to Ellijay by 1849. The population had grown to 150 by 1850 and the town at five stores. Some wood-frame buildings were being constructed at this time and in 1854, a new courthouse was built in the center of the square, replacing the earlier building. The County’s first newspaper was the Ellijay Courier, started in 1875, and during this time period, Ellijay was a stop on the stagecoach line. The railroad bridge over the Cartecay River was completed in 1884 and the town now had rail service.
With the arrival of the railroad and subsequent tracks to White Path, Ellijay began to grow much faster. Many hotels were constructed and land was donated for a depot east of town. More industries, such as a cheese factory and the Shippen Brothers Lumber Mill, located in Ellijay. By 1898, the city had expanded its limits in every direction and now included the depot.
By 1900, all the buildings on the town square were brick. This included the recently completed Hyatt Hotel. Most of the other buildings in town were still of log construction, but new wood-frame buildings were being built. The Shippen Brothers Lumber Company production was expanding and exporting their lumber to Europe. Within the next few decades, this company grew to be one of the largest employers in Ellijay, often with five to six million feet of lumber in the yard at one time.
The population of Ellijay grew to 659 by 1910, and began to acquire many new modern conveniences such as electric lights and power, a telephone company and many new businesses.
Then in 1912, a fire ravaged the city, destroying 23 buildings. As a result, many new buildings were constructed under new and stricter fire and safety guidelines. The population, however, decreased slightly at this time to 632 in 1920.
During the 1920’s the town’s population began to grow again and, by this time, apples were being shipped out of the county and new storage facilities were built. Chickens were also shipped to markets outside of Ellijay and Gilmer County.
From the mid 1930’s to 1950, Ellijay received much assistance from the Federal WPA Programs. The old courthouse was removed from the center of town square and the Hyatt Hotel was remodeled to be the new courthouse. A park was created on the site of the old courthouse and the streets around the square were paved. A new street was built at this time entering town from the northeast. Other new roads, bridges, sidewalks and gutters were constructed to improve the city. A school and gymnasium were also built and other structures improved.
This growth began to impact the city’s infrastructure and in the l950’s and l960’s, a period of upgrading water systems, roads, and power supplies began. New low-rent housing appeared in l960 and a new hospital was built in l957. Georgia Highway 5 was widened in l962, new buildings around the square replaced old ones and some were remodeled. In 1974, the hospital was enlarged.
Currently, Ellijay attracts tourists who love the small-town feel and friendly atmosphere. Hotels and restaurants, unique shops, antiques and art galleries lend their charms to those who visit. A new courthouse constructed to resemble the old one, new streetscaping, family-oriented downtown events and the beautification of the square have stepped up the social and economic activity and have made Ellijay a popular destination.
 Skill Construction & Design, LLC
It sparkles, it shimmers, it glitters, its glass. Glass mosaics are everywhere, from gorgeous kitchen backsplashes like this one, to color baths and reflective fireplaces. But as beautiful as this backsplash is, it’s only the beginning of this great kitchen.
Our kitchen begins with a little bump, a simple little peninsula with room for one. Upon the deep dark espresso cabinets sits the contrasting countertop. The super glossy white stone with subtle swirls reflects the colors of the glass mosaics. We gave the peninsula a little overhang and pulled up an enticing contemporary stool.
Although the kitchen space is fairly large, two walls contained openings to other spaces, while a third contained a large and sunny bay window. Rather than bottle neck our traffic flow, we chose to make the most of the walls we had. We started with a deep undermount stainless steel sink with a far-reaching faucet with pull out spray. Beside this, we placed our contemporary stainless steel dishwasher.
To keep the feeling open and airy we installed dark floating shelves, which really pop against our multicolored glass backsplash. We added lighting under the bottom shelf for extra sparkle, as well as the perfect task lighting.
We needed some wall cabinets, not just for storage but to compliment our microwave. Above the stainless steel stove our matching microwave serves multipurpose, from cooking, to venting, to task lighting the stove. When space counts, make the most of it. We nestled our stove beside the dishwasher, giving ourselves room for a landing zone at the end. The cooking area feels even more spacious set next to our large bay window.
To give us the greatest amount of storage, we added a floor to ceiling pantry. Although it is only 12″ deep, it’s 48″ wide. The clean “slab” style door create an uncluttered look that compliments the patterning of the floor. We used 6″ x 24″ porcelain wood look flooring. This flooring exploded on the market not too long ago, giving you the look of hardwoods, without fear of water, dents and scratches. The floor will never need to be refinished, no matter how much abuse it takes.
Look at all that storage. There’s even room on the bottom for that huge mixer we all seem to have. The pantry gives us plenty of room for all we need to store and it’s 12″ depth means it’s easy to find what you’re looking for. No more pulling out half your stored items just to find that product in the very back.
We round out this fabulous kitchen with a full-sized, bottom freezer, French door refrigerator. Espresso panels encase the sides while a deep and tall upper cabinet gives us room to store some more. By placing the refrigerator between the two entrances to the kitchen, family and friends can get a beverage without getting in the cook’s way.
To direct our lighting around the room and focus on specific areas, we used a long track of spot lights with a contemporary look. Between the window in the daytime, spots and undercabinet lights at night, the kitchen is always bright, even with the darker cabinetry.
http://www.rjkconstructioninc.com/
210