
Search results for "Workers" in Home Design Ideas

 kimberly peck architect
photo by Pedro Marti
The goal of this renovation was to create a stair with a minimal footprint in order to maximize the usable space in this small apartment. The existing living room was divided in two and contained a steep ladder to access the second floor sleeping loft. The client wanted to create a single living space with a true staircase and to open up and preferably expand the old galley kitchen without taking away too much space from the living area. Our solution was to create a new stair that integrated with the kitchen cabinetry and dining area In order to not use up valuable floor area. The fourth tread of the stair continues to create a counter above additional kitchen storage and then cantilevers and wraps around the kitchen’s stone counters to create a dining area. The stair was custom fabricated in two parts. First a steel structure was created, this was then clad by a wood worker who constructed the kitchen cabinetry and made sure the stair integrated seamlessly with the rest of the kitchen. The treads have a floating appearance when looking from the living room, that along with the open rail helps to visually connect the kitchen to the rest of the space. The angle of the dining area table is informed by the existing angled wall at the entry hall, the line of the table is picked up on the other side of the kitchen by new floor to ceiling cabinetry that folds around the rear wall of the kitchen into the hallway creating additional storage within the hall.
 kimberly peck architect
photo by Pedro Marti
The goal of this renovation was to create a stair with a minimal footprint in order to maximize the usable space in this small apartment. The existing living room was divided in two and contained a steep ladder to access the second floor sleeping loft. The client wanted to create a single living space with a true staircase and to open up and preferably expand the old galley kitchen without taking away too much space from the living area. Our solution was to create a new stair that integrated with the kitchen cabinetry and dining area In order to not use up valuable floor area. The fourth tread of the stair continues to create a counter above additional kitchen storage and then cantilevers and wraps around the kitchen’s stone counters to create a dining area. The stair was custom fabricated in two parts. First a steel structure was created, this was then clad by a wood worker who constructed the kitchen cabinetry and made sure the stair integrated seamlessly with the rest of the kitchen. The treads have a floating appearance when looking from the living room, that along with the open rail helps to visually connect the kitchen to the rest of the space. The angle of the dining area table is informed by the existing angled wall at the entry hall, the line of the table is picked up on the other side of the kitchen by new floor to ceiling cabinetry that folds around the rear wall of the kitchen into the hallway creating additional storage within the hall.

 Design + Build by Lazar
Steve Lazar's newest project, a six-bedroom residence built on a hillside peak of 30th Street in Hermosa Beach for design+build by South Swell, is a study in the functional exploitation of lot size and surrounding beauty. That, and an evolution of the designer’s singular style.
Modernist in its veins, the new home has the earmarks of a Lazar design inside and out. There’s a hint of lifeguard tower in its exterior, though more muted than visible in his past projects, mainly due to a ring of rusticated wood cladding swathed around its mid-section. Other signifiers are there, too, from a row of high-perched observation windows to a slightly raised metal hip roof of soft blue. Jutting out slightly over the home, its underside dressed in tidy shiplap, the roof contrasts smartly against the clean white stucco and earthy wood of the lower levels. In all, it’s still clean-cut Lazar, but more organic than sleek.
“I use a lot of the same ideas,” says Lazar, standing outside the structure while craftsmen and workers buzz around, putting finishing touches on the place. “ “I have a signature vocabulary, but I adapt it with each custom home to meet a client’s needs and maximize the particulars of that space.”
Thoughtfully designed by Steve Lazar design+build by South Swell. designbuildbysouthswell.com Photography by Laura Hull
Find the right local pro for your project

 Oran Remodeling Inc.
A job of this scope always starts by having our client meet with our architect, designer and project manager to go over what their vision is. Once the project is understood drawings are made and submitted to the client and the city for approval.
Once everything is submitted and approved we had to have perimeter fencing, a container for all the debris, a secure gate, and a portable restroom facility for our workers.
After the site has been prepped and is ready for work we disconnected all the electrical and main water line to begin the demolition. For this project, we had to demolish most of the walls in the kitchen.
In addition, this is what we did:
Demo all vinyl tile and carpet from the living room, kitchen, hallway, and bathroom.
Block outlet above the stove
Install in the kitchen faucet and garbage disposal- customer to supply
Demo the shower and install a new faucet
New outlet above vanity
New hot mop, new wood stud as necessary, new fan and install new shower door
Install tile in the shower
Install 2 LED fluorescent light above the garage
Remove 1 heater
Install 12-foot walls, drywall both sides
Replace LED lights
There were many, many details in this project that we don’t have the space to go into here.
 Oran Remodeling Inc.
A job of this scope always starts by having our client meet with our architect, designer and project manager to go over what their vision is. Once the project is understood drawings are made and submitted to the client and the city for approval.
Once everything is submitted and approved we had to have perimeter fencing, a container for all the debris, a secure gate, and a portable restroom facility for our workers.
After the site has been prepped and is ready for work we disconnected all the electrical and main water line to begin the demolition. For this project, we had to demolish most of the walls in the kitchen.
In addition, this is what we did:
Demo all vinyl tile and carpet from the living room, kitchen, hallway, and bathroom.
Block outlet above the stove
Install in the kitchen faucet and garbage disposal- customer to supply
Demo the shower and install a new faucet
New outlet above vanity
New hot mop, new wood stud as necessary, new fan and install new shower door
Install tile in the shower
Install 2 LED fluorescent light above the garage
Remove 1 heater
Install 12-foot walls, drywall both sides
Replace LED lights
There were many, many details in this project that we don’t have the space to go into here.
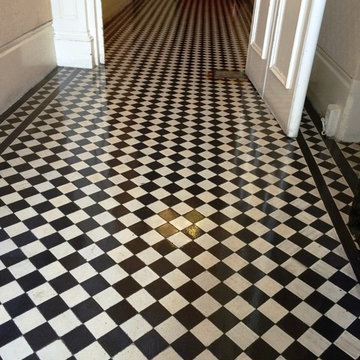
 Tile Doctor Ltd
Recently, I was asked to do some Tile Doctoring at Palmeira Square, in the seaside city of Brighton and Hove, to restore the Victorian tiled floor of one of the downstairs offices. Palmeira Square is a residential area which was first developed in the mid-19th century during the reign of Queen Victoria, so many of the buildings feature some fantastic original Victorian tile floors. Although there are many large terraced houses and even mansions in the area, some of the buildings have been converted into offices for commercial use. My client, who leased the downstairs office, managed to persuade the other tenants to employ professional help to restore the tiles, and so I was asked to come in to clean and seal the floor to get it back to looking its best.
With Palmeira Square being quite a lively area, I made sure to fence off the front door area from the wandering public. My first job was to apply Tile Doctor Remove & Go to the floor, a heavy duty stripper, multi-purpose stripper that was able to remove the stubborn marks, stains and ingrained dirt on and between the tiles. In particular, Remove & Go helped to remove some rust stains I found near the door hinges.
I left the product to sit and work its magic for twenty minutes, and during this time I began cleaning the floor using a buffing pad, which is suitable for use on all types of floor (except polished stone), and a solution of Tile Doctor Pro-Clean diluted with water. The combination of a buffing pad and Pro-Clean helped to remove the general dirt and grime that had built up over time in this high traffic area of the office. After the cleaning was complete, the black tiles appeared grey because any remaining sealer had been removed. However, the colour would return after resealing the tiles, which was my next job.
I returned to the office after two days to seal the Victorian tile floor. To do this, I needed to use Tile Doctor Seal & Go, which meant I had to ask the office workers to keep off the floor for most of the day. This is because I needed to apply six coats of Seal & Go to the floor, and each coat takes roughly fourty minutes to dry. Seal & Go provides a stain-resistant surface seal and a durable low-sheen finish, which will help keep this floor looking great for a long time, even with a high traffic of workers coming in and out of the office.
Luckily, it was a warm day outside, and the floor dried quickly, leaving a shiny, deep black surface. Both my client and I were very happy with the result. The client was also pleasantly surprised to see that I had been able to remove the rust stains near the door.
 Oran Remodeling Inc.
A job of this scope always starts by having our client meet with our architect, designer and project manager to go over what their vision is. Once the project is understood drawings are made and submitted to the client and the city for approval.
Once everything is submitted and approved we had to have perimeter fencing, a container for all the debris, a secure gate, and a portable restroom facility for our workers.
After the site has been prepped and is ready for work we disconnected all the electrical and main water line to begin the demolition. For this project, we had to demolish most of the walls in the kitchen.
In addition, this is what we did:
Demo all vinyl tile and carpet from the living room, kitchen, hallway, and bathroom.
Block outlet above the stove
Install in the kitchen faucet and garbage disposal- customer to supply
Demo the shower and install a new faucet
New outlet above vanity
New hot mop, new wood stud as necessary, new fan and install new shower door
Install tile in the shower
Install 2 LED fluorescent light above the garage
Remove 1 heater
Install 12-foot walls, drywall both sides
Replace LED lights
There were many, many details in this project that we don’t have the space to go into here.

 Downtown Tile Centre
Digital High Definition Porcelain Tile replacating renowned Canadian natural stone at fractional cost. This vanity was designed by us and made by our custom mill-worker.
Designed by Joana Carreira
 Oran Remodeling Inc.
A job of this scope always starts by having our client meet with our architect, designer and project manager to go over what their vision is. Once the project is understood drawings are made and submitted to the client and the city for approval.
Once everything is submitted and approved we had to have perimeter fencing, a container for all the debris, a secure gate, and a portable restroom facility for our workers.
After the site has been prepped and is ready for work we disconnected all the electrical and main water line to begin the demolition. For this project, we had to demolish most of the walls in the kitchen.
In addition, this is what we did:
Demo all vinyl tile and carpet from the living room, kitchen, hallway, and bathroom.
Block outlet above the stove
Install in the kitchen faucet and garbage disposal- customer to supply
Demo the shower and install a new faucet
New outlet above vanity
New hot mop, new wood stud as necessary, new fan and install new shower door
Install tile in the shower
Install 2 LED fluorescent light above the garage
Remove 1 heater
Install 12-foot walls, drywall both sides
Replace LED lights
There were many, many details in this project that we don’t have the space to go into here.


 Paul Lopa Designs
Traditional Kitchen Renovation & Design Of A First Floor Ranch.
See what our client say about Paul Lopa Designs:
It went as smooth as it possibly could go. The only bumps in the road was with what we found during demolition, you never know what your gonna run into when all the walls,floors and fixtures come out. Paul had explained to us that depending on what we found under all the out dated stuff it might take a little longer. Paul was there doing the work with his workers he showed up on time and finished on schedule. It was no problem being in touch with Paul because he answered his phone or got back to us in a timely fashion. He has an excellent sense of design he knows what goes well together and makes the house flow with comfort and usability.
(R)Haw Ron
 Downtown Tile Centre
Digital High Definition Porcelain Tile replacating renowned Canadian natural stone at fractional cost. This vanity was designed by us and made by our custom mill-worker.
Designed by Joana Carreira

 Jerry Bland
Sera Trimble
Small transitional porcelain tile kitchen photo in Los Angeles with an undermount sink, white cabinets, quartz countertops, white backsplash, subway tile backsplash and colored appliances
Small transitional porcelain tile kitchen photo in Los Angeles with an undermount sink, white cabinets, quartz countertops, white backsplash, subway tile backsplash and colored appliances
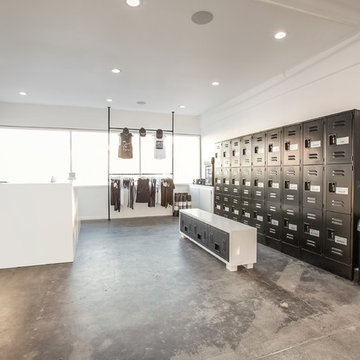


 G. Christianson Construction, Inc.
This beautiful Craftsman style Passive House has a carbon footprint 20% that of a typically built home in Oregon. Its 12-in. thick walls with cork insulation, ultra-high efficiency windows and doors, solar panels, heat pump hot water, Energy Star appliances, fresh air intake unit, and natural daylighting keep its utility bills exceptionally low.
Jen G. Pywell


 aamodt / plumb architects
Shou sugi ban, weathered mesquite wood and white walls around found throughout this modern home, including in the stairway.
Staircase - modern wooden straight metal railing staircase idea in Austin
Staircase - modern wooden straight metal railing staircase idea in Austin
 Design + Build by Lazar
Steve Lazar's newest project, a six-bedroom residence built on a hillside peak of 30th Street in Hermosa Beach for design+build by South Swell, is a study in the functional exploitation of lot size and surrounding beauty. That, and an evolution of the designer’s singular style.
Modernist in its veins, the new home has the earmarks of a Lazar design inside and out. There’s a hint of lifeguard tower in its exterior, though more muted than visible in his past projects, mainly due to a ring of rusticated wood cladding swathed around its mid-section. Other signifiers are there, too, from a row of high-perched observation windows to a slightly raised metal hip roof of soft blue. Jutting out slightly over the home, its underside dressed in tidy shiplap, the roof contrasts smartly against the clean white stucco and earthy wood of the lower levels. In all, it’s still clean-cut Lazar, but more organic than sleek.
“I use a lot of the same ideas,” says Lazar, standing outside the structure while craftsmen and workers buzz around, putting finishing touches on the place. “ “I have a signature vocabulary, but I adapt it with each custom home to meet a client’s needs and maximize the particulars of that space.”
Thoughtfully designed by Steve Lazar design+build by South Swell. designbuildbysouthswell.com Photography by Joel Silva.

 The Cleary Company
Countertops - VicoStone Borghini Polished
Knobs & Pulls - Atlas brushed nickel
Backsplash - Florida Tile bianco polished dimensional basket weave mosaic
Pendant lights - Corbett Lighting polished nickel
Chandelier - Hubbardton Forge burnished steel
Appliances - Thermador dishwasher & range, Ventahood hood, KitchenAide fridge
Sink - Kohler farmhouse white
Faucet - Moen chrome
83