
Search results for "Conducting" in Home Design Ideas
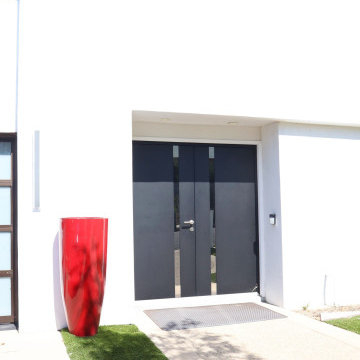
 United Porte Inc
Your front door is your best defender. It protects you, your family, and your most valuable personal belongings from theft and damage.
Furthermore, VDom Doors insulate your home from extreme weather conditions, as well as unwanted animals, insects, and dust from entering.
This technology makes it possible to protect the front door from condensation and ice formation.
A thermal break is a layer of material with low thermal conductivity. For the correct operation of the door, it must be located between the outer and inner sides of the leaf and the frame, thereby excluding the contact of the metal parts with each other.
This technology prevents the door from freezing, preserving its properties and impeccable appearance for many years.
The two-tone painting ofthe door leaf and the frame makes it possible to select colours separately for interior and exterior decoration, which gives the door a complete look and makes it possible to create a harmonious image in the interior and exterior.
All models of this collection are made with a frame made of aluminum. The external framework and internal power framework of the frame do not touch in any way, because they are interconnected by a polyamide insert (thermal break) 18 mm thick, which guarantees maximum thermal insulation performance.
The door leaf ofthis series is made of two sheets of metal 1 mm thick. A reliable two-layer design with a thermal insulation layer and expanded polystyrene filling guarantees reliability. durability, and the best indicators of heat and noise insulation of the door.
Model - 6777 Cynex
Color - Black
Door thickness - 3 1/4"
Frame thickness - 4"
Metal frame 4" thick - dimensions of the door with frame is 34" x 82".
Metal threshold.
Plate-type, primary lock for armoured type of steel doors, locked by 3 key turns
To maintain the warranty, a canopy is required over the door.
 Tile Doctor Ltd
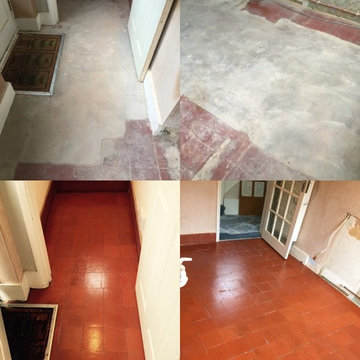
This customer from Woking had a Quarry tiled kitchen floor that she simply didn’t think could be restored. The floor had been unearthed after many years of being covered by a layer of levelling compound cement and then linoleum. Indeed, the situation certainly looked dire, but I carried out a successful test clean on a patch of the floor where the cement was at its thickest to show that it would be possible to conduct a full restoration. Having seen the results, the customer was more than happy for me to get the work underway.
To begin the restoration, I soaked small sections with water and Tile Doctor Remove and Go our heavy duty coatings remover. The solution was left to dwell for a short period to soften the cement, before I used the heat from a steamer in combination with a hand scraper to begin lifting away the muck. As you can probably imagine, this was an arduous and intensive process which took a full four days to fully complete.
Next, I cleaned the cement-free tiles using our high alkaline tile cleaning product Tile Doctor Pro Clean diluted 1 part cleaner with 3 parts water. This helped to eradicate the leftover muck once I had removed the bulk of the cement. I then sprayed Tile Doctor Grout Clean Up onto the grout lines and tiles to fully neutralise them and also remove any cement residue. Finally, I steamed the floor and left it for a week to dry out completely.
Upon my return to the property I sealed the floor with two coats of Tile Doctor Colour Grow, an impregnating sealer which really enhances the natural colours stone, and four coats of Tile Doctor Seal and Go, a topical sealer which provides a high quality sheen finish and durable protection against stains.
The customer was over the moon with the results and left some great feedback:
“Wayne did a really superb job. It was a very tough task, hot and exhausting, but he was fantastically good-humoured throughout, and kept me really well-informed. He was 100% reliable and very good at communicating between visits. I’m absolutely thrilled with the results! Thank you Wayne and thank you Tile Doctor! Would definitely recommend, and use your services again.”
 Do Arch LLC
Our Process
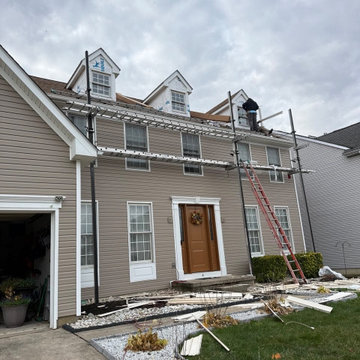
Every siding project we complete follows a structured, detail-focused approach to ensure long-term performance and a clean, high-end finish:
1. Preparation & Protection
We begin by protecting all surrounding areas, including landscaping, walkways, and entry points. This ensures a safe and clean job site from start to finish.
2. Removal of Existing Siding
The old siding is carefully removed and disposed of. During this stage, we inspect the underlying structure for any signs of damage or moisture issues.
3. Surface Inspection & Repairs
We address any compromised sheathing or framing as needed to create a solid, secure base for the new installation.
4. Weather Barrier Installation
A proper moisture barrier is installed to improve energy efficiency and protect the home from water intrusion.
5. Siding Installation
We install Double 4.5" Encore Dutch Lap siding in Natural Clay with precision, ensuring straight lines, tight seams, and consistent spacing throughout.
6. Trim, Shutters & Moldings
All shutters and exterior moldings are carefully reinstalled and aligned, maintaining the home’s original character while enhancing the updated look.
7. Final Detailing & Cleanup
We complete all finishing touches, conduct a full quality check, and leave the property clean and ready to enjoy.
Find the right local pro for your project
 Diane Bishop Interiors
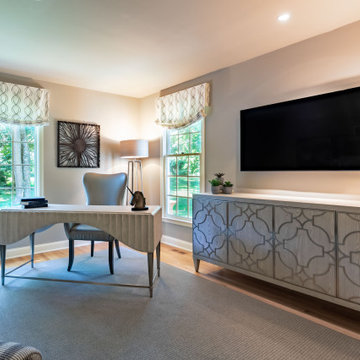
When an office is more than just an office, it needs special consideration. Just like this office redesign needed some extra planning, as this office space was pulling double duty. Not only was it a place where work was conducted, it was also a spot for the family to spend some quiet time – watching TV or reading.
Kingston Ko Photography
 Artistic Illumination
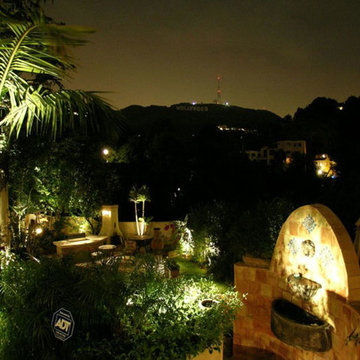
Go Green with LED Landscape & Interior Lighting
Artistic Illumination has conducted extensive testing and has compiled a complete line of LED lamps to match our existing Halogen lighting systems without any changes to the appearance and affect your current system offers, maintaining the original visual design.
LED lamps are guaranteed for 5 years by Artistic Illumination!
Request Design Quote Online
http://artisticillumination.com/gallery-hollywood-hills-landscape-lighting.htm
#lightingdesign
 Cordeiro Construction, Inc
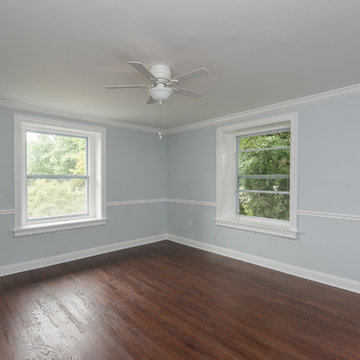
In Merion Station, PA, we successfully completed a comprehensive home renovation project that revitalized the entire property. Our services included new framing, drywall installation, and insulation upgrades to enhance energy efficiency and comfort. We also conducted interior painting to refresh the home's appearance. The kitchen was fully remodeled with modern cabinets, brand new countertops, and high-quality appliances, creating a functional and stylish culinary space. Bathrooms were renovated with new fixtures and updated vanities. Additional upgrades encompassed new hardwood floors, updated stairs, and improvements to three fireplaces. Exterior enhancements included a new roof, landscaping, and a refreshed driveway. This renovation has significantly improved the home's aesthetic appeal and functionality in Merion Station, PA.
 Andrea Canedo Design
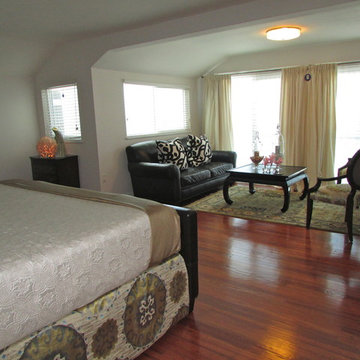
For the master suite, we created an elegant and chic heaven with a sense of style that is conductive to rest and relaxation.
We selected a specific color combination to create the perfect ambiance for this room. We mixed the quietness of a soothing neutral pallet with the sophistication and elegance of silver. We added drops of blue, which is considered beneficial to the mind and body. It slows human metabolism and produces a calming effect. We incorporated green, the color of life, renewal, nature, and energy.
Natural silk glimmer curtains, wave reflecting silver wall paper, a hand woven silk and wool rug from India, an original oil painting acquired in Paris 40 year ago, two elegant designer reupholstered chairs, were elements that spoke by themselves in this classic contemporary master bedroom.
The sitting room invites you to linger and enjoy the breathtaking vista of the Golf of Mexico. Sinking into the sofa allows you carve out restorative moments, to unwind, unplug and recharge.

 SUPERIOR CHIMNEY SERVICES CORPORATION
Why is Snow Melting on My Chimney?
We all get a bit excited when the predictions call for warmer temperatures. It’s a welcome relief from the layers of sweaters, thick socks and gloves that we need to wear to protect from the cold. When that warmth hits, it is amazing. But, are chimney’s ‘happy’ in their own way when the temperatures are rising? Homeowners sometimes take notice of the changes going on outside and call us to ask, why is snow melting on my chimney?
Why is Snow Melting on My Chimney?
It sounds like a silly question to ask, but there is a reason for it. Once you understand what causes it, you will then know if your chimney is starting to have a problem or not. Let’s take a look at a few of the causes for melting slow.
1. Transfer of Heat: Let’s get the most obvious out of the way. When you use your fireplace, the firebox heats up and as we all know, heat rises. Meaning, it will go through the chimney and out through the top. As the heat continues, the snow around the chimney begins to melt and turn into water.
2. Attic Insulation: Warm air from the room your fireplace resides, rises and can get into the attic. The warm air settles around the roof deck causing it to warm up around the chimney. It will melt the snow around the chimney.
3. Condensation: It is true when the warm air meets cold air, condensation, or a wet moisture forms. When the warm air makes it way up to the chimney top and it meets the cold outside air, condensation forms. The only problem with this cycle is that it can be concerning when it forms ice and can be dangerous.
What Can Be Done?
Now’s the time to schedule a chimney inspection. As the snow melts quickly with the warmer temperatures, you want to watch for water leaks. However, if you ‘see’ the results from a water leak, you’re too late, damage is done. This is where a chimney inspection can catch the water leak before it begins or before it can do any real damage.
Superior Chimney will conduct a 14 point inspection. The 14-point inspection is for you to gain a better understanding of the thorough check that we do each and every time, inside and outside of the home. This is critical as water leaks loom when the chimney is not functioning at its fullest capacity. A certified chimney technician has been fully trained to identify chimney leaks, or when creosote buildup can be dangerous to the safety of the home.
Contact us today to get your chimney cleaned and checked.
 Tile Doctor Ltd
Limescale deposits are a big problem in many parts of the UK where hard water is common. To remove it you need to use a strong acidic cleaner however what to do if you have limescale deposits on Limestone? As many may already know, Limestone is an expensive, high-quality stone that like a lot of natural stone is acid sensitive and can be damaged with the application of acid-based products.
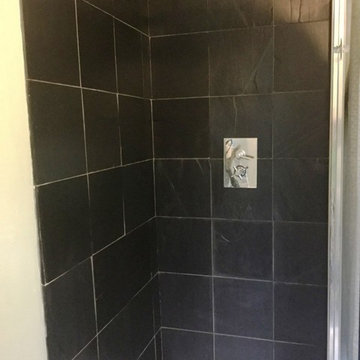
You can use acids on Limestone however if your careful and I demonstrated this recently at a property in this village of Everdon near Daventry in Northamptonshire. My customer had a fantastic black Limestone tiled shower cubicle that had been absolutely ruined by white limescale staining and it had reached the point where the situation simply couldn’t be resolved with standard cleaning products.
As the staining was so severe, I opted to use Tile Doctor Acid Gel to clean the tiles. This is a blend of phosphoric and hydrochloric acids in gel form and is the best product for cleaning vertical services, since water based products just run off and don’t have time to work on the staining.
Working in small areas, I carefully scrubbed the product into the stone and then rinsed it off with plain water. This process was repeated across the whole cubicle, reducing the stains significantly in the process.
Next, I used a handheld polishing machine fitted with 6” diamond encrusted burnishing pads, along with some water for lubrication, to polish and deep clean the stone, removing any stubborn stains remaining on the tiles.
I left the cubicle to dry completely overnight. Upon my return the next day, I proceeded to seal the tiles using two coats of Tile Doctor Colour Grow sealer.
This sealer is impregnating, meaning it fils the pores of stone to protect against ingrained dirt and staining. As well as providing stone protection, Colour Grow also enhances the natural colour in the stone – in this case, the deep black shades in the Limestone.
Having finished the job, I gave the very happy customer some advice on keeping limescale and other staining at bay in future. I explained that proper maintenance can be conducted by simply rinsing the tiles with clean water after each use of the shower, and by using Tile Doctor Aqua-Pro tile aftercare cleaner at least once a week.
Phil Vissian
Northamptonshire Tile Doctor
 Benjamin Silver Design
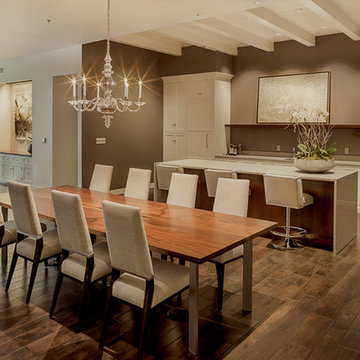
This series of photos are of the O'Donnell group Realty space in the Pearl district of Portland. this is kitchen/meeting room area incorporating an island, floating shelves, baton and beam ceiling and concealed appliances, a custom conference table, with visual comforts george II chandelier and fireplace wall done in a plaster to emulate an industrial cement wall.
The just completed space was a total build out from the existing, unfinished shell.
The brief was to create an environment that felt part industrial loft, and part vintage home brought up to date, creating an office space that could serve both as a meeting place, an art space and place to conduct business
 MHM LIVING
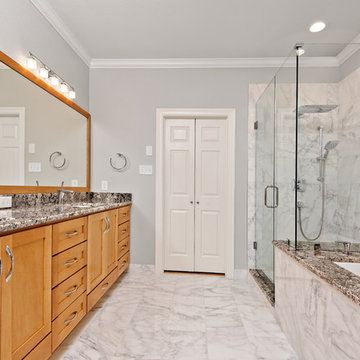
Our client requested a modern minimalist yet elegant bathroom with all natural stone throughout. To achieve that outcome, we conducted a total makeover: flooring, cabinets, shower, and tub.
•White marble tiles throughout.
•Stunning granite countertop and tub deck that compliment the white tiles.
•Custom shaker style maple cabinets with honey stain that brings true warmth to the room.
•Under sink drawers to maximize space utilization.
•Chrome Hansgrohe fixtures that compliment the minimalist design.
•Huge rain showerhead that truly "mimics" a downpour!
•Deep under-mount soaker tub that matches the rectangular under-mount sinks.
Even with four different materials (marble, granite, maple, and chrome) we achieved a spectacular look. The result is a fresh, clean, and modern look.
 Coco Maison Design
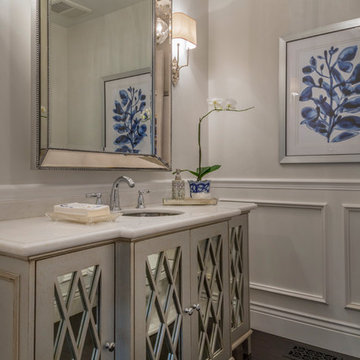
This makeup vanity offers a comfortable and glamorous place for our client to conduct their morning routine. Plenty of storage through cabinets and pull-out drawers, large vanity mirrors, and a convenient sink close by gives our client complete function at their fingertips.
Project designed by Courtney Thomas Design in La Cañada. Serving Pasadena, Glendale, Monrovia, San Marino, Sierra Madre, South Pasadena, and Altadena.
For more about Courtney Thomas Design, click here: https://www.courtneythomasdesign.com/
To learn more about this project, click here: https://www.courtneythomasdesign.com/portfolio/berkshire-house/
 Epic Watershapes
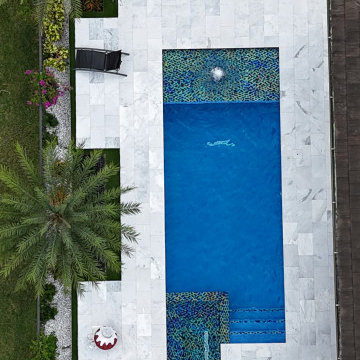
This 82 square foot residential pool project in Parkland FL breathes new life into an existing pool, transforming it into a modern masterpiece.
The remodeled spa, now adorned with luxurious full glass tile in the spa and sundeck, create a sophisticated and inviting atmosphere. Key features include bubblers, salt chlorinator system, automation, LED lights, and a pool heater for year-round enjoyment.
The project seamlessly integrates with the modern style of the South Florida property. It creates an entertaining space that enhances relaxation and adds value to the home.
The client's goal was to remodel a 10-year-old pool, giving it a fresh, modern look while maintaining its functionality. They envisioned a sophisticated pool that would blend seamlessly with the existing property and create a relaxing and entertaining space for their family and guests.
Epic Watershapes approached this project with a focus on understanding the client's vision and translating it into a reality. We conducted multiple site visits and created detailed 3D renderings to ensure the design met their expectations. Remodeling an existing pool presented challenges, such as working with existing plumbing and structure. Our team addressed these challenges with meticulous attention to detail and rigorous testing to ensure the pool's structural integrity.
The Linear Luxury at Parkland is a testament to Epic Watershapes' commitment to creating exceptional custom pools. This project exceeded the client's expectations by transforming their backyard into a luxurious and inviting oasis.
 Advance Design Studio, Ltd.
The couple who embarked on this Lake Zurich Illinois home renovation spent years planning a move from Virginia to the rolling hills of Northern Illinois when their first grandchild was born. Wanting to be closer to their grown children so they could enjoy their new role, they first embarked upon finding the right realtor and the right home. They settled on the “perfect” home; perfect that is to transform.
The seriously outdated 1,800 square foot ranch had a closed outdated kitchen, 3 bedrooms, a living room with a fireplace, a full basement and 2 baths. Although it had “good bones”, it was straight out of a builder’s catalog with wall to wall carpet, standard tile and honey oak everywhere you looked. But this couple had big plans for this home.
In tandem with their home purchase, they began the search for the just the right renovation company. The team they chose needed to be cohesive, as the whole house renovation would be designed hundreds of miles from their home several states away. She found Advance Design Studio, Ltd. online, and was quickly enamored by the team and by Common Sense Remodeling, simply by studying the website. Her decision to choose Advance Design to partner on this complete ranch renovation was confirmed quickly upon her first face to face meeting with owner Todd Jurs, and later by Advance’s designer, Nicole Ryan.
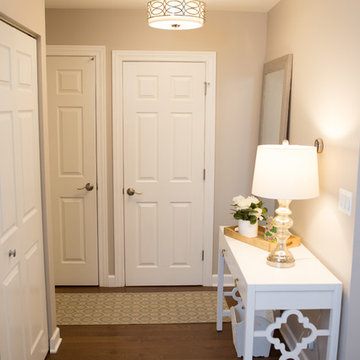
Three bedrooms were converted into a one master suite with ample bath and walk in closet, laundry, and a 2nd multi-purpose room designed for movies and entertainment, a home office, and a guest room all in one. A doorway leading to the garage was reconfigured to create a foyer area, and allowed for a better flow to an open modern kitchen complete with a large island for cooking and entertaining, which included a wide bench seat overlooking the back yard and opening onto an eating area flanked with a fireplace and TV.
The piece de resistance culminated with 3 walls of full glass anchored by a striking fireplace in the new four season’s room where the homeowners enjoy coffee every morning while gazing at the current day’s mid-western landscape. The open floorplan encourages living in “one space” throughout the day.
Ryan worked with the couple remotely, exchanging 3D color renderings and floorplans with detailed budget updates until the project took on the very image they had envisioned. “Working with them was a change from our normal meeting process since they were literally in a different state. We conducted meetings by phone, while reviewing materials and drawings via computer. It was a fun process that necessitated lots of detail and careful coordination, but we made it happen and the process was as smooth as if they were right here like normal”, says Nicole. During a stressful time planning their move, the constant interaction with Nicole assured the couple that all was being addressed by the Advance team and they could relax and focus on other important things (like moving cross country).
The new master bath incorporated heated flooring, a walk in shower with seating and custom shower niches, and an elegant double sink vanity with ample space for two. “The layout of each of the rooms is exactly what I envisioned,” the client said. “Advance’s attention to details such as light switch placement, electrical outlets, and many other minute details you wouldn’t even think of was the icing on the cake. If I didn’t think of it first, they certainly did,” said the happy homeowner. Small details like the crown molding, the custom designed fireplace mantle, the under-cabinet lighting and etched door glass, and even subtle rhinestones shimmering like delicate jewelry in the tile backsplash brought the whole project together. The clients were extremely happy with the way the Advance team made sure these small things were executed perfectly.
“It’s just gorgeous,” they said at a celebratory event in their home hosted shortly after completion for the entire Advance Design team that made it happen. “The entire crew at Advance Design was a pleasure to work with. We couldn’t have done this with a lesser team,” they concluded.
 Senergy360, LLC.
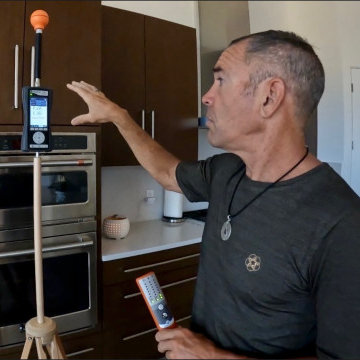
Brian Johnson, a specialist from SENERGY360, conducts an EMF/EMR assessment at The Sanctuary House in Catalina, Arizona. The certified Electromagnetic Radiation Specialist (EMRS) meticulously measures and analyzes electromagnetic fields (EMFs) throughout the living environment using state-of-the-art equipment. The inspection covers everything from 5G cellular and power line emissions to the entire home wiring system. By identifying potential exposure sources, technology emissions, and wiring errors, SENERGY360 provides actionable recommendations and mitigation solutions, ensuring the creation of a healthier and more sustainable living space.
 Studio InSitu Architects
design:
Tim Hess, Design Principal
Justin Mello, Nathan Sawyer
all for DSA Architects
photographs: Charles Mayer photography and Tim Hess
photo-styling: Natalie Leighton
stone sculpture: Todd Fulshaw
paintings: Charles Mayer and Todd Fulshaw
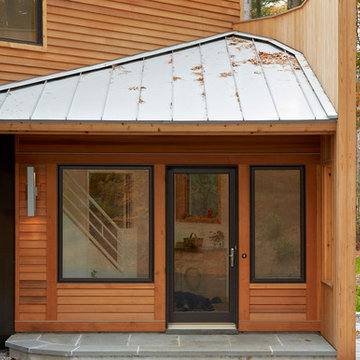
Guest quarters for a big house on the Concord River, this project enlarges former studio space over a four-bay garage into a new four-bedroom ‘outpost’.
design challenges:
Convert Studio Apartment to 4-Bedroom Home without enlarging footprint of building. Keep costs minimal.
On the ground floor, both pre-existing eight- and twelve-foot tall halves of the former scheme remain in-place, as do the structural bones of two faceted ‘beaks’. The complex former roof was removed for its limited use of available floor area.
A single long shed now unifies the high East side of the house and its small private individual spaces with the wide-open shared space of the lower West Side. Aligned with the stair-tower extruded from a former beak, a childrens’ loft-library and two-sided fireplace conduct the East-West interface.
 Artmill Group
Photo courtesy Dan De Los Monteros - http://www.dlmphoto.com/
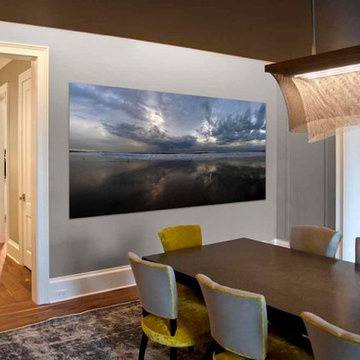
Mid-sized trendy medium tone wood floor and brown floor enclosed dining room photo in Chicago with gray walls
Mid-sized trendy medium tone wood floor and brown floor enclosed dining room photo in Chicago with gray walls
 Asbury Remodeling & Construction, LLC
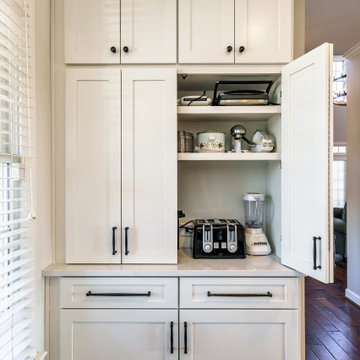
Beautiful open kitching, dining room and living room. Tile wall with floating shelves. Jennaire appliances with induction cooktop and Bluestar oven. A mix of white and stained cabinets create a warm and inviting space.
 United Porte Inc
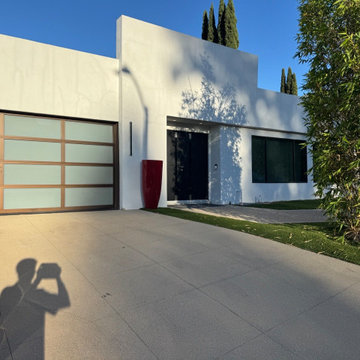
Furthermore, VDom Doors insulate your home from extreme weather conditions, as well as unwanted animals, insects, and dust from entering.
This technology makes it possible to protect the front door from condensation and ice formation.
A thermal break is a layer of material with low thermal conductivity. For the correct operation of the door, it must be located between the outer and inner sides of the leaf and the frame, thereby excluding the contact of the metal parts with each other.
This technology prevents the door from freezing, preserving its properties and impeccable appearance for many years.
The two-tone painting ofthe door leaf and the frame makes it possible to select colours separately for interior and exterior decoration, which gives the door a complete look and makes it possible to create a harmonious image in the interior and exterior.
All models of this collection are made with a frame made of aluminum. The external framework and internal power framework of the frame do not touch in any way, because they are interconnected by a polyamide insert (thermal break) 18 mm thick, which guarantees maximum thermal insulation performance.
The door leaf ofthis series is made of two sheets of metal 1 mm thick. A reliable two-layer design with a thermal insulation layer and expanded polystyrene filling guarantees reliability. durability, and the best indicators of heat and noise insulation of the door.
Model - 6777 Cynex
Color - Black
Door thickness - 3 1/4"
Frame thickness - 4"
Metal frame 4" thick - dimensions of the door with frame is 38" x 82".
Metal threshold.
Plate-type, primary lock for armoured type of steel doors, locked by 3 key turns
To maintain the warranty, a canopy is required over the door.
 Modern Citi Group: Renovations & Remodeling
We helped Miki and David successfully execute a bathroom and kitchen remodel for their Co-op in New York City. The primary objective was to enhance the sense of space, functionality, and style while keeping the project on track and on budget.
To kickstart the project, Anna, the highly skilled project planner, conducted a thorough walkthrough with Miki and David. During the meeting, she captured their vision, outlined a realistic timeline, and carefully considered their budgetary restrictions.
Anna made sure to grasp their aspirations of modernizing the kitchen and bathroom, aiming to elevate both the aesthetics and practicality while incorporating a bespoke design tailored to their desires.
The design challenge was to modernize the outdated kitchen and bathroom while maintaining a budget-friendly approach. The clients opted for a Scandinavian style, featuring neutral olive green colors, stone, and natural wood materials. The designers explored various layouts to maximize functionality and accommodate the clients' preferences, providing Miki and David with multiple options. Eventually, the family made their design choices and felt assured as they entered the construction phase.
During the building phase, the construction team completed a gut renovation of the kitchen and bathroom, replacing ceilings, walls, floors, and all fixtures. The result was a stunning custom kitchen designed in the Scandinavian style featuring matte grey-green cabinetry, natural wood open shelving, a built-in pantry and appliances, and Vivid White Quartz countertops. The combination of sage base cabinets with grey undertones and modern, natural wood structures created a neutral and earthy impression, while the smooth white wall cabinets and countertops added a sleek and airy touch to the space.
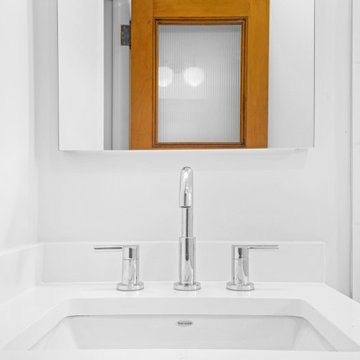
The bathroom renovation encompassed a full remodel, with all fixtures being replaced. A custom-ordered vanity in a matching grey-green shade was installed, along with the Maiolica White Polished Ceramic Wall Tile and Kohler and Delta fixtures. Within a few short weeks, Miki and David's new kitchen and bathroom were transformed to align perfectly with their style and vision, while significantly enhancing functionality.
19