
Search results for "Deciding locations" in Home Design Ideas
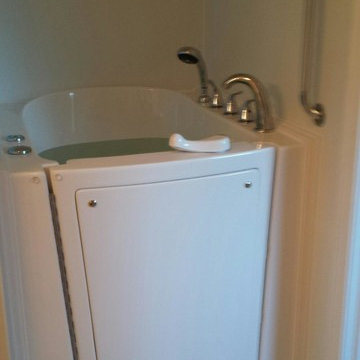
 Walk In Tubs in Southern California
Our goal at Independent Home is to provide happiness to our customers. Diane S. of Thousand Oaks got to experience that first hand. Check out her walk in tub installation story!
Diane’s walk in tub installation process started off with a pre-installation meeting. The purpose of the meeting is to determine the best walk in tub for the customer’s needs, find the best location, and discuss what type of finish should be added.
Our installation experts decided that our celebrity walk in bathtub model would be perfect for Diane. It was the perfect model because it simple yet can include hydrotherapy, which is the use of water to reduce joint pain.
The next part of the installation was the preparation period. This is where the old bathtub was taken apart, the plumbing was installed, and the shelf area around the tub was built. What was interesting about Diane’s tub was our installation exerts had to reverse the plumbing.
Diane’s former plumbing had the faucets on the left side of the bathtub. The problem with this was the toilet was in the way of the door and would have caused an issue for Diane to get into the tub. The solution was to switch the faucets to the right side and install a right handed door.
Once the preparation was complete it was time to install the tub. This included placing the tub in the best location and making sure that the legs were level. A simple wall surround was also added to complete the look. It only took one day to complete due to our experts’ high quality craftsmanship.

 Advance Design Studio, Ltd.
Quinn and Paige, residents of this tired 1960’s tri-level home hated their kitchen. As a matter of fact, prior to making plans to renovate the first floor - they considered selling the home, but were reluctant because of its enviable location near the heart of downtown Barrington which was within walking distance to local stores and all their favorite places. So instead they contacted Advance Design Studio after hearing about them from a neighbor, to rescue their tired home and give it new life.
The very first plan was to remove the constricting walls surrounding the original kitchen, and open the expansive first floor living room and dining area to the new heart of the space; a stunning state of the art coastal designed kitchen. Exposing attractive beams in the vaulted ceiling created an interesting structural detail that suits the open plan and salutes the original architecture of the home, further emphasizing the height of the new space enjoyed now by the family as a great room.
The stage was set for the seaside feel of this kitchen by pairing crisp white painted maple cabinets with Dura Supreme’s one of kind hand weathered finish on the island in soft blue-green finish. But the authentic feeling of being on your favorite beach was supremely achieved by the matching of unique Mt. Claire marble on the island and the specialty Wareham acid washed stone on the perimeter counter tops. Pictures don’t do justice to the feel of this stone under your hand; its water-washed texture reminds instantly of summer vacations collecting rocks softly etched by hundreds of waves.
Stainless steel appliances and satin nickel hardware shine brightly against the backdrop of bright white subway tiles accentuated by subtle grey grout lines contributing to the nautical feel of this comfortable kitchen. Seeded glass door cabinetry reminiscent of beach grasses dress up the space just enough, and a proud 6” stacked crown molding extends above 36” wall cabinets into the expanse of the now taller space; balancing this kitchen nicely within its newly integrated home.
Features in this kitchen include a built in standard depth refrigerator, pull out spice racks, tall tray dividers and wood super Susan with double pull out trash and recycling. A cutlery divider holds sharp knives, and an angled cabinet was customized to hold a secret USB charging station. The bright white Kohler farm sink is graced by an elegant bridge faucet in brushed nickel. This now airy and spacious kitchen has room for guest and family to congregate around the large island, complete with stools and attractive hidden storage for seldom used entertainment pieces.
“I was sold when I saw the drawings. My designer nailed it, down to every last storage idea and coastal detail I envisioned, it was all in there. It was unbelievable how accurate her interpretation was of what was in my head; working with her made my kitchen renovation so easy, it’s as if she literally read my mind”, said Paige enthusiastically.
The woman of the house expressed upon completion not only her love for her fantastic new cooking space, but how renovating her kitchen has given new life to the entire home. Talk of moving has been relegated to the recycling bin, and instead the family is discussing plans to renovate the master bath now that they’ve decided to stay for the long term. Friends who visit the home do a double-take as they recognize the new space’s dramatic transformation from original cramped and closed spaces - to the now amazingly fresh open kitchen that has become the center of every gathering and family meal.
Designer: Nicole Ryan
Photographer: Joe Nowak
 Breathe Design Studio
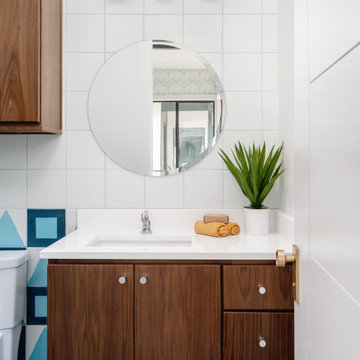
Our Austin studio decided to go bold with this project by ensuring that each space had a unique identity in the Mid-Century Modern style bathroom, butler's pantry, and mudroom. We covered the bathroom walls and flooring with stylish beige and yellow tile that was cleverly installed to look like two different patterns. The mint cabinet and pink vanity reflect the mid-century color palette. The stylish knobs and fittings add an extra splash of fun to the bathroom.
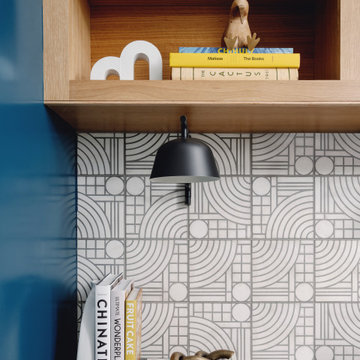
The butler's pantry is located right behind the kitchen and serves multiple functions like storage, a study area, and a bar. We went with a moody blue color for the cabinets and included a raw wood open shelf to give depth and warmth to the space. We went with some gorgeous artistic tiles that create a bold, intriguing look in the space.
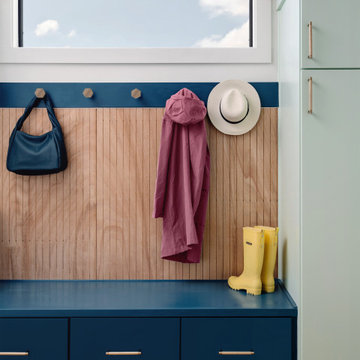
In the mudroom, we used siding materials to create a shiplap effect to create warmth and texture – a homage to the classic Mid-Century Modern design. We used the same blue from the butler's pantry to create a cohesive effect. The large mint cabinets add a lighter touch to the space.
Find the right local pro for your project
 Breathe Design Studio: San Francisco
Our Austin studio decided to go bold with this project by ensuring that each space had a unique identity in the Mid-Century Modern style bathroom, butler's pantry, and mudroom. We covered the bathroom walls and flooring with stylish beige and yellow tile that was cleverly installed to look like two different patterns. The mint cabinet and pink vanity reflect the mid-century color palette. The stylish knobs and fittings add an extra splash of fun to the bathroom.
The butler's pantry is located right behind the kitchen and serves multiple functions like storage, a study area, and a bar. We went with a moody blue color for the cabinets and included a raw wood open shelf to give depth and warmth to the space. We went with some gorgeous artistic tiles that create a bold, intriguing look in the space.
In the mudroom, we used siding materials to create a shiplap effect to create warmth and texture – a homage to the classic Mid-Century Modern design. We used the same blue from the butler's pantry to create a cohesive effect. The large mint cabinets add a lighter touch to the space.
 Breathe Design Studio
Our Austin studio decided to go bold with this project by ensuring that each space had a unique identity in the Mid-Century Modern style bathroom, butler's pantry, and mudroom. We covered the bathroom walls and flooring with stylish beige and yellow tile that was cleverly installed to look like two different patterns. The mint cabinet and pink vanity reflect the mid-century color palette. The stylish knobs and fittings add an extra splash of fun to the bathroom.
The butler's pantry is located right behind the kitchen and serves multiple functions like storage, a study area, and a bar. We went with a moody blue color for the cabinets and included a raw wood open shelf to give depth and warmth to the space. We went with some gorgeous artistic tiles that create a bold, intriguing look in the space.
In the mudroom, we used siding materials to create a shiplap effect to create warmth and texture – a homage to the classic Mid-Century Modern design. We used the same blue from the butler's pantry to create a cohesive effect. The large mint cabinets add a lighter touch to the space.

 VRA Interiors, LLC
For these Atlanta clients, we decided to go with a light and airy color palette for their master suite makeover. Pale blues, cool grays, and powerful golds complement one another and are timeless yet current. Tailored furnishings and subtle accents in the lighting offer a refreshing style while the natural textures and wall decor add depth and interest.
Home located in Dunwoody, Atlanta. Designed by interior design firm, VRA Interiors, who serve the entire Atlanta metropolitan area including Buckhead, Sandy Springs, Cobb County, and North Fulton County.
For more about VRA Interior Design, click here: https://www.vrainteriors.com/
To learn more about this project, click here: https://www.vrainteriors.com/portfolio/peachtree-dunwoody-master-suite/
 O'Brien Harris LLC
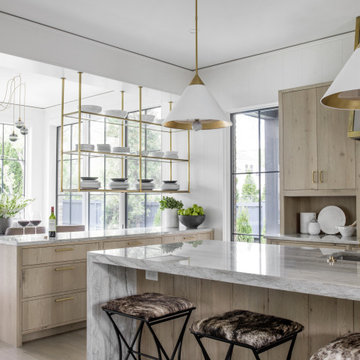
This project is new construction located in Hinsdale, Illinois. The scope included the kitchen, butler’s pantry, and mudroom. The clients are on the verge of being empty nesters and so they decided to right size. They came from a far more traditional home, and they were open to things outside of their comfort zone. O’Brien Harris Cabinetry in Chicago (OBH) collaborated on the project with the design team but especially with the builder from J. Jordan Homes. The architecture of this home is interesting and defined by large floor to ceiling windows. This created a challenge in the kitchen finding wall space for large appliances.
“In essence we only had one wall and so we chose to orient the cooking on that wall. That single wall is defined on the left by a window and on the right by the mudroom. That left us with another challenge – where to place the ovens and refrigerator. We then created a vertically clad wall disguising appliances which floats in between the kitchen and dining room”, says Laura O’Brien.
The room is defined by interior transom windows and a peninsula was created between the kitchen and the casual dining for separation but also for added storage. To keep it light and open a transparent brass and glass shelving was designed for dishes and glassware located above the peninsula.
The butler’s pantry is located behind the kitchen and between the dining room and a lg exterior window to front of the home. Its main function is to house additional appliances. The wall at the butler’s pantry portal was thickened to accommodate additional shelving for open storage. obrienharris.com
Sponsored
Columbus, OH
Free consultation for landscape design!

Peabody Landscape Group
Franklin County's Reliable Landscape Design & Contracting
 Breathe Design Studio
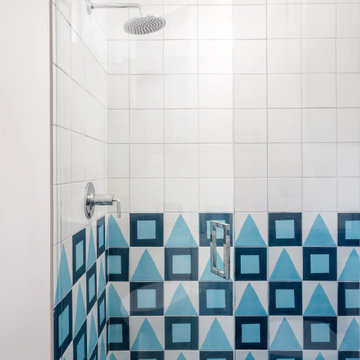
Our Austin studio decided to go bold with this project by ensuring that each space had a unique identity in the Mid-Century Modern style bathroom, butler's pantry, and mudroom. We covered the bathroom walls and flooring with stylish beige and yellow tile that was cleverly installed to look like two different patterns. The mint cabinet and pink vanity reflect the mid-century color palette. The stylish knobs and fittings add an extra splash of fun to the bathroom.
The butler's pantry is located right behind the kitchen and serves multiple functions like storage, a study area, and a bar. We went with a moody blue color for the cabinets and included a raw wood open shelf to give depth and warmth to the space. We went with some gorgeous artistic tiles that create a bold, intriguing look in the space.
In the mudroom, we used siding materials to create a shiplap effect to create warmth and texture – a homage to the classic Mid-Century Modern design. We used the same blue from the butler's pantry to create a cohesive effect. The large mint cabinets add a lighter touch to the space.

 Bianchi Design
This project is a (new) pool within an (existing) pool! The client asked me to remodel their extra large 1970s trapezoid pool that was lacking a spa and seating area. They wanted to make it into a focal feature of their yard allowing them to entertain and capture there scenic view in ways that the previous configuration prevented.
On this property, it made sense for the new spa to be on the uphill side adjacent to the master bedroom -- not only for convenience but also for enjoying the views, and allowing us to overflow the spa so that the water could return downhill back to the pool. This is where the cylindrical glass tile “jewel” is situated. The vibrant color of glass was chosen to compliment (be the opposite of, in order to visually resonate and create a higher energy feel) with the ocher seen in the natural stone palette that the house gave us as precedent.
Once the spas location was decided, the best views enjoyed by this property are located where the chaise lounges are now in the finished design. The previous pool occupied the space, and this prime area could not be accessed at all! Our second order of business was to carve out a destination space from the previous pool and give it back to be a furniture area for entertaining.
Locating the chaise lounger deck across the pool presented a challenge that became a fun opportunity not to be passed up. The overflowing spa water had to return to the pool somehow, and the flowing water had to be crossed over to get to the Chaise lounge viewing deck. The solution? A bridge of course! And with the stairs ascending up to the spa, why not have a stairway like water feature underneath the bridge?
The final touch on this design was omitting the weak and poorly executed vanishing edge, which had a horizon line finishing right into the rooftops of the homes below. Not the best aesthetic!
To block the roof lines of the homes below and direct your eyes up to the mountain peaks beyond, a stone clad raised planter became the central focal point of the yard, allowing us to create a beautiful agave, yucca, and cacti display to be enjoyed from every angle of the home.
Altogether the new configuration really plays off the angular shapes of the home, extends the pallet of materials around the yard, and makes the new space all that more enjoyable for the owners private and public entertainment.

 Custom Concepts Construction Inc.
Front Left Corner View -This exterior transformation is located in Arlington, VA. The existing siding was Cedar. The home owner decided to replace their siding with James Hardie Fiber Cement Siding products. This modern/contemporary design is complimented by the Hardie panels in the Light Mist Color. The horizontal lap siding areas are in a 4",4",7" pattern in Hardie's Deep Ocean color. The lower level has the Hardie Sierra 8 panel installed in Boothbay Blue. All trim is Hardie Arctic White fiber cement trim.

 Jennifer Gardner Design
The classic modern design of this kitchen was planned for an active young family of four who uses the space as their central hub for gathering, eating and staying connected. Our goals were to create a beautiful and highly functional kitchen with an emphasis on cabinet organization, heated floors and incorporating a live edge slab countertop. We removed an existing bulky island and replaced it with a new island that while only 60 x 26 in size packs a powerful punch housing a baking center, trash/recycle center, microwave oven and cookbook storage. The island seemed the natural place for the gorgeous live edge slab coupled with vintage mercury glass light pendants that make for a truly stunning kitchen island. Polished carrara quartz perimeter counters pair beautifully with the watery blue-green glass backsplash tile. A message center conveniently located on a side panel of the refrigerator cabinet houses built in mailboxes, a family calendar and magnetic surface to display the children’s artwork. We are pleased to have met the family’s goals and that they love their kitchen. Design mission accomplished!
Photography by: Marcela Winspear

 Before and After Builders, Inc.
Alcove bathtub - mid-sized transitional kids' gray tile and porcelain tile porcelain tile alcove bathtub idea in Nashville with an undermount sink, recessed-panel cabinets, gray cabinets, solid surface countertops, a two-piece toilet and gray walls

 Sceltas Custom Homes
This fairly new home was built on Daniel Island right on beautiful Smythe Park. The homeowners purchased the five-year-old home because of its location and potential, but they had great plans to make it more modern and unique to their styles by incorporating transitional and modern design. They decided to go very white, creating a sleek, clean look while contrasting it against stained, dark hardwood floors.
The project included adding new hardware, applying a fresh coat of paint to the entire interior (walls and ceilings), adding new light fixtures, refinishing the floors throughout the home and remodeling the master bathroom, morning kitchen, main kitchen and butler’s pantry cabinetry with newly refinished cabinetry, countertops and fixtures. What a remarkable transformation! The family able to create a fresh new look while keeping the architectural bones of the home in tact.
Photography by: Brennan Wesley
Sponsored
Columbus, OH

Structural Remodeling
Franklin County's Heavy Timber Specialists | Best of Houzz 2020!
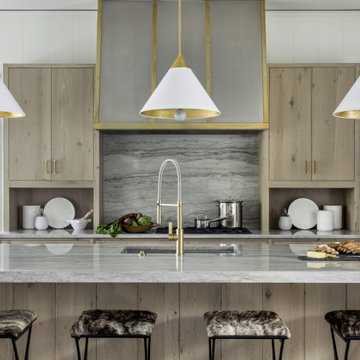 O'Brien Harris LLC
This project is new construction located in Hinsdale, Illinois. The scope included the kitchen, butler’s pantry, and mudroom. The clients are on the verge of being empty nesters and so they decided to right size. They came from a far more traditional home, and they were open to things outside of their comfort zone. O’Brien Harris Cabinetry in Chicago (OBH) collaborated on the project with the design team but especially with the builder from J. Jordan Homes. The architecture of this home is interesting and defined by large floor to ceiling windows. This created a challenge in the kitchen finding wall space for large appliances.
“In essence we only had one wall and so we chose to orient the cooking on that wall. That single wall is defined on the left by a window and on the right by the mudroom. That left us with another challenge – where to place the ovens and refrigerator. We then created a vertically clad wall disguising appliances which floats in between the kitchen and dining room”, says Laura O’Brien.
The room is defined by interior transom windows and a peninsula was created between the kitchen and the casual dining for separation but also for added storage. To keep it light and open a transparent brass and glass shelving was designed for dishes and glassware located above the peninsula.
The butler’s pantry is located behind the kitchen and between the dining room and a lg exterior window to front of the home. Its main function is to house additional appliances. The wall at the butler’s pantry portal was thickened to accommodate additional shelving for open storage. obrienharris.com
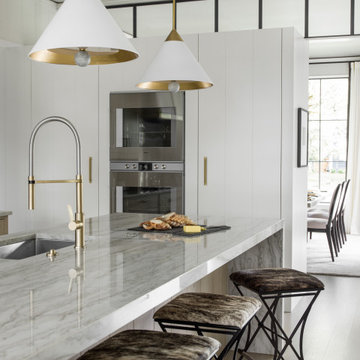 O'Brien Harris LLC
This project is new construction located in Hinsdale, Illinois. The scope included the kitchen, butler’s pantry, and mudroom. The clients are on the verge of being empty nesters and so they decided to right size. They came from a far more traditional home, and they were open to things outside of their comfort zone. O’Brien Harris Cabinetry in Chicago (OBH) collaborated on the project with the design team but especially with the builder from J. Jordan Homes. The architecture of this home is interesting and defined by large floor to ceiling windows. This created a challenge in the kitchen finding wall space for large appliances.
“In essence we only had one wall and so we chose to orient the cooking on that wall. That single wall is defined on the left by a window and on the right by the mudroom. That left us with another challenge – where to place the ovens and refrigerator. We then created a vertically clad wall disguising appliances which floats in between the kitchen and dining room”, says Laura O’Brien.
The room is defined by interior transom windows and a peninsula was created between the kitchen and the casual dining for separation but also for added storage. To keep it light and open a transparent brass and glass shelving was designed for dishes and glassware located above the peninsula.
The butler’s pantry is located behind the kitchen and between the dining room and a lg exterior window to front of the home. Its main function is to house additional appliances. The wall at the butler’s pantry portal was thickened to accommodate additional shelving for open storage. obrienharris.com

 Bolen Designs
We love, love, love this rustic glam home office - music room! The client decided to combine her music room with her office, swapping the location with her previous dining room. The combination of the rustic wood desk with acrylic legs, white bookcase, black lacquer piano, zebra rug and crystal chandelier completely fit the bill. In the dining room, we combined a rustic wood wall and table with comfy cream parsons chairs illuminated with crystal sconces and a beautiful vintage-look chandelier. New curved wainscoting accents the stairwell and 18-foot curtains highlight the dramatic entry with its metallic accented ceiling.

 Bennett Design Co.
For this kitchen remodel, the clients opted to maintain the location and footprint of the original kitchen in their 1960’s ranch style home. That meant we had our work cut out for us to maximize the counter space while providing enough storage for this growing family. We ultimately decided to maximize the working counter space by the sink and range and added a large pantry wall in the adjacent dining room for bulky items and food storage. We chose a lightly stained slab style cabinet to capture the era of the home but paired it with white high-gloss upper cabinets and white quartz to make the space also look fresh and functional. A light green paint helps pull in the accent color featured in the backsplash while adding warmth to the home. We finished the space with a unique light fixture and a perfectly modern dining table.
Photos By: Michael Kaskel Photography
Sponsored
Columbus, OH

Hope Restoration & General Contracting
Columbus Design-Build, Kitchen & Bath Remodeling, Historic Renovations
 Drury Design
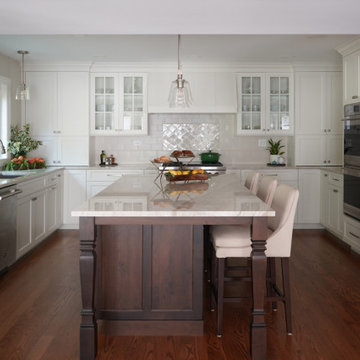
This house was 45 years old and the most recent kitchen update was past its due date. It was also time to update an adjacent family room, eating area and a nearby bar. The idea was to refresh the space with a transitional design that leaned classic – something that would be elegant and comfortable. Something that would welcome and enhance natural light.
The objectives were:
-Keep things simple – classic, comfortable and easy to keep clean
-Cohesive design between the kitchen, family room, eating area and bar
-Comfortable walkways, especially between the island and sofa
-Get rid of the kitchen’s dated 3D vegetable tile and island top shaped like a painters pallet
Design challenges:
-Incorporate a structural beam so that it flows with the entire space
-Proper ventilation for the hood
-Update the floor finish to get rid of the ’90s red oak
Design solutions:
-After reviewing multiple design options we decided on keeping appliances in their existing locations
-Made the cabinet on the back wall deeper than standard to fit and conceal the exhaust vent within the crown molding space and provide proper ventilation for the rangetop
-Omitted the sink on the island because it was not being used
-Squared off the island to provide more seating and functionality
-Relocated the microwave from the wall to the island and fitted a warming drawer directly below
-Added a tray partition over the oven so that cookie sheets and cutting boards are easily accessible and neatly stored
-Omitted all the decorative fillers to make the kitchen feel current
-Detailed yet simple tile backsplash design to add interest
Refinished the already functional entertainment cabinetry to match new cabinets – good flow throughout area
Even though the appliances all stayed in the same locations, the cabinet finish created a dramatic change. This is a very large kitchen and the client embraces minimalist design so we decided to omit quite a few wall cabinets.

 Cantoni Irvine
Designed By: Richard Bustos Photos By: Jeri Koegel
Ron and Kathy Chaisson have lived in many homes throughout Orange County, including three homes on the Balboa Peninsula and one at Pelican Crest. But when the “kind of retired” couple, as they describe their current status, decided to finally build their ultimate dream house in the flower streets of Corona del Mar, they opted not to skimp on the amenities. “We wanted this house to have the features of a resort,” says Ron. “So we designed it to have a pool on the roof, five patios, a spa, a gym, water walls in the courtyard, fire-pits and steam showers.”
To bring that five-star level of luxury to their newly constructed home, the couple enlisted Orange County’s top talent, including our very own rock star design consultant Richard Bustos, who worked alongside interior designer Trish Steel and Patterson Custom Homes as well as Brandon Architects. Together the team created a 4,500 square-foot, five-bedroom, seven-and-a-half-bathroom contemporary house where R&R get top billing in almost every room. Two stories tall and with lots of open spaces, it manages to feel spacious despite its narrow location. And from its third floor patio, it boasts panoramic ocean views.
“Overall we wanted this to be contemporary, but we also wanted it to feel warm,” says Ron. Key to creating that look was Richard, who selected the primary pieces from our extensive portfolio of top-quality furnishings. Richard also focused on clean lines and neutral colors to achieve the couple’s modern aesthetic, while allowing both the home’s gorgeous views and Kathy’s art to take center stage.
As for that mahogany-lined elevator? “It’s a requirement,” states Ron. “With three levels, and lots of entertaining, we need that elevator for keeping the bar stocked up at the cabana, and for our big barbecue parties.” He adds, “my wife wears high heels a lot of the time, so riding the elevator instead of taking the stairs makes life that much better for her.”

 Margaret Volney Designs, LLC
Margaret Volney, Designer, Artist, and Photographer.
My client commissioned this hand-paint custom Canvas Wall Mural for her teenage girl's room at their family beach house, in Atlantic Beach, NC. The canvas mural can be used on the wall as shown, or on the floor. After I completed the painting, my client decided she wanted to locate the wall hanging the top of the stairs, as a focal point, for when her guest retired to their bedrooms. Custom Wall Murals and Canvas Wall Hanging Designs created by request, as well as Interior Design Services!
58