
Search results for "Patches" in Home Design Ideas
 Darling Flooring
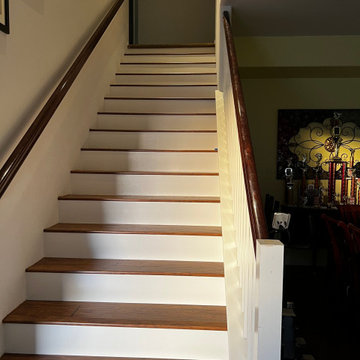
Here is the most basic and common of staircase installations. A job like this usually takes 2 days. We glue down, with a full spread, of flooring glue on every tread and riser. Every seem is sealed and painted. Any marks or scars left on the walls were patched and textured. No job is left unfinished! No job should require multiple contractors to clean up details to complete a project of this caliber. Darling Flooring will handle all details to leave your project complete!
 United Signature
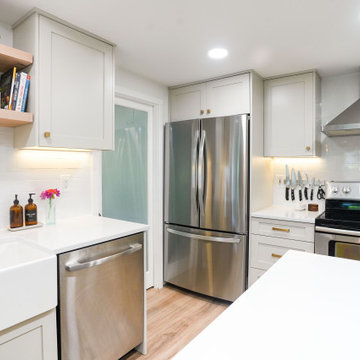
Full kitchen remodel opening to an open concept, contemporary style kitchen. Adding more lighting to lighten the room, relocated plumbing, focused on a more natural flow design, installed new flooring throughout, removed a brick chimney that separated the living room from the kitchen and patched up the roof. Lastly installed brand new drywall wall throughout.
 Huggins Wood Floor Specialist
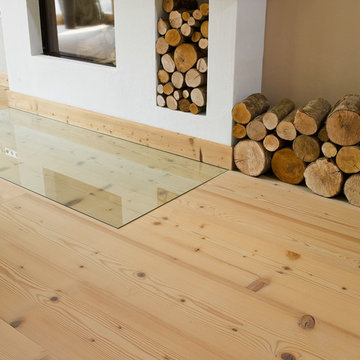
FIR Wide-Plank Fir plank in 3-layer construction with small bevel on long side and approx. 5 mm top layer, with approx. 5 mm backing in the same wood and middle layer conifer. Tongue and groove on all sides for easy installation. This particularly robust raw material originates from native mountain forests (Austria), from trees felled in the winter months. Typical are bony, well-embedded knots up to 60 mm diameter and pronounced formation of the annual rings. Isolated knotholes up to 30 mm diameter are sealed with appropriate wood putty. Two false knots per metre of plank length are permitted. Any flaws are corrected with other knots or matching patches. Stress cracks up to 50 cm are possible.
Find the right local pro for your project

 FORMA
MATERIALS/FLOOR: Reclaimed hardwood floor/ WALLS: Hardwood and patches of smooth wall/ LIGHTS: Lots pendant lights hanging from the ceiling; giant pendant light hanging on top of the dining table; and Can lights for the rest of the light needed/ CEILING: Hardwood ceiling and wood support beams shown, and iron support beams shown that add a cool aspect to the room/ TRIM: Wood finishes where the ceiling and wall meet in some places in the room; Window casing on all the windows/ ROOM FEATURES: Iron beams are exposed to add more detail to the room; Lots of the furniture and doors are bade to match the walls and floor of the house/ UNIQUE FEATURES: High ceilings provide more larger feel to the room/

 Cascade West Development
The Debonair : Cascade-Craftsman in Mt Vista Washington by Cascade West Development Inc.
Cascade West Facebook: https://goo.gl/MCD2U1
Cascade West Website: https://goo.gl/XHm7Un
These photos, like many of ours, were taken by the good people of ExposioHDR - Portland, Or
Exposio Facebook: https://goo.gl/SpSvyo
Exposio Website: https://goo.gl/Cbm8Ya

 Horton Construction, Inc
While working on other projects for the property owner, I noticed that his skylight was leaking a lot during one of our monsoon rains. As you can see, someone else had tried patching the damage inside without successfully repairing the damage outside. He gave me the go-ahead to fix it. Got up on the roof of this 2 story apartment and discovered that the seal on the dome was failing. Took the dome off and cleaned out the old seal and dirt that had accumulated and resealed with a premium silicone. Leak fixed! The leak caused damage to ceiling around the skylight inside. Skylight is in a winding stairway, so I put up ladders and scaffolds and tore out the bad sheetrock and replaced with new. Matched the texture and paint to blend everything back in.
 United Signature
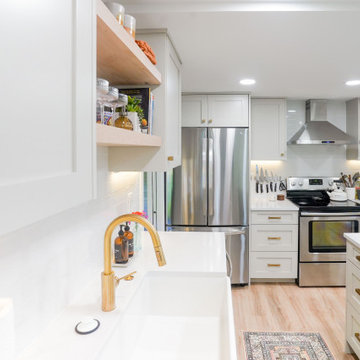
Full kitchen remodel opening to an open concept, contemporary style kitchen. Adding more lighting to lighten the room, relocated plumbing, focused on a more natural flow design, installed new flooring throughout, removed a brick chimney that separated the living room from the kitchen and patched up the roof. Lastly installed brand new drywall wall throughout.

 Three Palms Home Staging and Interior Design, LLC
The after picture of the same space showcases plenty of new lighting. Gone are the fluorescent strips and in place is new crown molding on top and bottom of the cabinets. There are now 4 recessed cans to provide ample light, a pendant fixture in the center of the kitchen and 4 pendant fixtures over the bar area.
New grey counter tops replace the shiny blue counters. A new coat of blue-green paint covers the old brown walls and the pass through has been patched and repaired. New appliances and a new sink and faucet make this kitchen complete.
 Sledgehammer Construction
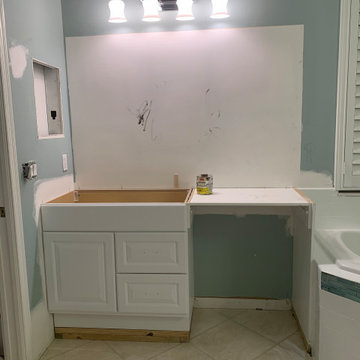
Installation of the ladies' vanity. A 2x4 platform was built for the new vanity to sit upon because the homeowner wanted to raise the height of the countertops for easier accessibility aging in place. The drywall was patched at the mirror and the bathtub surround wall and accent tile was completed. Part of the old vanity was salvaged and reused to create the make-up counter area


 Roland Oehme Landscape Architecture
This is a small garden (approx. 600 sq. ft.) next to a corner townhome in an urban setting in Baltimore’s popular Hampden neighborhood. We transformed this former weed patch into a thriving and beautiful pollinator garden of mostly native plants. The client specifically wanted flowering plants for all pollinators, but especially hummingbirds, and the garden was to be bird friendly as well. I designed the garden and installed it with the help of landscape contractors. I located a water fountain against the rear wall. The client also desired a vine to cover the rear wall so I selected the Trumpet Vine which is growing beautifully. I continue to oversee the maintenance of this garden.
Landscape design and photo by Roland Oehme

 Lounsbury Group
The owners of this property were selling it and wished to improve the property in order to raise its market value for sale. LB LounsBury Group created a renovation plan to improve the property with a limited budget in order to maintain financial gain at the time of sale. The house’s second storey flooring was extremely aged and needed upgrading. Some closet door handles and light fixtures were misplaced, wall colours were mismatched, and front porch was aged and weathered. We patched and painted the house throughout with warm, inviting colours, and upgraded second story flooring and trim. We added a new window to the master bedroom with a modern design, upgraded the lighting fixtures throughout the house, and installed new deck boards. At the end of the project the house was sold for a value of 15% higher than it would have been estimated to sell for before renovations.
 HUDSON REMODELING
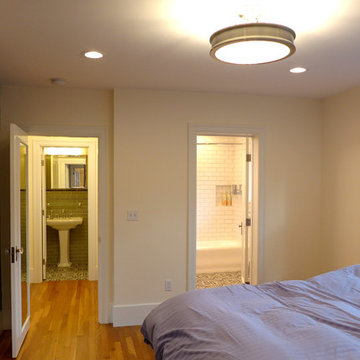
In the master bedroom, we moved a wall that had been dividing the space in two, using hardwood from the powder room to seamlessly patch the floor. We removed some built-in cabinetry from the bedroom and framed in a new closet (the old one was removed to make space for the bathroom). We also installed a new window in the bedroom, refinished the hardwood flooring there and in the hallway, and gave the walls and ceilings several fresh coats of paint. The result is a spacious new bedroom with adjoining master bathroom and office that makes much more functional sense.


 D&D Decorators
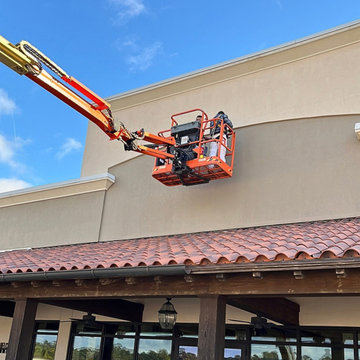
This commercial restoration project at the St. Simons Island Airport combined high-access stucco repair, texture matching and exterior painting.
Damaged and loose stucco on the upper façade was removed before the affected areas were rebuilt with hydraulic cement and stucco patch. The repaired sections were then textured to blend with the surrounding wall surface.
After the masonry repairs were completed, the areas were treated with a clear masonry conditioner/primer and finished with two coats of Loxon XP matched to the existing exterior color.
Because the repairs were located high above the main entrance and building signage, boom-lift access was required to complete the work safely and provide full access to the damaged areas.
The completed façade allows the restored stucco to recede back into the architecture rather than appearing as an obvious patch.
The broader commercial project also included interior drywall and painting repairs associated with electrical work. New drywall was installed where needed, taped, bedded and skim coated before sanding, spot priming and repainting.
D&D Decorators provides commercial painting, stucco restoration, drywall repair, specialty surface preparation and high-access exterior painting throughout the Golden Isles. Give us a call at (912) 715-1718 or learn more at www.dndcompany.com/commercial-painting-services/
 Promised Path Landscaping Inc
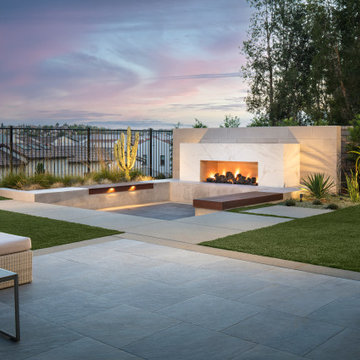
beautifully designed outdoor lounge area with a modern, minimalist aesthetic. The focal point is a built-in, open fireplace with a sleek, marble or stone surround, adding warmth and ambiance to the space. Adjacent to the fireplace is a sunken seating area framed by concrete and wooden bench-style seats, illuminated subtly with recessed lights that create a cozy atmosphere in the evening.
The surrounding landscape features drought-tolerant plants, including succulents, grasses, and a prominent cactus, adding a touch of desert-inspired greenery. The flooring consists of large, square concrete tiles with adjacent patches of artificial grass that add texture and contrast to the space.
 Carpetland USA Granite & Flooring
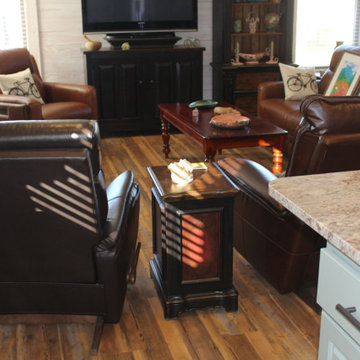
The authentic look of Vintage Pine will add rustic charm to any project. The contrast between the mid-brown tones and cooler gray weathered patches make for a distinctive look. With a 15-year commercial warranty, you can be sure this rigid core floor will maintain the perfect aged look without further wear.
Van Gogh features our 100% waterproof K-Core technology to ensure a strong, stable core for installation over most existing hard floors. With a durable 20 mil wear layer, this range is suitable for a variety of applications – light industrial, domestic, commercial and is backed by a 15-year commercial warranty. Maintenance is a breeze. Sweep to remove dust and debris then damp mop with a neutral detergent.
 Tile Doctor Ltd
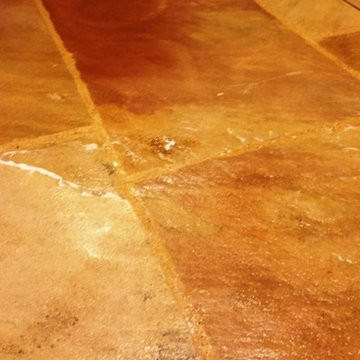
Sandstone is a particularly popular choice for kitchen and hallway floors amongst home owners in the UK. It not only possesses beautiful natural shades and features, but it is also typically hard wearing, making it an ideal stone for tiled flooring in high traffic areas of a house and can often be found laid as large riven flagstones in pubs and other commercial premises.
Naturally, just like any other type of tiled floor, Sandstone needs to be maintained using appropriate products and methods. A lack of adequate surface sealer in particular leaves Sandstone susceptible to ingrained dirt, and can leave distinct, unsightly patches such as those in the photograph below.
In this instance, I visited a client in the old Essex town of Thaxted, who believed that her four square meter Sandstone tiled floor might be suffering from damp issues after lifting up the mats covering the area.
However, when I arrived at the property and ran damp tests, I found the issue to be superficial. The Sandstone floor however did require attention in the form of a deep clean and a fresh seal to tackle the white patches and prevent further discolouration.
To begin the cleaning process I spread Tile Doctor Remove & Go evenly across the floor. It was left to dwell for approximately 15 minutes, during which time it worked to break down the old sealer remaining on the tiles. I then agitated the area twice over with both a black scrubbing pad fitted to a rotation machine lift away any dirt.
The resultant slurry was removed using a wet vacuum and the floor was then rinsed with water and then mixed a strong solution of one part Tile Doctor Pro Clean to three parts water which was used to give the floor a final clean and scrub the grout clean before using the wet vacuum again and giving the floor a final rinse with water.
After completing the cleaning process I left the floor to dry over the weekend. Upon my return to the house I proceeded to seal the tiles with three coats of Tile Doctor Colour Grow which is an impregnating sealer that soaks into the pores of the stone and provide durable surface protection going forward. Colour Grow is also specially designed to let the floor breathe and enhance the natural colours in the stone and, in this case, really helped to intensify the natural sand-coloured shades in the tiles.
The difference made to these Sandstone tiles was really noticeable, with the white patches completely removed and the surface more generally back to looking like new, needless to say, my client was very happy with the results.
Nick Murphy
South Essex Tile Doctor
 Phoenix Home Remodeling
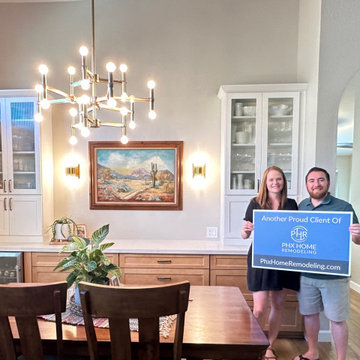
There was an area in Eric and Jeni's home that seemed under utilized and crowded with an HVAC vent. They envisioned a dry bar that could become a social hub during gatherings and a convenient space for daily life.
First on the agenda was the removal of the HVAC vent. The area was then drywalled, patched, and textured, leaving a blank canvas for the new dry bar.
Continuing from the other renovated spaces in the home, they chose Waypoint Cabinetry in a Rye finish for the base cabinets. For a touch of contrast, they opted for Waypoint Cabinetry in Painted Linen for the tower cabinets.
The Montreal Quartz countertop was selected to tie the look together. The area was illuminated with two new wall sconces. Lastly, Jeffrey Alexander cabinet handles were chosen to complete the cabinets and compliment the kitchen.
 Lounsbury Group
The owners of this property were selling it and wished to improve the property in order to raise its market value for sale. LB LounsBury Group created a renovation plan to improve the property with a limited budget in order to maintain financial gain at the time of sale. The house’s second storey flooring was extremely aged and needed upgrading. Some closet door handles and light fixtures were misplaced, wall colours were mismatched, and front porch was aged and weathered. We patched and painted the house throughout with warm, inviting colours, and upgraded second story flooring and trim. We added a new window to the master bedroom with a modern design, upgraded the lighting fixtures throughout the house, and installed new deck boards. At the end of the project the house was sold for a value of 15% higher than it would have been estimated to sell for before renovations.
141