
Search results for "Remove soil" in Home Design Ideas

 Tile Doctor Ltd
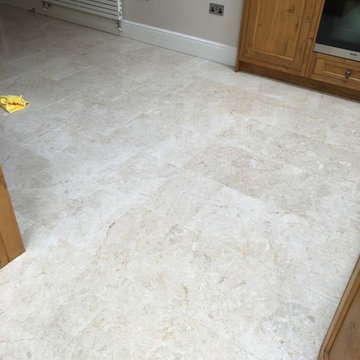
Marble tiles can be tumbled in large drums to achieve an aged and softened effect, and this can look very nice providing that the stone is adequately maintained.
In the case of this floor at a property in Twickenham South West London, the Marble tiles that had been laid over five years ago, and in that time the sealer had worn down offering the floor little protection. Dirt had now become ingrained in the pores of the stone and grout, and a deep clean and fresh seal were required to restore the stone’s original colour and lustre. The property owner asked me to complete the job and I was more than happy to oblige.
To begin the restoration, I applied both Tile Doctor Pro-Clean, which is a high alkaline cleaner, and Tile Doctor Remove and Go, which a heavy-duty stripper and remover, to the floor and scrubbed the products in using a scrubbing pad fitted to a professional rotary machine.
The chemical solvents in the Remove and Go helped to break down any old sealer that remained inside the stone, allowing the Pro Clean to then work its magic on the stubborn ingrained dirt the customer had struggled to remove previously. Some of the deeper veins and grout lines I chose to scrub by hand to ensure the fullest and most meticulous clean possible.
The resulting soiled cleaning solution was then pressure rinsed with water and the soil extracted with a wet-vacuum, leaving a completely clean floor that was now ready to be sealed using a new sealant.
I returned to the property the following day after allowing the Marble tiles to dry fully. Drying the tiles is a crucial part of the restoration process, since even a small quantity of excess moisture can cloud the sealer and prevent it from working to its fullest capabilities.
I applied two coats of our solvent-based impregnating sealer known as Tile Doctor Colour Grow. As the name of the product suggests, Colour Grow not only protects the tiles against ingrained soil, it also thoroughly lifts and enhances the natural colours in the stone.
The new seal will make it easy for our customer to maintain the floor, making daily cleaning easier. It will also protect the stone against the nasty spillages that are common in kitchens and living rooms.
The customer was thrilled with the much-improved appearance of the Marble tiles and is very reassured that they will now stay in great condition for a long time. Another satisfied client!
Jonathan Oldham
South Middlesex Tile Doctor

Find the right local pro for your project



 San Jose Tree Service & Landscaping
-New lawn installation with gopher wire underneath to prevent ongoing rodent damage
-Large tree removal in the front yard due to advanced root rot
-Tree replacement with a species appropriate for the site’s soil, sun, and drainage conditions
-Landscape lighting repair to restore functionality and enhance curb appeal and safety

 Interlocking Concrete Pavement Institute
HNA Hardscape Project Award Winner
Wayne Pool
Wayne, New Jersey
Monello Landscape Industries
Design elements and features include six multi level paver patios, three permeable paver patios, and a sunken pool bar and kitchen with seating inside and outside the pool. A 20 foot double water falls drops into a pond with glass panels that separate the pool from the pond enabling views of koi. A 24 in. by 30 foot running/trickle water wall over natural stone into the the pool is also features. Additional items include three built-in bistro tables, a 20 foot high boulder wall system featuring perennial garden plantings, and floating boulders built into the pool.
Design challenges included a 12 foot high bar wall engineered with ¾ in. rebar and a solid concrete pour. Lower levels of the patio system were built and excavated below the water table level, so an extensive and creative drainage system was installed. In addition, water pumps were active during construction. Trenching was so extensive under and around the hardscape areas that all soil had to be removed from the site and replaced with compacted clean stone so there was no threat of future settlement. There was over 1500 cubic yards of soil removed from the site and over 1500 yards of aggregate trucked into the site.

 Alison Kandler Interior Design
Bret Gum for Cottages and Bungalows
Eclectic painted wood floor and multicolored floor enclosed dining room photo in Los Angeles with multicolored walls
Eclectic painted wood floor and multicolored floor enclosed dining room photo in Los Angeles with multicolored walls



 Avid Landscape Management LLC
Updated: Almost a year removed from the original installation, we returned to add a knee wall for soil retention as well as additional seating.
Patio - traditional patio idea in Seattle
Patio - traditional patio idea in Seattle

 Greenwise Organic Lawn Care and Landscape Design
Autumn Brilliance Serviceberry at dusk.
Photo: Linda Oyama Bryan
Photo of a traditional landscaping in Chicago.
Photo of a traditional landscaping in Chicago.





 Edger Landscape Design
Alongside a backyard gazebo California natives such as Cleveland Sage, Redbud, Foothill Penstemon, and Canyon Dudleya announce spring.
Design ideas for a mid-sized rustic drought-tolerant backyard stone landscaping in San Francisco for spring.
Design ideas for a mid-sized rustic drought-tolerant backyard stone landscaping in San Francisco for spring.

 Pineapple House Interior Design
The kitchen and keeping room are connected to a large covered outdoor room, separated only by massive glass panels that stack into the wall. With removable boundaries between the interior and exterior, durable, high performance white, blue and taupe fabrics are employed both inside and out, to reduce soiling from stormy weather as well as wet bathing suits.

 Houtje Touwtje
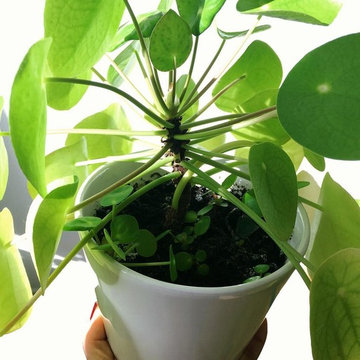
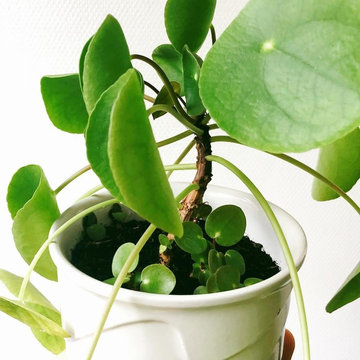
If you decide to keep your Pilea in the same pot for a while and take good care of it (water just once a week or when the soil is dried out), you will probably discover a few baby Pileas growing next to the big plant. You can either keep them in there or remove them carefully when they are at a minimum of 2". Credits: instagram.com/houtje.touwtje

 Linda Estrin Garden Design
MEDITERRANEAN, TRADITIONAL, CALIFORNIA, LOS ANGELES, MALIBU, CALABASAS, SANTA MONICA, THOUSAND OAKS, SHERMAN OAKS, WEST HILLS, PACIFIC PALISADES, NORTH RANCH, AGOURA, AGOURA HILLS, SOUTHERN CALIFORNIA, SUCCULENTS, ECLECTIC, OAK PARK, DECOMPOSED GRANITE, AUSTRALIAN PLANTS, CALIFORNIA NATIVE, CALIFORNIA NATIVE PLANTS, SUSTAINABLE, RAIN CAPTURE, SOIL HEALTH, RUSTIC, ENGLISH GARDEN, DROUGHT TOLERANT, DROUGHT RESISTANT, LAWN REMOVAL, WATER CONSERVATION, WATER CONSERVING, WATERWISE, LOW MAINTENANCE, CLIMATE, FRONT YARD, BACK YARD, BACKYARD, PATIO, POOL, SOUTHWESTERN, ASIAN, WALKWAY, SUCCULENT POTS, GRAVEL, EDIBLE, LANDSCAPE, POOL, GARDEN, GARDEN DESIGN, SUCCULENT GARDEN, SUCCULENT POTS, REBATE, SUCCULENT WALL, LIVING WALL, DRAFTING, HARDSCAPE, HARDSCAPING, LIGHTING, FOUNTAIN, WATER FEATURE, LOW WATER, DRIP IRRIGATION, FIRE PIT, SANTA BARBARA, OXNARD, VENTURA,

 Susan's Edible Garden & Permaculture Design
This is the aftermath of a 100 year flood event in the Los Padres National Forest near Goleta, California. While flood events will always happen, they are greatly mitigated with natural forests and native vegetation. But here, the forest was removed 200 years ago by smelting operations. Currently, this land is recovering with the help of Quail Springs Permaculture Demonstration Site. They are working with nature to restore this landscape by installing swales gabions to slow the water so it has time to rehydrate the soil. These low tech water harvesting are applicable on any scale.
 Houtje Touwtje
If you decide to keep your Pilea in the same pot for a while and take good care of it (water just once a week or when the soil is dried out), you will probably discover a few baby Pileas growing next to the big plant. You can either keep them in there or remove them carefully when they are at a minimum of 2". Credits: instagram.com/houtje.touwtje
 Fyrn Landscapes
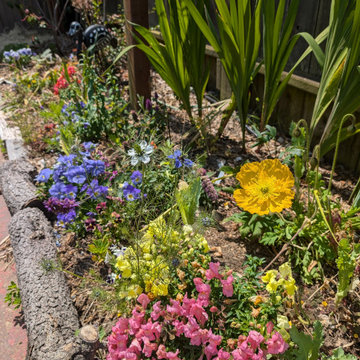
A cut flower and annual border edging the brick path, planted with snapdragons, California poppies, nigella, and pansies. The log edging is reclaimed from a removed tree on the property. This border produces cutting flowers from early spring through summer.

 Sparkle Cleaning Services Melbourne
Visit this site https://www.facebook.com/pages/End-of-Lease-Cleaning-Melbourne/1527963877420356 for more information on carpet steam cleaning Melbourne. Carpet steam cleaning Melbourne professionals helps in dissolving muck stuck in carpets even if it is oil, soil, and mud. They use a steam cleaning technique which depends entirely on the material and pile of your carpet. The steam cleaning ensures that all allergens are removed from the carpet, and all fungi dust mites and viruses trapped in the pile will be eliminated.Follow us: http://www.localbd.com.au/company/Sparkle-Cleaning-Services-Melbourne_1232727/

 Parr Lawn Services
The final product after removing all old materials and plants and installing new plants and materials.
Photo of a craftsman landscaping in Atlanta.
Photo of a craftsman landscaping in Atlanta.
12