
Search results for "Rinsing" in Home Design Ideas
 Tile Doctor Ltd
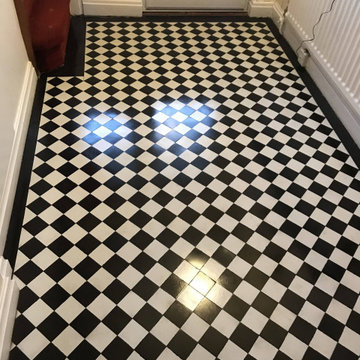
This is a great example of a Victorian Tiled floor refurbishment which I recently completed at a property in Stoke-on-Trent. If you look closely at the photographs below you will see the white tiles are looking grubby and paint splash staining from decorating. The owner was unhappy with how the floor now looked and wanted it refurbished.
Black and White Victorian tiles laid in a chequered diamond pattern is a classic style and a very popular choice for hallways at the turn of the 20th century. Over the years many have been replaced or covered up with carpet and those that survived are now a sought-after period feature that adds value to your property.
I initially cleaned the floor by applying a strong dilution of Tile Doctor Pro-Clean which was sprayed onto the floor and then left to soak in for ten minutes. Pro-Clean is our goto tile and grout cleaning product that is designed to break down dirt and remove old sealers. After ten minutes the solution was scrubbed in with a rotary machine fitted with a coarse 200-grit pad. The soil generated was rinsed off the tiles and extracted with a wet vacuum and the floor inspected.
I would see more work was needed to get the floor clean and free of staining, so I spot treated the problem areas with Tile Doctor Remove and Go which is a coatings remover. I worked in small sections leaving the product to dwell as before for 10 minutes, I then used a wallpaper steamer with handheld diamond blocks to get the ingrained dirt out of the floor. After a final rinse and extraction, the floor looked clean so, so much better than when I started.
I then left the floor to dry off overnight and came back the second day to seal the tiles first checking the moisture levels with a damp meter. Applying sealer to a damp floor will result in the floor looking patchy when it dries so I always check first. The readings were good, so I started to apply the first of five coats of sealer which for this floor I chose Tile Doctor Seal and Go Extra.
Old Victorian floors do not have a damp-proof membrane installed under the floor so its important to select a sealer that will allow moisture to rise through the tiles and evaporate on the surface, Seal and Go Extra allows for this. Choosing a non-breathable sealer can result in moisture being trapped under the floor where it can reach out to the walls leading to rising damp.
Once the floor dried it looked fantastic. In fact, my customer was so happy with the transformation she was taking pictures and sending them to her daughters as I worked; she couldn’t believe how well it was turning out.
Trevor Preece
Staffordshire Tile Doctor
 Tile Doctor Ltd
Most stone and tile benefit from the protection that a sealer provides to stop dirt becoming ingrained into its pores. However, the act of walking on the tile causes wear and this over time will lead to the sealer wearing off and dirt reaching the pores; the worse thing is you rarely notice it happening because it takes a long time to wear down a sealer.
Most of my customers have this problem and call on me to clean and reseal the floors every few years when it becomes difficult to clean effectively. The alternative which I do for a number of my clients is to have the floor lightly cleaned and a new layer of sealer added every six to twelve months.
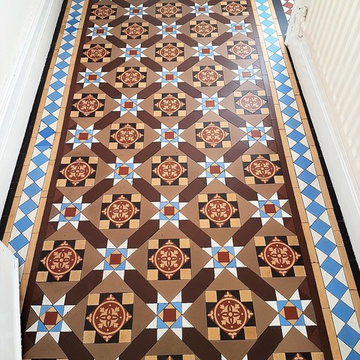
This Victorian tiled entrance at a period house in Ilkley was not in too bad a shape just a little dirty and dull and the owner was keen to have is renovated in the run up to the Christmas holidays. Ilkley is a lovely town in West Yorkshire which became very fashionable in the Victorian era due to the health benefits of the local water, this led to a lot of Victorian architecture and tiled entrance floors like this one are very typical in the area.
To get the dirt out of the tile and grout I applied a strong dilution of Tile Doctor Pro-Clean to the tiles and left it to soak in for fifteen minutes. Pro-Clean is a very reliable cleaner for all types of tile and grout including natural stone, Limestone, Slate and Travertine, amongst others; additionally, when used in a strong dilution it will strip off old sealers. The solution was then worked into the tile using a black scrubbing pad fitted to a rotary machine and the soil extracted using a wet vacuum.
I gave the floor a light rinse with water to remove any trace of cleaning products and then inspected the floor to ensure it was up to standard. At this point I could see there were flecks of paint on the tile around the edges of the floor from previous decorating work and, so I removed carefully removed these with a scrapper and a hand-held diamond block.
The floor was given a final rinse and the wet vacuum used to extract as much moisture from the floor as possible before leaving it to dry for the evening.
I returned the next day to seal the floor first discussing the finish that the customer wanted for the tiles. Typically, I recommend using a satin sealer for Victorian tiles as it adds a nice sheen to the tile however surprisingly the owner wanted a matt finish.
Tile Doctor has a full range of sealers available to cater for all requirements so for this floor I applied three coats of Tile Doctor Colour Grow which leaves a matt finish whilst enriching the colours in the tile.
The tiles are now full of life and with the paint specs removed there is now a crisp black edge between the floor and the skirting which the customer also picked up on.
Nigel Stoker
North West Yorkshire Tile Doctor
 Tile Doctor Ltd
This job was for a repeat client in Toft near Cambridge who had aa stunning large hallway that was tiled in beautiful pale Limestone. My client had asked me back to work on the floor having previously completed the deep clean and seal of a Terracotta floor previously.
The Limestone tiling in the entrance hall had years of some type of topical sealer applied to it. This caused the stone to look slightly discoloured and from certain lights showed up hundreds of scratches and smudges embedded in the seal. I’ve tried to capture this problem in the photographs on this page, but it was very difficult.
A topical sealer sits on the surface of the tile where it is vulnerable to scratching, hallways are generally high traffic areas and so more likely to see this sort of problem. Ideally an impregnating sealer should have been applied, impregnators work by occupying the pores in the stone thus preventing soiling from becoming ingrained in the stone.
Before starting we protected the woodwork against splashing with blue film, I don’t usually make a great deal of mess, but you can never be too careful when working in someone’s property especially one as beautiful as this.
To strip off the old sealer I began by applying a strong dilution of Tile Doctor Remove and Go to the Limestone tiles. I split the floor into sections and used a 400-grit diamond burnishing pad to work the Tile Doctor Remove and Go into the tiles. The floor was then rinsed off using our high-pressure cleaning system that applies pressurised hot water to the floor whilst simultaneously extracting the soil with its built-in vacuum. The system is quite heavy, so it is built into my van, and I run a large flexible hose to a spinner tool that does the cleaning. It is an expensive tool, but it saves a lot of time and leaves the floor fairly dry afterwards.
The 400-grit pad had released a lot of the sealer but there were quite a few layers to get through, so I changed the burnishing pad to a coarse 200-grit pad and repeated the process. After another rinse and extract I would see it had the desired effect and I was able to carry on building up the finish on the Limestone by apply the 400-grit followed by the 800, 1500 grit pads. It was a large floor and so this took up much of the day so once complete I left for the day so it could dry off overnight.
The next day I finished the polishing process with the application of a 3000-grit burnishing pad which is applied with a little water sprayed onto the tile and really brings up the polish on the stone. This process has the added advantage of leaving the floor dry so not long afterwards I was able to move on to sealing.
For this floor two coats of Tile Doctor Ultra-Seal were applied, it is an impregnating sealer that won’t alter the colour of the tiles leaving a natural look.
My client was much happier with the new finish and has asked for another quotation on some more Terracotta flooring that needs attention. For aftercare I recommend using Tile Doctor stone soap, it’s a special formula that builds on the patina which will help maintain the polished appearance of the Limestone.
Tom Conlon
Cambridge Tile Doctor
Find the right local pro for your project

 KCBR Design | Remodel
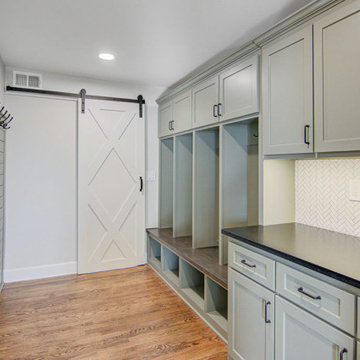
In this Modern Rustic Farmhouse kitchen remodel, discover a perfect blend of modern convenience and timeless charm. The kitchen showcases a captivating combination of a white gloss ceramic tile backsplash with rustic brick accents, creating an inviting atmosphere. Enjoy the convenience of a 45" stainless steel workstation sink equipped with a Pre-Rinse Pull-Down Kitchen Faucet and Instant Hot Water Dispenser, perfect for culinary tasks. Custom cabinets offer ample storage while enhancing the rustic aesthetic. Adjacent to the kitchen, the pantry/laundry/mudroom provides practical amenities including coat hooks, lockers, and cozy bench seating, ensuring organization and comfort. Meanwhile, the bathroom exudes tranquility with serene white gloss ceramic tile shower walls and durable Calabasas Porcelain floor tile, completing the cohesive and welcoming ambiance of this thoughtfully designed space.
 Tile Doctor Ltd
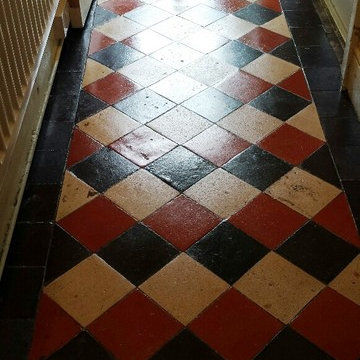
The pictures below were taken at a house in the town of Merthyr Tydfil, which is located not too far north of Cardiff. My client was keen to keep her very old Quarry tiled floor – which dated back to 1905 – intact. The floor had understandably seen a large amount of traffic in its lifetime, and was now in dire need of a professional restoration, including a thorough clean and seal.
First, I completed a survey of the area and provided my client with a quote. After completing many similar jobs in the past, I generally have a good idea of what the final result will look like. I passed on some images of a final result to my client, who was happy for me to begin my work.
On the first day, my first task was to take run some damp tests which were fine; it’s always good to know up front if there are likely to be any damp issues. Next I covered the floor with water to take the surface suction out and waited fifteen minutes before applying a cocktail of Tile Doctor NanoTech Heavy Build-Up cleaner mixed with Pro-Clean and Grout clean-up covering the whole floor. I then immediately starting to work the solution into the floor with a rotary machine fitted with a coarse black pad. The solution was then rinsed off with water which was then extracted with a wet vacuum as I worked. For stubborn areas I applied more of the previously mixed solution scrubbed into the floor with coarse wire wool by hand followed by further rinsing with water.
Each of the products used serves a particular purpose. Pro-Clean is a strong high-alkaline cleaner for natural stone, while NanoTech HBU is a particularly powerful cleaner that uses nano-sized particles to penetrate deep into the stone to get underneath and lift out ingrained dirt and stains. Grout Clean-Up, as the name implies, is a product for resolving grout related problems such as removing grout smears from tile surfaces aka grout haze.
After completing the clean I left the house for 48 hours, to leave enough time for the floor to dry completely in preparation for sealing. Upon my arrival back at the house I conducted some more damp tests to check that the floor was dry enough to seal using the previous readings as a benchmark. The results indicated that I was fine to proceed with the seal, so I applied a total of eight coats of Tile Doctor Seal & Go for durable protection. This was the product I recommended to my client as she wanted a nice, soft shine for her surface seal.
As you can see from the photos, the desired result was achieved to a high standard and needless to say my client was delighted with the transformation.
Julian Iancono
South East Wales
 Tile Doctor Ltd
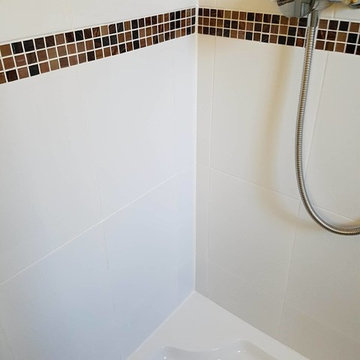
The photographs below are from the bathroom of a house in the Moston area of Manchester which is primarily residential and only 3 miles away from the city centre. My customer had been primarily concerned with the removal of unsightly mould but was also keen to have the grout in the ceramic tiled shower cubicle given a good deep clean.
To clean the Shower Cubicle, I used a strong dilution of Tile Doctor Pro Clean which is a strong alkaline cleaner that works really well on grout. The Pro-Clean solution was decanted into a spray bottle and then sprayed onto the grout lines and left it to dwell. The air in the solution makes it lighter and easier for it to stick to vertical surfaces.
After a few minutes the Pro-Clean was scrubbed in using a stiff grout brush. The tiles were then rinsed with water to remove the soiled solution from the tiles and the process repeated where required.
Although cleaning process was a success there were still a few mould marks left so to tackle these I used Tile Doctor Mould Away spray using the same process of scrubbing and rinsing. The Mould Away spray did the trick for me and I moved on to remove the silicone around the shower cubicle. When removing silicone, you must make sure you get all mouldy silicone out otherwise it can spread from the old to the new.
After I had finished removing the silicone I tidied the shower cubicle and used a bit of gentle heat from my heat gun to dry the grout lines and edges where silicone used to be.
I used my damp tester to make ensure there was no dampness anywhere around the working area and then moved on to colouring the grout which would give the whole shower a fresh and consistent appearance. On this occasion, I used a White colour from the Tile Doctor range of Grout Colourant’s, it’s an epoxy based colourant that protects and rejuvenate the grout lines.
I had to use 2 coats of colourant to get the best result and then moved on to putting new silicone around the shower base with a high-quality mould resistant silicone. When finished adding fresh silicone I tidied up again and the job was complete.
I think you can’t argue the shower cubicle was transformed and customer even said it looks better then when it was new; we also fixed few chips for her whilst there and stripped and replaced the silicone around the sink as a bonus.
Tony Olmet
Greater Manchester Tile Doctor
 KCBR Design | Remodel
In this Modern Rustic Farmhouse kitchen remodel, discover a perfect blend of modern convenience and timeless charm. The kitchen showcases a captivating combination of a white gloss ceramic tile backsplash with rustic brick accents, creating an inviting atmosphere. Enjoy the convenience of a 45" stainless steel workstation sink equipped with a Pre-Rinse Pull-Down Kitchen Faucet and Instant Hot Water Dispenser, perfect for culinary tasks. Custom cabinets offer ample storage while enhancing the rustic aesthetic. Adjacent to the kitchen, the pantry/laundry/mudroom provides practical amenities including coat hooks, lockers, and cozy bench seating, ensuring organization and comfort. Meanwhile, the bathroom exudes tranquility with serene white gloss ceramic tile shower walls and durable Calabasas Porcelain floor tile, completing the cohesive and welcoming ambiance of this thoughtfully designed space.
 KCBR Design | Remodel
In this Modern Rustic Farmhouse kitchen remodel, discover a perfect blend of modern convenience and timeless charm. The kitchen showcases a captivating combination of a white gloss ceramic tile backsplash with rustic brick accents, creating an inviting atmosphere. Enjoy the convenience of a 45" stainless steel workstation sink equipped with a Pre-Rinse Pull-Down Kitchen Faucet and Instant Hot Water Dispenser, perfect for culinary tasks. Custom cabinets offer ample storage while enhancing the rustic aesthetic. Adjacent to the kitchen, the pantry/laundry/mudroom provides practical amenities including coat hooks, lockers, and cozy bench seating, ensuring organization and comfort. Meanwhile, the bathroom exudes tranquility with serene white gloss ceramic tile shower walls and durable Calabasas Porcelain floor tile, completing the cohesive and welcoming ambiance of this thoughtfully designed space.
 Ariel Muller Designs
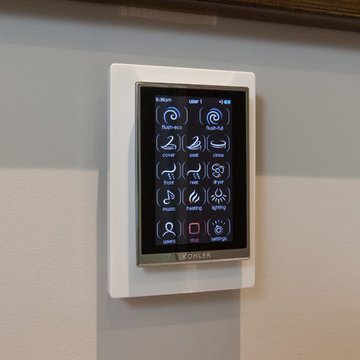
This touch panel allows for the ultimate convenience of control for the hybrid Toilet-Bidet Numi by Kohler. One can set personal preferences for music and rinse features.
 Concrete Wave Design
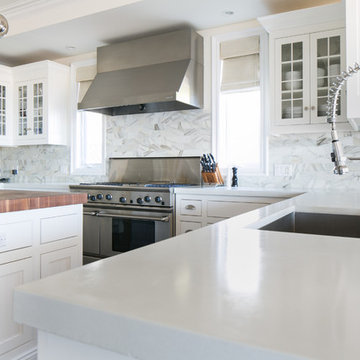
White concrete countertops in Newport Beach, CA. They go perfectly with the full marble backsplash and walnut butcher block island. Everything comes together to give this kitchen a bright and airy feel.
 Tile Doctor Ltd
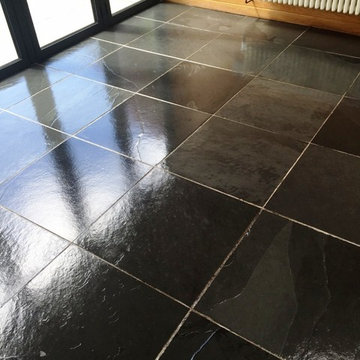
Tenuous link I know but I worked on this semi riven Black Brazilian Slate Tiles in the kitchen and dining room of a house in the seaside town of Thornton-Cleveleys around the time of the Rio Olympics. I love working on Slate as although it’s appearance can degrade without proper maintenance due to a build-up of dirt I knew they would look fantastic by the time I had finished.
The tile itself had lost its rich black colour and the grout lines had become stained, leaving the floor as a whole looking very unattractive. Out of interest honed Slate has a smooth, refined texture whereas the riven Slate has a rougher, more natural texture, and this can make it more difficult to keep clean. Needless to say, the customer was keen to have the tiles restored to looking their best.
To restore the appearance of the Slate, I cleaned the floor and removed what remained of the old sealer off using Tile Doctor Remove and Go. This was scrubbed into the floor using a scrubbing pad fitted to a rotary machine. The floor was then rinsed with water, and the process repeated where necessary to tackle particularly stubborn areas of dirt.
As mentioned previously, the grout lines were in a particularly bad state, and would need special cleaning attention. I cleaned carefully with a strong 5-to-1 dilution of Tile Doctor Pro Clean with water, which is our high alkaline cleaner. The cleaning solution was scrubbed I’m using a stiff handheld grout brush, with the grout lines looking immediately cleaner. When I was satisfied that the grout lines had been restored to the best possible condition, I gave the floor a thorough rinse using the wet pickup function of a wet wax machine to get the floor as dry as possible and then left the whole floor to dry off overnight.
Upon my return to the property I ran some quick damp tests to check that the floor was completely dry. This is important as any excess moisture would have prevented me from sealing the tiles, since it can cloud the sealer and damage it performance.
Previously I discussed sealer options with the customer and they stated that they would prefer a Satin finish, so I applied a sealer called Tile Doctor Seal and Go, our topical sealer which will both protect the Slate from dirt and stains, and also gave it the desired finish. As you can see from the below photographs, the rich, dark shades in the Slate were really enhanced.
The customer was very pleased with the finished result, but was also concerned about keeping the Slate clean in the long-term. For regular cleaning I advised the customer to use a pH neutral cleaner for aftercare called Tile Doctor Neutral Cleaner. As a pH neutral cleaner, it will not erode the sealer compared to acidic cleaners you so often find in supermarkets.
Russell Taylor
Lancashire Tile Doctor
 KCBR Design | Remodel
In this Modern Rustic Farmhouse kitchen remodel, discover a perfect blend of modern convenience and timeless charm. The kitchen showcases a captivating combination of a white gloss ceramic tile backsplash with rustic brick accents, creating an inviting atmosphere. Enjoy the convenience of a 45" stainless steel workstation sink equipped with a Pre-Rinse Pull-Down Kitchen Faucet and Instant Hot Water Dispenser, perfect for culinary tasks. Custom cabinets offer ample storage while enhancing the rustic aesthetic. Adjacent to the kitchen, the pantry/laundry/mudroom provides practical amenities including coat hooks, lockers, and cozy bench seating, ensuring organization and comfort. Meanwhile, the bathroom exudes tranquility with serene white gloss ceramic tile shower walls and durable Calabasas Porcelain floor tile, completing the cohesive and welcoming ambiance of this thoughtfully designed space.
 Tile Doctor Ltd
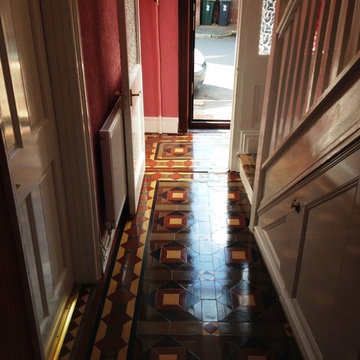
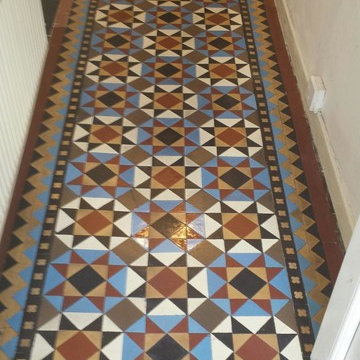
This Victorian tiled hallway at a house in the Forest of Dean had a very interesting pattern, consisting of an array of different colours, including shades of red, yellow and blue. Unfortunately, as you can see from the first photograph below, the tiles had lost all life, with the colours largely masked by months’ – or maybe even years’ – worth of ingrained dirt and muck. The floor as a whole was also suffering from a number of loose tiles that needed to be reset before it could be cleaned.
The property owner was keen to employ some professional assistance to restore the appearance of the floor and prevent it from getting in an even wrote state, and so contacted Tile Doctor who have a lot of experience working with Victorian tiled floors.
As mentioned, the loose tiles had to be repaired before the cleaning process could be started. I removed the tiles and extracted excess grout and old adhesive from the exposed concrete substrate using a vacuum, before putting the original tiles back into place and fixing them back into position carefully using fresh adhesive and matching grout.
Once happy the replaced tiles had set, I started the process of cleaning the entire area of hallway tiles using a combination of Tile Doctor Remove and Go to strip away the old sealer and Tile Doctor NanoTech HBU (formerly Ultra Clean) remover to get the tiles as clean as possible. The latter product contains nano-sized cleaning particles (hence the name) to reach difficult areas of trapped dirt, making it more effective than your run-of-the-mill tile cleaner. These two products were scrubbed into the tiles using a rotary machine fitted with a black scrubbing pad. The floor was then rinsed with water and the soiled residue was extracted with a wet vacuum.
I then paid particular attention to the grout, applying our alkaline-based multi-purpose cleaner Tile Doctor Pro-Clean to the grout lines, before scrubbing them with a narrow grout brush. This quickly had the grout looking clean again: I’d even go as far as to say that it matched it seamlessly with the fresh grout that had just been laid.
With the tile and grout as clean as it was possible to get it, I gave the whole floor a final rinse to neutralise the excess chemicals. I extracted as much water as possible with a wet vacuum and left the floor to dry overnight.
My first task upon returning to the property the next day was to check for any dampness. If you neglect to remove all excess moisture from the surface of the tiles before sealing it is more than likely going to cloud the sealer, rendering it less effective I’m protecting the stone against ingrained dirt and stains.
Once satisfied that the floor was completely dry, I proceeded to seal the tiles using multiple costs of Tile Doctor Seal and Go. Seal and Go is what we would classify as a topical sealer, meaning it rests on the surface of the tiles to act as a durable layer of protection against all kinds of muck. While providing surface protection, Seal and Go also adds a nice subtle sheen to the tiles, as per the customer’s request.
The customer was quite amazed at how quickly the appearance of the tiles had been restored. It was fantastic to see the colours we both knew were hidden in the tiles come to life once again. Another satisfied customer for sure!
Paul Wales
Monmouthshire Tile Doctor
 Tile Doctor Ltd
This set of photographs are from a house in the Warrington suburb of Stockton Heath where my client had discovered a Victorian Tiled floor under carpet in the hallway and was keen to have it restored back to its original condition. You can see from the photograph below that it was in quite a state with dirt and paint splashes however I was confident we could manage it.
On arrival I started to protect the skirting boards and entrance carpet to another room. Once that was done i started to strip the paint splashed and any remaining sealer from the floor using Tile Doctor Remove and Go which is an effective coatings and sealer remover that unlike some products is perfect safe to use on Victorian tiles
Working on the floor the product was diluted, scrubbed into the tile and then left to dwell for twenty minutes before being rinsed off with water which was then removed using a wet vacuum. The floor was now looking a lot cleaner, however I could see a number of stubborn areas that were going to need further treatment so I mixed the Remove and Go 50/50 with another Tile Doctor product called NanoTech HBU (Heavy Build-up Remover), which adds abrasive particles to the solution. This solution was scrubbed in and then rinsed off when i was happy with the condition of the floor. This process took much of the day and once done it was left to dry overnight ready for sealing the next day.
On my return the next morning i tested the floor in several places with a damp meter to ensure it was dry. When i was happy the floor was dry i started sealing with thin coats of Tile Doctor Seal and Go leaving thirty minutes between coats to allow it to dry; in total i gave the floor seven coats of sealer which gave the floor a nice shine which the customer was very happy with. As well as enhancing the look of the floor the sealer will provide stain protection going forward.
Alastair Robb
West Cheshire Tile Doctor
 KCBR Design | Remodel
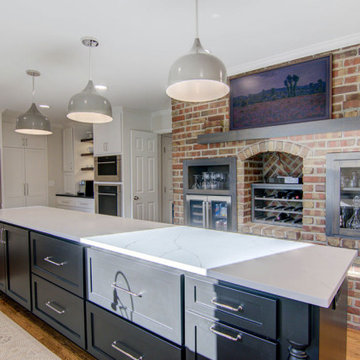
In this Modern Rustic Farmhouse kitchen remodel, discover a perfect blend of modern convenience and timeless charm. The kitchen showcases a captivating combination of a white gloss ceramic tile backsplash with rustic brick accents, creating an inviting atmosphere. Enjoy the convenience of a 45" stainless steel workstation sink equipped with a Pre-Rinse Pull-Down Kitchen Faucet and Instant Hot Water Dispenser, perfect for culinary tasks. Custom cabinets offer ample storage while enhancing the rustic aesthetic. Adjacent to the kitchen, the pantry/laundry/mudroom provides practical amenities including coat hooks, lockers, and cozy bench seating, ensuring organization and comfort. Meanwhile, the bathroom exudes tranquility with serene white gloss ceramic tile shower walls and durable Calabasas Porcelain floor tile, completing the cohesive and welcoming ambiance of this thoughtfully designed space.
 Tile Doctor Ltd
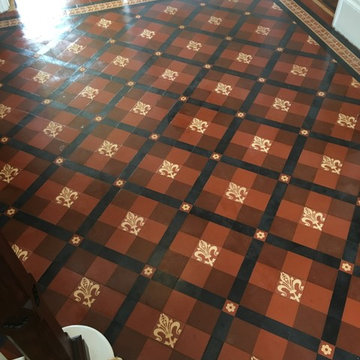
It’s always a great surprise to find old tiled flooring hidden underneath carpet or linoleum which appears especially common with 19th century properties where it’s not unusual for the owners to uncover fantastically patterned, original Victorian tiled floors and, naturally, they want to restore them to their former glory. If you have a property of this type you might want to look under the carpets.
The majority of the time, however, these tiles have been covered up for decades, allowing for thick layers of muck to build-up and are invariably damaged carpet grippers, surface glue and adhesive tape.
This was pretty much the case with this customer who lives in the town of Warminster and was keen to have her own newly discovered Victorian hallway brought back to life, and called me down to see what could be done. Upon arrival at the property, I determined that the tiles would definitely require a very deep clean, including the remove of numerous glue stains, followed by the application of a new seal.
Before I could begin the deep cleaning process, I needed to remove the carpet grippers and surface glue, attempting to remove as much as possible by hand using a scraper.
For the particularly stubborn areas, I applied Tile Doctor Remove & Go, a powerful stripper specially designed to break down adhesives and solvents, and left it to dwell for 20 minutes to eat through the glue deposits. I then attached a black pad to a rotary machine and scrubbed the area thoroughly to clean the affected areas, before removing the resulting slurry using a wet vacuum and rinsed with clean water.
Once I was satisfied that all of the glue had been removed, I proceeded to soak the floor using a solution of the high alkaline cleaner known as Tile Doctor Pro Clean. This is a versatile product that can be used on a wide range of natural stone floors to deal with heavy soil build-up.
I left the Pro-Clean to dwell for ten minutes, and then scrubbed it into the tiles to remove the ingrained dirt and also to break down any old and ineffectual seals. The floor was then once again rinsed thoroughly with clean water which was then extracted using a wet vacuum before being left to dry for a couple of days.
Upon our return to the property I immediately tested the floor for damp using a damp meter. This is an extremely important test to carry out before sealing any kind of tiled flooring, due to the fact that excess moisture left over from cleaning can cloud the sealer and damage its ability to protect against dirt and stains.
Thankfully, the damp test revealed no excess moisture, and I was able to proceed with sealing the tiles. My choice of sealer was Tile Doctor Seal and Go, a water-based topical sealer that simultaneously provides both a stain resistant surface seal and a durable and aesthetically pleasing low sheen finish, also being water based it doesn’t give off a smell as it dries.
This is a very cost effective product that is highly suitable for use on Victorian and Quarry tiles, I applied five costs to achieve the desired finish.
The customer was very pleased with the final results. It’s always satisfying to restore original Victorian tiled floors to looking their best once again – and this one was no exception.
Stuart Ford
Wiltshire Tile Doctor
 Landscape Design Services, LLC USA
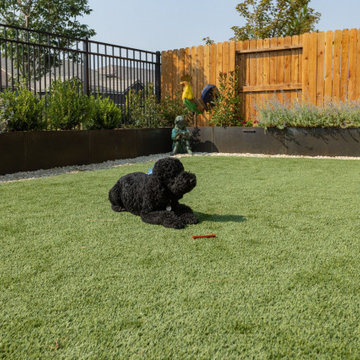
This was a very low water use design - High quality artificial Pet turf with a high flow rate makes it easy to rinse off . This project had a sprinkler zone dedicated to rinsing the turf every few days . The raised metal planters were found online and assembled on site. Modifications were made for low volt lighting on the planters A patio and pergola were part of the project - not shown
 KCBR Design | Remodel
In this Modern Rustic Farmhouse kitchen remodel, discover a perfect blend of modern convenience and timeless charm. The kitchen showcases a captivating combination of a white gloss ceramic tile backsplash with rustic brick accents, creating an inviting atmosphere. Enjoy the convenience of a 45" stainless steel workstation sink equipped with a Pre-Rinse Pull-Down Kitchen Faucet and Instant Hot Water Dispenser, perfect for culinary tasks. Custom cabinets offer ample storage while enhancing the rustic aesthetic. Adjacent to the kitchen, the pantry/laundry/mudroom provides practical amenities including coat hooks, lockers, and cozy bench seating, ensuring organization and comfort. Meanwhile, the bathroom exudes tranquility with serene white gloss ceramic tile shower walls and durable Calabasas Porcelain floor tile, completing the cohesive and welcoming ambiance of this thoughtfully designed space.
 KCBR Design | Remodel
In this Modern Rustic Farmhouse kitchen remodel, discover a perfect blend of modern convenience and timeless charm. The kitchen showcases a captivating combination of a white gloss ceramic tile backsplash with rustic brick accents, creating an inviting atmosphere. Enjoy the convenience of a 45" stainless steel workstation sink equipped with a Pre-Rinse Pull-Down Kitchen Faucet and Instant Hot Water Dispenser, perfect for culinary tasks. Custom cabinets offer ample storage while enhancing the rustic aesthetic. Adjacent to the kitchen, the pantry/laundry/mudroom provides practical amenities including coat hooks, lockers, and cozy bench seating, ensuring organization and comfort. Meanwhile, the bathroom exudes tranquility with serene white gloss ceramic tile shower walls and durable Calabasas Porcelain floor tile, completing the cohesive and welcoming ambiance of this thoughtfully designed space.
 Tile Doctor Ltd
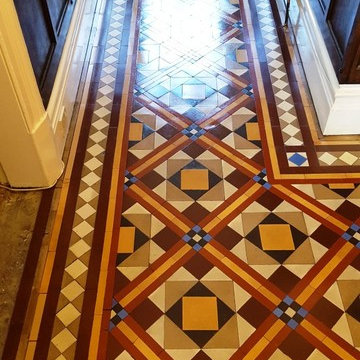
The colourful and diverse geometric patterns of a Victorian tiled floor can give a property a regal, elegant and timeless feel, making it a popular choice even in the 21st century. However, as time passes without regular care and maintenance, Victorian tiles can quickly lose their colour and appear deadened by the buildup of dirt and dust over several months (and sometimes years).
This property owner in Hebden a very small village in North Yorkshire of less than 300 people, had this common problem. Her Victorian tiled hallway had not been adequately maintained and was now more difficult to keep clean than ever. To add to the problem, most of the tiles along the edges were either broken, cracked, or filled with holes, probably I suspect from the installation of carpet grippers at some point in the past.
At this point, the property owner turned to Tile Doctor to see what could be done.
Before beginning a deep clean of the entire length of the hallway, it was first necessary to source and install replacement tiles for those that had been broken and damaged. I also relaid any that were loose.
When finished, I left the tiles to set and returned the next day to start the clean. My choice of cleaner in this situation was Tile Doctor Pro Clean, which was scrubbed into the floor with a special pad fitted to a rotary machine to break down ingrained dirt and stains. Pro Clean does this very effectively on all types of tile, including natural stone and of course Victorian tiles.
The floor was then rinsed with water and the soiled cleaning solution extracted from the floor using a vet vacuum. Stubborn areas were re-treated with more Pro Clean, and when I was satisfied with the condition of the tiles the floor was given a final but thorough rinse to remove any trace of cleaning product.
The floor was then left to dry completely overnight to ensure all excess moisture had disappeared, leaving it fresh to be sealed. I returned in the morning for a third day of work to seal the Victorian tiles with four coats of Tile Doctor Seal and Go, a topical sealer which provides a rich satin finish to really add depth to the colours in the tile while protecting it against dirt and stains.
The customer was delighted with the restoration and couldn’t quite believe the huge improvement in the appearance of the tiles, especially in regards to the enhancement in the different colours. Another satisfied customer!
Nigel Stoker
North West Yorkshire Tile Doctor
22