
Search results for "Rinsing" in Home Design Ideas
 Concrete Wave Design
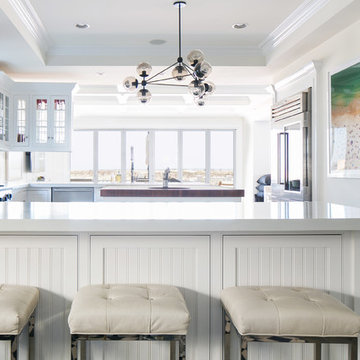
White concrete countertops in Newport Beach, CA. They go perfectly with the full marble backsplash and walnut butcher block island. Everything comes together to give this kitchen a bright and airy feel.
 Tile Doctor Ltd
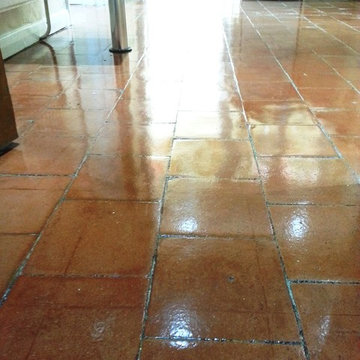
This was an unusual request in that this customer, in the small Bedfordshire village of Cople, had her Kitchen Quarry tiled floor cleaned and sealed six months earlier by another company. The sealer had come off and it soon became evident that after the work had been carried out the client was ill advised as to the correct maintenance of her floor. The cleaning product left by the previous company was totally unsuitable and over the course of six months she had managed in fact to slowly strip the sealer off of the tiles.
I soon realised the problem and advised that the only solution would be to strip any remaining sealer off the floor and re-seal, it’s generally not good practice to apply a different sealer on top of an existing sealer as there can be compatibility issues and the floor may look different in places where there are more layers of seal.
I used a strong dilution of Tile Doctor Pro-Clean to strip any remaining sealer off the tiles and clean them in the process, this involves spreading the solution over the tiles, allow it to dwell and soak in and then scrubbing the solution into the floor using a rotary machine fitted with a black scrubbing pad. The floor was then rinsed with water applied with a mop and bucket and the soiled water extracted using a wet vacuum. One the floor was clean I noticed there was evidence of concrete dust and grout haze on the surface of the tiles from when they were installed so I applied a another Tile Doctor product called Grout Clean-up to remove it, again the floor was thoroughly rinsed with water which was extracted the floor dried using air movers.
Tiled floors need to be dry before sealing and so I left this floor for four days to allow enough time for it to thoroughly dry out before returning to seal it. Choice of sealer for this floor was four coats of Tile Doctor Seal and Go which is a water based sealer so it doesn’t leave a smell and additionally adds a nice subtle shine to the floor. The difference was transformational as the sealer really does bring out the best in the quarry tiles.
Before leaving we have provided the customer a bottle of Tile Doctor Neutral Tile Cleaner which is the correct cleaning agent to maintain a sealed floor. It has a neutral PH formula so it won’t erode the sealer like many of the acidic floor cleaning products you find in the supermarket which are really only meant for use on Vinyl or Ceramic tiles.
Andrew Evans
Bedfordshire Tile Doctor
 Tile Doctor Ltd
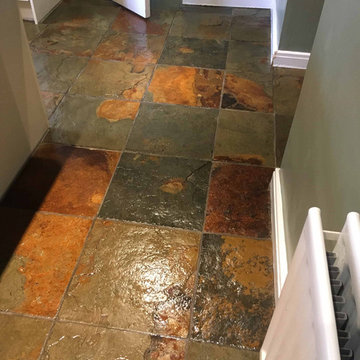
Except for general cleaning this multi-coloured slate floor had not been professionally cleaned since installation eleven years prior. Any sealer that had once been applied to the slate had long since worn off and dirt was now ingrained in the pores of the stone causing it to look dull and un-attractive. The property was in the lovely town of Staines Upon Thames, obviously situated on the banks of the River Thames and a popular place to live for London commuters.
I visited site to take a closer look at the floor and provide the client with an accurate price for renovating the stone. It turns out that the client had used all sorts of different household cleaners in an attempt to get the floor clean. Unfortunately, they were probably making the situation worse as these strong cleaning products would have actually stripped the sealant off the stone leaving it open to dirt. I carried out a test clean for them and they were very pleased to see how the floor could look. We agreed a price for the work and arranged a suitable date to carry out the work.
Cleaning a Multi-Coloured Slate Tiled Kitchen Floor
My first task was to strip off what was left of the old sealer and deep clean the stone using a dilution of Tile Doctor Remove and Go mixed 50:50 with Tile Doctor Pro-Clean. This powerful cocktail was applied to the floor and left to soak in for ten minutes before being scrubbed in using a rotary machine fitted with a black scrubbing pad.
The grout was hand scrubbed using more of the cleaning solution along the grout lines until I was happy the floor was as clean as it possibly could be. The floor was rinsed with water and the soil extracted by using the wet vacuum.
Once the floor was clear the Slate was inspected, and any stubborn areas were spot treated using the same process as before. After a final rinse and extraction, the floor was dried as much as possible using the wet vacuum and left to dry off overnight.
Sealing a Multi-Coloured Slate Tiled Kitchen Floor
I came back the next day and checked the moisture levels of the tiles using a damp meter. The floor had dried well so I had a green light for applying a new sealer. For this I used four Coats of Tile Doctor Seal and Go, allowing each coat to dry before applying the next. This product works really well on Slate and gave the tiles a nice sheen finish, the fresh sealer will also make maintenance cleaning far easier in the future.
The client was very happy with the result, the floor now looks great and the natural colours of the stone is so much more evident. For aftercare I recommended they throw away all those supermarket products and use Tile Doctor Neutral Tile Cleaner which is a pH neutral product that won’t prematurely erode the new sealer with use.
Jonathan Oldham
South Middlesex Tile Doctor
Find the right local pro for your project
 KCBR Design | Remodel
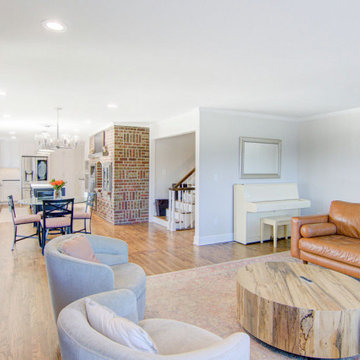
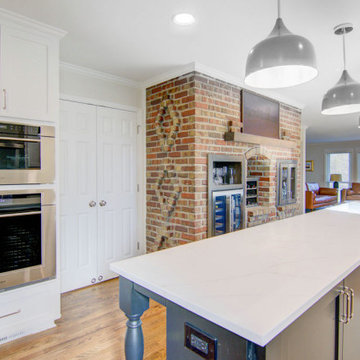
In this Modern Rustic Farmhouse kitchen remodel, discover a perfect blend of modern convenience and timeless charm. The kitchen showcases a captivating combination of a white gloss ceramic tile backsplash with rustic brick accents, creating an inviting atmosphere. Enjoy the convenience of a 45" stainless steel workstation sink equipped with a Pre-Rinse Pull-Down Kitchen Faucet and Instant Hot Water Dispenser, perfect for culinary tasks. Custom cabinets offer ample storage while enhancing the rustic aesthetic. Adjacent to the kitchen, the pantry/laundry/mudroom provides practical amenities including coat hooks, lockers, and cozy bench seating, ensuring organization and comfort. Meanwhile, the bathroom exudes tranquility with serene white gloss ceramic tile shower walls and durable Calabasas Porcelain floor tile, completing the cohesive and welcoming ambiance of this thoughtfully designed space.
 Tile Doctor Ltd
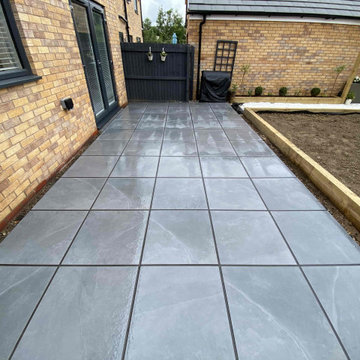
Earlier this summer I was called out to this job in the garden of a house in the city of Ely to inspect a freshly laid porcelain tiled patio with grout haze issues. The builder who had installed the patio hadn’t removed all the grout from the textured surface of the tile before it had dried. This was probably due to the hot weather which reduces drying times and has caught many tilers out. Multiple repeat visits by the builder trying followed who spent countless hours trying to remove the grout haze, unfortunately due to the textured surface of the tile he was unable to remove it and the patio was left looking awful.
Like the builder we are increasingly finding modern grouts, which although more durable, are very difficult to remove. Fortunately belonging to the Tile Doctor network, I had already been made aware of this problem and was able to offer a solution.
I arranged to pay the property a visit to demonstrate a potential solution and quote for resolving the issues. Even though the grout haze was indeed difficult to remove it wasn’t impossible if you know how. The demonstration came out well and relieved that they had finally found a solution to the problem booked me in to get the work carried out.
On my return I started with the application of a strong dilution of Tile Doctor Grout Clean-Up. This product is ideal for removing grout haze or smears as they often referred to; however, being acidic we don’t recommend it for use on every surface so if your using it yourself do check the label first. I left it to soak in for ten minutes before being agitated with a black scrubbing pad fitted to a rotary buffer
The weather was good, so it wasn’t a problem working outside and once all the grout smears were removed, I finished off by giving the whole patio a high-pressure rinse. I use a van mounted rinse/extraction system for this that applies warm water at high pressure onto the patio to dislodge dirt and then extracts the waste into a separate tank in the vehicle. It was an expensive investment but makes light work of jobs like this.
It took around four to five cleans to complete the job, by the late afternoon the grout haze was gone, and the porcelain patio looked completely transformed. It was quite a warm day, so the patio soon dried allowing my client to use it later that day. I should mention that this variety of Porcelain tiles were not the micro porous type and therefore did not need to be sealed.
Relieved the problem was finally resolved and happy with the result my client left the following feedback:
Amazing service, they were able to provide us with a quote and demo before we agreed to work. We are so happy with the results we have as our patio slabs looked ruined to the eye but the Tile Doctor managed to get them looking brand new.
Tom Conlon
Cambridge Tile Doctor
 Tile Doctor Ltd
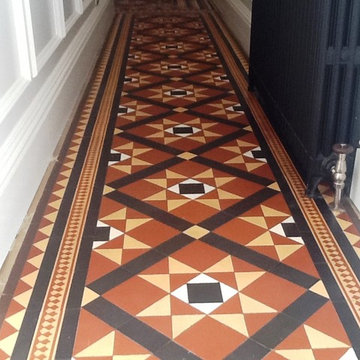
Here’s a job I completed just before Christmas last year, at a house in Northampton which has a rich history and mix of architectural styles. The run up to Christmas is always popular as people try to get their household projects finished off in time for celebrating the festive season with family so this is always a busy time for Tile Doctor.
The photos below show a neglected Victorian Quarry tiled floor in need of repair, with cracked tiles along the edges. These were caused by somebody in the past using brute force to remove carpet gripper rods which had been glued to the tiles. These cracks were present around the edges of the entire hallway, however; this particular type of tile is very hard to get hold of. Furthermore, it is a costly process to replace the tiles as the skirting boards would have had to have been removed.
As well as the physical issues the floor had a dull appearance due to the build-up of builder’s dust and the general wearing down of the paintwork over time. I agreed with the client that the best course of action would be to fill the tiles, and paint the damaged tiles using a colour that matched as close as possible. Many of my Tile Doctor colleagues would disagree with this approach opting to source the correct tile and rebuild the damaged section however unfortunately in this case we didn’t have the time or the budget.
My first action was to use a brush and vacuum to remove as much loose debris and dust as possible. I followed this by agitating the tiles with a dilution of Tile Doctor Pro Clean which is a strong alkaline product and safe to use on tile and stone. I use a combination of a coarse burnishing pad fitted to a rotary machine and hand held brushes, in order to get the floor clean. The resulting slurry was then rinsed and removed using a wet vacuum. This process was repeated twice followed by a thorough rinse to ensure any trace of cleaning agent had been removed and the floor neutralised.
As this was such an old property, I then used a steamer to heat up the tiles in order to draw out any contaminants and assist with the drying process. I installed a fan to dry the floor before starting repairs, mixing up some coloured grout and filling all holes and cracks along the edges, including the doormat area.
I allowed the coloured grout to dry overnight, before hand painting the black and Terracotta tiles. These were then given time to dry (about a couple of hours). Following this, I carefully painted in the other colours: brown and cream. The overall effect was quite convincing and you had to look very closely to notice.
Due to the fact that there were other tradesmen working in the house at the time, the floors were sheeted up to protect from additional dust and muck. I then left the house for a week, allowing the floor ample time to dry completely in preparation for sealing.
Upon my return, I took damp meter readings, and once satisfied with the dryness of the tiles, I began the sealing process with the impregnating, colour-enhancing sealer Tile Doctor Colour Grow. The sealer provides both durable surface protection and an aesthetically pleasing matte finish.
The below photos show how the product has enriched the colours with the two coats applied.
The process of restoring this wonderful Victorian Quarry tiled floor was certainly time consuming, but very rewarding. I am exceptionally pleased with the results myself, and my client couldn’t have been happier and I’m sure the newly revitalised hallway will have been a talking point for all their visitors during the Christmas break.
Phil Vissian
Northamptonshire Tile Doctor
 KCBR Design | Remodel
In this Modern Rustic Farmhouse kitchen remodel, discover a perfect blend of modern convenience and timeless charm. The kitchen showcases a captivating combination of a white gloss ceramic tile backsplash with rustic brick accents, creating an inviting atmosphere. Enjoy the convenience of a 45" stainless steel workstation sink equipped with a Pre-Rinse Pull-Down Kitchen Faucet and Instant Hot Water Dispenser, perfect for culinary tasks. Custom cabinets offer ample storage while enhancing the rustic aesthetic. Adjacent to the kitchen, the pantry/laundry/mudroom provides practical amenities including coat hooks, lockers, and cozy bench seating, ensuring organization and comfort. Meanwhile, the bathroom exudes tranquility with serene white gloss ceramic tile shower walls and durable Calabasas Porcelain floor tile, completing the cohesive and welcoming ambiance of this thoughtfully designed space.
 Carpet Cleaning Pros
Carpet Cleaning Pros
Obtain your totally free Carpet Cleaning Quote Today! Serving all locations in Johannesburg City
Your carpetings experience a lot of damage and need to be skillfully cleansed at least yearly.
We clean much more than simply rugs! We can aid with furniture, mattresses, workplace chairs, deodorising and also a lot more!
Carpet Cleaning Pros is Johannesburg City leading carpet cleaning company. We head out of our means to provide superb customer care and also professional carpet and furniture cleaning services.
We run throughout Johannesburg City so give us a call currently!
Carpet Cleaning Pros
Address: Shop 8, 406 Southern Klipriviersberg Rd, Steeledale, Johannesburg City, 2197
087 250 0268
Website: https://www.carpetcleaningpros.co.za/
Social Media: https://www.facebook.com/Carpet-Cleaning-Pros-105599832051569 https://www.youtube.com/channel/UCb0lO04xmlg0s8X0bWSIAqQ/ https://za.pinterest.com/parpetcleaningpros/
Carpet Cleaning Pros - Carpet Cleaning in Johannesburg City. Carpet Cleaning Pros South Africa - Fast, Affordable, Free Quotes. Quick results, remove stains, restore to new. Serving all areas in South Africa, Durban, Cape Town, Joburg, Pretoria.
The Carpet Cleaning Pros Special Technique
Carpet Cleaning Pros uses our own unique technique for specialist carpet cleaning:
Pre-clean examination. Prior to cleaning your carpets or upholstery, our experts inspect the location for discolorations, tracked-in dust and also locations of problem.
Pre-clean treatment. Based on the pre-clean assessment, your carpet cleaning pro will certainly treat any kind of spots to eliminate stubborn dirt. We likewise deal with woollen carpets with a brownout solution.
Specialist cleaning. This is where the magic takes place. Using our specialized equipment as well as high-tech solutions, we expertly deep clean your carpets or furniture.
Rinsing. Our rinsing stage gets rid of the cleaning service and any kind of continuing to be accumulation.
Deodorizing. We will deal with the location with our special ventilating option if you require your rugs or upholstery deodorised.
Quick-dry. With our special method, your rugs as well as upholstery will be completely dry prior to you understand it!
Carpet Cleaning Johannesburg City
Did you recognize that you should have your carpetings professionally cleansed a minimum of once a year?
Your rugs hold any kind of dust, dirt, germs as well as allergens that people track in, as well as specialist cleaning can remove all this.
Over time, carpets can create an undesirable smell.
We will skillfully clean your carpets promptly and also efficiently, and also they'll be completely dry within a couple of hours!
It's less expensive than you believe so call currently for a totally free quote!
Office Chair and Furniture Cleaning Johannesburg City
Workplace chairs, couches and also other soft furniture can obtain very unclean.
Don't enable your consumers to obtain the incorrect impact of your workplace, as well as get your carpetings and furnishings cleansed on a regular basis.
Our expert cleaning will get rid of dirt, stains as well as irritants for a healthy workplace.
Call us right here for a free quote!
Upholstery Cleaning Johannesburg City
Sofas, curtains, drapes, area rugs, and also furniture with upholstery all require normal, specialist cleaning.
This not just keeps them clean and hygienic, but additionally extends their life-span.
Visit this site for a totally free quote for upholstery cleaning.
Bed as well as Mattress Cleaning Johannesburg City
Your bed and cushion has a great deal of hidden dust that is unclean and can also make you ill.
After a short while, a brand-new mattress will contain dead skin cells, sweat, dander, dirt, dirt and also various other toxic irritants. This can make your allergic reactions flare as well as supply an unclean sleeping place.
The good news is that regular mattress cleaning can prevent this.
Call right here to reserve a specialist mattress cleaning.
Office, Church, Synagogue as well as Mosque Cleaning
Carpet Cleaning Pros uses professional office, mosque, synagogue and also church cleaning.
These buildings all see a lot of traffic through their doors. Rugs can soon get upholstered and unclean chairs as well as benches can become discolored and unhygienic.
We provide economical prices for cleaning workplaces, mosques, churches and also synagogues. We run throughout Johannesburg City and will involve you!
To reserve your professional cleaning, go here.
Ventilating
Carpet Cleaning Pros additionally uses specialist ventilating services.
Deodorising can be very effective in a variety of circumstances:
Pet dog messes. Cat pee is specifically potent-smelling as well as can be tough to get out on your own. Our expert deodorising can remove offensive family pet mess smells.
Water damage. If your carpets have been water damaged, the trapped water in the carpets can end up being moudly and also smelly. Specialist deodorising can clean and then remove the scent.
Old carpets. Rather of ripping them up you may desire to maintain them if your carpets are old however still in excellent adequate condition to continue making use of. A professional clean and deodorising can eliminate moldy smells from old rugs.
Food splashes. Mistakenly spilt food on your carpets? Obtain them deodorised and smelling like new!
Sick spaces. It will be almost difficult to remove the scent on your very own if someone has actually thrown up on your carpets. We will professionally deep clean and afterwards deodorise the location, making it as if it never happened!
Obtain your totally free Carpet Cleaning Quote Today! Based on the pre-clean examination, your carpet cleaning pro will treat any kind of discolorations to remove persistent dust. Utilizing our specialist devices as well as high-tech options, we professionally deep clean your carpetings or furniture.
If your carpets have actually been water harmed, the trapped water in the carpets can end up being moudly and also stinky. A professional clean as well as deodorising can get rid of mildewy smells from old rugs.
 Tile Doctor Ltd
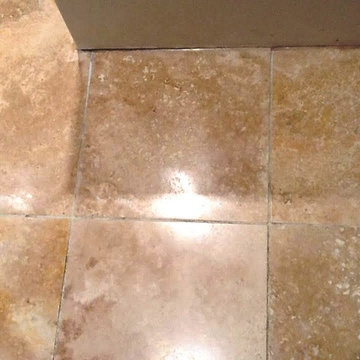
Earlier this month I was in the town of Northampton, to see a client who had reported a problem with her Travertine kitchen tiles. Basically the grout between the tiles was badly stained, to the point of appearing almost black.
The Travertine tiles were also in need of some maintenance, and so I was commissioned to provide a clean, polish and a fresh seal. Travertine is a popular choice for kitchen flooring due to its relatively high durability and distinct features. My task was to get this floor back to looking its best.
My priority was to address the badly stained grout so I cleaned the grout lines by hand using a combination of hand brushes and Tile Doctor Grout Clean-Up. The surface was pre-wet with water, before a solution of Grout-Clean Up and clean water was applied to the surface. The brushes were then used to agitate the solution. Grout Clean-Up contains a mix of concentrated phosphoric acid and cleaner designed to penetrate below the surface of the grout to remove grout stains, smears and mineral deposits.
As you can see from the photos, Grout Clean-Up made an immediate difference to the appearance of the tiles. This product is suitable for use on masonry and acid resistant surfaces. After completing the clean, I gave the floor a thorough rinse to neutralise the floor after cleaning and removed as much of the water as possible using a wet vacuum.
Following this, I paid attention to the tiles themselves, cleaning them to achieve a polished effect by using a system of burnishing pads. Tile Doctor burnishing pads comprise a set of four pads varying in grit type, from Coarse and Medium to Fine and Very Fine. I applied all four pads in turn to the floor, stopping to rinse the floor in between each. The result was a high quality polished finish.
I then left the floor to dry completely overnight, before commencing the seal the next day. My choice of sealing product was Tile Doctor Colour Grow which is a colour intensifying sealer that both enhances the natural appearance of the stone and provides a durable surface seal.
My client was very pleased with the finished product, and left the following comment on the Tile Doctor feedback system: “efficiently done”, yielding “good results”.
Phil Vissian
Northamptonshire Tile Doctor
 KCBR Design | Remodel
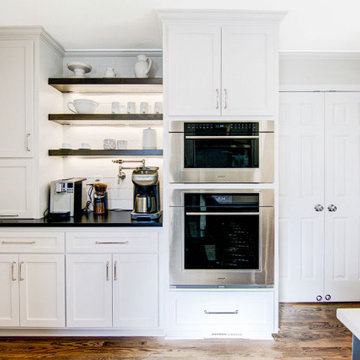
In this Modern Rustic Farmhouse kitchen remodel, discover a perfect blend of modern convenience and timeless charm. The kitchen showcases a captivating combination of a white gloss ceramic tile backsplash with rustic brick accents, creating an inviting atmosphere. Enjoy the convenience of a 45" stainless steel workstation sink equipped with a Pre-Rinse Pull-Down Kitchen Faucet and Instant Hot Water Dispenser, perfect for culinary tasks. Custom cabinets offer ample storage while enhancing the rustic aesthetic. Adjacent to the kitchen, the pantry/laundry/mudroom provides practical amenities including coat hooks, lockers, and cozy bench seating, ensuring organization and comfort. Meanwhile, the bathroom exudes tranquility with serene white gloss ceramic tile shower walls and durable Calabasas Porcelain floor tile, completing the cohesive and welcoming ambiance of this thoughtfully designed space.
 Tile Doctor Ltd
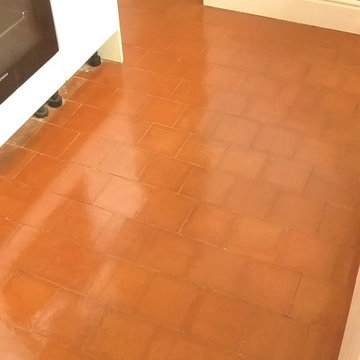
Here’s a job I recently completed in the heartland of the English pottery industry, Stoke-on-Trent. In this particular instance I was commissioned by my client to restore the appearance of the Quarry tiled floor in her kitchen which as you can see from the photo below was far from looking it’s best. Quarry tiles are typically a very hard wearing stone, but in high traffic areas like a kitchen, even this type of tile will require regular maintenance.
My first task, before beginning the restoration, was to remove the kickboards from around the bottom of the kitchen units, to prevent them from being damaged during the process. The next step was to acid wash the tiles using Tile Doctor Grout Clean-Up which was scrubbed into the tiles to remove old grout and plaster that had become stuck to the surface of the tiles at some point in the past. Once this had done its job I rinsed the entire floor with water washing away the excess soiled residue and any trace of acid.
The next step was to give the tiles a good clean using Tile Doctor Pro Clean, which is a high alkaline cleaner suitable for use on a range of natural stone floors. This was left to dwell on the tiles for ten minutes, allowing it time to seep into the stone to get underneath – and lift out – the ingrained dirt. I then agitated the solution with a scrubbing brush to remove the muck from the surface of the tiles. The floor was then given another rinse with water, and this was extracted using a wet vacuum.
I left the floor to dry after cleaning for more than 24 hours, making sure that it would be ready for sealing the next day. Upon my return to the house I checked the floor was dry and then sealed the floor using four coats of Tile Doctor Seal & Go, which provides a robust surface seal and a durable low-sheen finish. The product is suitable for use on internal, unsealed, porous surfaces.
The photographs above bears witness to the massive improvement which has been made to the quarry tiles, which has not only completely transformed the look of the tiles but also the appearance of the kitchen.
Trevor Preece
Staffordshire Tile Doctor
 Tile Doctor Ltd
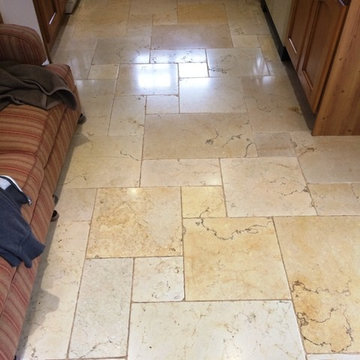
Polished stone floors will lose their shine over time depending on the amount of wear and cleaning products used and this Travertine Tiled Floor in Lower Woodrow had basically experienced this problem. The solution is to burnish the floor with diamond encrusted pads, a process that will remove any dirt and bring back the polish.
We started by smothering the floor is a mild dilution of Tile Doctor Pro-Clean and left it to dwell for ten minutes. We then scrubbed the grout lines using a stiff grout brush to get the grout clean. Next we fitted a course diamond burnishing pad to a rotary machine and slowly burnished each and every tile. We then extracted the slurry using a wet vacuum and rinsed. We continued this procedure with the medium, fine and very fine pads rinsing in-between until the shine had been restored. We then left the floor overnight to dry.
Upon our return we sealed the floor using Tile Doctor Colour Grow which is an impregnating sealer that soaks into he pores of the stone protecting it from within and enhancing the natural colours in the stone. Once the seal had dried I used a white buffing pad attached to the rotary machine and buffed the travertine to a nice shine.
Stuart Ford
Wiltshire Tile Doctor
 KCBR Design | Remodel
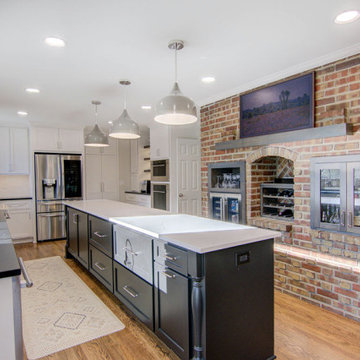
In this Modern Rustic Farmhouse kitchen remodel, discover a perfect blend of modern convenience and timeless charm. The kitchen showcases a captivating combination of a white gloss ceramic tile backsplash with rustic brick accents, creating an inviting atmosphere. Enjoy the convenience of a 45" stainless steel workstation sink equipped with a Pre-Rinse Pull-Down Kitchen Faucet and Instant Hot Water Dispenser, perfect for culinary tasks. Custom cabinets offer ample storage while enhancing the rustic aesthetic. Adjacent to the kitchen, the pantry/laundry/mudroom provides practical amenities including coat hooks, lockers, and cozy bench seating, ensuring organization and comfort. Meanwhile, the bathroom exudes tranquility with serene white gloss ceramic tile shower walls and durable Calabasas Porcelain floor tile, completing the cohesive and welcoming ambiance of this thoughtfully designed space.
 Tile Doctor Ltd
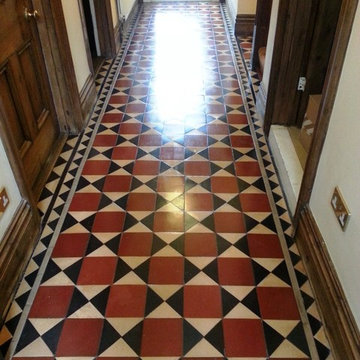
Recently I was contacted by a man in the town of Bedford who was worried that he had damaged his Victorian tiled hallway as a result of dragging a piano across the floor. I went round to the property to get a better look at the problem and, on closer inspection, realised that the tiles were actually fine; however, the piano had torn through the old surface seal.
The 150-year old tiles, dating back – as the name suggests – to the reign of Queen Victoria, had been poorly sealed and additionally had not been maintained correctly with the appropriate cleaning products. I was commissioned to remove the old sealer, clean and re-seal in order to restore this fantastic floor to its former glory.
My first task was to mix a solution of Tile Doctor Pro-Clean and water, which was then spread across the floor. Pro-Clean is a high alkaline cleaner which also contains stripping properties and this helped to break down the old, damaged sealer. The solution was left to dwell for approximately 20 minutes, giving it time to seep into the stone to get underneath, and lift out, any ingrained dirt. Pro-Clean was worked into the tiles using a heavy low speed rotary machine fitted with a black pad.
Once cleaned and stripped, we rinsed the floor using plain, clean water to neutralise the high alkaline Pro-Clean and the removed the resulting slurry using a wet-vac machine.
At this point I noticed that the white/magnolia tiles were particularly well worn and still very dirty and in need of further cleaning. Around this time Tile Doctor had also been discussing the successful use of Burnishing Pads (normally used on polished stone) on Victorian Tiles so I hand burnished the most stained tiles with a small 6 inch diamond encrusted burnishing pad with a little water to help lubricate the process. Following this, I rinsed the entire floor once again.
After leaving the floor to dry for four days, I returned to the house to seal the tiles opting to apply a single coat of Tile Doctor Colour Grow impregnating sealer first followed up with four coats of Tile Doctor Seal & Go. This combination of sealers provides a durable internal and surface stain protection whilst lifting the colours and adding a nice subtle sheen finish.
Once dried and cured, the floor was buffed using micro-fibre clothes to further enhance the appearance of the tiles further. My client was very pleased with the results, and couldn’t believe it was possible to get a floor that was so old appear brand new! The floor will dull with wear so I advised my client on the benefits of a regular maintenance plan going forward to ensure this great flooring feature remains in top condition.
Andrew Evans
Bedfordshire Tile Doctor

 Tile Doctor Ltd
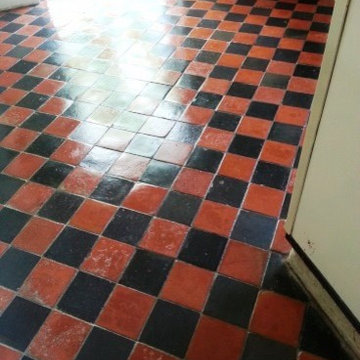
We were asked to restore a beautiful Victorian tiled floor at a house in the small village of Sharnbrook, Bedfordshire. The floor had been badly treated for many years until new occupiers decided to restore it.
The area comprised of a Pantry, Loo, Lobby, Dining room, Kitchen and Conservatory, we had several problems to deal with including some tiles that were loose, some had cement on them and the dining room floor had the remnants of a coir rug stuck to the surface.
Having moved all the furniture we started from the far end pre-treating the coir matted dining room tiles by soaking them in a strong dilution of Tile Doctor Pro-Clean; leaving them to soak in this way would soften up the matting and enabled us to remove the debris more easily with a scrapper by the time we got to the dining room.
We then started on the rest of the floor again using a strong dilution of Tile Doctor Pro-Clean which was left to dwell on the tile for ten minutes before being worked in using a scrubbing pad until any remaining old sealer was stripped off the tile the tiles were clean.
For the tiles which were covered in cement we treated them with an acid rinse using Tile Doctor Grout Clean-Up, being an acid you have to take care and wear appropriate personal protection and not to leave the acid on the tile for too long. It was satisfying however to watch the cement fizz away to reveal the beautiful tile below.
Once everything was stripped and the floor clean we gave the tiles a thorough rinse and extracted as much water from the floor as possible before installing a number of and air movers to speed up the drying process.
Whilst the floor was drying our attention moved onto the replacement of the lose tiles and re-adhering them to the floor. This was a straight forward job using tile adhesive and matching grout and we then left to allow the floor to dry out thoroughly.
We returned seven days later and took more damp readings, these all read ok so we proceeded to seal the floor. First we used a coat of Tile Doctor Colour Grow which is an impregnating sealer the gets into the pores of the tile protecting it from within and also enhancing the colours in the tile in the process; this was then followed with four coats of Tile Doctor Seal and Go to leave a high shine finish as requested by the client.


 KCBR Design | Remodel
In this Modern Rustic Farmhouse kitchen remodel, discover a perfect blend of modern convenience and timeless charm. The kitchen showcases a captivating combination of a white gloss ceramic tile backsplash with rustic brick accents, creating an inviting atmosphere. Enjoy the convenience of a 45" stainless steel workstation sink equipped with a Pre-Rinse Pull-Down Kitchen Faucet and Instant Hot Water Dispenser, perfect for culinary tasks. Custom cabinets offer ample storage while enhancing the rustic aesthetic. Adjacent to the kitchen, the pantry/laundry/mudroom provides practical amenities including coat hooks, lockers, and cozy bench seating, ensuring organization and comfort. Meanwhile, the bathroom exudes tranquility with serene white gloss ceramic tile shower walls and durable Calabasas Porcelain floor tile, completing the cohesive and welcoming ambiance of this thoughtfully designed space.
 Studio IQL
Sam Oberter Photography
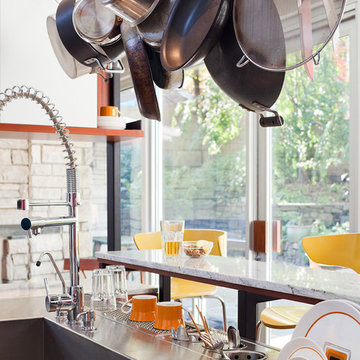
Example of a mid-sized 1960s galley open concept kitchen design in Philadelphia with a drop-in sink, flat-panel cabinets, white cabinets, wood countertops, beige backsplash, stone tile backsplash, stainless steel appliances and an island
Example of a mid-sized 1960s galley open concept kitchen design in Philadelphia with a drop-in sink, flat-panel cabinets, white cabinets, wood countertops, beige backsplash, stone tile backsplash, stainless steel appliances and an island
27