
Search results for "Forward thinking approach" in Home Design Ideas

 Gallery KBNY
Our clients occupied the first two floors of this Manhattan townhouse, converted to condos with coveted access to the outdoors via a patio. The overall space had been well-maintained, but was dated and didn't necessarily reflect the aesthetic of our clients. Our goal was to brighten the home with character alongside modern elements.
In addition to a full kitchen renovation, this Manhattan townhouse renovation included installing new flooring; retiling and installing new fixtures in the bathroom and powder room; painting the walls; updating the staircase; renovating all the doors, including closets and to the back patio; and installing new lighting fixtures.
EYE-CATCHING KITCHEN
The kitchen in this Manhattan townhouse renovation is a galley-style space attached to the dining room. We wanted to connect the two in a more cohesive manner, so we built custom banquette seating benches in the dining room, with the table in the center acting as both a connector and divider.
Light wainscoting on the base of the walls and wallpaper above contrast against the bright orange benches and ultra-modern light fixture. Gray Shaker-style cabinets and a true herringbone backsplash are paired with a farmhouse sink set in white quartz countertops for a contemporary take on farmhouse style.
TOWNHOUSE CHARACTER
For the aesthetic in this Manhattan townhouse, we combined elements of a variety of design styles: farmhouse in the kitchen, transitional in the bathroom, touches of modern throughout. But the one factor shared by all is the charm of character. Retaining and refining that classic character was important to our clients.
Our extensive experience in renovating townhouses and brownstones in New York, including our gut renovation of this landmarked townhome in Hudson Square and this brownstone in Bed-Stuy, we were able to provide our clients with the confidence and clarity needed when entering these types of highly specific renovation projects.
SOME HIGHLIGHTS
- New select white oak flooring throughout
- White gloss penny tiles and black grout in the powder room
- Wraparound built-in banquette seating in the dining room
- Newly exposed brick wall in hallway leading out to patio, painted white for fresh contrast
Thinking about renovating your townhouse? We are a design-and-build firm with a full-scale approach that handles every single aspect of your townhouse renovation, from filing permits to sourcing materials and everything in between. Contact us today to find out how you can benefit from our expertise in remodeling New York City townhomes and brownstones.
 Gallery KBNY
Our clients occupied the first two floors of this Manhattan townhouse, converted to condos with coveted access to the outdoors via a patio. The overall space had been well-maintained, but was dated and didn't necessarily reflect the aesthetic of our clients. Our goal was to brighten the home with character alongside modern elements.
In addition to a full kitchen renovation, this Manhattan townhouse renovation included installing new flooring; retiling and installing new fixtures in the bathroom and powder room; painting the walls; updating the staircase; renovating all the doors, including closets and to the back patio; and installing new lighting fixtures.
EYE-CATCHING KITCHEN
The kitchen in this Manhattan townhouse renovation is a galley-style space attached to the dining room. We wanted to connect the two in a more cohesive manner, so we built custom banquette seating benches in the dining room, with the table in the center acting as both a connector and divider.
Light wainscoting on the base of the walls and wallpaper above contrast against the bright orange benches and ultra-modern light fixture. Gray Shaker-style cabinets and a true herringbone backsplash are paired with a farmhouse sink set in white quartz countertops for a contemporary take on farmhouse style.
TOWNHOUSE CHARACTER
For the aesthetic in this Manhattan townhouse, we combined elements of a variety of design styles: farmhouse in the kitchen, transitional in the bathroom, touches of modern throughout. But the one factor shared by all is the charm of character. Retaining and refining that classic character was important to our clients.
Our extensive experience in renovating townhouses and brownstones in New York, including our gut renovation of this landmarked townhome in Hudson Square and this brownstone in Bed-Stuy, we were able to provide our clients with the confidence and clarity needed when entering these types of highly specific renovation projects.
SOME HIGHLIGHTS
- New select white oak flooring throughout
- White gloss penny tiles and black grout in the powder room
- Wraparound built-in banquette seating in the dining room
- Newly exposed brick wall in hallway leading out to patio, painted white for fresh contrast
Thinking about renovating your townhouse? We are a design-and-build firm with a full-scale approach that handles every single aspect of your townhouse renovation, from filing permits to sourcing materials and everything in between. Contact us today to find out how you can benefit from our expertise in remodeling New York City townhomes and brownstones.

 Roeser Home Remodeling
This active, forward-thinking couple bought a new house in order to “right-size” for the next chapter in their lives. They found a ranch home in a neighborhood they liked, but the floor plan needed a remodel in order to fit their lifestyle.
Two small bedrooms were combined in order to make one large master. The existing living room and garage were combined to make one large living space. The floor of the garage was raised to be on an equal plane to the existing living room. Hardwood was added to match the existing flooring and then all was refinished for a fresh look.
A large ViWinco Bay Window was added where the garage door once was, and a Velux Solar Skylight was installed to add to the natural sunlight coming from the bay. Custom built-ins lined the furthest wall for storage and closet space. Sliding doors were installed as an entrance and exit to the back of the existing house.
A new extended length garage was added for the owner’s vehicles with spare room for the homeowners brewing experiments. Azek window and door trim surrounded the newly installed ViWinco windows along with Cedar Siding mimicking the house. Liftmaster Garage Doors were installed with dual controls for the car and a spare for safety and easy entry.
Hangout for Grandchildren
These two people are much too busy with their jobs and their many hobbies, from beer brewing, to gardening, and everything in between. But they needed a place where grandchildren could hang out and watch a movie when they came to visit. A part of their basement was finished into a perfect space with a lot of storage for games, books, movies and any other toys or crafts that may need to be stored for frequent visits. Custom bookshelves lined two walls and one was designed for the television and all its components. The area was carpeted and a hall was created with tile to another storage cabinet for linens. A nice basement bathroom was created opposite to the laundry area.
Basement Bathroom Remodel
A Sterling Accord, 60” Seated Shower was installed in the bathroom with a Moen 4-functioning massaging hand shower with slide bar for the shower feature. A Wellborn select vanity was selected with upgraded solid wood, dovetail drawers. Moen’s hardware on the cabinets compliments the brushed nickel plumbing fixtures in Moen’s Voss Series.
The Highline Kohler comfort height toilet, along with the Grip-tight Cachet seat added to the practicality, along with the beauty of this basement bath. A Verdera Kohler mirrored cabinet was installed, giving this homeowner more storage for all those bathroom essentials.
Kohler was also installed in this remodel, as the Caxton sink is a bathroom favorite among many of our clients.
The Caesar stone countertop in Urban Safari, along with the 12” X 12” Castelbianco Nasino Ivory tile flooring, softens the look and brings it all together. This wonderful couple can now concentrate on their gardening and savoring the long days of summer.
Find the right local pro for your project
 Gallery KBNY
Our clients occupied the first two floors of this Manhattan townhouse, converted to condos with coveted access to the outdoors via a patio. The overall space had been well-maintained, but was dated and didn't necessarily reflect the aesthetic of our clients. Our goal was to brighten the home with character alongside modern elements.
In addition to a full kitchen renovation, this Manhattan townhouse renovation included installing new flooring; retiling and installing new fixtures in the bathroom and powder room; painting the walls; updating the staircase; renovating all the doors, including closets and to the back patio; and installing new lighting fixtures.
EYE-CATCHING KITCHEN
The kitchen in this Manhattan townhouse renovation is a galley-style space attached to the dining room. We wanted to connect the two in a more cohesive manner, so we built custom banquette seating benches in the dining room, with the table in the center acting as both a connector and divider.
Light wainscoting on the base of the walls and wallpaper above contrast against the bright orange benches and ultra-modern light fixture. Gray Shaker-style cabinets and a true herringbone backsplash are paired with a farmhouse sink set in white quartz countertops for a contemporary take on farmhouse style.
TOWNHOUSE CHARACTER
For the aesthetic in this Manhattan townhouse, we combined elements of a variety of design styles: farmhouse in the kitchen, transitional in the bathroom, touches of modern throughout. But the one factor shared by all is the charm of character. Retaining and refining that classic character was important to our clients.
Our extensive experience in renovating townhouses and brownstones in New York, including our gut renovation of this landmarked townhome in Hudson Square and this brownstone in Bed-Stuy, we were able to provide our clients with the confidence and clarity needed when entering these types of highly specific renovation projects.
SOME HIGHLIGHTS
- New select white oak flooring throughout
- White gloss penny tiles and black grout in the powder room
- Wraparound built-in banquette seating in the dining room
- Newly exposed brick wall in hallway leading out to patio, painted white for fresh contrast
Thinking about renovating your townhouse? We are a design-and-build firm with a full-scale approach that handles every single aspect of your townhouse renovation, from filing permits to sourcing materials and everything in between. Contact us today to find out how you can benefit from our expertise in remodeling New York City townhomes and brownstones.
 Gallery KBNY
Our clients occupied the first two floors of this Manhattan townhouse, converted to condos with coveted access to the outdoors via a patio. The overall space had been well-maintained, but was dated and didn't necessarily reflect the aesthetic of our clients. Our goal was to brighten the home with character alongside modern elements.
In addition to a full kitchen renovation, this Manhattan townhouse renovation included installing new flooring; retiling and installing new fixtures in the bathroom and powder room; painting the walls; updating the staircase; renovating all the doors, including closets and to the back patio; and installing new lighting fixtures.
EYE-CATCHING KITCHEN
The kitchen in this Manhattan townhouse renovation is a galley-style space attached to the dining room. We wanted to connect the two in a more cohesive manner, so we built custom banquette seating benches in the dining room, with the table in the center acting as both a connector and divider.
Light wainscoting on the base of the walls and wallpaper above contrast against the bright orange benches and ultra-modern light fixture. Gray Shaker-style cabinets and a true herringbone backsplash are paired with a farmhouse sink set in white quartz countertops for a contemporary take on farmhouse style.
TOWNHOUSE CHARACTER
For the aesthetic in this Manhattan townhouse, we combined elements of a variety of design styles: farmhouse in the kitchen, transitional in the bathroom, touches of modern throughout. But the one factor shared by all is the charm of character. Retaining and refining that classic character was important to our clients.
Our extensive experience in renovating townhouses and brownstones in New York, including our gut renovation of this landmarked townhome in Hudson Square and this brownstone in Bed-Stuy, we were able to provide our clients with the confidence and clarity needed when entering these types of highly specific renovation projects.
SOME HIGHLIGHTS
- New select white oak flooring throughout
- White gloss penny tiles and black grout in the powder room
- Wraparound built-in banquette seating in the dining room
- Newly exposed brick wall in hallway leading out to patio, painted white for fresh contrast
Thinking about renovating your townhouse? We are a design-and-build firm with a full-scale approach that handles every single aspect of your townhouse renovation, from filing permits to sourcing materials and everything in between. Contact us today to find out how you can benefit from our expertise in remodeling New York City townhomes and brownstones.
 Gallery KBNY
Our clients occupied the first two floors of this Manhattan townhouse, converted to condos with coveted access to the outdoors via a patio. The overall space had been well-maintained, but was dated and didn't necessarily reflect the aesthetic of our clients. Our goal was to brighten the home with character alongside modern elements.
In addition to a full kitchen renovation, this Manhattan townhouse renovation included installing new flooring; retiling and installing new fixtures in the bathroom and powder room; painting the walls; updating the staircase; renovating all the doors, including closets and to the back patio; and installing new lighting fixtures.
EYE-CATCHING KITCHEN
The kitchen in this Manhattan townhouse renovation is a galley-style space attached to the dining room. We wanted to connect the two in a more cohesive manner, so we built custom banquette seating benches in the dining room, with the table in the center acting as both a connector and divider.
Light wainscoting on the base of the walls and wallpaper above contrast against the bright orange benches and ultra-modern light fixture. Gray Shaker-style cabinets and a true herringbone backsplash are paired with a farmhouse sink set in white quartz countertops for a contemporary take on farmhouse style.
TOWNHOUSE CHARACTER
For the aesthetic in this Manhattan townhouse, we combined elements of a variety of design styles: farmhouse in the kitchen, transitional in the bathroom, touches of modern throughout. But the one factor shared by all is the charm of character. Retaining and refining that classic character was important to our clients.
Our extensive experience in renovating townhouses and brownstones in New York, including our gut renovation of this landmarked townhome in Hudson Square and this brownstone in Bed-Stuy, we were able to provide our clients with the confidence and clarity needed when entering these types of highly specific renovation projects.
SOME HIGHLIGHTS
- New select white oak flooring throughout
- White gloss penny tiles and black grout in the powder room
- Wraparound built-in banquette seating in the dining room
- Newly exposed brick wall in hallway leading out to patio, painted white for fresh contrast
Thinking about renovating your townhouse? We are a design-and-build firm with a full-scale approach that handles every single aspect of your townhouse renovation, from filing permits to sourcing materials and everything in between. Contact us today to find out how you can benefit from our expertise in remodeling New York City townhomes and brownstones.
 Advance Design Studio, Ltd.
Richard and Monica of Huntley, IL, needed to make better use of their kitchen as well as more storage for pots, pans, and countertop appliances. Their space was laid out unconventionally, making cooking a challenge. A triangular nook held their refrigerator, hard-to-reach cabinets, and a cramped pantry. They needed to find a solution, so they searched Facebook for home remodeling companies in their area. Soon they found Advance Design Studio’s profile and were immediately impressed.
“Advance Design was the first and last studio I contacted,” Richard said.
Richard called Advance Design and felt an immediate connection with Project Designer Nicole. She was knowledgeable and thorough and offered many unique solutions to their kitchen layout problem.
A week later, Nicole came out to their home to meet the couple. They talked about their kitchen remodeling project and told Nicole what they wanted in their dream kitchen. Nicole saw that the kitchen had weird angles that hindered the cabinets you could use. She knew that designing a space that met both the client’s needs and dreams would be challenging.
Nicole worked with Richard and Monica to create an innovative design. When the couple came out to Advance Design Studio in Gilberts, they were blown away by the 3D illustrations Nicole showed them.
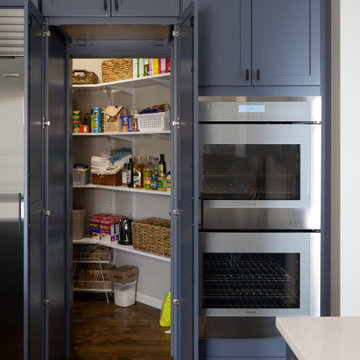
“I incorporated a hidden pantry cabinet to not only be a cool feature but also allowed me to square off the walls to gain more cabinet space,” Nicole said.
The hidden pantry added storage and squared off the strange triangular nook, creating a more traditional and functional kitchen layout. With the layout problems solved, they worked together to select materials. Richard and Monica wanted something brighter than their previous dark brown kitchen. They chose a combination of blue and white cabinetry with a white subway tile backsplash and white quartz countertops. The design was finalized, the materials were selected. It was time to begin construction.
One fear most homeowners have when beginning a home remodel is dust. Advance Design uses BuildClean HEPA filters to eliminate dust throughout the house while construction is going on. Project Manager Jason and his crew created temporary walls and cleaned up after every day of work.
“We were very impressed with how clean and organized the crew kept things while the remodeling process was underway,” Richard said.
The result is just what Richard and Monica envisioned when they began the process. Richard’s love for cooking can be explored through all-new Thermador appliances, featuring an easy-to-use induction cooktop, built-in double oven, and spacious refrigerator. Matte black hardware contrasts the bright white backsplash, countertops, and cabinets, while the stunning blue cabinets complement the dark hardwood floor and stainless-steel appliances. The dual pendant light fixtures over the reconfigured island are eye-catching and add necessary lighting.
This Huntley kitchen renovation turned out better than Richard and Monica hoped. Their experience with Advance Design’s Common Sense Remodeling process has them thinking about other projects they could do in the future.
Our award-winning design team would love to create a beautiful, functional, and spacious place for you and your family. With our “Common Sense Remodeling” approach, the process of renovating your home has never been easier. Contact us today at 847-665-1711 or schedule an appointment.


 ROAM Architecture
Detail of LED wall sconce with white glass tile background
Inspiration for a small contemporary kids' white tile and glass tile porcelain tile and gray floor alcove bathtub remodel in New York with flat-panel cabinets, dark wood cabinets, a two-piece toilet, green walls and an integrated sink
Inspiration for a small contemporary kids' white tile and glass tile porcelain tile and gray floor alcove bathtub remodel in New York with flat-panel cabinets, dark wood cabinets, a two-piece toilet, green walls and an integrated sink
 Rhodes Architecture + Light
Cost : Withheld at Owner’s Request
6880 Square Feet New and Renovated
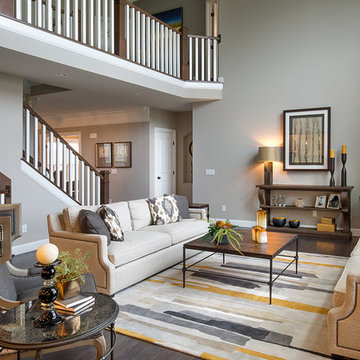
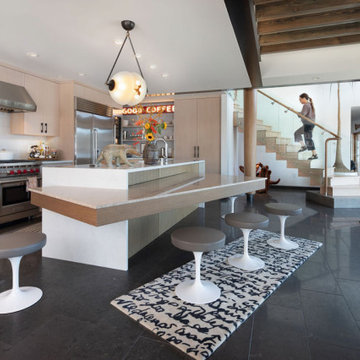
The renovation of an extensive linear residence and site facing Port Orchard waterway embraces water, greenspace and forested hillside. The home, completed this fall, serves as an artist’s studio, galleries, family space, game room, outdoor living areas and peaceful retreat.
New interiors and exterior spaces and finishes, cabinetry, lighting, paving, landscape and courtyards become settings for the owner’s art + collections, three-generations of family and the wonderful colors and textures of the land + water.
Inside, a monumental central stair and tapered two-story tall red cedar and steel column was designed as the residence’s entry focal point and internal landmarks, guiding the visitor’s eye to the main atrium…. and upward. Heavy wide-flange steel moment frames support the house and enable whole walls of glass. Rough, mill-finished steel contrasts refined cabinetry, stone, wood structure and defining dropped ceilings, reflecting the opener’s love of the tension between highly polished and detailed + rough, found art.
Outside, A new southern “dining room” was designed for warm summer evening gatherings under a heavy-timber trellis. The focus, opposite water and island views, is a metal perforated screen. The final screen is composed of the lyrics from a Joe Cocker song of great meaning to the owners, cut from ½” marine bronze, set into dark-fired brick. “Oh My Darling, Be Home Soon….”
Natural daylight and high-efficiency lighting are central players as in any gallery. From a high clerestory and extensive southern and eastern window-walls to carefully selected up-lighting, pendants, and accent fixtures, Rhodes Architecture + Light worked closely with the owner to ensure that their dark existing house would become one filled with light…. night and day.
The owners, Ken and Jane, allowed us to interview them about their experience working with Rhodes Architecture + Light, and how they are feeling about living with the architecture today.
What was your experience like, working with Rhodes Architecture + Light?
“They worked with us because it was a remodel, an existing thing, and we had to try to make it work for all of our interests and how our family operated. They listened, and we listened, and it was a great communication back and forth.”–Jane
How has the renovation changed the way you live and enjoy your home?
“I remember saying to them that I want the whole floor heated because it gets so chilly down here. And we had the wood burning stove, but it was over there and now we just turn the floor heat on and we can come down. It’s cozy and nice. So we’re looking forward to winter now.”–Ken
“We have 5 kids together and now a bunch of grandchildren. I wanted a marble countertop, but there’s just no way. I didn’t want it to be a place where I had to say, ‘No, no, no. Wipe up your drink, do this, do that.’ I wanted it to be a place where everybody can come with all the kids, and we make a big mess, and I can clean it up. And we can enjoy ourselves here, because that room upstairs, we almost never went in. And now we’re in there eating pizza and watching the game.” –Jane
As an artist, Jane enjoyed the collaborative process.
“I can’t believe it was as positive as it was. I went into it thinking it would be a great, creative, fun, collaborative thing, and I have to say, with our architects, it was. I like that creative process. I always say when I am doing a painting, it’s a series of problem solving so it wasn’t unusual for me. I am completely blown away by them and had fun with that part of it.” –Jane
Architect: Tim James Rhodes RA AIA, Rhodes Architecture + Light
Builder: Fairbank Construction Company
Structural: Swensen Say Faget

 Mottram Architecture
Timber frame homes offer unique challenges during a remodel. What often makes them beautiful and attractive to most homeowners, also makes them challenging for space requirements.
Context: The lovely couple that owned this home were struggling with some interesting floor plan challenges that just didn't work for their family. The loved the beautiful timbers and woodwork of their home, but the dramatically sloping ceilings on the second floor, particularly in the bathroom, just didn't work for this 1 1/2 bath home. Needing to use the skylight to approach the toilet was a less then ideal scenario. Although the bathroom footprint was more then adequate, the sloped ceiling only made half of the space useable. Check out the Before/After post on our blog to see the photos of the house pre-renovation. As much as they loved all the wood features in their home, another challenge they had was light. The wood ceiling made everything inside the house darker, even with a fantastic array of south facing windows, there were spaces in the home that felt dark and small. When they contacted us they wanted to know how could they make their brighter and more inviting, were there solutions to the 2nd floor sloped ceiling issues, and if they were going to do all of this work, how could they make their home more comfortable and efficient. A nagging water leak in the upstairs bathroom spurred them into action and here is how we solved their dilemma.
Conclusion: First, we added a little dormer to the rear of the house so we could get full headroom in nearly all of the upstairs bathroom! Then we decided to extend that dormer one more timber bay over to create a walk in closet with natural light and plenty of space. Since we were contemplating energy efficiency, we resolved a nagging issue that is present in a lot of timber frame construction, air tightness. Commonly found in timber frame construction, fiberglass insulation is installed in the rafter bays and board ceilings are installed over top. Unfortunately, board ceilings are anything but air tight, and fiberglass insulation needs to be in an airtight cavity for maximum effectiveness. So we were able to solve two issues at the same time for this homeowner. We removed the board ceiling and fiberglass insulation, we dense packed the rafter bays with cellulose insulation, and installed sheetrock in place of the boards. The boards were salvaged for re-use by the homeowner, and the space and light quality was dramatically improved. Some may think that losing the board ceiling took something away from the space, but what you'll see in the pictures is that it highly accentuates the heavy timbers and really makes them stand out in a beautiful way. Now with this added airtightness, better insulation, and brighter space, the homeowner hardly runs their wood stove, and it's so quiet in the space, an added bonus from changing the insulation. It became necessary to also add a sheetrock ceiling to the living room to hide the plumbing from the new bathroom layout above. Changing this ceiling gave the homeowner some real quality lighting that was lacking in the living room before. The brighter ceiling and new lighting layout completely transforms the living room into a space you want to hang out, even though the layout didn't change at all. When the homeowner saw the finished spaces she said "I can't believe this is my house, I want to live in this house"
Energy Efficiency: I touched a little on the efficiency above, but like all projects done with Mottram Architecture, we always want to leave you with a little extra. Timber frame construction with board ceilings and fiberglass insulation are notoriously leaky! If you want to know what we think about fiberglass insulation, check our our blog post on Why Fiberglass Insulation Sucks. By installing cellulose insulation and covering it with sheetrock we were able to greatly reduce the heat flowing out of this home. It not only improves cashflow it improves the comfort level in the space. Who wants to sit in their living room and feel a draft? Let us remind you, we are not saying cellulose insulation is an air barrier, we use the sheetrock to help with that, but it does significantly reduce the air flow over fiberglass insulation. And when we reduce the airflow, we reduce the heat flow. And when we reduce the heat flow, we reduce the need to re-heat that drafty air from outside. When it comes to energy efficiency the first and best place to start is air infiltration. We greatly reduced the air infiltration with the new insulation, but we also added a hat and warm boots. What I mean by that is, we improved the insulation in the roof, and we installed insulation in the basement. Maybe it's a silly analogy, but when you think about keeping warm, we always start with the hat and boots! With sustainability in mind, the next project will be to add a deck to the front of this house with rain catchment barrels from the metal roof. They are planning to plant a garden in the spring and the rain catchment system will help to irrigate the new garden.
Builder: East Shore Builders
Photographer: Michael Eric Berube
 Gallery KBNY
In this Manhattan pied-à-terre renovation, Gallery tackled the entire apartment. A true full renovation, we updated the kitchen, master bathroom, and powder room, installed new flooring throughout the entire space, and built the entertainment center in the living room.
DESIGN DETAILS
The clients wanted their pied-à-terre to have some modern touches, but not too sleek or contemporary. Since it combines a number of styles and elements, transitional turned out to be their ideal aesthetic. Whites, grays, and earthy tones carried this color theme throughout the apartment.
One of the clients is an artist and wanted wall space to display their original work, visible in the dining area and powder room in the photos below. The entertainment center is another highlight, with its white mosaic brick tile accent wall and glass open shelves to display family photos on both sides.
Instead of tiles, the new powder room walls received a textured concrete application, resulting in an almost industrial vibe. In the master bathroom renovation, glass mosaic tile accent walls bring a touch of personality to both the shower and a storage nook opposite the vanity.
UNIQUELY-SHAPED ROOMS
We specialize in adapting to every potential challenge, including uniquely-shaped rooms like the nearly-triangular kitchen in this Manhattan pied-à-terre renovation.
It’s important to design an uncommonly-shaped space as practically as possible, including specs seemingly as small as sink positioning. Every little detail counts tenfold in a room that’s not rectangular!
Other design details in the kitchen renovation include the classic combination of Shaker-style cabinets and quartz countertops, with a glass mosaic backsplash that matches the one used in the bathroom.
VISIBILITY = TRUST
Communication is always a core value at Gallery, but it’s even more vital when working with bi-coastal clients who were in another state throughout almost the entire process. We met with them once; everything else was done virtually thanks to JobTracker, our project management system.
The client had complete visibility into the renovation, including all design renderings, scheduled installations, and daily progress videos and photos. Even though they were 3000 miles away, they had a direct line to everyone on the team at all times.
SOME HIGHLIGHTS
- Entertainment center designed and built to serve as focal point, with white brick mosaic accent wall and open shelves made of glass
- Track lighting for ease of displaying art and to preserve ceiling height instead of the dropped ceiling that recessed lighting would necessitate
- Deliberate consideration of space in the unusually-shaped, nearly triangular kitchen
- Glass mosaic tile accent walls in the master bathroom with matching tile for the backsplash in the kitchen
Thinking about renovating your bathroom? Contact us today to find out how you can benefit from our expertise in remodeling New York City bathrooms. As a design-and-build firm with a full-scale approach, we handle every single aspect of your home renovation from start to finish.

 Lori Ramsay Design
Blue and white ocean inspired bath with New Ravenna blue glass tile and glass mosaic shower pan. White all drawer vanity with Drawer Doc electrical outlets maximize storage and functionality.


 Mottram Architecture
Timber frame homes offer unique challenges during a remodel. What often makes them beautiful and attractive to most homeowners, also makes them challenging for space requirements.
Context: The lovely couple that owned this home were struggling with some interesting floor plan challenges that just didn't work for their family. The loved the beautiful timbers and woodwork of their home, but the dramatically sloping ceilings on the second floor, particularly in the bathroom, just didn't work for this 1 1/2 bath home. Needing to use the skylight to approach the toilet was a less then ideal scenario. Although the bathroom footprint was more then adequate, the sloped ceiling only made half of the space useable. Check out the Before/After post on our blog to see the photos of the house pre-renovation. As much as they loved all the wood features in their home, another challenge they had was light. The wood ceiling made everything inside the house darker, even with a fantastic array of south facing windows, there were spaces in the home that felt dark and small. When they contacted us they wanted to know how could they make their brighter and more inviting, were there solutions to the 2nd floor sloped ceiling issues, and if they were going to do all of this work, how could they make their home more comfortable and efficient. A nagging water leak in the upstairs bathroom spurred them into action and here is how we solved their dilemma.
Conclusion: First, we added a little dormer to the rear of the house so we could get full headroom in nearly all of the upstairs bathroom! Then we decided to extend that dormer one more timber bay over to create a walk in closet with natural light and plenty of space. Since we were contemplating energy efficiency, we resolved a nagging issue that is present in a lot of timber frame construction, air tightness. Commonly found in timber frame construction, fiberglass insulation is installed in the rafter bays and board ceilings are installed over top. Unfortunately, board ceilings are anything but air tight, and fiberglass insulation needs to be in an airtight cavity for maximum effectiveness. So we were able to solve two issues at the same time for this homeowner. We removed the board ceiling and fiberglass insulation, we dense packed the rafter bays with cellulose insulation, and installed sheetrock in place of the boards. The boards were salvaged for re-use by the homeowner, and the space and light quality was dramatically improved. Some may think that losing the board ceiling took something away from the space, but what you'll see in the pictures is that it highly accentuates the heavy timbers and really makes them stand out in a beautiful way. Now with this added airtightness, better insulation, and brighter space, the homeowner hardly runs their wood stove, and it's so quiet in the space, an added bonus from changing the insulation. It became necessary to also add a sheetrock ceiling to the living room to hide the plumbing from the new bathroom layout above. Changing this ceiling gave the homeowner some real quality lighting that was lacking in the living room before. The brighter ceiling and new lighting layout completely transforms the living room into a space you want to hang out, even though the layout didn't change at all. When the homeowner saw the finished spaces she said "I can't believe this is my house, I want to live in this house"
Energy Efficiency: I touched a little on the efficiency above, but like all projects done with Mottram Architecture, we always want to leave you with a little extra. Timber frame construction with board ceilings and fiberglass insulation are notoriously leaky! If you want to know what we think about fiberglass insulation, check our our blog post on Why Fiberglass Insulation Sucks. By installing cellulose insulation and covering it with sheetrock we were able to greatly reduce the heat flowing out of this home. It not only improves cashflow it improves the comfort level in the space. Who wants to sit in their living room and feel a draft? Let us remind you, we are not saying cellulose insulation is an air barrier, we use the sheetrock to help with that, but it does significantly reduce the air flow over fiberglass insulation. And when we reduce the airflow, we reduce the heat flow. And when we reduce the heat flow, we reduce the need to re-heat that drafty air from outside. When it comes to energy efficiency the first and best place to start is air infiltration. We greatly reduced the air infiltration with the new insulation, but we also added a hat and warm boots. What I mean by that is, we improved the insulation in the roof, and we installed insulation in the basement. Maybe it's a silly analogy, but when you think about keeping warm, we always start with the hat and boots! With sustainability in mind, the next project will be to add a deck to the front of this house with rain catchment barrels from the metal roof. They are planning to plant a garden in the spring and the rain catchment system will help to irrigate the new garden.
Builder: East Shore Builders
Photographer: Michael Eric Berube

 InnovationLand
Patio kitchen plans these days require the ability to incorporate high-tech, modern appliances into rustic, timeless – even ancient-looking – outdoor design styles.
You can see this juxtaposition pulled off perfectly in this outdoor kitchen by Outdoor Homescapes of Houston.
“A smart patio kitchen plan requires not only a balance of the new and old,” says Outdoor Homescapes owner Wayne Franks, “but a blending of new elements – like an outdoor kitchen – with the existing home and outdoor living features like a pool, hardscaping or landscaping.”
In this case, explains Franks, the existing 25-by-15-foot pool had a craggy edge of moss rock boulders, plus a spa and firepit faced with a rough Scabos splitface travertine.
“The overall look was rustic and naturalistic,” says Franks, “so we of course wanted the new outdoor kitchen island to match.”
Hence the 14-foot-long outdoor kitchen island with a raised bar, also faced in the Scabos splitface travertine and topped with a Normandy granite countertop. The hardscaping around it is Kool Deck® textured concrete.
“People used to shy away from busy textures in outside patio kitchen plans, but now they’re embracing them,” notes Franks. “They’re increasingly attracted to the beautiful imperfections and irregularities of nature – there’s more of an authenticity and character to it.”
Now, for the high-tech part: A Traeger wood pellet grill. Traeger grills are becoming increasingly popular for their ability to infuse amazing, rich flavor and for their versatility (they can grill, bake, smoke, slow cook, braise and barbecue).
This premier model, the Memphis Pro 304, features 562 square inches of cooking space and a three-in-one cooking system (high-temperature grill, low-and-low smoker and true-convection-oven roasting and baking). It also has an intuitive Intelligent Temperature Control (see the display panel to the left of the grill) that can be set for cooking and internal temperature.
A programmable food probe tells you when the internal temperature is reached and drops the grill down to a programmed lower temperature to keep the food warm till serving.
The dual-fan convection system, with reliable metal blades, circulates heat evenly for tender, juicy results. Double-walled and sealed construction of 304 stainless steel allows for optimum heat retention and consistent temperatures in all weather conditions. A direct-flame “flavorizer” insert delivers the added flavor of a seared finish.
Outdoor Homescapes also added a mount sink with a custom oil-rubbed bronze faucet by Moen and the following RCS stainless steel accessories: a pull-out trash door, a countertop trash chute, dual horizontal grill utensil drawers and a swing-out storage door.
“At first, you’d think all this technology and the smooth, modern stainless steel would fight with the rustic look of the rough-faced stone in outdoor patio kitchen plans,” says Franks. “But it actually provides some visual rest from all the rugged textures and busyness.”
Serving a similar function is the smooth, polished Scabos travertine tile used for the pool coping and firepit ledge.
“It’s a perfect environment for the client to entertain business associates,” says Franks. “He’s very happy with the old-meets-new approach, and so are we.”
More patio kitchen plans can be found at Outdoor Homescapes of Houston’s website, at www.outdoorhomescapes.com

 T.A. French - Custom Builder
Example of a mid-sized transitional dark wood floor and brown floor double front door design in Austin with gray walls and a black front door
 Rhodes Architecture + Light
The renovation of an extensive linear residence and site facing Port Orchard waterway embraces water, greenspace and forested hillside. The home, completed this fall, serves as an artist’s studio, galleries, family space, game room, outdoor living areas and peaceful retreat.
New interiors and exterior spaces and finishes, cabinetry, lighting, paving, landscape and courtyards become settings for the owner’s art + collections, three-generations of family and the wonderful colors and textures of the land + water.
Inside, a monumental central stair and tapered two-story tall red cedar and steel column was designed as the residence’s entry focal point and internal landmarks, guiding the visitor’s eye to the main atrium…. and upward. Heavy wide-flange steel moment frames support the house and enable whole walls of glass. Rough, mill-finished steel contrasts refined cabinetry, stone, wood structure and defining dropped ceilings, reflecting the opener’s love of the tension between highly polished and detailed + rough, found art.
Outside, A new southern “dining room” was designed for warm summer evening gatherings under a heavy-timber trellis. The focus, opposite water and island views, is a metal perforated screen. The final screen is composed of the lyrics from a Joe Cocker song of great meaning to the owners, cut from ½” marine bronze, set into dark-fired brick. “Oh My Darling, Be Home Soon….”
Natural daylight and high-efficiency lighting are central players as in any gallery. From a high clerestory and extensive southern and eastern window-walls to carefully selected up-lighting, pendants, and accent fixtures, Rhodes Architecture + Light worked closely with the owner to ensure that their dark existing house would become one filled with light…. night and day.
The owners, Ken and Jane, allowed us to interview them about their experience working with Rhodes Architecture + Light, and how they are feeling about living with the architecture today.
What was your experience like, working with Rhodes Architecture + Light?
“They worked with us because it was a remodel, an existing thing, and we had to try to make it work for all of our interests and how our family operated. They listened, and we listened, and it was a great communication back and forth.”–Jane
How has the renovation changed the way you live and enjoy your home?
“I remember saying to them that I want the whole floor heated because it gets so chilly down here. And we had the wood burning stove, but it was over there and now we just turn the floor heat on and we can come down. It’s cozy and nice. So we’re looking forward to winter now.”–Ken
“We have 5 kids together and now a bunch of grandchildren. I wanted a marble countertop, but there’s just no way. I didn’t want it to be a place where I had to say, ‘No, no, no. Wipe up your drink, do this, do that.’ I wanted it to be a place where everybody can come with all the kids, and we make a big mess, and I can clean it up. And we can enjoy ourselves here, because that room upstairs, we almost never went in. And now we’re in there eating pizza and watching the game.” –Jane
As an artist, Jane enjoyed the collaborative process.
“I can’t believe it was as positive as it was. I went into it thinking it would be a great, creative, fun, collaborative thing, and I have to say, with our architects, it was. I like that creative process. I always say when I am doing a painting, it’s a series of problem solving so it wasn’t unusual for me. I am completely blown away by them and had fun with that part of it.” –Jane
Architect: Tim James Rhodes RA AIA, Rhodes Architecture + Light
Builder: Fairbank Construction Company
Structural: Swensen Say Faget
Sponsored
Sunbury, OH

J.Holderby - Renovations
Franklin County's Leading General Contractors - 2X Best of Houzz!
 Advance Design Studio, Ltd.
Mike and Michelle of Lake Barrington knew they needed extra space. Their home was becoming too crowded for their family with blossoming teenagers, so a basement renovation offered the perfect solution for more space for the kids and more room to entertain for the adults.
“Our project consisted of expanding our laundry room, putting in a first floor wet bar so we had adult space upstairs, while also renovating our basement for a family-friendly and teen-functional area as well,” Michelle says.
They found Advance Design Studio through a neighbor who gave a glowing recommendation, giving Michelle and Mike the confidence they needed to move forward with a major home renovation. They felt like they knew Advance Design before they even worked together. When they met with the owner Todd Jurs and designer Nicole Ryan, Mike and Michelle knew they were getting a trustworthy, dependable team that could create the project they had been dreaming about for 7 years.
Having virtually no natural light to work with, one of the biggest design challenges was creating a basement that did not feel dark and depressing. The Advance team got to work creating architectural archways and custom detailed dry-stack stone columns artfully designed into the space, adding a dramatic element that made the space feel less like a basement or more like a relaxing family room. Color 3D renderings were created to portray what the space would look like so Mike and Michelle could visualize the space in advance.
Detailed trim and crown moldings grace the built in buffet and wet bar making for an amazingly functional space that lacks nothing in style and visual interest. Cherry wood cabinetry by Dura Supreme is featured in the space with a “Cocoa Brown” finish and includes beautiful mirrored glass doors embellished with unique elliptical mullion details. A built-in microwave, dishwasher and mini fridge add practicality to the ample entertainment mecca. An under mounted sink finishes the space joined with a intricate mosaic tile backsplash and “Ventisca Polished” quartz countertops.
The basement is absolutely perfect for hosting friends and family with expertly designed key areas such as a game space for the kids, a movie area for the family, an ample workout room with luxurious full bath, and even built in wine storage. The family absolutely loves the new basement living space, and has already enjoyed numerous family movie nights and sleep-overs with friends.
While custom cabinets made by Dura Supreme were used to create unique spaces that lived up to Mike and Michelle’s expectations., heated flooring under the 16”x16” “Mongolian Spring” tile was installed giving all tiled areas of the basement a much cozier feel, eliminating that cold hard surface most of us hate in our basements!
The new basement must-have requirement list included a new bath space, which was incorporated adjacent to the work out room. The sleek shower door and cabinets in the new bathroom make guests and family feel like they are in an elegant hotel. The new guest bath features 4”x36” “Silver Screen” honed marble tile in a brick pattern on the shower walls and 2”x2” “Chenille” limestone tile in a hexagon mosaic pattern on the shower floor.
“I came in with very specific requirements for our three project areas,” Michelle says. “There was not one time that I felt like I was asking for something that was not going to turn out how I anticipated.”
Tying in multiple rooms during a renovation if you have can do it makes a lot of sense and saves money in the long run. A fully functional laundry room as well was a must on this family’s wish list. Michelle wanted to add space to the existing cramped and awkward laundry room, and Mike wanted to make sure they could still park a car in the garage. Reconfiguring interior walls required borrowing unused space cleverly from the garage in order to enlarge the laundry room space.
Drawers under the stairs added beautiful hidden storage created almost magically out of dead space. White painted Dura Supreme cabinets bring additional light into the small space; while the 16”x16” cleft slate tile flooring provides excellent contrast and the naturally earthy feel Michelle wanted. Quartz countertops with a 3”x12” “Debut Dew” subway tile backsplash add elegance to the now upliftingly bright laundry room.
The extra space makes doing laundry much more pleasurable and the added storage is a great for all those little things like winter hats and gloves, umbrellas and the like. “The Advance Design project team was phenomenal to work with,” Michelle says. “They came in, shared the plans with us and walked us through the expectations. We always knew what was coming next.”
Converting an existing closet space, the wet bar upstairs was challenging because they wanted a functional area that didn’t look or feel like cabinets just sticking out of a closet. So the Advance team transformed this ordinary closet space into a stunning wet bar that architecturally appears as if it’s always been there. Traditional, elegant hand carved custom molding matching the adjacent fireplace ties the new entertainment bar area in nicely with the existing family room and kitchen area.
Featuring a built in wine refrigerator, Dura Supreme cabinetry in deep cherry wood elegantly displays wine bottles and etched glass mullion doors that fill with soft light in the evening hours. Cambria “Windermere” quartz countertops with a sophisticated hammered copper sink and a glimmering backsplash round out the stunning wet bar. Hosting parties and family functions has become much more enjoyable now that they have a dedicated beverage serving area large enough to include hors devours.
All three projects were designed and constructed together at the same time, making for a cohesive project that was administered smoothly and easily both for the design team and for the family. Disruption to the home was minimal as each phase was completed in each project conclusively, and design and meeting time for the homeowner was efficient and organized making for an enjoyable process.
“Advance Design was great to work with,” Michelle says. “I would highly recommend them to anyone considering a home improvement project. They took the time at the beginning to understand our needs, our budget, and our vision for our home. The field team was great, attentive, on time, cleaned up each day and made the overall experience very positive. We couldn't be happier with the finished product.”
With the help of our talented, award winning design team you can create the basement, laundry room, or any other home renovation that you have been dreaming of. With our “Common Sense Remodeling” approach, the process of renovating you home has never been easier. Contact us today at 847-836-2600 or schedule an appointment to talk with us about that kitchen remodeling project.
Joe Nowak

 Rigsby Group, Inc.
A complete Lake Home Kitchen Remodel with custom-made off-white cabinets, light multi-colored polished granite countertops, and ivory limestone backsplash, which complements the dark wood island. This custom vent-a-hood creates an additional and unique focal point to this one-of-a-kind kitchen.
-Rigsby Group. Inc.
 Mottram Architecture
This custom piece of cabinetry was specially designed and built by the homeowner's father!
Timber frame homes offer unique challenges during a remodel. What often makes them beautiful and attractive to most homeowners, also makes them challenging for space requirements.
Context: The lovely couple that owned this home were struggling with some interesting floor plan challenges that just didn't work for their family. The loved the beautiful timbers and woodwork of their home, but the dramatically sloping ceilings on the second floor, particularly in the bathroom, just didn't work for this 1 1/2 bath home. Needing to use the skylight to approach the toilet was a less then ideal scenario. Although the bathroom footprint was more then adequate, the sloped ceiling only made half of the space useable. Check out the Before/After post on our blog to see the photos of the house pre-renovation. As much as they loved all the wood features in their home, another challenge they had was light. The wood ceiling made everything inside the house darker, even with a fantastic array of south facing windows, there were spaces in the home that felt dark and small. When they contacted us they wanted to know how could they make their brighter and more inviting, were there solutions to the 2nd floor sloped ceiling issues, and if they were going to do all of this work, how could they make their home more comfortable and efficient. A nagging water leak in the upstairs bathroom spurred them into action and here is how we solved their dilemma.
Conclusion: First, we added a little dormer to the rear of the house so we could get full headroom in nearly all of the upstairs bathroom! Then we decided to extend that dormer one more timber bay over to create a walk in closet with natural light and plenty of space. Since we were contemplating energy efficiency, we resolved a nagging issue that is present in a lot of timber frame construction, air tightness. Commonly found in timber frame construction, fiberglass insulation is installed in the rafter bays and board ceilings are installed over top. Unfortunately, board ceilings are anything but air tight, and fiberglass insulation needs to be in an airtight cavity for maximum effectiveness. So we were able to solve two issues at the same time for this homeowner. We removed the board ceiling and fiberglass insulation, we dense packed the rafter bays with cellulose insulation, and installed sheetrock in place of the boards. The boards were salvaged for re-use by the homeowner, and the space and light quality was dramatically improved. Some may think that losing the board ceiling took something away from the space, but what you'll see in the pictures is that it highly accentuates the heavy timbers and really makes them stand out in a beautiful way. Now with this added airtightness, better insulation, and brighter space, the homeowner hardly runs their wood stove, and it's so quiet in the space, an added bonus from changing the insulation. It became necessary to also add a sheetrock ceiling to the living room to hide the plumbing from the new bathroom layout above. Changing this ceiling gave the homeowner some real quality lighting that was lacking in the living room before. The brighter ceiling and new lighting layout completely transforms the living room into a space you want to hang out, even though the layout didn't change at all. When the homeowner saw the finished spaces she said "I can't believe this is my house, I want to live in this house"
Energy Efficiency: I touched a little on the efficiency above, but like all projects done with Mottram Architecture, we always want to leave you with a little extra. Timber frame construction with board ceilings and fiberglass insulation are notoriously leaky! If you want to know what we think about fiberglass insulation, check our our blog post on Why Fiberglass Insulation Sucks. By installing cellulose insulation and covering it with sheetrock we were able to greatly reduce the heat flowing out of this home. It not only improves cashflow it improves the comfort level in the space. Who wants to sit in their living room and feel a draft? Let us remind you, we are not saying cellulose insulation is an air barrier, we use the sheetrock to help with that, but it does significantly reduce the air flow over fiberglass insulation. And when we reduce the airflow, we reduce the heat flow. And when we reduce the heat flow, we reduce the need to re-heat that drafty air from outside. When it comes to energy efficiency the first and best place to start is air infiltration. We greatly reduced the air infiltration with the new insulation, but we also added a hat and warm boots. What I mean by that is, we improved the insulation in the roof, and we installed insulation in the basement. Maybe it's a silly analogy, but when you think about keeping warm, we always start with the hat and boots! With sustainability in mind, the next project will be to add a deck to the front of this house with rain catchment barrels from the metal roof. They are planning to plant a garden in the spring and the rain catchment system will help to irrigate the new garden.
Builder: East Shore Builders
Photographer: Michael Eric Berube
Michael Eric Berube, Maine Virtual Home Tours
148