

How to Strip Painted or Varnished Doors
Peeling or worn paint or varnish on doors definitely distracts from the beauty of an older home. Restoring rather than replacing a door doesn’t have to be a daunting project. With the right tools and proper surface preparation, a facelift for old door can be easy and very rewarding.
If the home or door is older than 1978, it likely is painted with toxic, lead-based paint. Before you attempt any work on an old door or other woodwork, test it with LeadCheck swabs from your hardware or paint store. Read more about the dangers of lead paint at https://www.epa.gov/lead. If working with lead-based paint, wear protective googles, gloves and an N-100 dust mask. Wash clothing separately. Read More in our blog at:
https://eco-strip.com/how-to-know-if-your-home-has-lead-paint-and-how-to-safely-remove-it/
What is proper surface preparation? It is making sure the surface will support long-term and attractive adhesion of new coatings. If the existing paint is fully intact with few cracks or little peeling, you may need to only wet sand the rough edges to blend them in to the good paint around it. Wet sanding prevents dust from escaping. If the paint coatings look uneven and weathered, strip all the paint off and start over on bare wood.
Which stripping method is best? Until the last few decades dry scraping, chemical strippers, sanding, and high heat guns were the traditional methods for refinishing doors. The chemicals are goopy to work with and clean up, dry scraping and sanders create lots of flying toxic lead paint chips and dust, and high heat guns vaporize lead in the paint and create a fire risk. Infrared technology was introduced around 2000 with the Speedheater™ Infrared Paint Removers. This new technology eliminates the negative effects of traditional strippers.
STEPS TO STRIPPING A DOOR
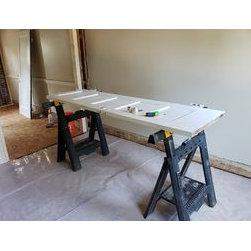
1. Set up: Take the door down off its hinges and lay it on a pair of sawhorses or worktable outdoors or in a well-ventilated workroom. Put plastic sheeting under the work area to collect the paint waste. Remove all the hardware with a screwdriver and set it aside. If the door has glass panels, tape them over or shield them from the stripping.
2. Hardware: If the metal hardware has lots of paint on it, an easy stripping method is to soak it overnight in a CrockPot with warm, soapy water. Then lightly scrape it.
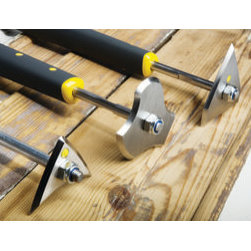
3. Scraper: Find sharp, pull-type paint scrapers. With soft paint and an even pressure, a pull scraper more easily than a push scraper like a putty knife takes off all the layers of paint down to the bare wood. If the door is completely flat, a very sharp, straight-edged scraper like the Speedheater™ Clapboard Scraper and the Speedheater™8-Cut Scraper work well. If there are panels in the door, other blade edges may be needed. If there are wide curves or sloping surfaces, the Speedheater™ Profile Scraper with 1” diameter curves works well. If there are narrow grooves, the Speedheater™Boomerang Scraper with 1/2” and narrower, rounded edges works best.
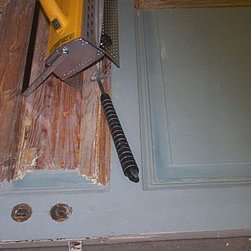
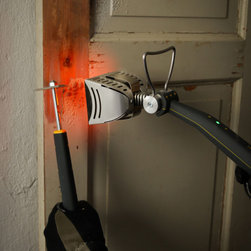
4. Heating: Speedheater™ Infrared Paint Removers work fast to heat paint and varnish to release them from the wood. The larger, Speedheater™1100’s side plates can be seated directly on the painted door for 20-60 seconds until the paint bubbles and slightly smokes. The 3” x 3” Speedheater™ Cobra should never be placed directly on the paint but rather held 1” - 2” from the surface for 2-5 seconds. Remove the heaters and infrared rays away from the surface when the coatings bubble and slightly smoke. Immediately scraping the soft, warm coatings leaves a clean surface.
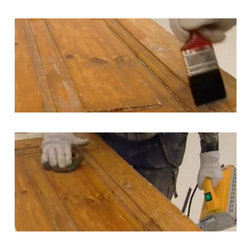
5. Sanding: Wait until both sides of the door, as well as the edges, have been stripped before deciding if sanding is needed. If the door is to be painted, very little sanding will be needed. If it is to be clear coated, light sanding may be desired to remove any old paint which penetrated into the wood grain. Painting the stripped, bare wood with linseed oil, slightly reheating, and rubbing with steel wool will usually provide an even smoother, cleaner surface.
6. Clean up: If you stripped lead-based paint, collect its waste thoroughly for disposal. Call your local waste authority to find out how to dispose of hazardous waste in your area.
If the home or door is older than 1978, it likely is painted with toxic, lead-based paint. Before you attempt any work on an old door or other woodwork, test it with LeadCheck swabs from your hardware or paint store. Read more about the dangers of lead paint at https://www.epa.gov/lead. If working with lead-based paint, wear protective googles, gloves and an N-100 dust mask. Wash clothing separately. Read More in our blog at:
https://eco-strip.com/how-to-know-if-your-home-has-lead-paint-and-how-to-safely-remove-it/
What is proper surface preparation? It is making sure the surface will support long-term and attractive adhesion of new coatings. If the existing paint is fully intact with few cracks or little peeling, you may need to only wet sand the rough edges to blend them in to the good paint around it. Wet sanding prevents dust from escaping. If the paint coatings look uneven and weathered, strip all the paint off and start over on bare wood.
Which stripping method is best? Until the last few decades dry scraping, chemical strippers, sanding, and high heat guns were the traditional methods for refinishing doors. The chemicals are goopy to work with and clean up, dry scraping and sanders create lots of flying toxic lead paint chips and dust, and high heat guns vaporize lead in the paint and create a fire risk. Infrared technology was introduced around 2000 with the Speedheater™ Infrared Paint Removers. This new technology eliminates the negative effects of traditional strippers.
STEPS TO STRIPPING A DOOR
1. Set up: Take the door down off its hinges and lay it on a pair of sawhorses or worktable outdoors or in a well-ventilated workroom. Put plastic sheeting under the work area to collect the paint waste. Remove all the hardware with a screwdriver and set it aside. If the door has glass panels, tape them over or shield them from the stripping.
2. Hardware: If the metal hardware has lots of paint on it, an easy stripping method is to soak it overnight in a CrockPot with warm, soapy water. Then lightly scrape it.
3. Scraper: Find sharp, pull-type paint scrapers. With soft paint and an even pressure, a pull scraper more easily than a push scraper like a putty knife takes off all the layers of paint down to the bare wood. If the door is completely flat, a very sharp, straight-edged scraper like the Speedheater™ Clapboard Scraper and the Speedheater™8-Cut Scraper work well. If there are panels in the door, other blade edges may be needed. If there are wide curves or sloping surfaces, the Speedheater™ Profile Scraper with 1” diameter curves works well. If there are narrow grooves, the Speedheater™Boomerang Scraper with 1/2” and narrower, rounded edges works best.
4. Heating: Speedheater™ Infrared Paint Removers work fast to heat paint and varnish to release them from the wood. The larger, Speedheater™1100’s side plates can be seated directly on the painted door for 20-60 seconds until the paint bubbles and slightly smokes. The 3” x 3” Speedheater™ Cobra should never be placed directly on the paint but rather held 1” - 2” from the surface for 2-5 seconds. Remove the heaters and infrared rays away from the surface when the coatings bubble and slightly smoke. Immediately scraping the soft, warm coatings leaves a clean surface.
5. Sanding: Wait until both sides of the door, as well as the edges, have been stripped before deciding if sanding is needed. If the door is to be painted, very little sanding will be needed. If it is to be clear coated, light sanding may be desired to remove any old paint which penetrated into the wood grain. Painting the stripped, bare wood with linseed oil, slightly reheating, and rubbing with steel wool will usually provide an even smoother, cleaner surface.
6. Clean up: If you stripped lead-based paint, collect its waste thoroughly for disposal. Call your local waste authority to find out how to dispose of hazardous waste in your area.
Project Year: 2020
Project Cost: Less than $1,000