Shop Products
Houzz Logo Print
formerlyflorantha

Covering window treatments when rolled up/retracted?

formerlyflorantha
13 years ago

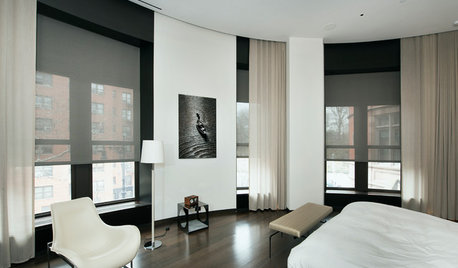
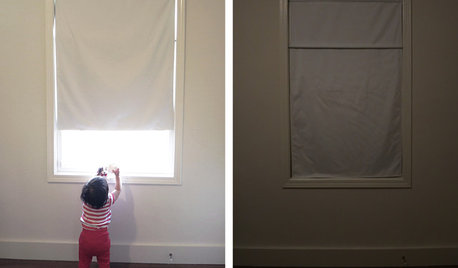
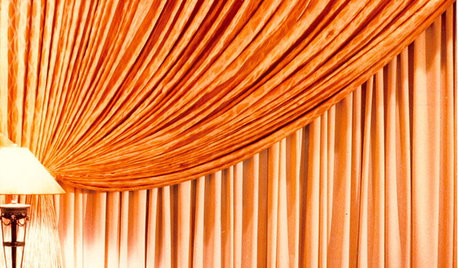
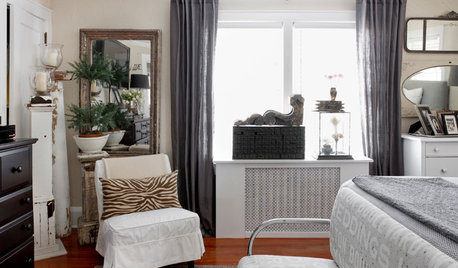
Am trying to decide how to handle the problem of dealing with roman shades when they're pulled up off the window at top. I'd appreciate any images of a kitchen with roman shades, blinds, honeycombs, etc. that show how they attach above the window. Would especially appreciate images that have a wooden piece of any sort at the top of the window treatment instead of fabric.

I have 3 large windows on the sink wall with a thin slice of wall between them. There are no upper cupboards on this wall. Windows face the street, which has quite a bit of pedestrian and automobile traffic and I feel very exposed in the room when I'm in there alone, esp. when I have lights on. Additionally, the windows face west and the late afternoon sun will be a problem for people seated at peninsula or working at that sink, so I need a treatment that will allow sunlight to illuminate the room but cut the glare (and the summer heat). We installed these windows with the hope of brightening the interior of the house, so I don't want to block light any more than I have to.

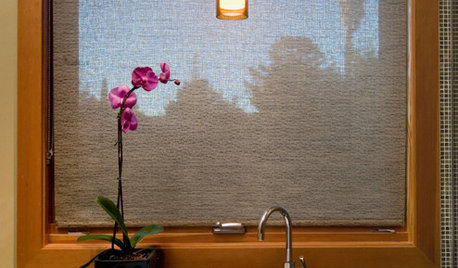
I will be making insulated roman shades to keep the wall warm and private, esp. in the northern winter. This fabric will have a pattern and will be quite a personality in the room when lowered. I don't really want the fabric shades to be a major presence in the room during the summer when I need the room to feel airy and not smothering or dark. I have enough money saved up to buy honeycomb shades or something similar in a quiet linen look, with the option of their opening top down as well as bottom up. Yes, I know for many of you, two sets of shades on the same windows sounds like overkill, but this is what I think I want. (My old kitchen faced the same view and I felt that my insulated roman shades were insufficient for sun control but that's all I ever had. But it was only 2 windows, now I've got the same two windows plus one honkin' big double window, all facing the street. See link below.)

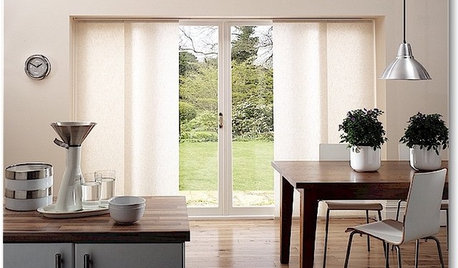
I would mount the light diffusing shades inside the window frame and the romans on the outside.

So...

I've been making drawings of my options for an oak cornice that would bridge the entire wall and ride above the windows. My hope is to have it conceal the romans, which will stack about 6 inches at top, if past experience is any indicator of future performance. Also, I have wondered if it would be possible to use the top of the oak as a display surface, albeit only a very short open space would be above it. We have no window trim at present but DH will be asking me "so what have you decided?" and I'm gonna have to tell him something by September (or October? or January?) when he might be messing with mouldings on kitchen windows and doors. The glass begins 18.5 inches from ceiling, top of window is 14.5 inches down from ceiling. Not sure how far down on the window the blinds will extend, but the bottom of the fully retracted blinds is the absolute bottom I can consider for a wooden valence/cornice riding over them. Then, as I said, I would need 6-7 inches above that line for the romans to live in plus sufficient wood to make a top for the cornice.

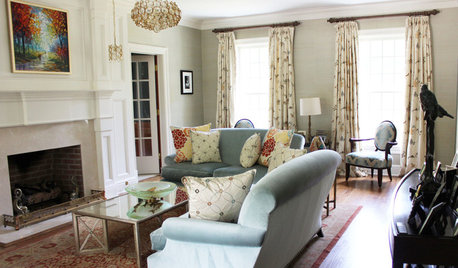
We have a horizontal oak board across the top of our living room draperies and the kitchen drapery design should reinforce this existing theme or at least not introduce a radically different theme. I also have a quilted fabric cornice in dining room above an outside double door, but not sure yet as to whether I will retain this fabric one or replace with oak. Depends on how the kitchen adventure turns out.

Anyway, I would appreciate images, advice, hand-holding, suggestions, or commiseration on the topic of toppings above window treatments in kitchens. --F.

Here is a link that might be useful: Two side windows and big middle window need topping treatment...

Comments (13)

  • formerlyflorantha
    Original Author
    13 years ago
    last modified: 9 years ago

    Have found a website that claims it's possible to make roman shades that can be retracted in either or both of two directions!

    Here is a link that might be useful: top-down + bottom-up homemade Roman Shade

  • bmorepanic
    13 years ago
    last modified: 9 years ago

    I'll see your window and raise you mine - which is 4 x 6 feet. It's maybe 3 inches up from the counter. I chose to use filtering honeycomb shades, but my window faces the back yard and tree leaves take care of privacy issues most of the year and its a pretty steep grade, so a passerby in the alley sees the ceiling. The shades are primarily for sun control year round.

    These decisions are very personal and very hard - so try to resist rushing. You might cross post into decorating.

    The problem with the roman shades, the honeycomb shades or any other non-washable treatment is the same - the backsplash from the faucet. In my case, they are not lowered into the danger zone except (probably) during winter nights.

    With casements, you might find that an inside mount and screens are mutually exclusive and/or that the window latches interfere with correction operation and you'll be forced into an outside mount for those also.

    I had toyed with solar shades - the thin net on a roller blind frame. You might look at them and see what you think.

    The deal with them is the DARKER they are, the more transparent they are from the inside. But people can't see in from the outside and they are effective at cutting strong sunlight and glare way down. They are also literally thinner.

    On decorating, I wouldn't feel the need to connect the kitchen window treatments to another room. Keeping the lightness would not involve adding more wood and more enclosure to an already wood-filled space.

  • formerlyflorantha
    Original Author
    13 years ago
    last modified: 9 years ago

    bmorepanic,
    Thanks for comments. Minnesota law requires 6 inch deep new construction walls, so I have plenty of room inside the window area for the inside shade to go up and down. The sink area is bumped out 3 inches into the room and we've run the Formica all the way out to the glass moulding, so the romans should have sufficient room to run behind the sink. As for the splash, that's one of the wages of sin, right? Based on past experience, I will wash the romans very rarely but I WILL wash them, usually when the tops get very dusty or there's someone coming to visit that I want to impress. I usually prewash fabrics in hot water before sewing but I don't use a clothesdryer on drapery ever. Nevertheless, romans usually shrink up from the bottom over time, sigh.

    Thanks for comments on solar shades and on the topic of wood in this very oaky room.

    We're going to paint the back of the bookshelf, to cut the wood look there. Maybe we could work some paint into the window cornice too?

  • Sue Brunette (formerly known as hockeychik)
    13 years ago
    last modified: 9 years ago

    Florantha,
    I think the idea of some type of wood cornice board at the top of the windows would be nice. I also like the idea of them having a shelf top and being painted to match your bookshelf or maybe even the wall. I can also appreciate you wanting to have sun and privacy control but also wanting to allow the light in. Our dining room has a west window and it can get so hot in the summer, but in the winter we just crave the light. I think the two types of shades will be very nice.

    Are you wanting to have 3 separate cornice boards? One over sink, one over each of the other two windows on that wall as well? Rereading your post, sounds like you are thinking one very long cornice board spanning all 3 windows. Is that correct? Just looking at your pictures and it looks like the wall space between your cabinet on the right side and the window is pretty narrow, so keep in mind you won't have much room to spare for a cornice board outside of the window treatments there. I see you do have a filler piece right at the corners so that may help with attachment of cornice as long as it isn't so deep that it interferes with the cabinet doors opening. So hard to tell from pictures. Curious to see the drawings you have been working on.

    I noticed at home depot that Bali, Levelor someone has the roman shades that are top down bottom up too. That kind of blew me away. I tell myself that I can make the roman shades for my dining room window myself, but really wondering if that will ever happen. I'm not too gifted in the sewing department :)

  • formerlyflorantha
    Original Author
    13 years ago
    last modified: 9 years ago

    hockeychic:
    Thanks for input, even if I'm more interested in looking at images of others' solutions than having a recommendation for my particular oddball situation. Those windows were wrong from the beginning but we're trying to turn them into a positive. Long story I won't bother you with. Anyway, I do have about 7 inches of filler perpendicular to the window wall on either side and DH is rather big on the long board idea. If there were a small shelf, it would be about 6 inches deep. What can sit on a 6-inch shelf and be seen from below? I have some ideas, but nothing sure. Stay tuned.

    It's good to know that the big store brands have top down bottom up romans. I should go look at them to see how they do it. Thanks for the lead.

    Here's a link to my current solution--tension rods with half-window cafe curtains of gauzy cotton. Am just getting used to it, but it definitely cuts the feeling that everyone's looking in. The room still seems airy, but not as much as previously. I suspect that single-cell honeycombs would feel at least as womb-y. I'm not done hemming yet but I have to cut up all those tomatoes for the dehydrator before I get back to sewing.

    Thanks to all who are tuning in on this, the latest of my many sagas.

    Here is a link that might be useful: temporary half-window curtains

  • sara_the_brit_z6_ct
    13 years ago
    last modified: 9 years ago

    I have made many roman blinds, but don't have a photo to upload.

    Anyway, the way I mount them is to mount a piece of wood (say 2" x 1") on brackets at either end. The top edge of the wood (the 2" part) has velcro stuck onto it. I then stitch the other part of the velcro on to the top edge of the blind. Screw-eyes then go into the underside of the wood, for the strings to feed through.
    The blind itself is made 3" longer than the total required length, to allow for mounting it on the velcro. Fit the velcro, and hang the blind. Run the strings up from the lowest stitched-on ring, up to the screw-eyes in the wooden batten. Then run them across at right angles to whichever side you want the 'string' on. Braid them together into a single strand and when you pull up the blind, wind the braid around a cleat mounted on the window frame.

    The batten should be mounted above the window, but the height will depend on where you want the blind to hang when 'up' and in folds. Mine allows the bottom edge of the blind to just cover the top piece of window frame (but not eliminate any of the light).

    When you need to wash the blind, it's simple to unbraid the strings and peel it off the batten velcro.

  • formerlyflorantha
    Original Author
    13 years ago
    last modified: 9 years ago

    Sara,
    I assume, then, that the top of the blind is essentially a wooden-bound fabric rectangle, yes? And that the blind fabric is always in view, even when retracted?

  • phyl345
    13 years ago
    last modified: 9 years ago

    sara .. If I wanted roman blinds that would just stay in place (never lowered) would your same instructions apply?

  • sara_the_brit_z6_ct
    13 years ago
    last modified: 9 years ago

    florantha, all that's visible is the front of the blind itself. The top edge of the blind is mounted on the top edge of the batten: i.e. the top edge is at right-angles to the rest of the blind, as though it was folded over. The batten itself is invisible (unless you stuck your head up under the blind itself).

    Imagine a piece of wood, approximately 2"/3" wide - however far away from the wall you want your blind to hang. That batten should be the width of you window frame, plus a little extra, to allow the blind to overlap the sides of the window frame. The batten is mounted on "L" brackets (with the "L" being upside down). Then, the velcro is on the top surface of the 2/3" wide batten. (I did paint the batten white, but have stained them in the past).

    I have seen versions where the batten was covered in matching fabric, but they were for a more 'imposing' upper edge, where it stood further out from the window. In my case, I wanted a simple rectangle hanging over the window. Mine is a white panel, with navy blue top and bottom, and along the sides. The top blue section is part hanging, and part velcroed onto the batten.
    Does that make sense?
    phyl1345, the same system would work whether you never lowered the blind, or even just for mounting a top treatment: it just makes it easier to remove and wash.
    If this still isn't making sense, let me know and I'll try and upload a photo (I'm not good at that, so can't promise success).

  • formerlyflorantha
    Original Author
    13 years ago
    last modified: 9 years ago

    Sara's roman shades are probably the most common type of roman shade. I've made these in the past--the velcro allows easy detach compared to nails or staples. Sara's treatment has the full stack of the raised, folded shade exposed at the front, which is usually just fine. But I'm planning to use an assymetrical fabric pattern which is very distinctive, so I'd like to have the fabric covered when it's fully retracted. The pleats in the up position will not be a look that I would enjoy all summer--I assume that it will simply look lopsided. I suppose I could just remove the shade during the summer, but there are odd times when I might like being able to drop the shade in the off season, including when I'm going to be gone or when I want to run them halfway down to show the fabric.

    One thing that Sara's posting reminds me of is that I'll perhaps have to remove the cornice in order to access the fabric for washing. Gotta think on that.

    Below is one commercial source for traditionally styled cornices for windows, should anyone be interested to see an example of a wooden cornice. I would want something plainer, with spare trim. Disclaimer: I know nothing about the company, Smith + Noble.

    Fabric will be a Finnish Marimekko supergraphic pattern "Luminara" in the white-silver colorway. It's in a Crate & Barrow tablecloth....
    http://www.crateandbarrel.com/outlet/table-linens/marimekko--lumimarja-white-tablecloth/f22276 The tablecloths are in the Outlet store, making them almost affordable.

    I plan to center the pattern in the wide middle window, and position it at the outside on each side curtain. Artsy idea, yes? Not sure if I'll give the romans the Warm Window treatment or not. That makes them quite bulky. With the second shade below it, I think that a lining without an insulated interlining on the fabric shade might be sufficient, but I do like that mylar layer in the Warm Window. Bounces the heat back into the room and is a vapor barrier.

    Warm Window supplies and roman shade supplies are sold at Joann Fabrics. There are lots of directions for roman shades on the internet. It's a do-able sewing project for a motivated sewer, even if without a lot of experience. I won't be using ring tape on mine--I'm too hard on the presewn rings so I have to tack mine on extra hard. It's a project to do with a recorded book going in the background.

    Here is a link that might be useful: examples of wooden, very classic cornice boxes

  • calimama
    13 years ago
    last modified: 9 years ago

    I am all in on this thread. I have even bought the fabric with which i will make the roman shades for my three windows in the kitchen. I have no idea how to do it, but i am planning on keeping the existing wooden blinds on the inset of the window, and the roman shade on top, so that it acts as a cornice itself when up, but adds extra insulation and privacy when down. Just need to figure how to make it work now.... :P

  • abbycat9990
    13 years ago
    last modified: 9 years ago

    Sorry, I have no wisdom to offer, but I'm watching this thread with interest. We have a similar situation: 3 large windows facing west on sink wall - but our back yard is pretty private (even with an alley). The afternoon sun is the problem; and it's only a problem for maybe an hour each evening. Our ideal solution is to build a pergola parallel to the window wall. We think the slats (and, later, the jasmine when it grows in) would provide shade from the sun. Now to get it done!

  • formerlyflorantha
    Original Author
    13 years ago
    last modified: 9 years ago

    abbycat,

    So glad to hear you're thinking wisely. Voices like yours are essential for the next generation to listen to.

    Back in the 1970s when solar issues were much more interesting to house planners and homeowners, there were studies done about homes and sun.

    The summer sun is high, so having slatted overhangs or deep roof overhangs really does shade south-facing windows. West-facing ones are more problematical, since the sun sinks in the west even in very hot weather. The lower sun of the daytime winter can penetrate and warm rooms when that warmth is needed, esp on south side. Native homes in the southwest were always oriented with the sun. During the energy analysis manias of the 1970s and 80s, people began to delete north-facing windows in the northern states, which indeed does help. Planting deciduous trees (or vines like yours) is also helpful for cooling and shading homes on the west and south. For reasons that make no sense to me, we've moved away from some of these common sense, pay once and then you can forget it methods of heating and cooling a house. You almost never hear the term "passive solar" any more, even if it's so very easy to plan it into new construction. I have to admit that I lost the battle to put an overhang over my west-facing windows. My DH caved in and allowed the designer to design this *%%! window combo that grew like Topsy. These guys kept saying that we could handle the heat gain with drapes and shades, but my logic says to keep the heat on the OUTSIDE of the building in the summer. At least I was able to discourage one of those trapezoidal windows that are such a pain to put window treatments on, but I would have enjoyed a high ceiling with a rectangular window high on the wall--not much harder to curtain than the ones at person height.