


Treated Wood Greenhouse Frame
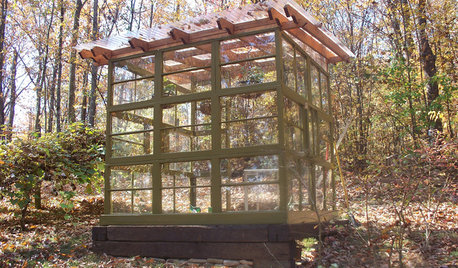
I'm planning to build a 12x12 greenhouse with an 8 on 12 roof pitch using treated lumber (4x4 posts and beams, 2x6 plates, purloins, and ridge beam--double 2x6, and 2x4 studs, rafters, and mullions) and twin- or triple-wall polycarbonate glazing. Do I have to make special provisons to accomodate possible warping of the frame? Do I have to use special (beyond the recommended standard) techniques or materials to fasten and seal the PC panels? If anyone has experience building a PC on treated lumber greenhouse, I would be very grateful for the benefit of your experience. My email address is .
Thanks in advance,
Hank Cochran
Comments (34)

bihai
17 years agoThe only advice I can offer you is:
Don't let water or condensation from the treated lumber fall and drip onto your plants. It can damage them. This is a problem that a good friend of mine has, she has a 2000 sq ft GH built from treated wood and has lost plants due to this problemtom_n_6bzone
17 years agoI've been looking at kits and decided like you, to build from scratch. This may be a stupid question, but couldn't we put the poly film on the inside of the studs and then have no problem with treated dripped water?
~Tom
Related Professionals
Citrus Heights Landscape Architects & Landscape Designers · Lowell Landscape Architects & Landscape Designers · Westwood Landscape Contractors · New Baltimore Landscape Contractors · Northport Landscape Contractors · Pleasant Prairie Landscape Contractors · Pleasanton Landscape Contractors · Red Oak Landscape Contractors · Ridgewood Landscape Contractors · Severna Park Landscape Contractors · University City Landscape Contractors · Palos Heights Landscape Contractors · Belleville Solar Energy Systems · Greenville Solar Energy Systems · Greenwich Solar Energy Systemstom_n_6bzone
17 years agoI found a pic of what looks like to me, polyfilm of some kind placed on the 'inside' of the studs.
~Tom
Here is a link that might be useful: example of 'inside' poly.
april_pnw
17 years agoHi all,
I have also looked at kits and decided to build myself. That example of "inside poly" doesn't look like that at all to me, Tom. It looks like redwood frame with twin-wall polycarbonate glazing. With respect, I would not even consider using treated wood because of the toxicity. I plan on using western red cedar which like redwood is rot-resistant. It helps perhaps that I am on the west coast.
If I were going to use treated wood, I would use copper naphthenate (e.g. Cuprinol) as it is not toxic to plants (at least that is my understanding... see Steve Solomon who is incredibly knowledgeable).
But here is something else. What about using regular lumber and painting it white? This is what I did in two greenhouses in the past and you get the great benefit of reflected light which makes your plants smile. Hmmm. Maybe I should be doing that myself!!! I just might.
Please share thoughts.
Aprilechris_in_iowa
17 years agoI built mine out of ac2 pressure treated. It was designed to be fitted with PC eventually.
Currently it is covered with a double layer of PE.
The frame has 2-3 coats of white latex paint and I have not noticed any problems from toxic drips.
HOWEVER. Pressure treated lumber is not stored indoors in a climate controlled environment before you get it delivered. It may have been kiln dried then treated, but I bet when you get it it is wet!
You need to let it all dry out first before you build with it.
birdwidow
17 years agoChris is right: let pressure treated wood dry completely before you cut it, but once dry, it accepts penetrating oil stain very well.
I have first oil stained, then placed both the old arsnic and new copper treated wood in planting beds and never noticed any bad reaction from plants growing right next to the wood.
I don't know if that was due to the stain, or if the danger to plants from the treated wood is over-rated, but can say that if appplied correctly, oil stained pressure treated lumber can look good and hold up as well if not better than either cedar or redwood.
plantcompost
17 years agoWe have a pressure treated wood greenhouse and a pressure treated suroom.
I wouldn't use anything else. WAY BETTER than buying a package. Cheaper and much more versatile and strong. You can alter the design 'on the go'. It also looks great once weathered a year or two. I've also never had any issue with plants dying. Folks here have raised vegetable beds using pressure treated 4x4s.
The above comment is right on. Let your lumber dry out before attaching anything to it. I wouldn't worry about building the frame, etc. but just wouldn't attach any sheets to it for a couple weeks. also, after a couple weeks, you can build shelves and a potting bench and attach them to the wall frames right for added strength.
Remember to use galvanized nails both inside and outside. You can also use various sized deck screws. I like screws because if I make a mistake, I can remove a screw in a jiffy, recut the wood, etc.
User
17 years agoplantcompost, you mean "WAY BETTER than buying a package [for me]." I love my "package" and there is no way I would build from wood if I had to do it again. Strengthwise, I'd put my aluminum GH up against any wood GH any day.
"Remember to use galvanized nails both inside and outside." Not exactly. You cannot use regular galvanized fasteners on ACQ. You must use hot dipped galvanized or stainless steel on ACQ.
barrie2m_(6a, central PA)
17 years agoVery good points, Stressbaby. But has anyone done a price comparison of wood to galvanized metal? At a recent seminar a researcher noted that a wooden frame might cost double what a metal frame structure would.
Most of us with metal arches use treated wood for framing ends as well as baseboards and catch board for rollup sides. For those needs alone my structure costs were increased by 30% for a 30x96 structure.
Redwood might look good but it needs to be treated (painted) regularly to keep it from cracking. Maintenance costs on any wooden structure are going to be higher and will be needed at times when you are usually busy with other growing concerns.
alpiner
17 years ago"'d put my aluminum GH up against any wood GH any day."
For strength? Baloney. You obviously have never built a proper wooden structure. It'll never have a problem and last a century if built correctly. Many newbies on this forum are asking advice and being misguided into using these by these overpriced greenhouse kits.
"Has anyone done a price comparison of wood to galvanized metal? At a recent seminar a researcher noted that a wooden frame might cost double what a metal frame structure would. "
Absolute garbage. I've been in building for 30 years. Either the guy was incompetent or a liar. also, note he did not say a finished kit but galvanized metal. A wooden structure will cost a third or quarter of the equivalent in a manufactured finished aluminum frame. It bothers me when I read folks promoting these kits with all their labor costs, mark up, shipping and so on added on to what would cost a couple hundred dollars of PT at your local Home Depot. I wouldn't be surprised if some company reps aren't lingering here and promoting certain manufacturers.
oregon_veg
17 years ago"A wooden structure will cost a third or quarter of the equivalent in a manufactured finished aluminum frame."
That depends. If you are talking kits, then they are TONS cheaper. Any home hobbyist can put one of these up. If we are talking wood (I don't agree it's 1/3 or 1/4 the cost) then there is the cost of construction. Not to mention that the upkeep is much more.
BTW, I'm not a company rep. I've built plenty of GH's , 75% of them wood because you're right "Wood is MUCH stronger" but it sure is not cheaper.
Just look at all the commercial Greenhouses. Why do you think most of them are metal framed? Is it because of a good sales pitch? No, It's the cost of construction and maintenance. Plain and simple. Wood is NOT cheaper.
IMHOTom
User
17 years agoAlpiner, you have obviously never seen my greenhouse. And it is pretty presumptive of you to guess at my construction experience. So I'm ignoring you and the rest of your comments.
Let's try to look objectively at wood versus aluminum...
First, wood kits. A quick look at the ACF GH site shows us that their wood GH kits are 1.5-2 times the cost of a comparably sized, mid-level GH like Juliana or Sundog. The cost of a 6x8 wood GH there is 5.5 times the cost of the 6x8 HFGH. I haven't done the research, but I suspect that this wood GH kit is comparable or even a little less expensive than a high-end kit based on $/sq ft prices. The initial cost of a home built wood GH is likely less, and almost certainly lower than a higher end aluminum kit.
I've never walked on the roof of a HFGH, but I suspect that a properly built wood GH is stronger than the kind of inexpensive aluminum greenhouses, particularly the HFGH, which people often complain about on this forum. But strength-wise, a higher end aluminum greenhouse is comparable to a well-built wooden one...you can hang from the ceiling, stomp around on the roof, pound on the frame...whatever.
Wood is higher maintenance, however, so bmoser is right about maintenance costs. The humid atmosphere of a GH may result in deterioration of wood unless the wood is treated with a stain or sealer. Aluminum will last practically forever without rust or rot. Wood frames are also subject to warping, as hdcochran acknowledges in his original post. A wooden frame results in less heat loss than aluminum because the wood doesn't conduct heat as well as the metal. Wooden frames are often larger and heavier, resulting in more shadowing in the GH. Finally, as I've said before, there is the often ignored issue of aesthetics. There are settings that aesthetically demand wood, and other settings that demand another product like aluminum.
So there are advantages and disadvantages to both types of structures. I'm not trying to mislead anyone. I'm trying to keep people from being mislead by statements like, "WAY BETTER than buying a package." Most readers of this forum are bright enough to read up and decide for themselves on the right kind of GH for their needs.
hdcochran, has anyone answered your question?
hdcochran
Original Author17 years agoI have really enjoyed this discussion and have learned a lot from you folks. The one remaining question I have is this: Can anyone suggest practical ways to avoid problems with warping of pressure treated wood? Thanks for all the help so far.
Hank
birdwidow
17 years agoHank:
To avoid warping of pressure treated wood, start with warp free lumber and have a place set aside to lay it out to dry, making sure it has plenty of support, to lay flat. Do you have a good, solid floor in a garage? If so, relegate the car to the driveway for a few weeks and use your garage as a lumber storage site.
Those who claim that wood framed GHs cost more are correct only as regards to a pre-cut structure. If you buy the lumber locally and cut it yourself, it will be cheaper to build your own than to buy a quality pre-fab aluminum framed one, and be far stronger.
I bought one of those "overpriced" aluminum framed GH's only because we are no longer young and vigorous and it was a case of buy what a pair of ancients could handle, or die without ever having my GH. So for us, it was the oft sad tale of finally having plenty of money, but no energy. (In my next life, I'd love to try having both. LOL!)
If we had been just 20 years younger, we would have built from scratch, with treated lumber, all SS fasteners, and used all vinyl thermopane windows, not polycarb. Such a GH might have ended up costing as much as my fancy Cross Country, but would have put it to shame.
BTW: If you are going to build, start with very carefully laid out plans. If you know the size of each cut piece, you can and should use a good penetrating oil stain on every piece of wood after you cut and before you erect. Then, you will be able to get to every inch of it, including the cut ends.
hdcochran
Original Author17 years agoBirdwidow,
Thank you for your helpful post. I will dry the boards in the garage for a few weeks before using them. In order to stain the pieces before installing them though, I'll have to measure, cut, stain, dry, install each piece before starting the next because I'm neither a good enough designer nor a good enough carpenter to cut and stain them all before begining to erect.
birdwidow
17 years agoOkay hd. I understand. But you can still save yourself a lot of stretch labor on ladders, and drips in your face.
Once your lumber is good and dry, oil stain it, then let it dry overnight, before turing it over for the other side. If your garage is heated, all the better and a floor fan would help too.
You will need a few days at least, to do one side and the edges, then turn it over and repeat. If you don't have several sets of saw horses to hold the lumber to work on and let the stain dry, make some. It will be worth the small cost and effort.
If you need to do it all in batches over the course of days, or a week, do so. Just do a batch in the gargage where you can ignore the weather, and when dry, if you run out of room to work, just stack the stained ones outside under a tarp until all are done. Then start cutting.
You will be grateful for your patience later, when all you have to do on the finished structure will be to take a small can of the stain and a disposable foam brush, and dab at any exposed cuts.
BTW: regardless if you plan a solid or semi-transparent appearance, start with the semi. It will penetrate better. You are going to spend some on the stain. Don't chintz. Use the best quailty stain, and a good brush. Use it liberally and allow the wood to absorb as much as it can. It will fade in time, but the resins in the stain will have penetrated into the pores of the wood and sealed it if not forever, long enough for you to enjoy your GH for many long years without the need to do it again.
The last thing you want to need to do after your GH is completed, before you have had some years to enjoy it, will be to climb on it to restain the frame, while trying to avoid dripping it all over the polycarb.
User
17 years agoThe next question is drying time. Traditionally in my area it is recommended that you wait 6 months before applying paint, stain, or sealer to treated lumber. A quick google search reveals recommendations from 6 weeks to 6 months. HDCochran, I see that you are zone 8...where in zone 8?
I would work toward two coats on all of the end-grain cuts.
I give up on the strength issue.
hdcochran
Original Author17 years agoStressbaby.
Zone 8a in Oriental, NC, on the Neuse River and Pamlico Sound. 6 months is what I've always heard, but I'll probably do it with stain and probably in weeks not months.
Hank
bihai
17 years agoBirdwidow,
Yes, you may have used treated wood in planting beds and not noticed any damage to the plants you have planted next to it. (you said you stained yours first).In Florida we commonly use treated landscape timbers to form planting beds for perennials as well and we generally do not stain it first. I too have not ever noted and damage to, or stunting of, my in ground plants.
The situation I am talking about is differnt.
My friend's greenhouse wood is not stained or painted. The structure has been up for about 10 years now, its not a new structure. And still, the treated wood leaches toxic chemicals that damage her plants.
Having a plant in the ground surrounded by soil that helps to disseminate the chemicals, and having the plant absorb the chemicals through the roots, is a totally different circumstance than having potted, bench grown plants having a concentrated amount of heavily contaminated water dripping right onto the leaves.
The damage my friend's plants have suffered is not systemic, its contact, so to speak...the water from the wood drips on the plants and damages the leaves severely, causing burns, deformities and rot. She has tried to move plants around to minimize the damage but its hard to do.
She grows a wide variety of plants: orchids, bromeliads, succulents, carnivorous, cacti and euphorbia, sansevierria, staghorns and other ferns, and many large potted plants as well. Her husband collects rare caudiciforms and carnivorous plants. At one time or another some of all genus has had damage from the treated wood drip syndrome.
I think the answer to this may well be to paint or stain the wood. When they built their greenhouse years ago, they had come from Ohio where the humidity and condensation were not a problem like it is here in the intensely humid Florida climate. If they were to build a new structure, I am sure they would do something differently (paint the wood, or not use wood at all), but for now they have a 2000 sq ft totally functional nice greenhouse with no plans to spend the money to build a new one so they have to "make do" with the problem of the treated wood damaging their plants. Its not an overrated problem.
birdwidow
17 years agobihai: As you wrote: "I think the answer to this may well be to paint or stain the wood."
I agree.
bcfromfl
17 years agoI, too, am planning on building a greenhouse sometime in the future using pressure-treated wood. Birdwidow above recommended drying the wood laying flat on a garage floor. I've done this with wood for other projects, but I still experienced warping problems, and even "cupping" on 2x4s. In the lumberyard wood is transported with straps, and stacked that way in the warehouse until ready to be sold -- keeping it straight. Does anyone have suggestions for warp-free drying?
I checked into kiln-dried pt wood, but the pricing is astronomical, not to mention that it's not available locally in profiles other than 2x4. Fresh pt wood is AWFUL on tools! That gummy stuff mixes with sawdust and makes almost a glue of sorts that cakes in hard-to-clean spots on circular saws and power drills/bits.
I'd like to paint the frame gloss-white, but most of the recommendations above (and on the web) seem to be with stains. Any suggestions for how to achieve a long-lasting gloss-white finish? (That to somewhat combat the increased shading-profile of the wood structure.)
Thanks!
Bruce C.
bcfromfl
17 years agoAlso as a note to hdcochran -- it sounds like you might be over-building your greenhouse. I live in zone 8a like you, and we have no snow-loads to worry about. Not only are the heavier lumber profiles you mentioned going to cost more, but they will produce a substantial amount of shade -- especially in the winter when the angle of the sun is lower.
If you use select lumber, you can get away with less wood, and thinner profiles. Additionally, your roof pitch doesn't have to be as steep, or require as much bracing/trussing.
Bruce C.
hdcochran
Original Author17 years agobcfromfl:
Thanks for your two posts. Regarding lumber profiles, my plan is to have the load-bearing members be central and end posts with a single cross-beam halfway up the roof and a heavy ridge beam. Then, the studs and rafters can be on 24" or greater centers. The top plates and single purloin on each side of the roof then distribute the load and may need to be 2x6. I am designing so that the frame will support my weight if I have to go on top. With these additional details. do you still think I am going too heavy with the sections? Any how, 2x2's or 2x3's are not too easy to find.
WRT paint vs stain, PC mfgrs recommend paint, and paint is far more durable. I'm planning to go with top quality exterior paint.
Hank
bcfromfl
17 years agoHi Hank --
It still sounds like you may be a little heavy, although without seeing a complete plan it's hard to say. Remember that your structural strength will be added to considerably with the attachment of the polycarbonate panels.
My dad is a retired engineer and helping me come up with a light yet adequate design for my orchids -- some of which require a lot of light. He built an immensely-strong greenhouse next to his home in upstate New York. See the link below for a detailed description of his project.
My dimensions are a little different from yours -- I'm working on a 10 x 14 design. So, my rafters will only be a hair over five feet, compared with yours at a shade over six. Also, I'm planning on a peak of nine feet with eight foot walls -- very minimal pitch. You most likely don't need the cross-beam you're talking about. The load from rafters is transferred to the walls, trying to spread them apart, and not so much on the rafters themselves. Some greenhouse designs have reinforced the walls to compensate for this with the use of heavy wire/cables running from wall header to wall header.
4x4 posts are good, but many studs and purlins (except those around the door, exhaust fan, etc.) can be 2x2. The only purpose for the ridge beam is to assist in setting up the rafters and afterwards to counteract some mid-point settling, so it could be something as innocuous as a 1x4.
As far as climbing around on the roof afterwards, take two pieces of plywood wider than your 24" rafters, and staple soft carpeting to one side. Place it on the roof so each piece of plywood straddles the peak, and slide it carefully as you have a knee on each side. The rest of the roof you can access from the sides with a stepladder.
Don't mean to change your ideas radically, but it may be worth rethinking some things.
Bruce
Here is a link that might be useful: Stu Culp's Greenhouse
kittyl
17 years ago'Those who claim that wood framed GHs cost more are correct only as regards to a pre-cut structure. If you buy the lumber locally and cut it yourself, it will be cheaper to build your own than to buy a quality pre-fab aluminum framed one, and be far stronger.'
I couldnÂt agree with you 100% more.
I would NOT use pressure treated wood. Pressure treated is for posts in the ground or retaining walls(to prevent rotting), but NOT needed for above-the-ground upright structures. The cost of pressure treated wood is substantially higher than using something like fir. Just stain the fir. And you donÂt have to stain and dry on the ground. I stained my greenhouse all in one day. Check out my post of Nov. 06 http://forums2.gardenweb.com:80/forums/load/strucs/msg112353188489.html
I love my greenhouse and I saved a ton of money building it myself (well with hubby building it) and everyone who sees it just awes over it!
Here is a link that might be useful: Pics of greenhouse
bcfromfl
17 years agoThe use of pressure-treated wood depends upon a couple of factors, and you're right -- it may not be necessary for all.
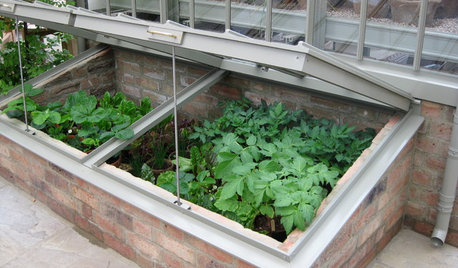
If the structure is to be a "dry" greenhouse for use as a cold frame, starting seedlings in trays, winter-protecting sensitive plants, etc., then pressure-treated wood is probably not required. If the greenhouse is a dedicated environment for established, mature plants, such as orchids, bromeliads, cactii, tropicals, etc., complete with automatic watering, then I would say that pressure-treated lumber is necessary. The increased humidity, regular splashing/misting of water on wood, etc., makes challenging conditions for untreated wood.
Another benefit from pressure-treated wood is protection from termites and other wood-boring insects. In my area, that makes it worth the expense alone. I can go just a few feet into the woods behind our home and roll over a branch or log, and see dozens of the little white monsters! There are types of wood that are somewhat insect-resistant, but they aren't available in all parts of the country.
Bruce C.
nathanhurst
17 years agoIf you put glazing on the inside of the wood frame then untreated timber is fine even for permanent plants. The extra air gap is very beneficial for insulation too, and you can use non-UV protected materials. I use PVC shrinkwrap on the inside to good effect.
bcfromfl
17 years agoThanks very much, mokevinb, for your great suggestions! I didn't know that latex could go over oil -- sounds like a perfect combo!
It looks like I'm going to have to figure out how and where I'm going to stack the wood to dry. From what you wrote and what I've read elsewhere, plus my own experience working with the stuff, it's really the best way to go. Can't do it in the garage, but I'll figure something out...
Thanks again!
Bruce C.
mokevinb
17 years agoBruce, If you've got to stack it outside try placing a layer of plastic onto the ground, elevating the stack as previously mentioned, stack with the splinters between the layers of material and then place 2xs on the top as splinters and a piece of plywood on top of that. Finally cover the entire stack with a tarp, make sure it is well weighted down to prevent it from blowing off, but try to let it have some means for there to be some air movement getting under it and around the wood. If necessary remove it on hot sunny days, too much heat can be just as damaging as too much moisture.
birdwidow
17 years agoBruce: Moke is right on with both the proper way to dry wood, and the linseed oil, but make sure it's BOILED and not raw.
He is also correct in the best way to prepare unfinished exterior wood for finish painting, especially siding and trim on any structure.
However, I disagree about the latex paint, at least for the INTERIOR of a GH. If you lay on extra coats of the linseed oil thinned white, oil based paint, it will color the wood a soft, near white and while it will fade over time to a soft silvery grey, unlike latex, it will never, ever crack, flake or peel.
bcfromfl
17 years agoThanks again for your suggestions! I'll have to find an out-of-the-way shady spot where they can sit for a while. Really got to start nailing down design details now so I know exactly what I'll be needing...
Bruce C.
trdawson122
8 years agolast modified: 8 years agoThank you for all the info, I am helping build a greenhouse for momma and I since the deer eat everything in site. I was given 5 sets of french doors, a sliding glass door and a couple windows. I will be buying the wood and the Suntuf 26 in. x 12 ft. Clear Polycarbonate Roofing Panels for the roof. What would I connect french doors with, what kind of brackets and the french doors with be one wall. Thank you in advance. Tammy


mokevinb