


method for leaf propagation between paper in ziploc bags.
I wrote this up yesterday for a Facebook forum.
It was already long, but I actually expanded it here.
.
First: an example of how this method can work
Second: A brief description of the method
Finally: Detailed comments about the method, how to do it, and potential problems.
.
An Example: Begonia 'Starry Nights'
The example is one that's easy using conventional propagation; the difference using this method is that the yield of plants is very high.
This is rex Begonia 'Starry Nights':
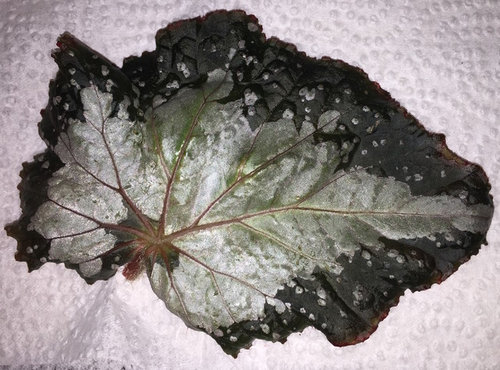
On October 9th, this was chopped up into over 100 pieces:
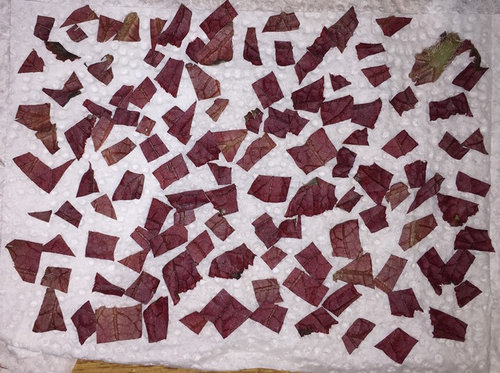
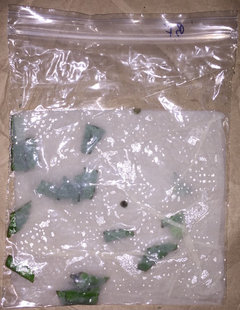
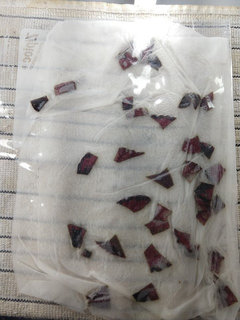
These were then put in a ziploc bag between two layers of a paper napkin, sterilized and washed. They grew roots and some plantlets. On November 19th:
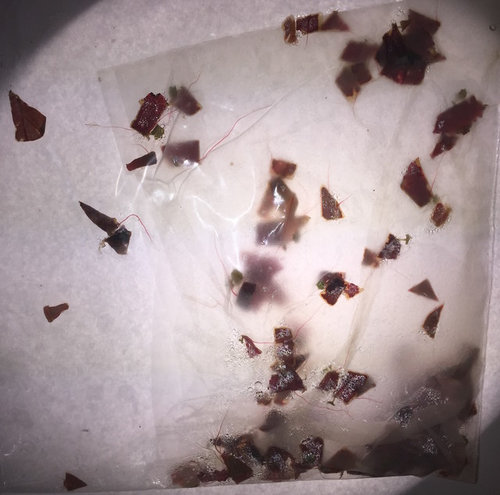
The were removed from the ziploc bag:

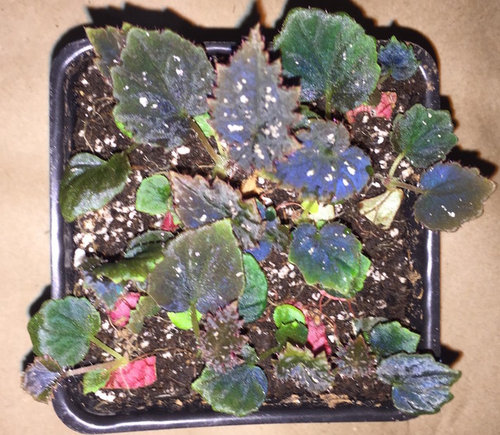
Placed on soil, and on December 10th some (less than half) looked like this:

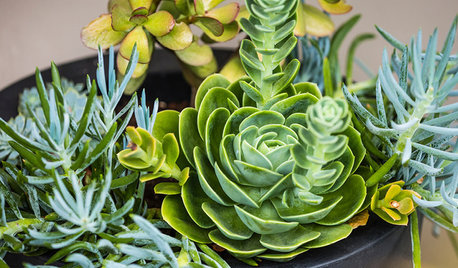
And here's a few of them today, very close to 3 months after starting:
.
Summary of the method and why I use it:
Why do this—what are some possible reason it succeeds? Some of my first experiences were trying this with leaf fragments that decayed upon incubation using conventional propagation—often quickly. I think the sterilization (which is probably only partial) of the ziploc bag contents removes many of the potential pathogens. Further, I think even in cases where conventional propagation of leaf fragments works, it allows smaller pieces of leaves to callus without challenge by as many pathogens or competitors. Thus, the number of sites for plantlet formation for a given area of leaf is increased. Ultimately the yield of plantlets can be greater in many cases. There may be other factors at play, for example, the entire piece of the leaf can utilize light when in the ziploc bag—there’s no need for a portion of it to be buried in the medium.
A quick rundown of the technique: A leaf is (usually) cut into pieces, then placed between two layers of either paper towel or paper napkin. This is then slid into a ziploc bag of the appropriate size. The contents of the bag are first sterilized with a roughly 10% (1 to 10 dilution) of household bleach, and incubated 2-5 minutes. Somewhat higher concentrations or longer incubation times are possible, however they must be balanced against damage to the leaves. Likewise, different agents may be used to sterilize the bag contents, the most obvious of which is alcohol (isopropanol or ethanol).
The contents are then washed thoroughly with water that is as absent of pathogens as is reasonably possible. True sterile technique could be attempted by those with the equipment (an autoclave for the water, a fume hood, etc.), however for most, “semi-sterile” technique should be attempted. Assume that the air and especially all contact is a source of potentially deadly pathogens, and minimize or avoid exposure. After 7-10 washes, which can extend over hours, the free water is drained. The paper will remain wet, and perhaps even some pooled water will remain in the bag. In modest amounts this is fine.
The bag is then exposed to light for a period of weeks. Hopefully after 2-8 weeks, or so, roots will appear. At some point a decision will be made to transfer the leaf (pieces) either on top or inserted into soil. They need to be kept very humid, especially at first, and from this point on, they can be treated as any other leaf cutting. Plantlets can be either left attached to the original leaf (piece) or removed, and so on.
I’ve tried this mainly on Begonias and Streptocarpus, with generally good results. Some attempts have failed. Others have been very successful.
I would recommend trying this with something unimportant until the technique is easy.
It appears I've reached a limit in terms of photos; I'll split this into two posts.
Continued....
Comments (15)

mark4321_gw
Original Author6 years agoContinued from above:
Detailed comments about the method
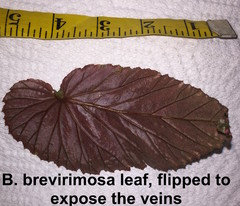
1) Choice of leaf: In general, the same quality of material as use for any leaf cutting is important—leaves that are not too soft, and not senescent, either. Some damage can be tolerated, as it can simply be removed. For this thread, I”ll follow two examples which I started a week ago: a) a leaf of Begonia brevirimosa and b) a fraction of a leaf of Begonia sizemoreae. I’ve succeeded with B. brevirimosa in the past. B. sizemoreae I expect should work, although this particular plant was severely stressed after being outside in the cold wet rains in November. it dropped leaves, and I was concerned about rot. I suppose there still could be a problem, and this plant could serve as an example of a plant where a leaf or a portion of a leaf is propagated to potentially save the plant.
Begonia brevirimosa leaf:
This part of the Begonia sizemoreae leaf was removed: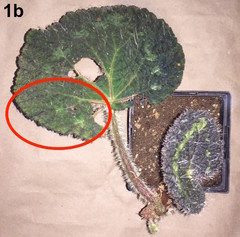
2) Preparation of leaf
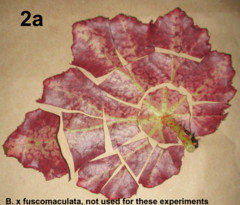
a) How to cut: Generally what I do is to remove a small piece containing the petiole, then cut the rest of the leaf into pieces between the main veins. Those pieces can be further cut into pieces which intersect the main vein(s). The goal is to choose cut sites so that the number of cut veins on the proximal side (closest to the petiole) meeting with the cut sites is maximized. Photo 2a shows in general how such pieces can be generated. In practice, I’ve cut leaves sometimes into many more—as many as 150 pieces. It still works, although damage by bleach is potentially greater.


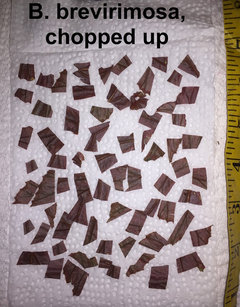
b) Size of pieces: This really depends on the leaf and how many plants one hopes to obtain. I would suggest experimenting, if the material allows it. Even with one leaf, one can generate different sizes.
3) Transfer of leaf plus Paper towel (or napkin) into ziploc bag: The leaf pieces should be spread out on a pieces of paper towel or paper napkin, which can be cut to size, if necessary. I try to do it so the the other half simply folds over, and not use two pieces. That way there’s less tendency to slide, and the fold can be positioned towards the opening of the bag, preventing pieces from exiting. To get the paper plus leaf fragments into the bag, I fold it carefully in half, then insert that into the bag, then unfold. It makes sense to practice this with any leaf other than one’s prized plant for the first try. All steps can be practiced with something nonessential, of course.
4) Sterilization with bleach: I make up a 10 oz. cup with approximately 10% (1 to 10) dilution of household bleach. I don’t measure the quantities, but eyeball it. I originally said 5%, but checking what I eyeball, it’s clearly closer to 10%. Add enough bleach solution so that the contents are thoroughly immersed—ideally with little air. Slosh and flip the bag around, while trying to avoid moving the paper and leaf pieces. This may take practice.
5) Washing with water:
a) Water quality: I use our tap water, which is from the Hetch-Hetchy reservoir in the Sierra Nevada Mountains, then Crystal Springs reservoir South of San Francisco. As such, it is some of the highest quality water in the U.S. and used without modification on plants such as carnivorous plants. So if one wants to try similar water, one may want to dilute tap water with distilled water. I believe about a 4 or 5 fold dilution would do it in many cases, although it depends on the quality of one’s own tap water. I do not know if water quality is crucial.
b) Water sterility: I use disposable microwavable containers from the dollar store which are only used for this purpose. I do reuse them. They should not be a significant source of pathogens. I microwave water for 6 minutes, and then let it cool to room temperature. In a pinch, I put the water in the freezer after boiling, check by pouring some on my hand, and re-microwave and retest if I overshoot.
c) Semi-sterile technique: Potential sources of contamination should be minimized. In the example just above, testing water temperature (which may be deceptive based on touching the container) never stick anything into the water, especially not a finger. Pour the water out. Keep the water container covered whenever possible. Watch for splashes, especially of bleach solutions. Pretend that you have just had contact with someone with a deadly virus—it’s on your hands, and in the air, and that keeping the water solution pure is your only hope. Whatever works. The water needs to remain untouched.
d) Opening the bag: Don't pry the bag open with your fingers—you are touching exactly the surfaces where the water needs to go in and out. Try sliding the two halves of the bag relative to one another, at the zipper region—nothing should go in or out of the bag with such a motion. Two pockets should be created through which water can be poured out of the container (see photo). This may take practice.
e) Timing of washes, length and number: I add enough of the water to throughly immerse the contents, and as with the bleach solution, I try to avoid too much air in the bag. I would alternate short and long washes. A quick wash quickly gets rid of much of the bleach, however the volume associated with the paper does not equilibrate. Longer incubations before pouring off the water allow this, but they are more time consuming. I would let one wash go several hours or overnight, just to make sure the residual bleach equilibrates completely. I use so many washes (7-10) because during each wash a sizable volume of water remains in the bag. To get rid of 99.999999% (or whatever) of the bleach requires multiple washes. Too many washes, of course, could in principle increase the risk of contamination.
f) Movement of leaf pieces: Try to be gentle and reduce the movement of leaf pieces and paper. Some leaf pieces may exit the bag and some may end up down the sink. This is unavoidable. Sometimes two fingers (on the outside of the bag!) can keep a piece from exiting the bag. I find that if a few pieces exit the paper towels, but remain in the bag, it is generally fine. Often they seem to root first, or maybe it’s just easiest to visualize.
Again too long. To be continued...mark4321_gw
Original Author6 years agoContinued from above:
6) Incubation of ziploc bag
a) Light levels/duration: After the water is drained (some may remain, and the paper will still be very wet), the bag should be exposed to light. I use light that’s on 24/7. I don’t know if this is good or bad, and I have no particular reason to change it. The optimum light level is not clear to me, but as a first guess I would say something similar to that used for cuttings in general. However, I have had leaf pieces all clump up in the bottom of a bag, and they root just fine. I tend to lay the bags flat, wherever I can find a spot, although sometimes I’ve taped them to walls (tape the zipper part, so as to not damage the actual bag). Since they transmit most light, I suspect hanging them vertically in racks might be most efficient.
b) Temperature: This is something I have not explored, although it must have a huge effect. Right now I am at about 66 F (19 C), although must have been a few degrees warmer in the Fall or late Summer when I started this.
7) Checking for results: I like to hold up bags to a light bulb and use a magnifier. A magnification level that’s not too high works to get a quick look. Checking both sides is important, as roots are usually only visible from one side. Sometimes they are clear in color, sometimes red…
8) When to open the bag: I open the bag and remove the contents when things feel “right”. For example, when it seems that a nutritional source will help things—often progress seems to slow down. When most pieces have roots, or especially plantlets, I would consider it. And if conditions just seem to be deteriorating, I take action quickly.9) What to do with the contents
a) horizontal or vertical (inserted): After opening opening the bag, I try to expose the piece as little as possible to room air. They've been swimming in moisture for weeks. Depending on the cuttings, how many, how many have roots, i decided whether to lay them on top of soil, or insert in soil (or both). In general, cuttings with roots do better inserted in soil. And cutting without roots do better inserted, but of course only in the proper orientation. If the orientation is unknown, it's better to lay them flat.
b) Humidity and sterility: I try to keep the newly removed leaf fragments at essentially 100% humidity, spray them with water if necessary, and so on. I’ve never sterilized the soil. I normally figure that the cuttings have had so much time in a relatively low pathogen environment that they have callused fully and are fairly resistant.
10) Types of failure
a) Leaves get damaged by bleach: This is a huge concern. In my experience the damage often becomes apparent after 2-3 days then stops. Sometimes the cut edges of the leaf pieces die, which is often not a problem, other times the entire piece will die, which of course is. Solutions are to alter the concentration of bleach or the time of sterilization, or to use a different agent to sterilize. See for example, here: https://www.sigmaaldrich.com/…/b…/explant-sterilization.html Note that Isopropanol can be used in place of ethanol. Also note that over the counter Hydrogen Peroxide is usually only 3%, I think. I favor bleach because it kills pretty much everything.
b) Contamination: This could be either microbes that survived sterilization, came in with the washes, or somehow entered the bag in other ways.
c) Failure to root: Even if everything is perfect, no doubt there are plants that can be propagated by leaf cuttings which will fail here. Some things will be impossible and/or require significant modifications of this technique. There could be a number of reasons.
d) Failure to transfer to soil: I’ve been asked this several times. I have never observed this problem. I would suspect that humidity which is too low could make it seem that this is a problem.
e) Others? All sorts of things could go wrong, and at this point I’m really just speculating
11) Potential problems/solutions:
c) 24 hour light: This could be a problem for some. I know that there are species which do poorly when grown under 24 hour lights (tomatoes are a good example). If all else is good, and there are no roots, i would put the bag in the dark for a day, or put it on a 12 hour cycle.
d) Temperature: This could also be something to investigate if all is good, except no roots.
e) Need for darkness or medium at roots. Another thing to try with stubbornly unrooted pieces might be to open the bag and stick them in perlite or another medium. I’ve gotten the sense before that unrooted pieces often suddenly root when this change is made. Even if they don't root in the ziploc bag, cuttings that are otherwise impossible might be first stabilized there, than can progress to conventional propagation techniques.
If anyone has any additional observations or improvements, please let me know.Related Professionals
Middle River Landscape Architects & Landscape Designers · Salisbury Landscape Architects & Landscape Designers · Stoughton Landscape Contractors · Wilmington Landscape Contractors · Arlington Landscape Contractors · Canby Landscape Contractors · Dallas Landscape Contractors · New Providence Landscape Contractors · Reedley Landscape Contractors · Roseville Landscape Contractors · Tustin Landscape Contractors · Whittier Landscape Contractors · Destin Siding & Exteriors · Rahway Siding & Exteriors · Wilmington Siding & Exteriorshc mcdole
6 years agoLong post so I will probably save it for a later read. I may direct our club in Atlanta to this site in case anyone is interested in making more with a little.
mark4321_gw
Original Author6 years agolast modified: 6 years agoThis is also relevant. A list of what I've tried (as far as Begonias) and where they stand:
Full Successes:
B. ’Little Brother Montgmery’
B. U614
B. ‘Tornado’
B. ‘Starry Nights’
B. brevirimosa
B. ‘Super Curl’
B. ‘Cook’s Swirl’
B. amphioxus (but lost everything on a second try)Likely to be Full Successes (rooting right now):
B. ‘Red Fred’
B. formerly known as B. perakensis
B. ‘Harmony’s Wild Fury’.Partial Successes (only some leaf pieces survived and rooted):
B. difformis
B. cleopatraeToo soon to say:
B. carolineifolia (looks bad)
B. laternaria (looks bad)
B. ‘New Orleans Masquerade’ (would be a partial success at best)
B. ricnifolia or relatedToo soon, but I will be surprised if these fail:
B. sizemoreae
B. ‘Curly Fireflush’Likely failures:
B. chlorosticta (small, thin leaf from a very small plant).
Begonia bogneri (long, narrow leaves have very high surface area to volume, which opens them to severe damage by bleach) .mark4321_gw
Original Author6 years agoPeople often ask why the need for (partial) sterility. It looks like some sort of fungus got into this bag of Streptocarpus 'Blue Frills'. Perhaps it spread with a wash to the other part of the bag (the second colony near the top)? This is recent--I haven't tossed it, but I'm watching very carefully. Now imagine lots of colonies like this and think you can see there would be a problem.

phreckless
6 years agoFascinating and an excellent write up. I have been mostly doing either water rooting or propagation in pure perlite to minimize my failures. I can’t wait to try your method!
I’ll document my experiments.
Thank you for making the effort to write up your method.mark4321_gw
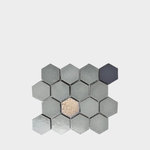
Original Author6 years agoI just noticed this--it's a good example of how even the smallest piece can root. This must have broken off a larger piece. From Sinningia speciosa (Gloxinia), possibly 'Touch of Spice'. The coin is a dime (17.9 mm for non-Americans). I expect this to form a tuber and eventually a plant.

mark4321_gw
Original Author6 years agoI want to edit the success/failure list to bump B. lanternaria to the partial success list--a couple pieces have rooted. The former B. perakensis and 'Harmony's Wild Fury' also get moved to full successes. I don't see the option to edit for some reason.
mark4321_gw
Original Author6 years agoHere's what Begonia sizemoreae looks like as of Feb. 6th, so a little more than a month after beginning December 30th.

Tiffu (Oregon 8b)
6 years agoRandy, I'm trying your method just for giggles with my rex Red Kiss. Mine is not nearly as neat as yours, haha!
Tomorrow marks 1 week in the bag...think I saw my first root today??
mark4321_gw
Original Author6 years agoCongratulations. That's fast. What temperature are you doing this at?
Tiffu (Oregon 8b)
6 years agoThe portion of the house that my plants are in is half underground. We run central heat at about 70F, but it stays cooler downstairs usually and that room in particular has all the vents closed. I'd say with big circulation fan blowing on them it's probably in the mid to high-60F range, probably closest to 67-68F during the warmer weather we've been laughingly calling 'winter'. I don't have a thermometer in that room but the living room registers a solid 68F most of the time. Might be a bit warmer considering the lights -- they are LEDs though and do not give off a lot.
Probably just got lucky. The rest of the pieces are doing nothing except a few that are possibly molding. Do not quite have the sterilization washes down. I'm a clumsy gal and while my brain understood the concept, my hands were not always as quick to obey, haha.Tiffu (Oregon 8b)
6 years agoA fun update here for this! Yesterday I opened the bag -- A few pieces were openly rotting and I was getting concerned that it would spread to the healthy pieces so I decided it was time. Here are my results.
Begin Date: 2/14/2018
Time since Start: 6 weeks
Of the total 36 leaf pieces, 4 rotted entirely. Of the remaining 32 pieces, 4 did nothing -- no roots, no rot.

Maybe if I had left them longer they might have eventually done something, but given their exposure to the rot, I opted to just get rid of them. That left me 28 pieces of leaf that successfully rooted. Of these 28 pieces, MOST of them had baby plants already!
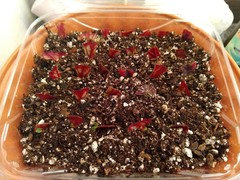
All of these went into the closed cookie container (best upcycle ever!) with lightly dampened soil and were misted well before the container was closed. Now we wait some more! :)

Rosie1949
6 years agolast modified: 6 years agoCongrats on your success! I see baby leaves!!! Rosie
PS Gotta love those containers!


mark4321_gwOriginal Author