


How to fix gap between ceiling and kitchen crown molding?
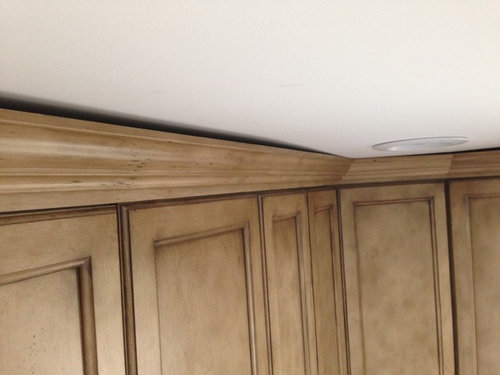
Doing a complete kitchen remodel. The ceiling drywall is all brand new with the remodel, though the house was built in 1958 so the ceiling joists are not all level with each other. When our cabinets and crown molding were installed it became apparent how not level/flat the new ceiling is. A worker who was at our house last week for another purpose, noticed the large gaps in between the ceiling and molding and stated that he would have shimmed the new ceiling drywall to avoid this problem. I'm curious if that worker was correct-- could this issue have been avoided and the ceiling been shimmed?
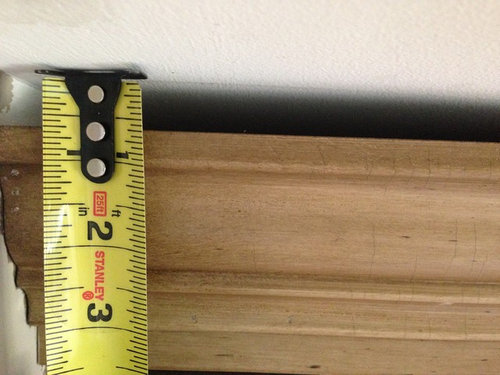
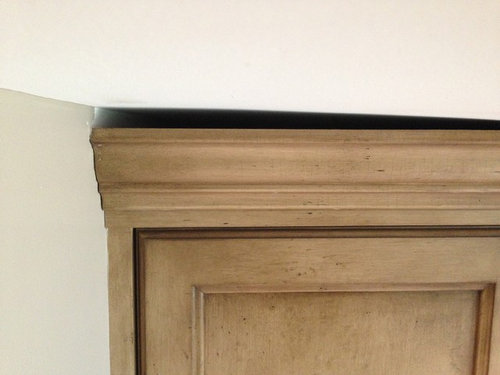
My other question is, given such large gaps (the biggest is 5/8") how should the gaps be filled? Some of our workers have said skim coating. Someone else said caulk. We want it to look as unnoticeable to the eye as possible. We've heard contradicting things between our contractor and his project manager, but they have been slow to fix this issue (the cabinets and molding were installed a month ago). There are a few spots that the molding is flush with the ceiling. We just want to know from knowledgeable sources what would normally and professionally be done in this situation. Thank you!
Comments (30)
 PRO
PRORockin' Fine Finish
9 years agothe crown could've been scribed to the ceiling but the difference is huge the crown would look funny if 5/8 is the biggest gap is pretty even or does it fluctuatelfblair768 thanked Rockin' Fine Finish
lfblair768
Original Author9 years agoThere are a few areas where the molding is flush with the ceiling, but the gaps vary in size. A lot of the gaps are about 1/4 inch, but it does fluctuate.
Related Professionals
Clinton Township Interior Designers & Decorators · Vineyard Kitchen & Bathroom Designers · St. Louis Furniture & Accessories · Adelanto Furniture & Accessories · Alpharetta Furniture & Accessories · Miami Beach Furniture & Accessories · Rogers Furniture & Accessories · San Juan Capistrano Furniture & Accessories · North Bellmore Furniture & Accessories · The Crossings General Contractors · Ames General Contractors · Havelock General Contractors · Highland City General Contractors · Pinewood General Contractors · Riverside General Contractors
L J
9 years agoThink caulk would just make it more obvious. Think working something with the crown is your best option. Is there a matching issue with the crown? If not think you could remove what you have and redesign with something that the variances would not be apparent.lfblair768 thanked L J PRO
PROCinar Interiors, Inc.
9 years agoYour least expensive way to fix would be to caulk the gaps, choosing a color that blends with your cabinet color. You will always know it's there but it will not be an eye sore for those who are visiting. Their eyes will be drawn to the cabinets instead of where the cabinets meet the ceiling.
lfblair768 thanked Cinar Interiors, Inc.lfblair768
Original Author9 years agoThank you for everyone's input. The workers showed up today with instructions from our contractor to do skim coating. So far it actually looks decent. Will be interesting to see when it's all done, but I think it might blend alright. Part of our confusion (and frustration) was the we'd heard some workers suggest skim coating, but then the project manager freaked at us for suggesting such a thing and said it needed to be caulked. We ended up speaking to the contractor and he said it needed to be skim coated. Because of all the conflicting opinions, I really wanted to hear how others would correct an issue like this. I definitely think the skim coat will look better than caulk, as it can be blended in better with the ceiling.
I think our project manager was given a reprieve from our project after yesterday's communication issues, a different manager came today. I asked him if shimming the ceiling would have avoided the problem and was told that is not to code. We are in Southern California. He also said the only ways to fix the gap problem was to fix the framing in the ceiling or do skim coating. Clearly there are several ways to skin a cat, my goal is that it looks good and not distracting. :)User
9 years agolast modified: 9 years ago"Shimming" would only be not to code in certain situations and even then, only if the shimming was done with these types of small pieces that are literally called shims.
"Fixing the framing in the ceiling" is also referred to as "shimming" as opposed to cutting or trimming the framing in the ceiling, which would be against code. The worst case scenario would be a fire rated assembly where a solid (full lenght and width of the joist) tapered piece of wood can be glued to the underside of the appropriate joist(s) and then using longer sheetrock screws. Shimming in the correct sense of the word is not against code.
It seams like your biggest problem is communication. Skim coating should work just fine as well, although I generally think it is easier to skim if the problem is under 1/4" and only occasional, while shimming or fixing the framing before sheetrock is easier with this much variance.
lfblair768 thanked Userlfblair768
Original Author9 years agoThank you, Fred. First, you are absolutely correct that our biggest problem is communication!!! That's an understatement for this remodel. The manager who mentioned fixing the framing said that that was the pricey and involved option. Are you saying that the fire rated assembly scenario is what is to code? Just curious. Anyway, the skim coating was done yesterday but we are still waiting for it to dry in some parts before they can sand it. So far it doesn't look bad, it'll be easier to tell once everything is sanded and the tape/plastic sheeting is removed from the cabinets and molding.
User
9 years ago"Are you saying that the fire rated assembly scenario is what is to code?"
Not exactly. I am saying that the only way "I asked him if shimming the ceiling would have avoided the problem and was told that is not to code." isn't just a bunch of BS is if the kitchen ceiling you were trying to "shim" down was over 1,000 square feet and only if it was also done in such a rediculous way as to leave air spaces under the joists as a means for a fire to spread. The likelihood of
coming into play here is about 0%. It was just an excuse to pass the blame.
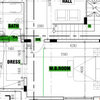
As I look closer at the first picture. I don't believe, or see how, that particular low spot could possibly be a low joist.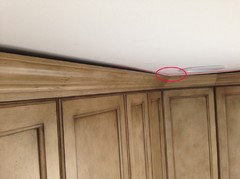
If it was, the joist would be low the entire distance, either north-south, or east-west, making one of those two straight runs of cabinets much closer to the ceiling all the way across. In addition, the low spot is usually in the middle of the joist span, not in the corner. It is much more likely that the carpenter either left some nails in the joist from the old drywall sticking down, or nailed some backing in the corner too low.lfblair768
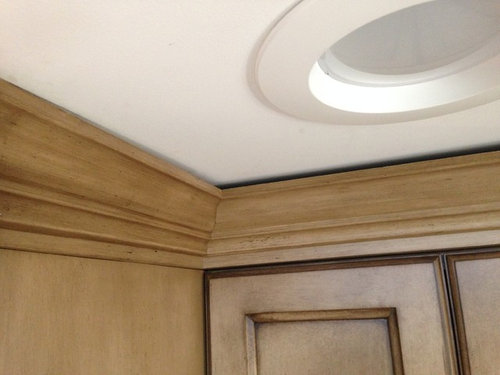
Original Author9 years agoThanks, Fred. The photos I already posted are mostly of the wall that has the fridge and stove. Adding another one to give more context. The joists run the direction of the sink wall. The molding above the sink is mostly flush except for in the corner-- where you made the red circle.
We added the skylight. I seem to remember seeing uneven beams when the skylight was built but I thought I saw the wood had been straightened out before the drywall was added- though I don't think the skylight should effect the crown molding.
Generally, the kitchen is actually looking pretty good. It's just been very depressing and frustrating with the number of big mistakes and ripple effects that have occurred. All along the way we have been assured that things would be fine, but such mistakes leave me reluctant to trust our contractor.
PS- thank you for the advice a while back about the recessed light placement. I'm happy with it.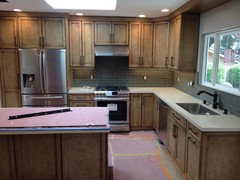
lfblair768
Original Author9 years agoAlso, Fred... IF you have the time.... I'd actually be curious as to your opinion on a floor issue we're having as well:
https://www.houzz.com/discussions/how-important-is-a-level-kitchen-floor-dsvw-vd~2922444
One thing that has been nice through this project is the invaluable wealth of information given from Houzz members, so thank you for the time you have taken to help me and others!User
9 years agoIt should all turn out fine in the end :) What I find that is the biggest problem usually, is just as you say. A little problem that could have been fixed to some extent earlier, becomes a bigger one as different trades try to just cover it up. Sometimes, they never even notice the extra little bump in the ceiling, and sometimes they just figure it isn't their concern and are just trying to hurry up and get done so they can get paid, which usually slows down the whole job :-/ It has been my experience that it is easier and faster to fix at least some of it, or the extremes, before sheetrock, and then only need to spend half the time on skimming at half the thickness. But, when it is done, you should be the only one that will know the difference, and since I wasn't there to point out the obvious place or two that I would have taken care of before sheetrock, this could have been one of the few exceptions ;D
On the floor thing, specifically the slide in range problem, what type of counter tops do you have, and how thick are they, exactly?
User
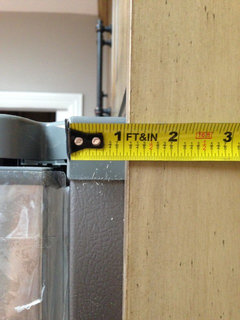
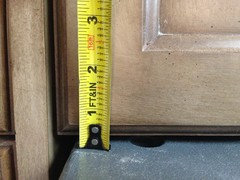
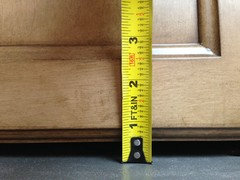
9 years agoAlso, can you post that last picture on the other thread an maybe one that shows the refrigerator down to the floor?
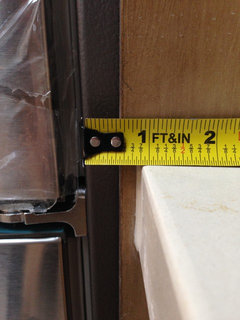
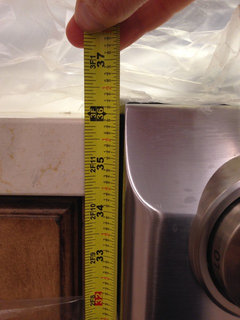
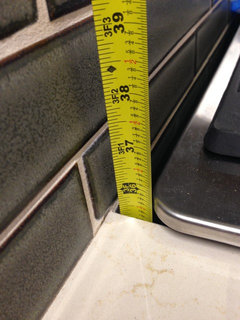
A couple other measurements would also be nice. First, the exact distance from the floor to the top of the countertop at the back side of the range by the wall. Second, the exact distance from the countertop to the bottom of the light rail.
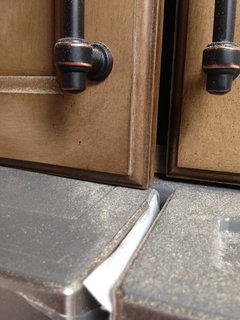
Trying to make sure I understand what method they used to level the cabinets. I believe that the fridge problem is due more to the floor and possibly has a little to do with the ceiling. But, the slide in range problem could actually be due to the countertop only being 1 3/16" thick instead of 1.5"lfblair768
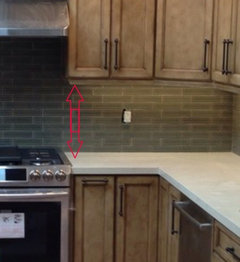
Original Author9 years agoHi Fred-- What follows is a bunch of information, some snagged from my other thread. So I apologize as it may be confusing. I added a few photos to the other post, but I'll put a couple here too. The counters are quartz caesarstone, as the slab sits on top of the plywood, it is 3/4" thick; including the plywood it's about 1 3/8", though it's a little hard to check accurately. The overhang part of the slab is 1 5/8". The distance from counter to bottom of the light rail is 18 3/8". The floor to counter top height at the front of the stove is just a hair under 36", at the back it is between 35 1/4-3/8".
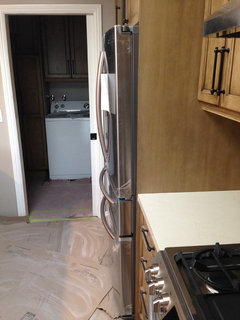
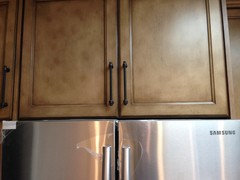
I agree that the fridge problems are due to the floor. I think the cabinet guys didn't think to check the floor to cabinet height when they did the install. The cabinet guy had the fridge specs (70" tall) and built the fridge
cabinet to be 70 1/2" tall. However, I believe the floor to cabinet
height may be 70" at the back of the fridge (have not been able to check/remove the fridge). The opening at the front
is 70 1/2" but the fridge leans forward and cannot be raised enough to
be leveled. In the first fridge pics I'm posting, the feet are raised to
about 70 1/2 but that isn't high enough to be level and it's too high
for the cabinet. The second fridge pics have the feet lowered. On the right side the foot is actually higher but the door is lower. On the left side the foot is lower but the left door is higher-- apparently the left door cannot be adjusted in height but the right can. (The plumber left the feet uneven).
The guys who installed the stove said the back feet are already in their lowest position. Someone else said I could remove the back feet of the stove and solve the problem that way, but I was reading in the manual the the back feet are necessary to use the anti-tip bracket.
The
cabinet guys used large plastic feet under the cabinets to level
everything- and the counters are level. But I don't think they
accounted for the fridge cabinet changing dimensions.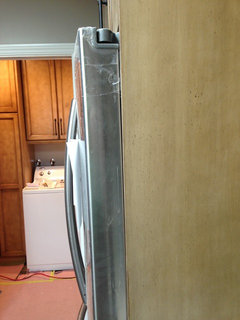
lfblair768
Original Author9 years agoPS-- They sanded and painted the skim coat at the crown molding and it actually looks pretty good.
emilyam819
9 years agoIt looks almost level in that first fridge pic. They should replace the doors on the cabinet so they are about a half inch shorter than what they are now. Would that clear the cabinet? If you go that route, I would make them replace the doors on the pantry to match, even if you see the frame a tiny bit.
emilyam819
9 years agoMaybe they can also sand the bottom frame of the fridge cabinet.
Don't worry, your fridge does not need air to circulate around it, unless the manual says it does.
lfblair768 thanked emilyam819User
9 years agolast modified: 9 years agoSince you brought over all the pictures, I will comment here. First, this is fairly common, although it shouldn't be. With the height of the counter, there are two issues, (1) not getting it too high that the dishwasher looks wrong, and (2) not getting it too low that a slide-in range doesn't work.... and (3) not having the proper installation instructions for the range when planning the countertop height.
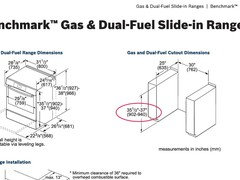

The first one is Bosch, and the second is Fridgedaire. The minimum height is 35 1/2 on one and 35 7/8 on the other. A "standard" countertop height is 36". Part of what happens is the cabinet installer talks himself into believing there will be plenty of tolerance in the range instead of standing around waiting for the installation instructions and not making any money. The other problem is that the countertop maker also convinces himself that the 1/4" tolerance is his to use up as well. Standard countertops are 1 9/16" thick (corresponding to your 1 3/8" measurement), or at least that is what the cabinet dimensions are based on. When you combine both people using the same leeway, you have a problem. You probably would have had a problem even if the counter was thicker in this case, since the slope was so much, and the tolerance for that stove was not.
Personally, I have never seen a remodel done where the floors were not redone anyway, and except for a standard oak floor, which this is not, refinishing isn't worth planning for. Floors are much more costly and time consuming to get level than a ceiling, and probably would not have been worth it. I have leveled quite a few, and don't normally feel it is worth it in the end. Instead, I prefer to only put flooring in so that it stops about 18" from the walls where there will be cabinets in this situation. This gives room to shim the back of the cabinet base instead of having to cut them all off. I then level the floor just under where the range goes with an appropriate piece of underlayment, and cover it with a piece of vinyl flooring that will take some abuse and be easier to clean than the wood flooring.
I do the same thing for the refrigerator. Wood under the refrigerator is not that good of an idea, especially when the wood looks like it has grooves in it to carry water from a leaking ice maker far under the cabinets. This is where I even like to run vinyl flooring up the back and side walls a couple of inches. Then, any leak will run out to where you see it right away and can fix it.
It looks like about a 3/8 tilt in 3' on the fridge. That should mean that the back needs to go down 1/4". I am hoping that the wheels have that much clearance, and you only need to make two channels in the floor in the back half. (I would have to be able to see this in person to know if this would cut off any airflow.) Of course, it still ruins the floor that nobody will ever see ;-/. I would prefer to see the same type thing for the range if possible. Just router out a small cup where the back levelers go instead of trying to take them off. Hopefully, there is just enough room left beween the floor and the frames to do it this way, otherwise, it becomes a lot more work. In which case, I would either plane down the boards and cover with vinyl, or take them out and put in an appropriate underlayment and cover it with vinyl, linolium, etc.
User
9 years agoI wouldn't mess with the cabinet above the fridge, especially now that the skim coat is already done. Just seems more like backing up to me.
lfblair768
Original Author9 years agoYou are a wealth of information, Fred, thank you. So, are you a contractor or what? Want to come to Los Angeles and do my bathrooms? Don't worry, you have time- it'll be a few years till we have money again for that project. ;)
The cabinet maker had the model numbers for all of our appliances. Generally everything fits where it's supposed to be. It's our floors that have caused the problem.
"Personally, I have never seen a remodel done where the floors were not redone anyway,"-- I'm confused what you meant by that. Your 18" trick sounds clever. We went back and forth on the wood because we were concerned about appliance malfunction ruining everything. In the end we wanted a cohesive look with the adjacent rooms. It didn't occur to me to have a different flooring under the appliances. Kinda wish our contractor had suggested that. You mentioned the possibility of water leaking in the wood grooves leaking underneath all the cabinets on the sides of the fridge (and dishwasher). Do you think running some silicone along the edges of the floor would help lessen that or buy us time if a leak did occur? I've heard conflicting things about silicone-- that over time it pulls up. We did buy some moisture sensors/alarms that link to your iphone, to put under the appliances. Not totally sure how well they will work as the sensor itself is tiny but we'll see.
It looks like there is 1/8" gap on either side of the fridge. Once it's officially in place, I'm not sure if there will be any gap at the top. It's a counter depth Samsung. The manual says "Allow sufficient space around the refrigerator". Not sure what qualifies as sufficient space. Emily, a previous commenter, says it does not need air circulation. Since the manual doesn't seem to expressly say circulation, I'm hoping the tight fit will be okay.lfblair768
Original Author9 years agoAlso, Fred, your idea about removing the wood and placing vinyl actually sounds good to me. That's probably what we should have done in the first place, but oh well.
User
9 years ago"So, are you a contractor or what?"
Yes
"The cabinet maker had the model numbers for all of our appliances."
I can't tell what the range is, but if it is Samsung, I couldn't find any information online for minimum counter height. (As if most guys would bother to look anyway)
"Personally, I have never seen a remodel done where the floors were not redone anyway,"-- I'm confused what you meant by that.
Mostly, that there isn't much of a reason to run the flooring wall to wall under the cabinets. Some people on here think it is a good idea just in case they want to move cabinets later :-/. Most of the time, it appears that most of the slope in the floor is within the first 2' of the wall. The middle of your floor is probably much flatter. Your biggest visible bumps are probably where you go to another room. Therefore, not putting flooring under the cabinets, except for the front edge, eliminates some of the problems. Sanding down the subfloor just in the doorways can give a lot of return for the effort. Otherwise, it will often seem like it would have been easier to just take up all the subflooor, put in new joist along side the old ones, and start fresh with a new subfloor. (I believe that most flooring warranties are designed so that it is difficult to follow specs for installation on older homes deliberately) If the older flooring of the same kind is doing fine in the rest of your house, then you should be fine.
"Do you think running some silicone along the edges of the floor would help lessen that or buy us time if a leak did occur?"
YES. You can force it into the groove under the cabinet a bit too. That way it can't pull up where you need it most. Eventual failure is not a good reason for not having protection as long as you can. Otherwise, the condom companies would already be out of business :) Under the appliances, you shouldn't have a problem with it pulling up if it sticks to the floor finish to begin with. Sensors are at least worth a try, haven't actually seen one yet.
"Not sure what qualifies as sufficient space."
A 36" refrigerator is designed to go in a 36" space, so side to side is fine. I would need to look up the model number for top and bottom. It shouldn't need too much on top as I would imagine they would try to design it to look good. Maybe there is a fan to just circulate air through the bottom area, but even 1/8" all the way around is probably enough to equal at least 3/4 of the net area of a front grill at the bottom of the fridge.
lfblair768
Original Author9 years agoThe range is a Samsung NX58H9500WS, if you're curious. I couldn't find any info on minimum counter height, either. :)
The fridge is a Samsung model RF24FSEDBSR. On Best Buy's website a Samsung rep answering a question said "The RF24FSEDBSR is 35-3/4" wide, and Samsung recommends leaving at least
3/8" on each side for air circulation and ease of movement. The height
without the door hinges is 68-7/8", so should fit under your 70"
cabinets." Hopefully it'll all be good.
Do you think silicone is necessary where the tile backsplash meets the counter top? Presently there is a very thin strip of grout between the tile and counter. From different workers we've heard conflicting things. Someone said a clear silicone will pull up and turn yellow. Someone else said silicone would be good to protect the grout from deteriorating. But then someone said if the grout deteriorates behind the silicone there is no way to fix it. ......... We just want it to look good and not deteriorate.
Thanks again.- PRO
Cinar Interiors, Inc.
9 years agolast modified: 9 years agoWhen a tiled backsplash meets a counter top, it is wise to use a silicon grout caulking between the two surfaces. Grout caulking will match the color grout you have in your tile and you can get it sanded and non sanded. Over time, with minimal movement in your slab, the standard grout will crack and come out...grout caulking will withstand the movement and hold place.
The workers you spoke with are ill-advised. User
9 years agoWe had this issue with white kitchen cabinets. Our contractor added white quarter round to the top, level with the cabinets, as close as he could to the ceiling. Great solution!User
9 years agoPutting silicone OVER grout is not a good idea. The recommended method is to not put grout in the gap between the counter and tile at all. And then put a silicone, colored caulk, or the newer products that match the grout more closely as Cinar mentions INTO the gap so that it looks just like the grout. Since you already have grout in the joint, I would leave it until there is a problem ( it may never have one on a well settled house). If it does, then scrape the cracked grout out and replace with caulk. For now, about the best thing you can do is use a really good grout sealer, and maybe put a fresh coat of sealer on every few years.
lfblair768 thanked UserUser
9 years agoI'm guessing that on the left side of the refrigerator, behind the face frame, there is a 3/8" space. It sounds like the 1" at the back is the important one, and unless they recessed the electrical receptacle, the plug pretty much holds it out that far. I have noticed, in the past, that I would rather use refrigerator side panels with a 1.5" face frame if using them on both sides instead of 3/4" flat panels for "ease of installation" because the sides bulge a little sometimes.
lfblair768
Original Author9 years agoThanks, Fred. I think there probably is a 1" clearance behind the fridge. I know the outlet is not recessed. The sides only have about 1/8" on either side of the fridge, and the panels are 3/4". Nothing has happened yet with leveling the appliances. Hopefully soon.
Mr Rex
6 years agoit is a real shame that there are people out there calling themselves professionals. I keep seeing a lot of poor workmanship out there, I have a friend who remodeled his kitchen and it has been a nightmare as I have been his eyes.
I'm sorry you are going through this I would take the upper cabinet down and trim the edge or use a good belt sander then refinish the edge should be pretty easy, and I'm glad the ceiling turned out you must have found someone good with mud.
l'm sure in the end you will be happy with it. all the flaws are magnified at this time but it is good that you have a good eye for it good luck.
Mark Apelian
3 years agoIt is wonderful to see so many people trying to help out a stranger. Bravo. The truth is that the person you are paying your after-tax money to should be the one with all of the appropriate alternatives.


Cabinets 4U, Inc.