


FREE shipping on orders over $49!* Details


Item 1 of 4


Item 1 of 4
- Product Description
- Product Specifications
- Shipping and Returns
Cutting Edge Stencils offers the best Tile stencils and Wall stencils for DIY décor - stencils expertly designed by professional decorative artists Janna Makaeva and Greg Swisher with over 25 years of painting experience. We are a reputable stencil company that stands behind its high quality product. We are honored to have your 100% positive feedback. Stencil returns are easy and there is no restocking fee!
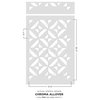
This striking geometric stencil Chroma looks amazing on an accent wall or as a painted floor tile. The dramatic optical effect of this modern stencil pattern makes it a real show-stopper. Our Tile stencils are a perfect money saving alternative to the popular but expensive and labor intensive cement tiles. You can stencil your outdoor cement patio floor, or right over your old dated tile or ugly linoleum floor! Learn How to stencil a tile floor - it’s so easy!
We proudly make our own stencils in the U.S.A.! Detailed Stenciling instructions, color photo and a FREE STENCIL ($4.95 value) included with each order. Stencil comes in attractive packaging and makes a great GIFT!
Our stencils can be used on walls, floors, ceilings, as well as furniture! Did you know you can stencil on fabric too? With proper technique, you can easily create custom stenciled curtains, pillows and tablecloths!
Some wall textures are really rough, with huge "peaks and valleys" and, if this is your case, stenciling may not be an option. However, there are light to medium textures that are very suitable for stenciling.
This striking geometric stencil Chroma looks amazing on an accent wall or as a painted floor tile. The dramatic optical effect of this modern stencil pattern makes it a real show-stopper. Our Tile stencils are a perfect money saving alternative to the popular but expensive and labor intensive cement tiles. You can stencil your outdoor cement patio floor, or right over your old dated tile or ugly linoleum floor! Learn How to stencil a tile floor - it’s so easy!
- Single overlay stencil.
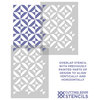
- Sheet: 24.5" x 34.5", Design: 21.5" x 30.5"
- Top part stencil is included for FREE!
We proudly make our own stencils in the U.S.A.! Detailed Stenciling instructions, color photo and a FREE STENCIL ($4.95 value) included with each order. Stencil comes in attractive packaging and makes a great GIFT!
- WHICH PAINTS AND TOOLS TO USE FOR STENCILING:
- Our Stencil Essentials Tool kit contains a foam roller, a brush and a stencil level AND it costs you 10% less than buying all the items individually!
HOW TO STENCIL A FLOOR:
- You can create a tiled floor look with tile stencils by painting over your old tile, linoleum, concrete or wooden floors. Make sure that the floor that you'll be stenciling is properly prepared! Thoroughly clean your floor first. It is super important that you use a Bonding primer such as STIX, Kilz or Bin to make sure that you get proper adhesion to your floor. Apply 1-2 coats of primer and let it dry. Then, apply at least 2 coats of regular wall latex paint in desired color with a tight nap roller (1/4" - 3/8") or even a dense foam roller for a smooth finish and good coverage. The paint should be allowed to dry for at least 24 hours before stenciling, for best results. After the stenciling is complete, seal your floor with a coat of non-yellowing water-based polyurethane for added durability.
- IMPORTANT INFO ON STENCILING TEXTURED WALLS:
- In general, it's possible to stencil over textured surfaces, however it depends on the roughness of your texture and your desired outcome.
- Some textures are really rough, with huge "peaks and valleys" and, if this is your case, stenciling may not be an option. However, there are light to medium textures that are very suitable for stenciling.
- With textures it is especially important that you put very little paint on your brush and always off-load it onto a paper towel. Use a rubbing/dabbing motion while stenciling and try not to force the paint under the edges of the stencil. You can also use a dense foam roller, but make sure that you off-load it onto some paper towels so that it is relatively dry. To avoid seepage, use very little paint, and don't press hard on the roller. Using spray adhesive can also help prevent seepage of paint under the stencils. We love Elmer's repositionable spray adhesive but most repositionable spray adhesives are fine. Always test the stencil on a disposable surface first (such as a piece of cardboard), or try stenciling a small area in a corner somewhere and immediately wipe the stenciled paint off the wall with a moist baby wipe. Also, it's good to remember that using high-contrast colors (like black over white) is much less forgiving than using colors that are similar to each other.
SPRAY ADHESIVE:
We find that it is not necessary to use spray adhesive with our stencils. However, if you want crisper edges or are stenciling with high contrasting colors, please use it (Elmer's spray adhesive seems to be the best). It is helpful for beginners to mist a stencil with spray adhesive just to make sure you get great results. Always use pieces of blue painters tape to secure your stencil in place.STENCILING FABRIC:
You can create custom stenciled curtains, pillows and tablecloths with our stencils! When stenciling on fabric, stencil adhesive is very helpful. First, tape your ironed fabric to the surface so it doesn't move around while you stencil. Use stencil brushes, or roller, and add some textile medium (sold in craft stores) to your acrylic paint. You can also get a special fabric paint, but, frankly, good craft acrylics with a dollop of textile medium work just as well, and costs way less too! :) Let the stenciled image dry completely, 24 hours is best, then heat-set it by ironing the fabric for about 20 seconds (more or less) on a LOW setting through a piece of cloth. Heat-setting will cure the paint and prevent it from being washed off in the washing machine. Always experiment with a sample of your fabric first to ensure good results. We've stenciled on silk, cotton, linen and even sheer fabrics with great results. It's always better if your fabric doesn't have too much texture.Our stencils can be used on walls, floors, ceilings, as well as furniture! Did you know you can stencil on fabric too? With proper technique, you can easily create custom stenciled curtains, pillows and tablecloths!
Some wall textures are really rough, with huge "peaks and valleys" and, if this is your case, stenciling may not be an option. However, there are light to medium textures that are very suitable for stenciling.
- This listing is for the stencil only. No furniture, paint, or other decor items are included in this listing.
Chroma Tile Stencil Pattern - DIY Faux Tile Stencils - Modern Geometric Design
$48
Free Shipping
Est. Delivery: May. 1 - May. 13 (to )
Qty: 1
Cutting Edge Stencils offers the best Tile stencils and Wall stencils for DIY décor - stencils expertly designed by professional decorative artists Janna Makaeva and Greg Swisher with over 25 years of painting experience. We are a reputable stencil company that stands behind its high quality product. We are honored to have your 100% positive feedback. Stencil returns are easy and there is no restocking fee!
This striking geometric stencil Chroma looks amazing on an accent wall or as a painted floor tile. The dramatic optical effect of this modern stencil pattern makes it a real show-stopper. Our Tile stencils are a perfect money saving alternative to the popular but expensive and labor intensive cement tiles. You can stencil your outdoor cement patio floor, or right over your old dated tile or ugly linoleum floor! Learn How to stencil a tile floor - it’s so easy!
We proudly make our own stencils in the U.S.A.! Detailed Stenciling instructions, color photo and a FREE STENCIL ($4.95 value) included with each order. Stencil comes in attractive packaging and makes a great GIFT!
Our stencils can be used on walls, floors, ceilings, as well as furniture! Did you know you can stencil on fabric too? With proper technique, you can easily create custom stenciled curtains, pillows and tablecloths!
Some wall textures are really rough, with huge "peaks and valleys" and, if this is your case, stenciling may not be an option. However, there are light to medium textures that are very suitable for stenciling.
This striking geometric stencil Chroma looks amazing on an accent wall or as a painted floor tile. The dramatic optical effect of this modern stencil pattern makes it a real show-stopper. Our Tile stencils are a perfect money saving alternative to the popular but expensive and labor intensive cement tiles. You can stencil your outdoor cement patio floor, or right over your old dated tile or ugly linoleum floor! Learn How to stencil a tile floor - it’s so easy!
- Single overlay stencil.
- Sheet: 24.5" x 34.5", Design: 21.5" x 30.5"
- Top part stencil is included for FREE!
We proudly make our own stencils in the U.S.A.! Detailed Stenciling instructions, color photo and a FREE STENCIL ($4.95 value) included with each order. Stencil comes in attractive packaging and makes a great GIFT!
- WHICH PAINTS AND TOOLS TO USE FOR STENCILING:
- Our Stencil Essentials Tool kit contains a foam roller, a brush and a stencil level AND it costs you 10% less than buying all the items individually!
HOW TO STENCIL A FLOOR:
- You can create a tiled floor look with tile stencils by painting over your old tile, linoleum, concrete or wooden floors. Make sure that the floor that you'll be stenciling is properly prepared! Thoroughly clean your floor first. It is super important that you use a Bonding primer such as STIX, Kilz or Bin to make sure that you get proper adhesion to your floor. Apply 1-2 coats of primer and let it dry. Then, apply at least 2 coats of regular wall latex paint in desired color with a tight nap roller (1/4" - 3/8") or even a dense foam roller for a smooth finish and good coverage. The paint should be allowed to dry for at least 24 hours before stenciling, for best results. After the stenciling is complete, seal your floor with a coat of non-yellowing water-based polyurethane for added durability.
- IMPORTANT INFO ON STENCILING TEXTURED WALLS:
- In general, it's possible to stencil over textured surfaces, however it depends on the roughness of your texture and your desired outcome.
- Some textures are really rough, with huge "peaks and valleys" and, if this is your case, stenciling may not be an option. However, there are light to medium textures that are very suitable for stenciling.
- With textures it is especially important that you put very little paint on your brush and always off-load it onto a paper towel. Use a rubbing/dabbing motion while stenciling and try not to force the paint under the edges of the stencil. You can also use a dense foam roller, but make sure that you off-load it onto some paper towels so that it is relatively dry. To avoid seepage, use very little paint, and don't press hard on the roller. Using spray adhesive can also help prevent seepage of paint under the stencils. We love Elmer's repositionable spray adhesive but most repositionable spray adhesives are fine. Always test the stencil on a disposable surface first (such as a piece of cardboard), or try stenciling a small area in a corner somewhere and immediately wipe the stenciled paint off the wall with a moist baby wipe. Also, it's good to remember that using high-contrast colors (like black over white) is much less forgiving than using colors that are similar to each other.
SPRAY ADHESIVE:
We find that it is not necessary to use spray adhesive with our stencils. However, if you want crisper edges or are stenciling with high contrasting colors, please use it (Elmer's spray adhesive seems to be the best). It is helpful for beginners to mist a stencil with spray adhesive just to make sure you get great results. Always use pieces of blue painters tape to secure your stencil in place.STENCILING FABRIC:
You can create custom stenciled curtains, pillows and tablecloths with our stencils! When stenciling on fabric, stencil adhesive is very helpful. First, tape your ironed fabric to the surface so it doesn't move around while you stencil. Use stencil brushes, or roller, and add some textile medium (sold in craft stores) to your acrylic paint. You can also get a special fabric paint, but, frankly, good craft acrylics with a dollop of textile medium work just as well, and costs way less too! :) Let the stenciled image dry completely, 24 hours is best, then heat-set it by ironing the fabric for about 20 seconds (more or less) on a LOW setting through a piece of cloth. Heat-setting will cure the paint and prevent it from being washed off in the washing machine. Always experiment with a sample of your fabric first to ensure good results. We've stenciled on silk, cotton, linen and even sheer fabrics with great results. It's always better if your fabric doesn't have too much texture.Our stencils can be used on walls, floors, ceilings, as well as furniture! Did you know you can stencil on fabric too? With proper technique, you can easily create custom stenciled curtains, pillows and tablecloths!
Some wall textures are really rough, with huge "peaks and valleys" and, if this is your case, stenciling may not be an option. However, there are light to medium textures that are very suitable for stenciling.
- This listing is for the stencil only. No furniture, paint, or other decor items are included in this listing.
- Product ID
- 130459733
- Manufactured By
- Cutting Edge Stencils
- Sold By
- Cutting Edge Stencils
- Size/Weight
- W 24.5" / D 0.01" / H 34.5" / 8 oz.
- Designer
- Janna Makaeva
- Assembly Required
- No
- Category
- Wall Stencils
- Style
- Contemporary
Sold by Cutting Edge StencilsTop Seller- Free shipping!
Ready to ship to the contiguous U.S. in 2-6 days
This product does not ship to Canada
Note: Free shipping is not available to AK, HI, PR or Canada. Some exclusions apply.
Houzz offers a 30-day standard return policy for most items. We also accept returns on damaged large or oversized items that ship via freight, as long as you report the damage within 5 days of delivery. View our full return policy.
- Product Description
- Product Specifications
- Shipping and Returns
Cutting Edge Stencils offers the best Tile stencils and Wall stencils for DIY décor - stencils expertly designed by professional decorative artists Janna Makaeva and Greg Swisher with over 25 years of painting experience. We are a reputable stencil company that stands behind its high quality product. We are honored to have your 100% positive feedback. Stencil returns are easy and there is no restocking fee!
This striking geometric stencil Chroma looks amazing on an accent wall or as a painted floor tile. The dramatic optical effect of this modern stencil pattern makes it a real show-stopper. Our Tile stencils are a perfect money saving alternative to the popular but expensive and labor intensive cement tiles. You can stencil your outdoor cement patio floor, or right over your old dated tile or ugly linoleum floor! Learn How to stencil a tile floor - it’s so easy!
We proudly make our own stencils in the U.S.A.! Detailed Stenciling instructions, color photo and a FREE STENCIL ($4.95 value) included with each order. Stencil comes in attractive packaging and makes a great GIFT!
Our stencils can be used on walls, floors, ceilings, as well as furniture! Did you know you can stencil on fabric too? With proper technique, you can easily create custom stenciled curtains, pillows and tablecloths!
Some wall textures are really rough, with huge "peaks and valleys" and, if this is your case, stenciling may not be an option. However, there are light to medium textures that are very suitable for stenciling.
This striking geometric stencil Chroma looks amazing on an accent wall or as a painted floor tile. The dramatic optical effect of this modern stencil pattern makes it a real show-stopper. Our Tile stencils are a perfect money saving alternative to the popular but expensive and labor intensive cement tiles. You can stencil your outdoor cement patio floor, or right over your old dated tile or ugly linoleum floor! Learn How to stencil a tile floor - it’s so easy!
- Single overlay stencil.
- Sheet: 24.5" x 34.5", Design: 21.5" x 30.5"
- Top part stencil is included for FREE!
We proudly make our own stencils in the U.S.A.! Detailed Stenciling instructions, color photo and a FREE STENCIL ($4.95 value) included with each order. Stencil comes in attractive packaging and makes a great GIFT!
- WHICH PAINTS AND TOOLS TO USE FOR STENCILING:
- Our Stencil Essentials Tool kit contains a foam roller, a brush and a stencil level AND it costs you 10% less than buying all the items individually!
HOW TO STENCIL A FLOOR:
- You can create a tiled floor look with tile stencils by painting over your old tile, linoleum, concrete or wooden floors. Make sure that the floor that you'll be stenciling is properly prepared! Thoroughly clean your floor first. It is super important that you use a Bonding primer such as STIX, Kilz or Bin to make sure that you get proper adhesion to your floor. Apply 1-2 coats of primer and let it dry. Then, apply at least 2 coats of regular wall latex paint in desired color with a tight nap roller (1/4" - 3/8") or even a dense foam roller for a smooth finish and good coverage. The paint should be allowed to dry for at least 24 hours before stenciling, for best results. After the stenciling is complete, seal your floor with a coat of non-yellowing water-based polyurethane for added durability.
- IMPORTANT INFO ON STENCILING TEXTURED WALLS:
- In general, it's possible to stencil over textured surfaces, however it depends on the roughness of your texture and your desired outcome.
- Some textures are really rough, with huge "peaks and valleys" and, if this is your case, stenciling may not be an option. However, there are light to medium textures that are very suitable for stenciling.
- With textures it is especially important that you put very little paint on your brush and always off-load it onto a paper towel. Use a rubbing/dabbing motion while stenciling and try not to force the paint under the edges of the stencil. You can also use a dense foam roller, but make sure that you off-load it onto some paper towels so that it is relatively dry. To avoid seepage, use very little paint, and don't press hard on the roller. Using spray adhesive can also help prevent seepage of paint under the stencils. We love Elmer's repositionable spray adhesive but most repositionable spray adhesives are fine. Always test the stencil on a disposable surface first (such as a piece of cardboard), or try stenciling a small area in a corner somewhere and immediately wipe the stenciled paint off the wall with a moist baby wipe. Also, it's good to remember that using high-contrast colors (like black over white) is much less forgiving than using colors that are similar to each other.
SPRAY ADHESIVE:
We find that it is not necessary to use spray adhesive with our stencils. However, if you want crisper edges or are stenciling with high contrasting colors, please use it (Elmer's spray adhesive seems to be the best). It is helpful for beginners to mist a stencil with spray adhesive just to make sure you get great results. Always use pieces of blue painters tape to secure your stencil in place.STENCILING FABRIC:
You can create custom stenciled curtains, pillows and tablecloths with our stencils! When stenciling on fabric, stencil adhesive is very helpful. First, tape your ironed fabric to the surface so it doesn't move around while you stencil. Use stencil brushes, or roller, and add some textile medium (sold in craft stores) to your acrylic paint. You can also get a special fabric paint, but, frankly, good craft acrylics with a dollop of textile medium work just as well, and costs way less too! :) Let the stenciled image dry completely, 24 hours is best, then heat-set it by ironing the fabric for about 20 seconds (more or less) on a LOW setting through a piece of cloth. Heat-setting will cure the paint and prevent it from being washed off in the washing machine. Always experiment with a sample of your fabric first to ensure good results. We've stenciled on silk, cotton, linen and even sheer fabrics with great results. It's always better if your fabric doesn't have too much texture.Our stencils can be used on walls, floors, ceilings, as well as furniture! Did you know you can stencil on fabric too? With proper technique, you can easily create custom stenciled curtains, pillows and tablecloths!
Some wall textures are really rough, with huge "peaks and valleys" and, if this is your case, stenciling may not be an option. However, there are light to medium textures that are very suitable for stenciling.
- This listing is for the stencil only. No furniture, paint, or other decor items are included in this listing.


At Houzz we want you to shop for Cutting Edge Stencils Chroma Tile Stencil Pattern - DIY Faux Tile Stencils - Modern Geometric Design with confidence. You can read real customer reviews for this or any other product and even ask questions and get answers from us or straight from the brand. When you buy Cutting Edge Stencils Chroma Tile Stencil Pattern - DIY Faux Tile Stencils - Modern Geometric Design or any product product online from us, you become part of the Houzz family and can expect exceptional customer service every step of the way. If you have questions about Cutting Edge Stencils or any other product for sale, our customer service team is eager to help.